Python

How to use Queue: A beginner’s guide

Prerequisites

To learn about the Queue data structure, you should first have a good understanding of the following:

  1. Python 3
  2. Basic data structure concepts like List (Click here to refresh List concepts)
  3. OOP concepts

Introduction

This tutorial will help you understand a Queue data structure and how to implement it. These concepts are often tested in interviews and have a wide variety of applications. Python implementation of Queue is relatively simple when compared to other languages. Here you will learn how to do it in the Pythonic way and in a language agnostic way.

How to use Queue

A Queue is a simple data structure concept that can be easily applied in our day to day life, like when you stand in a line to buy coffee at Starbucks. Let’s make a few observations based on this example:

  1. People enter the line from one end and leave at the other end
  2. The person to arrive first leaves first and the person to arrive last leaves last
  3. Once all the people are served, there are none left waiting to leave the line

How to use Queue A beginner’s guide

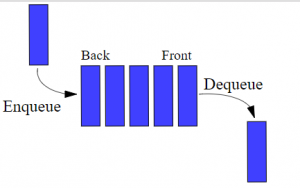
Now, let’s look at the above points programmatically:

  1. Queues are open from both ends meaning elements are added from the back and removed from the front
  2. The element to be added first is removed first (First In First Out – FIFO)
  3. If all the elements are removed, then the queue is empty and if you try to remove elements from an empty queue, a warning or an error message is thrown.
  4. If the queue is full and you add more elements to the queue, a warning or error message must be thrown.

Things to remember:

  1. The point of entry and exit are different in a Queue.
  2. Enqueue – Adding an element to a Queue
  3. Dequeue – Removing an element from a Queue
  4. Random access is not allowed – you cannot add or remove an element from the middle.

Implementation

We are going to see three different implementations. One is using Lists, another is using the library deque and the last is by using an array. Let’s take a look one by one…

  1. Queue implementation using List

Here we are going to define a class Queue and add methods to perform the below operations:

  1. Enqueue elements to the beginning of the Queue and issue a warning if it’s full
  2. Dequeue elements from the end of the Queue and issue a warning if it’s empty
  3. Assess the size of the Queue
  4. Print all the elements of the Queue
class Queue:

  #Constructor creates a list
  def __init__(self):
      self.queue = list()

  #Adding elements to queue
  def enqueue(self,data):
      #Checking to avoid duplicate entry (not mandatory)
      if data not in self.queue:
          self.queue.insert(0,data)
          return True
      return False

  #Removing the last element from the queue
  def dequeue(self):
      if len(self.queue)>0:
          return self.queue.pop()
      return ("Queue Empty!")

  #Getting the size of the queue
  def size(self):
      return len(self.queue)

  #printing the elements of the queue
  def printQueue(self):
      return self.queue

myQueue = Queue()
print(myQueue.enqueue(5)) #prints True
print(myQueue.enqueue(6)) #prints True
print(myQueue.enqueue(9)) #prints True
print(myQueue.enqueue(5)) #prints False
print(myQueue.enqueue(3)) #prints True
print(myQueue.size())     #prints 4
print(myQueue.dequeue())  #prints 5
print(myQueue.dequeue())  #prints 6
print(myQueue.dequeue())  #prints 9
print(myQueue.dequeue())  #prints 3
print(myQueue.size())     #prints 0
print(myQueue.dequeue())  #prints Queue Empty!

Call the method printQueue() wherever necessary to ensure that it’s working.

Note: You will notice that we are not removing elements from the beginning and adding elements at the end. The reason for this is covered in the ‘implementation using arrays’ section below.

  1. Queue implementation using deque

Deque is a library which, when imported, provides ready-made commands such as the append() command for enqueuing and the popleft() command for dequeuing.

#Importing the library
from collections import deque

#Creating a Queue
queue = deque([1,5,8,9])

#Enqueuing elements to the Queue
queue.append(7) #[1,5,8,9,7]
queue.append(0) #[1,5,8,9,7,0]

#Dequeuing elements from the Queue
queue.popleft() #[5,8,9,7,0]
queue.popleft() #[8,7,9,0]

#Printing the elements of the Queue
print(queue)

Try using the popleft() command after the queue is empty and see what you get. Post the ways in which you can handle this issue.

NOTE: Implementation 2 is more efficient as the insert operation in the list is costly! This is because whenever an element is inserted at position 0, all of the other elements have to be shifted by one position (it is similar to when people sitting on a bench push down to accommodate another person). We will discuss the efficiency of operations in detail in later tutorials.

  1. Queue implementation using array

Python Lists have made it so easy to implement Queue. However, if you want to implement Queues language agnostically, you have to bear in mind the following points:

  1. Elements are added from the end and removed at the beginning of the Queue.
  2. Treat lists like arrays (fixed in size) – we can achieve it by virtually restricting the size of the list. This is done by ensuring that the list doesn’t grow beyond a fixed limit or size.
  3. Use a Tail pointer to keep a tab of the elements added to the Queue – the Tail pointer will always point to the next available space. For instance when there are three elements in the queue, Tail will point to the fourth place. When the queue is full, the tail pointer will be greater than the declared size.
  4. Use a Head pointer to keep a tab on the elements removed from the Queue – the Head pointer will point to the element to be dequeued next. For instance, if there are three elements in a queue, the Head pointer will be pointing to the first element. After one dequeue operation, the Head pointer will point to the second element in the queue. No element will be actually removed from the queue. This is because once an element is removed, the list automatically shifts all the other elements by one position to the left. This means that the position 0 will always contain an element, which is not how an actual queue works.
  5. Use a Reset method – this method is called to reset the queue, Tail and Head. For instance, if there are three elements in the queue then Head = 0, Tail = 4. Now, if we dequeue all three elements, the queue will be empty meaning Head = Tail = 4. So if you enqueue an element, it will happen at position 4 which is not correct. Hence it becomes necessary to reset these pointers to 0. Note that since we are not actually deleting elements, the list still contains the ‘deleted” elements, hence a new list needs to be created as well.

Algorithm

  1. Declare a list and an integer MaxSize, denoting a virtual maximum size of the Queue
  2. Head and Tail are initially set to 0
  3. Size method
    1.  Calculates the number of elements in the queue -> Size = Tail – Head
  4. Reset method:
    1. Resets Tail and Head to 0
    2. Creates a new Queue (initializes queue to a new list)
  5. Enqueue operation:
    1. Check if Size is less than the MaxSize:
      1. If yes, append data to Queue and then increment Tail by 1
      2. If no, print Queue full message
  6. Dequeue operation:
    1. Check if Size is greater than 0:
      1. If yes, pop the first element from the list and increment Head by 1
      2. If no:
        1. Call Reset method
        2. Print Queue empty message

Program

class Queue:

    #Constructor
    def __init__(self):
        self.queue = list()
        self.maxSize = 8
        self.head = 0
        self.tail = 0

    #Adding elements
    def enqueue(self,data):
        #Checking if the queue is full
        if self.size() >= self.maxSize:
            return ("Queue Full")
        self.queue.append(data)
        self.tail += 1
        return True     

    #Deleting elements 
    def dequeue(self):
        #Checking if the queue is empty
        if self.size() <= 0:
            self.resetQueue()
            return ("Queue Empty") 
        data = self.queue[self.head]
        self.head+=1
        return data
                
    #Calculate size
    def size(self):
        return self.tail - self.head
    
    #Reset queue
    def resetQueue(self):
        self.tail = 0
        self.head = 0
        self.queue = list()
    
q = Queue()
print(q.enqueue(1))#prints True
print(q.enqueue(2))#prints True
print(q.enqueue(3))#prints True
print(q.enqueue(4))#prints True
print(q.enqueue(5))#prints True
print(q.enqueue(6))#prints True
print(q.enqueue(7))#prints True
print(q.enqueue(8))#prints True
print(q.enqueue(9))#prints Queue Full!
print(q.size())#prints 8        
print(q.dequeue())#prints 8
print(q.dequeue())#prints 7 
print(q.dequeue())#prints 6
print(q.dequeue())#prints 5
print(q.dequeue())#prints 4
print(q.dequeue())#prints 3
print(q.dequeue())#prints 2
print(q.dequeue())#prints 1
print(q.dequeue())#prints Queue Empty
#Queue is reset here 
print(q.enqueue(1))#prints True
print(q.enqueue(2))#prints True
print(q.enqueue(3))#prints True
print(q.enqueue(4))#prints True

Note: Element 9 was not added to the Queue and hence the size of the Queue remains 8

Apart from the methods described above, you can add methods which could return the element at the start of the queue, check if the queue is empty etc.

Conclusion

That’s it for this tutorial. Be sure to learn the applications of Queue. Plus, stay tuned with us here on PythonCentral to learn more about other types of Queues like Circular Queue and Priority Queue. Happy Pythoning!

How to use Queue: A beginner’s guide Read More »

Circular Queue: An implementation tutorial

Prerequisites

To learn about Circular Queue, you should first have a good understanding of the following:

  1. Python 3
  2. Linear Queues (you can learn more here)
  3. Basic Python data structure concepts – lists
  4. Basic math operations – modulo(%)

What is a Circular Queue?

Before you go ahead and read this tutorial, I highly recommend you to read our previous tutorial on Queues as we will be building off of those concepts. Circular Queues are widely used and are often tested on job interviews. A Circular Queue can be seen as an improvement over the Linear Queue because:

  1. There is no need to reset Head and Tail pointers since they reset themselves. This means that once the Head or Tail reaches the end of the Queue, it resets itself to 0.
  2. The Tail and Head can point to the same location – this means the Queue is empty
  3. The Head can be greater than the Tail or vice-versa. This is possible because the Head and Tail pointers are allowed to cross each other.

Check out this animation to understand the circular queue a bit better.

Observations based on the above animation:

  1. Head pointer – Points to the front of the Queue. Or in other words, it points to the element to be removed if the dequeue operation is called.
  2. Tail pointer – Points to the next empty spot in which the new element can be inserted. In the above animation, if you tried to fill the queue completely you wouldn’t be able to enqueue after the 13th position. This is because the Tail has no empty spot to point to after an element is inserted in the 14th position. The queue is considered full, even though there is one empty spot left. You should also try doing three or four dequeue operations and then enqueueing an element. Here you will observe that the elements are inserted from the 14th position and then it restarts from 0. It is for this reason that it is called a circular queue.
  3. Number of elements:
    1. Tail>=Head: Number of elements = Tail – Head. For instance, if Head = 2 and Tail = 5, then the number of elements will be 5 – 2 = 3
    2. Head>Tail: Number of elements = (Size of Queue) – (Head-Tail) =  (Size of Queue) – Head + Tail. For instance, Head = 14, Tail = 5 and Size of Queue = 15, then the number of elements = 15 – (14 – 5) = 6

How to implement circular queue?

I hope you now feel confident that you know what a circular queue is. Let’s see how to implement it using the language agnostic method. To do this, we need to treat Lists like arrays, hence we will restrict its size.

Note: During a dequeue operation, the Head pointer will be incremented by 1 but no element will actually be removed from the queue. This is because once an element is removed, the list automatically shifts all the other elements by one position to the left. This means that the position 0 will always contain an element which is not how an actual queue/circular queue works.

Algorithm

The following steps can be seen as a flow chart to the operation of the Circular Queue:

  1. Initialize the queue, size of the queue (maxSize), head and tail pointers
  2. Enqueue:
    1. Check if the number of elements (size) is equal to the size of the queue (maxSize):
      1. If yes, throw error message “Queue Full!”
      2. If no, append the new element and increment the tail pointer
  3. Dequeue:
    1. Check if the number of elements (size) is equal to 0:
      1. If yes, throw error message “Queue Empty!”
      2. If no, increment head pointer
  4. Size:
    1. If tail>=head, size = tail – head
    2. if head>tail, size = maxSize – (head – tail)

Note: The range for the head and tail pointer should be between 0 and maxSize – 1,  hence we are using the logic that if we divide x by 5, then the remainder can never be greater than 5. In other words, it should be between 0 and 4. So apply this logic to the formulae tail = (tail+1)%maxSize and head = (head+1)%maxSize. Observe that this is helps us to avoid reinitializing tail and head to 0 when the queue becomes full.

Program

class CircularQueue:

    #Constructor
    def __init__(self):
        self.queue = list()
        self.head = 0
        self.tail = 0
        self.maxSize = 8

    #Adding elements to the queue
    def enqueue(self,data):
        if self.size() == self.maxSize-1:
            return ("Queue Full!")
        self.queue.append(data)
        self.tail = (self.tail + 1) % self.maxSize
        return True

    #Removing elements from the queue
    def dequeue(self):
        if self.size()==0:
            return ("Queue Empty!") 
        data = self.queue[self.head]
        self.head = (self.head + 1) % self.maxSize
        return data

    #Calculating the size of the queue
    def size(self):
        if self.tail>=self.head:
            return (self.tail-self.head)
        return (self.maxSize - (self.head-self.tail))

q = CircularQueue()
print(q.enqueue(1))
print(q.enqueue(2))
print(q.enqueue(3))
print(q.enqueue(4))
print(q.enqueue(5))
print(q.enqueue(6))
print(q.enqueue(7))
print(q.enqueue(8))
print(q.enqueue(9))
print(q.dequeue())
print(q.dequeue())
print(q.dequeue())
print(q.dequeue())
print(q.dequeue())
print(q.dequeue())
print(q.dequeue())
print(q.dequeue())
print(q.dequeue())

Application

There are several uses for Circular Queues, such as:

  1. Computer Architecture (Scheduler)
  2. Disk drivers
  3. Video buffering
  4. Printer job scheduling

Conclusion

Circular Queue may appear a little confusing at first but the only way to get the hang of it is to keep practicing. Try out different enqueue and dequeue operations in the animation link provided above to see how it works. That’s it for this tutorial. Happy Pythoning!

Circular Queue: An implementation tutorial Read More »

Search implementations: Linear and Binary

Prerequisites

To learn about Linear and Binary search, you’ll need to have a good understanding of:

  1. Python 3
  2. Basic Python data structure concepts – lists

Introduction

Often we will have to find an element from a given data structure like lists, linked lists or binary trees. An efficient searching technique saves a great amount of time and improves performance. In this tutorial, we are going to see two very commonly used searching algorithms.

Linear Search

So if you were to search “Harry Potter”, from a shelf in a poorly lit room how would you go about it? You would start at one end, take one book at a time and check if it’s Harry Potter or not. You will use a brute force methodology which checks every book until the Harry Potter is found or the end of the shelf is reached. Best case scenario would be when Harry Potter is the first book and worst case would be the book not in there at all. Either way, you can know this only by checking each and every book. This is exactly what Linear Search is.

Binary Search

What if you were to search for Harry Potter from a shelf of books which are ordered alphabetically? Would you start searching from the start? Definitely not! You would start somewhere near the middle and check the first letter of the books and then go back or forward from there to find the ‘H’ titles. This means that you won’t be looking at all the books, thus saving time. You also won’t need to go through the entire shelf to know whether the book is there or not. At a given point you are eliminating many books which you will never look at. Binary Search is similar to this.

NOTE: Linear Search can be done on both sorted and unsorted items but Binary Search can only be done on a sorted set of items.

Implementation

Now that you know what Linear and Binary Search methodologies are, let us look at how these searches would work on a list of numbers.

Linear Search

Given list A = [6,3,9,0,5,8,2] find if 0 is present in this list or not.

Algorithm

  1. Take one number at a time from list A
  2. Compare it with 0 and check if it is a match:
    1. If yes, return True
    2. If not, return False
  3. If the end of the list is met, return False

Code

def linearSearch(ls,data):

   for item in ls:
       if item == data:
           return True
   return False

print(linearSearch([6,3,9,5,8,2],0))

Binary Search

The idea is to keep comparing the element with the middle value. This way with each search we eliminate one half of the list.

Algorithm

  1. Keep track of two pointers First and Last, these are incremented or decremented to limit the part of the list to be searched.
  2. Find the middle element of the list: mid = ( length of the list )/2
  3. Compare the middle element with the value to be found
  4. Check if the middle element is lesser than the value to be found:
    1. If yes, the element must lie on the second half of the list
    2. If no, the element must lie on the first half of the list
  5. Repeat steps 1 through 3 until the element is found or the end of the list is reached

NOTE: The list continues to get divided into two and the middle element gets compared until the element is found or no more elements are left to compare with.

Code

Given list B = [2,5,7,8,9,11,14,16] find if 14 is present in this list or not.

def binarySearch(ls,data):
   first = 0
   last = len(ls)-1
   done = False   

    while first<=last and not done:
       mid = (first+last)//2
          if ls[mid] == data:
           done = True
       else:
           if ls[mid] > data:
               last = last-1
           else:
               first = first+1
   return done 

print(binarySearch([2,5,7,8,9,11,14,16],4))
RoundFirstLastMidls[mid]Result
107388<14
24751111<14
36761414=14

NOTE: To find the mid element, “(first+last)//2” is used instead of “(first+last)/2”. This gives us whole numbers especially when the length of the list is odd. Try 9/2 and 9//2 in your Python IDLE to get a better understanding.

Try out this animation for a better understanding of both these search algorithms. Try to find the first element of the array. Which is faster?

Conclusion

From the above explanation, it must be clear that Binary Search is consistently faster than Linear Search. If you are familiar with o(n) notation, Linear Search is o(n) and Binary Search is log(n)

You can perform Linear Searches on a sorted list as well with a small optimization. You can stop the search once the number to be found exceeds the element being compared to. For instance, you want to search for 12 from the list [2,4,5,13,16,19], once you reach 13 you can stop because there is no way that 12 is going to come after 13 in a sorted list.

In this tutorial, we have discussed only the iterative method of Binary Search. Try to implement the recursive approach on your own.  Also, learn about the uses of these searches and when to apply them. That’s all for this tutorial. Happy Pythoning!

Search implementations: Linear and Binary Read More »

Priority Queue: A Beginner’s Guide

Prerequisites

To learn about Priority Queue, you must know:

  1. Python 3
  2. Linear Queue
  3. Basic Python data structure concepts – lists, tuples

What is a priority queue?

Before you go ahead and read this tutorial, I highly recommend you to read the previous tutorial on Queues and Circular Queues as it will give you a better foundation and help you grasp the the content here.

What would you do if you wanted to track the least played songs in your playlist? The easiest solution would be to sort the list but that is time-consuming and wasteful. You only have to keep track of the song with the least hits. A min heap or priority queue helps you do this.

Priority Queues, also known as heap queues, are abstract data structures. Heaps are binary trees where every parent node has a value less than or equal to any of its children. In other words, this type of queue keeps track of the minimum value. Thus it helps retrieve the minimum value at all times. For this reason, it is also referred to as min heap. Thus, position 0 holds the smallest/minimum value. There is also a max heap whose operation is quite similar.

Note: heap queues or priority queues don’t sort lists in ascending order. It just keeps the smallest element in its 0th position. The rest of the elements may or may not be sorted.

How To Implement Priority Queue

To use priority queue, you will have to import the heapq library. This is done as follows:

import heapq

The following heap commands can be performed once the heapq module is imported:

  1. heapify() – this operation enables you to convert a regular list to a heap. On performing this operation, the smallest element gets pushed to position 0.
h = [5,2,6,8,0,1,2,4]
heapq.heapify(h) #returns [0, 2, 1, 4, 5, 6, 2, 8]

Note: Only the first element is in its correct sorted position.

  1. heapq.heappush(heap, item) – this operation pushes an element into a heap. Heap refers to the name of the heap and item refers to the item to be added to the heap. For instance:
heapq.heappush(h,7)
print(h) #[0, 2, 1, 4, 5, 6, 2, 8, 7]

Try adding a negative number and observe what happens.

  1. heapq.heappop(heap) – this operation is used to return the smallest element in the heap. Heap refers to the name of the heap.
heapq.heappop(h) #returns 0
  1. heapq.heappushpop(heap, item) – as the name suggests this command adds an item to the heap and returns the smallest number. This single command is much more efficient than a heappush() command followed by heappop() command.
heapq.heappushpop(h,3) #returns 0
print(h) #prints [1, 2, 2, 4, 5, 6, 3, 8, 7]

If you try the above command with a number smaller than the min value of heap, you will notice that the same element gets popped. For instance:

heapq.heappushpop(h,0) #returns 0 print(h) #prints [1, 2, 2, 4, 5, 6, 3, 8, 7]

  1. heapq.heapreplace(heap, item) -the above issue can be solved by executing this operation as it returns the smallest element and then adds the new element.
heapq.heapreplace(h,0) #returns 1
print(h) #prints [0, 2, 2, 4, 5, 6, 3, 8, 7]

The above-mentioned commands are the main ones you will use when dealing with heaps but there are also other general commands like merge(), nlargest() and nsmallest(). You can explore these on your own!

Applications

Priority Queues are widely used in different fields such as Artificial Intelligence, Statistics, Operating systems and in graphs.

Conclusion

Try solving the music player problem discussed in the introduction. You will need to heapify a list of tuples where each tuple should look like (number of hits, songid, name of the song). The heapify command will track the min according to the first element of the tuple which is why the first element of the tuple is the number of hits. Post your answers below. That’s it for this tutorial. Happy Pythoning!

Priority Queue: A Beginner’s Guide Read More »

Python Starter Tips: Beginner’s Guide to Writing Simple and Effective Code

Getting started with Python

If you are new to Python, chances are that you will find this post quite useful. Here you will learn about some common Python starter tips and tricks that will enable you to write simple and efficient code.

Python version 3.5.2 was used to create this tutorial.

List initialization

Lists are one of the most frequently used data structures in Python. If you have declared lists in the past, you would have done something like this:

alist = list()

              (or) 

            alist = []

If you want to initialize alist to five 0s, you would have done this:

alist = [0,0,0,0,0]

The above mentioned way works well enough for short lists, but what if you wanted to initialize a list to twenty 0s? Typing 0 twenty times would not be an efficient way. So instead, you can write something like this:

alist = [0] * 20

print(alist)

Output: [0,0,0,0,0,0,0,0,0,0,0,0,0,0,0,0,0,0,0,0]

Randint Command

Often you will be required to generate random numbers. Python has made this very easy by introducing the randint command. This command selects a number at random from the range you specify, making the process quick and simple. Randint needs to be imported from the ‘random’ library, which can be done like this:

from random import randint

The syntax for using randint is:

randint(<from_range>,<to_range>)

As an example, if you want to print random integers between 0 and 9 (both inclusive), it would be done like this:

from random import randint 

print(randint(0, 9))

Output: prints an integer between 0 and 9

Note that every time you execute the above command, you will get a different integer between 0 and 9.

Type Command

When you receive inputs from users or process inputs from other programs, it’s very useful to know the datatype of the input that you are dealing with. This gives you better control over the operations that you can perform. The type command identifies the datatype of a variable.

The syntax looks like this:

type(<variable_name>)

For instance, if you have a variable named alist which is a list, then executing the below command would return:

alist = list()

type(alist)

Output: <class 'list'>

Strip Command

This is a very useful command that formats inputs that are received in the form of strings. The strip command removes the spaces that are present before and after a string. The syntax is:

<string>.strip()

For example, if you want to strip spaces before and after in a string, it should be done like this:

sample = “   Python “

sample.strip()

Output: Python

Note: only spaces before and after are removed and not the spaces in between two words. For example:

sample = “      I love Python       “

sample.strip()

Output: “I love Python”

There are many more operations that can be performed using lstrip/rstrip commands like stripping on the left/right side of the string respectively. Be sure to explore further on your own!

Counting 

I am sure you will be familiar with counting forward using the for keyword, which looks like this:

for i in range(0,5):

print(i)

Output: prints 0,1,2,3,4

However, there is more to the for keyword. It also enables you to count in steps and even in reverse. The syntax is as follows:

for i in range (<from_value>,<to_value>,<step>):

print(i)

For example, if you want to count every second number between 0 and 10, it should be written as follows:

for i in range(0,10,2):

print(i)

Output: prints 0,2,4,6,8

The above command will print 0,2,4,6,8. Note that if the step is not specified, it is taken to be 1 by default.

To count in reverse, the command is as follows:

for i in range(10,0,-1):

print(i)

Output: prints 10,9,8,7,6,5,4,3,2,1

If the step is specified as -2, then the above command would print 10,8,6,4,2.

General Tips

A few other general tips:

  • Comment – write comments wherever possible as this will help you and others to understand the code better. Single line comments can be written as follows:
#<Single line comment>

Paragraph comments can be written as below:

“”” 

<Paragraph comment>

“””
  • Naming conventions – Take extra care in using relevant names while naming variables. Specifying the datatype in the name will be extra helpful when someone else reads your code. If you are initializing a string called “first name”, be sure to include the data type in the name like “strFirstName”. This way anyone reading your code will immediately understand that the variable “strFirstName” is of the type string.
  • Line number – If you are using Python IDLE, be sure to use the ALT+G command to get to a particular line. This helps in tracking a line based on line number and can be a lifesaver when you have several lines of code and an error is thrown.

Conclusion

These are a few handpicked tips from Python and hopefully these make coding a little easier for you. There is so much more to learn as Python has an ocean of libraries that make coding extremely simple. So keep exploring and happy Pythoning!

Python Starter Tips: Beginner’s Guide to Writing Simple and Effective Code Read More »

List in Python: How To Implement in Place Reversal

Prerequisites

To learn about in place list reversal, you should know the following:

  1. Python 3
  2. Python data structures – Lists
  3. Swapping values

What is in place list reversal?

In the previous posts, you might have learned how to read a list in reverse in Python which is quite fun. You can check this out here. However, the motive of this tutorial is quite different. We are not going to read a list in reverse but we are going to change an existing list to its reversed self. Note that this is a language agnostic approach.

Let’s look at an example:

alist = [1,2,3,4,5,6,7]

print(alist[::-1]) #prints [7,6,5,4,3,2,1]

print(alist) #prints [1,2,3,4,5,6,7]

So you are merely reading alist in the reverse order when you do alist[::-1]. What we want to achieve is to make alist = [7,6,5,4,3,2,1].

How to implement this?

The idea behind this is to use two pointers, left and right. The left pointer points to the first index of the list and the right pointer points to the last index of the list. Now we swap the elements pointed to by these pointers. Then, we move the pointer to the next indices. The terminating condition of this would be when the left pointer equals or crosses over the right pointer. Let us see this using an example:

Roundalistleftrightalist after swapping
1[1,2,3,4,5,6,7]1 [0]7 [6][7,2,3,4,5,6,1]
2[7,2,3,4,5,6,1]2[1]6[5][7,6,3,4,5,2,1]
3[7,2,3,4,5,6,1]3[2]5[4][7,6,5,4,3,2,1]
4[7,6,5,4,3,2,1]4[3]4[3]Stop since left == right

As you can see, now the list is reversed.

Algorithm

  1. left pointer points to the first index and right pointer points to the last index
  2. Swap elements pointed by the left and right pointers respectively
  3. Increment the left pointer by 1 and decrement the right pointer by 1
  4. Check if left>= right:
    1. If no, repeat steps 2-4
    2. If yes, stop. The list reversal is complete

Note: Although this algorithm is explained for lists, you can use this on strings as well. In that case, you might have to convert the string to a list by typecasting it. Do not forget to reconstruct the string back from the list format. This can be done by using some of the formatting commands like replace().

Code

def reverse(alist):

   #intializing pointers
   left = 0
   right = len(alist)-1

   #condition for termination
   while left<right:

       #swapping
       temp = alist[left]
       alist[left] = alist[right]
       alist[right] = temp

       #updating pointers
       left += 1
       right -= 1

   return alist

print(reverse([1,2,3,4,5]))

Efficiency

You might think that instead of going through all this trouble, you can create a new list with reversed contents. Something like this:

alist = [1,2,3,4,5,6,7]
blist = list()
for item in alist[::-1]:
blist.append(item)
print(blist) #prints [7,6,5,4,3,2,1]

Although the above approach works, you are using additional memory (blist) to store the reversed list. This might be a serious concern if the number of elements in the list is large. That is when the in place reversal will come in handy. The efficiency of in place reversal is O(n) since we visit all the elements of the list at least once.

Conclusion

This is a very commonly asked interview question. Try using the same approach to solve these puzzles and comment below:

  1. Reverse the string “hello”. Output should be “olleh”
  2. Reverse the sentence “I love Python Central”. Output should be “Central Python love I”
  3. Check if “madam” is a palindrome or not

We will use this concept in future tutorials like linked list reversal. That’s it for this tutorial. Happy Pythoning!

List in Python: How To Implement in Place Reversal Read More »

Singly Linked List: How To Find and Remove a Node

Prerequisites

To learn about singly linked lists, you should know:

  1. Python 3
  2. OOP concepts
  3. Singly linked list – inserting a node and printing the nodes

What will we learn?

In the last tutorial, we discussed what singly linked lists are, how to add a node and how to print all the nodes. We strongly recommend you to read that first if you haven’t as we will be building off of those concepts.

This tutorial is about how to remove a node and how to know if a particular element exists in the linked list or not. Both these methods belong to the LinkedList class. Let us see these one by one.

How to find an element?

Like in most data structures, the only way to find if an element exists is by traversing the entire linked list. Note that if the linked list is sorted, we can use binary search. But here we are going to consider an unsorted linked list. The way this works is that the user will give us an element and we return True if we find the element else we return False. You can also use a counter and return the index of the element if it exists.

Algorithm

  1. Set a pointer curr to the head
  2. Compare curr.data to the input value:
    1. If equal, return True
    2. Else, move to the next pointer
  3. Repeat steps 1-2 until the element is found or the end of the linked list is met

Code

def findNode(self,value):

       curr = self.head
       while curr:
           if curr.getData() == value:
               return True
           curr = curr.getNextNode()
       return False

How to remove nodes from singly linked lists?

Now that you know how to find a node, we can use this to remove a node. Again, there are several approaches to do this. You can remove the first node or you can remove the last node by maintaining a tail pointer that points to the last node of the linked list. The approach we are discussing here is that we get a value from the user, find the element in the linked list and remove it if it exists. It is very important to let the user know if the element was successfully removed. For this purpose, we return True for success and False otherwise. Remember to decrement the size attribute by 1.

Let us call the node to be deleted as the current node. The idea is to link the previous node’s next to point to the current node’s next node. For example, let us say we want to delete 4 from the given linked list:

Linked list: H-->3-->4-->5 

Remove 4: H-->3-->5

We made the 3’s next node point to 4’s next node which is 5.

Let us say we want to delete 3

Remove 3: H-->5

We made the head pointer to point to 3’s next which is 5.

Note: To do make a connection between the previous node and the current node’s next node, it is important to keep track of the previous node.

Algorithm

  1. Have two pointers:
    1. curr – Initially points to head
    2. prev – initially points to None
  1. If inputted value matches the data of curr:
    1. Check prev exists:
      1. If yes, set next node of prev to next node of curr
      2. If no, simply point the head to next node of curr (this happens when you want to delete the first node)
      3. Decrement size by 1
      4. Return True
  2. If inputted value doesn’t match the data of curr:
    1. Proceed to next node by:
      1. Pointing prev to curr
      2. Pointing curr to next node of curr
  3. Repeat steps 1-3 till the end of the linked list
  4. If the end of the linked list is reached, return False indicating no element in the linked list matches the inputted value

Code

def removeNode(self,value):

        prev = None
        curr = self.head
        while curr:
            if curr.getData() == value:
                if prev:
                    prev.setNextNode(curr.getNextNode())
                else:
                    self.head = curr.getNextNode()
                return True
                    
            prev = curr
            curr = curr.getNextNode()
            
        return False

Conclusion

That’s it for this tutorial. In the future tutorials, we will see how to reverse a singly linked list. Happy Pythoning!

Singly Linked List: How To Find and Remove a Node Read More »

How To Reverse a Singly Linked List

Prerequisites

To learn how to reverse singly linked lists, you should know:

  1. Python 3
  2. Python data structures – List
  3. In place list reversal
  4. OOP concepts
  5. Part 1  and Part 2 singly linked list

What will we learn?

In the last tutorials, we discussed what singly linked lists are, how to add a node, how to print all the nodes and how to remove a node. We strongly recommend you to read these first if you haven’t yet as we will be building off of those concepts.

This tutorial covers how to reverse a linked list. As discussed in the previous tutorial, you can perform an in place reversal by swapping the last and the first values and so on. But here we are going to discuss a different approach. The idea is to reverse the links. So 4–>2–>3 (head points to 4 , 3 points to None) will become 4<–2<–3 (head points to 3 , 4 points to None). This can be done iteratively and recursively.

We will keep track of three things: the current element, the previous element, and the next element. This is because once we reverse the link between the previous node and current node, we won’t be able to move to the next node of the current. That is why it becomes mandatory to track the next node of the current. Let us see this using an example:

Linked listprevcurrnexAfter reversal
(h)4–>2–>3(None)None42(None)4–>2–>3
(None)4–>2–>3423(None)4<–2–>3
(None)4<–2–>323None(None)4<–2<–3
(None)4<–2<–33NoneNone(None)4<–2<–3(h)


Note:
 In the end, we point head pointer to the previous node.

How to implement this?

Now that you have a good handle on the linked list reversal, let’s take a look at the related algorithm and code.

Iterative method

Algorithm

  1. Set previous as Nonecurrent as head and next as the next node of current
  2. Iterate through the linked list until current is None (this is the loop’s exit condition)
  3. During each iteration, set the next node of current to previous
  4. Then, set previous as currentcurrent as next and next as its next node (this is the loop’s iteration process)
  5. Once the current becomes None, set the head pointer to the previous node.

Code

def reverseList(list):

       #Initializing values
       prev = None
       curr = list.head
       nex = curr.getNextNode()
  
       #looping
       while curr:
           #reversing the link
           curr.setNextNode(prev)     

           #moving to next node      
           prev = curr
           curr = nex
           if nex:
               nex = nex.getNextNode()

       #initializing head
       list.head = prev

Recursive method

Algorithm

  1. Pass the head pointer to this method as node.
  2. Check if the next node of node is None:
    1. If yes, this indicates that we have reached the end of the linked list. Set the head  pointer to this node
    2. If no, pass the next node of node to the reverse method
  3. Once the last node is reached, the reversing happens.

Code

def reverse(self,node):

       if node.getNextNode() == None:
           self.head = node
           return
       self.reverse(node.getNextNode())
       temp = node.getNextNode()
       temp.setNextNode(node)
       node.setNextNode(None)

Conclusion

Try to solve the above problem using in place reversal as well. The reversal serves as the base for solving other problems associated with linked lists which we will see in the future tutorials. Happy Pythoning!

How To Reverse a Singly Linked List Read More »

Singly Linked List: How To Insert and Print Node

Prerequisites

To learn about a singly linked list, you should know:

  1. Python 3
  2. OOP concepts

What are singly linked lists?

In this tutorial, we will learn about what singly linked lists are and some very basic operations that can be performed on them.

Before we get into the details of what singly lists are, we must learn what nodes are. This is because nodes are the building blocks of a linked list. A node consists of two parts:

  1. Data part – contains the data
  2. Address part – this is pointer that points to location of the next node

In a singly linked list, each node’s address part contains the information about the location of the next node. This forms a series of chain or links. The first node of the linked list is kept track by the head pointer. The last node points to None.

Let us see the following diagram to understand this better:
What are singly linked lists

Note: In the above figure, the last element 1 points to None. Even though these nodes are drawn contiguous to each other, in reality, they may or may not be in contiguous memory locations.

Check out this animation for the visualization of the working of a linked list.

Tip: Always try to draw these data structures to get a clear understanding.

How to create a Singly Linked List?

Creating classes

Firstly, you must create a node in order to create a singly linked list. To do this, we create a class Node with data and nextNode attributes. As discussed earlier, the data attribute will contain the data and the nextNode will simply point to the next node in the linked list. We will make the default value of nextNode to be None. You can use getter and setter methods to do this.

Now that the Node class is created, it is time to create the LinkedList class. This has only one attribute, head. By default, this will point to None. If the head points to None it means that the linked list is empty. To keep track of the number of nodes in the linked list, we can add a size attribute to the LinkedList class and default it to 0.

Inserting a Node

This is a method of the LinkedList class. Remember, to make the coding simple and efficient we will always add the new node to the beginning of the linked list. In other words, the head will always point to the most recently added node. If we add the new node to the end of the list, we need to do the extra work of finding the end of the list and then adding it. This is a wasteful operation. However, if you maintain another pointer, let’s call it the tail pointer such that it points to the last node, this can be done. You can insert a new node anywhere in the linked list. We have discussed the former approach i.e insertion at the beginning of the linked list.

Let’s say we need to add 7 to a linked list, we need to do the following steps:

  1. Create a node object with 7 as the data and the next node pointing to head node
  2. Point the head pointer to this new node

Finally, increment the size attribute by 1. It is always a good practice to return True if insertion was successful. This way the user knows what is happening.

Print Nodes

This is a method of the LinkedList class. To print the data present in all the nodes of the linked list, we need to traverse one node at a time and print each node’s data part.

Coding a Singly Linked List

class Node:

   def __init__(self,data,nextNode=None):
       self.data = data
       self.nextNode = nextNode

   def getData(self):
       return self.data

   def setData(self,val):
       self.data = val

   def getNextNode(self):
       return self.nextNode

   def setNextNode(self,val):
       self.nextNode = val

class LinkedList:

   def __init__(self,head = None):
       self.head = head
       self.size = 0

   def getSize(self):
       return self.size

   def addNode(self,data):
       newNode = Node(data,self.head)
       self.head = newNode
       self.size+=1
       return True
       
   def printNode(self):
       curr = self.head
       while curr:
           print(curr.data)
           curr = curr.getNextNode()

myList = LinkedList()
print("Inserting")
print(myList.addNode(5))
print(myList.addNode(15))
print(myList.addNode(25))
print("Printing")
myList.printNode()
print("Size")
print(myList.getSize())

What are the advantages and disadvantages of Singly Linked Lists?

Advantages

  1. It’s a dynamic data structure in which insertion and deletion are simple as we don’t need to shift the elements. Just updating the next pointer will do the job for us.
  2. Stack and Queue data structures can be easily implemented using linked lists.

Disadvantages

  1. Additional memory is used up by the next pointers.
  2. Random access is not possible. You must traverse the linked list from the beginning to get to a particular node.

Conclusion

That’s it for this tutorial. In the future tutorials, we will see how to remove an element from the linked list, how to find if an element exists in the linked list etc. Happy Pythoning!

Singly Linked List: How To Insert and Print Node Read More »

What is python used for: Beginner’s Guide to python

Prerequisites

If you’re looking forward to learning python, chances are that you will find this post quite useful. Here you will learn about Python. What it is used for? where to learn it?

To know more about any language, you need to know a little bit about its history. by knowing its history you will know a lot about language main focus and it’s development directions.

Python is one of the most popular programming languages used according to the StackOverflow 2019 survey. In this article, we will know more about

  • The History of python
  • How long does it take to learn
  • The main usage of python
  • Where to learn python for free

Programming language popularity chart according to StackOverflow 2019 survey

History of python

Python is an interpreted, high-level, general-purpose programming language. Created by Guido van Rossum and first released in 1991. Guido’s goal of python is to be open-source and interactive programming language. He wanted to encourage other developers to use it. Python is based on C Language, which helps python in performance. CPython’s goal is to translate a Python script into C and make direct C-level API calls into the interpreter. Python’s code readability makes it useful for long term projects. It is a good choice for different companies. And beyond the usage of python in large business projects, developers started to use python for side projects. Now you know the main goal of python. Python focus on readability, performance. Python supports different operating systems. Let’s start looking at its main usage.

The main usage of python

The support of multiple programming paradigms object-oriented and functional programming and the huge community behind are helping the language to be adapted in different development fields. Let’s talk more about Python’s popular usage.

Web development

In Web development there are a lot of programming languages options.  Python is widly adoabted in web development with frameworks like Django, Flask and Pyramid. Or with scrapping tools  like scrappy, BeautifulSoup4 that fetch the data from different websites.

Django is the biggest python web framework. It’s an MVC (model-view-controller) framework that encourages rapid development. it provides well-structured files with standard architecture. Django gives you out of the box project:

  • Scalable architecture with a lot of customizations.
  • A settings module that contains project configurations.
  • ORM (object-relational mapper) that translates your python code into SQL.
  • Admin portal with a user management system.
  • Template engine for HTML rendering.
  • Built-in form validation.
  • Vulnerabilities prevention like (SQL injection, cross-site scripting, clickjacking, and password management )

You can know more about Django in our introduction to Django.

Flask is a microframework, it called that because it doesn’t require particular tools or libraries to be installed. It has no default database or form validation, you have full control over the project architecture. You can add the tools according to your needs. Flask is a quick solution for big projects or micro-services based projects. This does not mean that Flask is not a good option for scalable projects. Flask meant to be an easy choice for

  • Projects that need detailed customization
  • Microservices systems.
  • Creating web applications quickly with the minimum amount of configurations.

Note: We did a full comparison between Django and other frameworks in the previous article. Python usage isn’t just for building web applications only, other fields like machine learning and data science.

Machine Learning and Data Science

Python is very good at resources management (RAM, CPU, and GPU). Data scientist & Machine learning engineers are using it With libraries like:

  • Tensor flow, an end to end python platform for machine learning.  it handles complex computations. it used in NLP, voice recognition with an out of the box user-friendly responses.
  • Pytorch,  A production-ready machine learning library. It takes advantage of machine CPU and GPU to enable applications to accelerate the calculations
  • NumPy, Python’s most popular library for complex mathematical operations. It has a lot of linear algebra equations like Fourier transformation.

Data science and Machine learning are heavily used recently in academic researches and in companies. You need a good Mathematical background and you’re ready to start learning it.

Automation scripts

DevOps and security engineers are using it to write automation scripts to help them in their daily work. check our article about using boto with python for access AWS services

You can use it in almost all kinds of applications except mobile and gaming it’s not good at it.

How long does it take to learn?

Apparently, the time of learning a new language isn’t fixed for everyone. It was designed to be human-readable like English. we can say that it could take about 2 weeks to learn it’s basics and start using it.

Here is an example of python syntax

# define variables
language = "english"

# check type the type
type(language)  # str

# python boolean
is_readable = True

# List Data structure
numbers = [1, 2, 3, 4, 5]

# conditional statment
If language == "english":
   print("Welcome to english language")
else:
   print("Invalid language")

# iteration and for loop
for num in numbers:
    print("current number is : ", num)

# we can use ptyhon funtions to isolate logic
def get_number_type(number):
    if number % 2 == 0:
       return "Even number"
    else:
       return "Odd number"

# calling function

number_type = get_number_type(2)
print(number_type)
# Output : Even number

number_type = get_number_type(3)
print(number_type)
# Output : Odd number

The above code was an example of easy to read Python code. that’s why Python is easy to learn. check out tips for clean python code.

Where to learn python for free?

There are tons of resources to learn it for free, we will list the best learning resources.

  • Documentation docs tutorial
  • Udacity Course Introduction to python programming
  • Coursera Specialization Python for everybody
  • Tutorialspoint tutorial
  • W3Schools tutorial
  • Sololearn course

Conclusion

From the above explanation, it must be clear that you can use python with different applications. There is a wide usage of python in different industries and fields. it’s compatible with all operating systems. It is a good start if you want to start your career with programming.  Python is a very useful tool to use as a mathematician who wants a couple of scripts in his daily work. And if you are looking for scalable web application python is a good choice too.

What is python used for: Beginner’s Guide to python Read More »