Python

Basics of Python – Built-in Types

In this Page, We are Providing Basics of Python – Built-in Types. Students can visit for more Detail and Explanation of Python Handwritten Notes Pdf.

Basics of Python – Built-in Types

Built-in types

This section describes the standard data types that are built into the interpreter. There are various built-in data types, for e.g., numeric, sequence, mapping, etc., but this book will cover few types. Schematic representation of various built-in types is shown in figure 2-1.
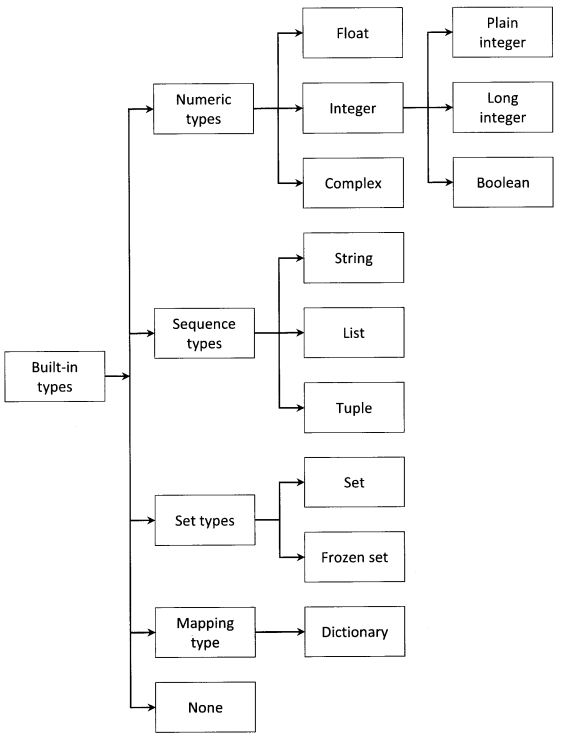
Python Handwritten Notes Chapter 2 img 1

Numeric types

There are three distinct numeric types: integer, floating-point number, and complex number.

Integer

Integer can be sub-classified into three types:

Plain integer

Plain integer (or simply ” integer “) represents an integer number in the range -2147483648 through 2147483647. When the result of an operation would fall outside this range, the result is normally returned as a long integer.

>>> a=2147483647 
>>> type (a) 
<type ' int '>
>>> a=a+1
>>> type (a)
<type ' long '>
>>> a=-2147483648 
>>> type (a)
<type ' int '>
>>> a=a-1
>>> type (a)
<type ' long ’>

The built-in function int(x = 0) converts a number or string x to an integer or returns 0 if no arguments are given.

>>> a =' 57 '
>>> type (a) 
<type ' str '>
>>> a = int (a)
>>> a 
57
>>> type (a)
<type ' int '>
>>> a = 5.7
>>> type (a)
<type ' float '> 
>>> a = int (a)
>>> a 
5 
>>> type (a)
<type ' int '>
>>> int( )
0

Long integer

This represents integer numbers in a virtually unlimited range, subject to available memory. The built-in function long (x=0) converts a string or number to a long integer. If the argument is a string, it must contain a possibly signed number. If no argument is given, OL is returned.

>>> a = 5 
>>> type (a) 
<type ' int '> 
>>> a = long (a) 
>>> a 
5L
>>> type (a) 
<type ' long '> 
>>> long ( )
OL
>>> long (5)
5L
>>> long (5.8) 
5L
>>> long(' 5 ') 
5L
>>> long(' -5 ')
-5L

Integer literals with an L or 1 suffix yield long integers (L is preferred because 11 looks too much like eleven).

>>> a=10L 
>>> type (a) 
<type ' long '>
>>> a=101 
>>> type (a)
<type ' long '>

The following expressions are interesting.

>>> import sys 
>>> a=sys.maxint 
>>> a
2147483647
>>> type (a)
<type ' int '>
>>> a=a+1
>>> a
21474836 48L
>>> type (a)
<type ' long ’>

Boolean

This represents the truth values False and True. The boolean type is a sub-type of plain integer, and boolean values behave like the values 0 and 1. The built-in function bool ( ) converts a value to boolean, using the standard truth testing procedure.

>>> bool ( ) 
False 
>>> a=5
>>> bool (a)
True
>>> bool (0)
False
>>> bool( ' hi ' )
True
>>> bool(None)
False
>>> bool(' ')
False
>>> bool(False)
False
>>> bool("False" )
True
>>> bool(5 > 3)
True

Floating point number

This represents a decimal point number. Python supports only double-precision floating-point numbers (occupies 8 bytes of memory) and does not support single-precision floating-point numbers (occupies 4 bytes of memory). The built-in function float  ( ) converts a string or a number to a floating-point number.

>>> a = 57 
>>> type (a)
<type ' int '>
>>> a = float (a)
>>> a
57.0 
>>> type (a)
<type ' float '>
>>> a = ' 65 ' 
>>> type (a)
<type ' str ' > 
>>> a = float (a) 
>>> a
65.0 
>>> type (a)
<type ' float '>
>>> a = 1e308 
>>> a 
1e+30 8 
>>> type (a)
<type ' float '>
>>> a = 1e309 
>>> a
inf 
>>> type (a)
<type ' float '>

Complex number

This represents complex numbers having real and imaginary parts. The built-in function complex () is used to convert numbers or strings to complex numbers.

>>> a = 5.3
>>> a = complex (a)
>>> a 
(5 . 3 + 0 j)
>>> type (a)
<type ' complex '>
>>> a = complex ( )
>>> a
0 j 
>>> type (a)
<type ' complex '>

Appending j or J to numeric literal yields a complex number.

>>> a = 3 . 4 j 
>>> a 
3 . 4 j
>>> type (a)
<type ' complex '>
>>> a = 3 . 5 + 4 . 9 j 
>>> type (a)
<type ' complex '>
>>> a = 3 . 5+4 . 9 J
>>> type (a)
<type ' complex '>

The real and imaginary parts of a complex number z can be retrieved through the attributes z. real and z. imag.

a=3 . 5 + 4 . 9 J
>>> a . real
3 . 5
>>> a . imag 
4 . 9

Sequence Types

These represent finite ordered sets, usually indexed by non-negative numbers. When the length of a sequence is n, the index set contains the numbers 0, 1, . . ., n-1. Item i of sequence a is selected by a [i]. There are seven sequence types: string, Unicode string, list, tuple, bytearray, buffer, and xrange objects.

The sequence can be mutable or immutable. The immutable sequence is a sequence that cannot be changed after it is created. If an immutable sequence object contains references to other objects, these other objects may be mutable and may be changed; however, the collection of objects directly referenced by an immutable object cannot change. The mutable sequence is a sequence that can be changed after it is created. There are two intrinsic mutable sequence types: list and byte array.

Iterable is an object capable of returning its members one at a time. Examples of iterables include all sequence types (such as list, str, and tuple) and some non-sequence types like diet and file, etc. Iterables can be used in a for loop and in many other places where a sequence is needed (zip(), map (), …). When an iterable object is passed as an argument to the built-in function iter (), it returns an iterator for the object. An iterator is an object representing a stream of data; repeated calls to the iterator’s next () method return successive items in the stream. When no more data are available, a Stoplteration exception is raised instead.

Some of the sequence types are discussed below:

String

It is a sequence type such that its value can be characters, symbols, or numbers. Please note that string is immutable.

>>> a=' Python : 2 . 7 '
>>> type (a)
<type ' str ’>
>>> a [2 ] =' S '
Traceback (most recent call last) :
File "<stdin>", line 1, in <module>
TypeError: 'str' object does not support item assignment

The built-in function str (object =’ ‘ ) returns a string containing a nicely printable representation of an object. For strings, this returns the string itself. If no argument is given, an empty string is returned.

>>> a=57.3
>>> type(a) 
<type 'float'>
>>> a=str(a)
>>> a
' 57.3 '
>>> type (a)
<type ' str '>

Tuple

A tuple is a comma-separated sequence of arbitrary Python objects enclosed in parenthesis (round brackets). Please note that the tuple is immutable. A tuple is discussed in detail in chapter 4.

>>> a=(1 , 2 , 3 ,4) 
>>> type (a)
<type ' tuple '>
'a', 'b', 'c')

List

The list is a comma-separated sequence of arbitrary Python objects enclosed in square brackets. Please note that list is mutable. More information on the list is provided in chapter 4.

>>> a=[1, 2 ,3, 4]
>>> type(a) 
<type ' list '>

Set types

These represent an unordered, finite set of unique objects. As such, it cannot be indexed by any subscript, however, they can be iterated over. Common uses of sets are fast membership testing, removing duplicates from a sequence, and computing mathematical operations such as intersection, union, difference, and symmetric difference. There are two set types:

Set

This represents a mutable set. It is created by the built-in function set (), and can be modified afterward by several methods, such as add () remove (), etc. More information on the set is given in chapter 4.

>>> set1=set ( )                                                    # A new empty set
>>> set1.add (" cat ")                                           # Add a single member
>>> set1.update ([" dog "," mouse "])                 # Add several members
>>> set1.remove ("mouse")                                # Remove member
>>> set1
set([' dog ', ' cat '])
>>> set2=set([" dog "," mouse "])
>>> print set1&set2                                           # Intersection
set ( [' dog ' ] )
>>> print set1 | set2                                           # Union
set([' mouse ', ' dog ', ' cat '])

The set ( [ iterable ] ) return a new set object, optionally with elements taken from iterable.

Frozenset

This represents an immutable set. It is created by a built-in function frozenset ( ). As a frozenset is immutable, it can be used again as an element of another set, or as a dictionary key.

>>> frozenset ( ) 
frozenset ( [ ] )
>>> frozenset (' aeiou ') 
frozenset{ [' a ', ' i ',' e ',' u ',' o '])
>>> frozenset ( [0, 0, 0, 44, 0, 44, 18] ) 
frozenset (10, 18, 44])

The frozenset ( [iterable] ) return return a new frozenset object, optionally with elements taken from iterable.

Mapping Types

This represents a container object that supports arbitrary key lookups. The notation a [k] selects the value indexed by key k from the mapping a; this can be used in expressions and as the target of assignments or del statements. The built-in function len () returns the number of items in a mapping. Currently, there is a single mapping type:

Dictionary

A dictionary is a mutable collection of unordered values accessed by key rather than by index. In the dictionary, arbitrary keys are mapped to values. More information is provided in chapter 4.

>>> dict1={"john":34,"mike":56}
>>> dict1[" michael "] = 42 
>>> dict1
{' mike ' : 56, ' john ' : 34, ' michael ' : 42}
>>> dictl[" mike "]
56

None

This signifies the absence of a value in a situation, e.g., it is returned from a function that does not explicitly return anything. Its truth value is False.

Some other built-in types such as function, method, class, class instance, file, module, etc. are discussed in later chapters.


Basics of Python – Built-in Types Read More »

Check If there are Duplicates in a List

Python Check If there are Duplicates in a List

Lists are similar to dynamically sized arrays (e.g., vector in C++ and ArrayList in Java) that are declared in other languages. Lists don’t always have to be homogeneous, which makes them a useful tool in Python. Integers, Strings, and Objects are all DataTypes that can be combined into a single list. Lists are mutable, meaning they can be modified after they’ve been formed.

Duplicates are integers, strings, or items in a list that are repeated more than once.

Given a list, the task is to check whether it has any duplicate element in it.

Examples:

Input:

givenlist=["hello", "this", "is", "BTechGeeks" , "hello"]

Output:

True

Explanation:

hello is repeated twice so the answer is Yes

Check whether list contains any repeated values

There are several ways to check duplicate elements some of them are:

Method #1 :Using list and count() function

The list class in Python has a method count() that returns the frequency count of a given list element.

list.count(Element)

It returns the number of times an element appears in the list.

Approach:

The idea is to iterate over all of the list’s elements and count the number of times each element appears.

If the count is greater than one, this element has duplicate entries.

Below is the implementation:

# function which return true if duplicates are present in list else false
def checkDuplicates(givenlist):
    # Traverse the list
    for element in givenlist:
        # checking the count/frequency of each element
        if(givenlist.count(element) > 1):
            return True
    # if the above loop do not return anuthing then there are no duplicates
    return False

#Driver code
# Given list
givenlist = ["hello", "this", "is", "BTechGeeks", "hello"]
# passing this list to checkDuplicates function
print(checkDuplicates(givenlist))

Output:

True

Time Complexity : O(n^2)

Method #2 : Using set()

Follow the steps below to see if a list contains any duplicate elements.

If the list does not contain any unhashable objects, such as list, use set().

When a list is passed to set(), the function returns set, which ignores duplicate values and keeps only unique values as elements..

Using the built-in function len(), calculate the number of elements in this set and the original list and compare them.

If the number of elements is the same, there are no duplicate elements in the original list ,if the number of elements is different, there are duplicate elements in the original list.

The following is the function that returns False if there are no duplicate elements and True if there are duplicate elements:

# function which return true if duplicates are present in list else false
def checkDuplicates(givenlist):
    # convert given list to set
    setlist = set(givenlist)
    # calculate length of set and list
    setlength = len(setlist)
    listlength = len(givenlist)
    # return the comparision between set length and list length
    return setlength != listlength


# Driver code
# Given list
givenlist = ["hello", "this", "is", "BTechGeeks", "hello"]
# passing this list to checkDuplicates function
print(checkDuplicates(givenlist))

Output:

True

Time Complexity : O(n(log(n))

Method #3: Using Counter() function from collections (Hashing)

Calculate the frequencies of all elements using Counter() function which will be stored as frequency dictionary.

If the length of frequency dictionary is equal to length of list then it has no duplicates.

Below is the implementation:

# importing Counter function from collections
from collections import Counter

# function which return true if duplicates are present in list else false


def checkDuplicates(givenlist):
    # Calculating frequency using counter() function
    frequency = Counter(givenlist)
    # compare these two lengths and return it
    return len(frequency) != len(givenlist)


# Driver code
# Given list
givenlist = ["hello", "this", "is", "BTechGeeks", "hello"]
# passing this list to checkDuplicates function
print(checkDuplicates(givenlist))

Output:

True

Time Complexity : O(n)
Related Programs:

Related Programs:

Python Check If there are Duplicates in a List Read More »

Basics of Python – Line Structure

In this Page, We are Providing Basics of Python – Line Structure. Students can visit for more Detail and Explanation of Python Handwritten Notes Pdf.

Basics of Python – Line Structure

Line structure

A Python program is divided into a number of logical lines.

Physical and logical lines

A physical line is a sequence of characters terminated by an end-of-line sequence. The end of a logical line is represented by the token NEWLINE. A logical line is ignored (i.e. no NEWLINE token is generated) that contains only spaces, tabs, or a comment. This is called a “blank line”. The following code

>>> i=5 
>>> print (5)
5

is the same as:

>>> i=5; print (i)
5

A logical line is constructed from one or more physical lines by following the explicit or implicit line joining rules.

Explicit line joining

Two or more physical lines may be joined into logical lines using backslash characters (\), as shown in the following example:

>>> if 1900 < year < 2100 and 1 <= month <= 12 \
. . .   and 1 <= day <= 31 and 0 <= hour < 24 \
. . .   and 0 <= minute < 60 and 0 <= second < 60 :
. . .   print year

A line ending in a backslash cannot carry a comment. Also, backslash does not continue a comment. A backslash does not continue a token except for string literals (i.e., tokens other than string literals cannot be split across physical lines using a backslash). A backslash is illegal elsewhere on a line outside a string literal.

>>> str=' This is a \
. . .    string example ' 
>>> str
' This is a string example'

Implicit line joining

Expressions in parentheses, square brackets, or curly braces can be split over more than one physical line without using backslashes. For example:

>>> month_names=['Januari','Februari','Maart',          # These are the
. . .    'April ', ' Mei ', 'Juni',                                              # Dutch names
. . .    'Juli','Augustus','September',                                 # for the months
. . .   'Oktober','November','December']                        # of the year

Implicitly continued lines can carry comments. The indentation of the continuation lines is not important. Blank continuation lines are allowed. There is no NEWLINE token between implicit continuation lines. Implicitly continued lines can also occur within triple-quoted strings; in that case, they cannot carry comments.

>>> str=" " "This is 
. . . a string 
. . . example" " "
>>> str
' This is \na string \nexample'
>>> str='' 'This is 
. . . a string 
. . . example'' '
>>> str
' This is \na string \nexample'

Comment

A comment starts with a hash character (#) that is not part of a string literal and terminates at the end of the physical line. A comment signifies the end of the logical line unless the implicit line joining rules are invoked. Also, comments are not executed.

Indentation

Whitespace is important in Python. Actually, whitespace at the beginning of the line is important. This is called indentation. Leading whitespace (spaces and tabs) at the beginning of the logical line is used to determine the indentation level of the logical line, which in turn is used to determine the grouping of statements. This means that statements that go together must have the same indentation. Each such set of statements is a block. One thing that should be remembered is that wrong indentation can give rise to error (IndentationError exception).

>>> i=10
>>> print "Value is ",i 
Value is 10 
>>> print "Value is ",i 
File "<stdin>", line 1
print "Value is ",i 
∧
IndentationError: unexpected indent

The indentation levels of consecutive lines are used to generate INDENT and DEDENT tokens. One can observe that inserting whitespace, in the beginning, gave rise to the IndentationError exception.

The following example shows non-uniform indentation is not an error.

var=100 
>>> if var!=100:
. . .  print 'var does not have value 100'
. . .  else:
. . .                 print 'var has value 100'
. . . 
var has value 100

Need for indentation

In the C programming language, there are numerous ways to place the braces for the grouping of statements. If a programmer is habitual of reading and writing code that uses one style, he or she will feel at least slightly uneasy when reading (or being required to write) another style. Many coding styles place begin/end brackets on a line by themselves. This makes programs considerably longer and wastes valuable screen space, making it harder to get a good overview of a program.

Guido van Rossum believes that using indentation for grouping is extremely elegant and contributes a lot to the clarity of the typical Python program. Since there are no begin/end brackets, there cannot be a disagreement between the grouping perceived by the parser and the human reader. Also, Python is much less prone to coding-style conflicts.

Basics of Python – Line Structure Read More »

How to Make a Discord Bot Python

In a world where video games are so important to so many people, communication and community around games are vital. Discord offers both of those and more in one well-designed package. In this tutorial, you’ll learn how to make a Discord bot in Python so that you can make the most of this fantastic platform.

What Is Discord?

Discord is a voice and text communication platform for gamers.

Players, streamers, and developers use Discord to discuss games, answer questions, chat while they play, and much more. It even has a game store, complete with critical reviews and a subscription service. It is nearly a one-stop shop for gaming communities.

While there are many things you can build using Discord’s APIs this tutorial will focus on a particular learning outcome: how to make a Discord bot in Python.

What Is a Bot?

Discord is growing in popularity. As such, automated processes, such as banning inappropriate users and reacting to user requests are vital for a community to thrive and grow.

Automated programs that look and act like users and automatically respond to events and commands on Discord are called bot users. Discord bot users (or just bots) have nearly unlimited application.

How to Make a Discord Bot in the Developer Portal:

Before you can dive into any Python code to handle events and create exciting automations, you need to first create a few Discord components:

  1. An account
  2. An application
  3. A bot
  4. A guild

You’ll learn more about each piece in the following sections.

Once you’ve created all of these components, you’ll tie them together by registering your bot with your guild.

Creating a Discord Account

The first thing you’ll see is a landing page where you’ll need to either login, if you have an existing account, or create a new account:

Creating-a-Discord-Account

If you need to create a new account, then click on the Register button below Login and enter your account information.

Once you’re finished, you’ll be redirected to the Developer Portal home page, where you’ll create your application.

Creating-a-Discord-Account-login

Creating an Application:

An application allows you to interact with Discord’s APIs by providing authentication tokens, designating permissions, and so on.

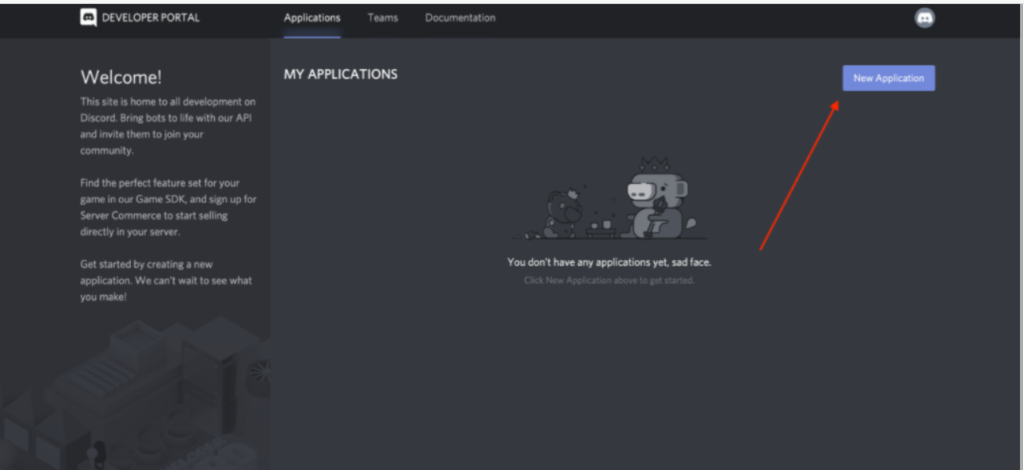
To create a new application, select New Application:

Creating-a-Discord-Account-application

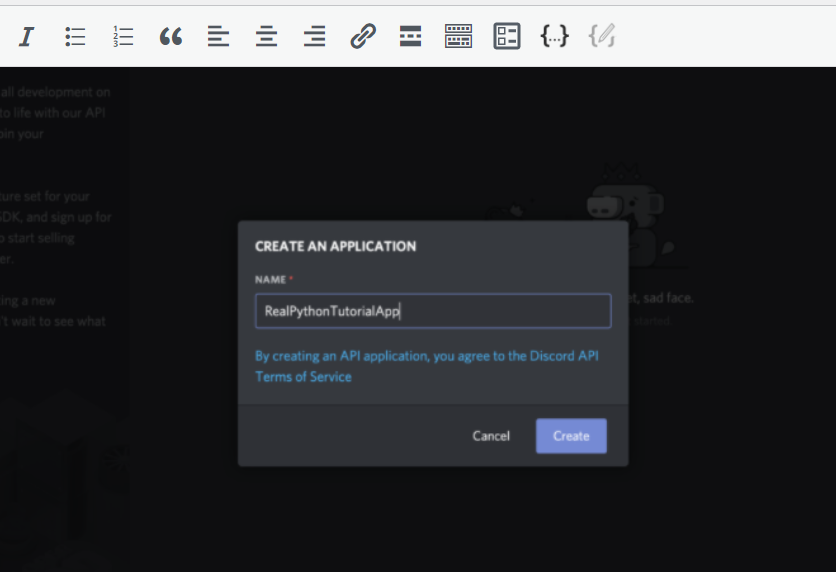
Next, you’ll be prompted to name your application. Select a name and click Create:

Creating-a-Discord-Account-login-creating

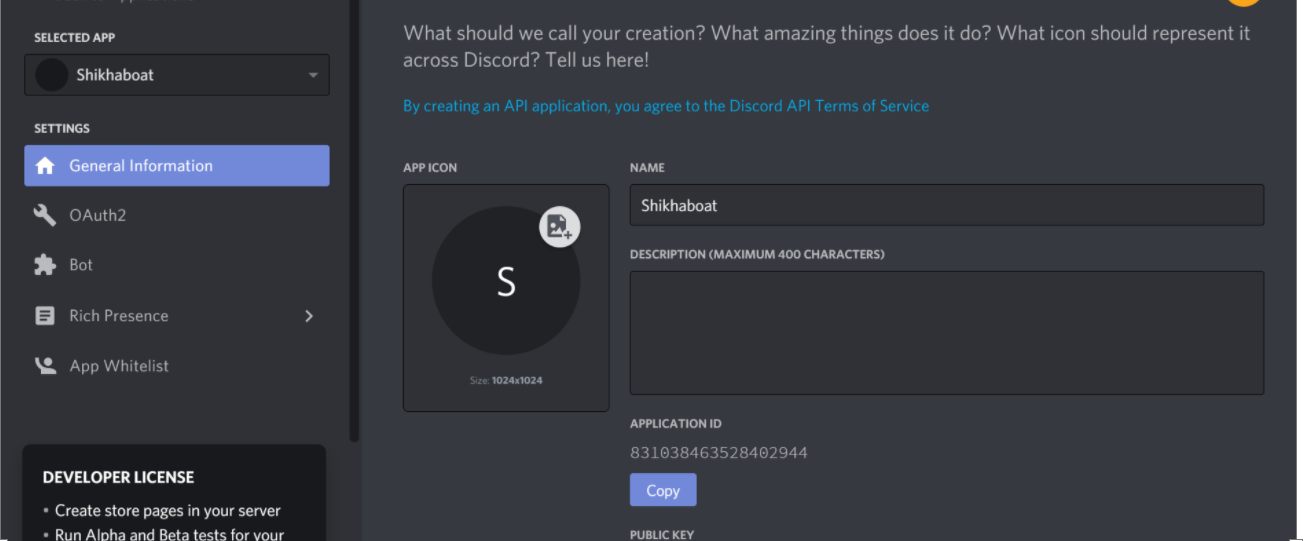
Congratulations! You made a Discord application. On the resulting screen, you can see information about your application:

Creating-a-Discord-Account-login-done.png

Keep in mind that any program that interacts with Discord APIs requires a Discord application, not just bots. Bot-related APIs are only a subset of Discord’s total interface.

However, since this tutorial is about how to make a Discord bot, navigate to the Bot tab on the left-hand navigation list.

Creating a Bot

As you learned in the previous sections, a bot user is one that listens to and automatically reacts to certain events and commands on Discord.

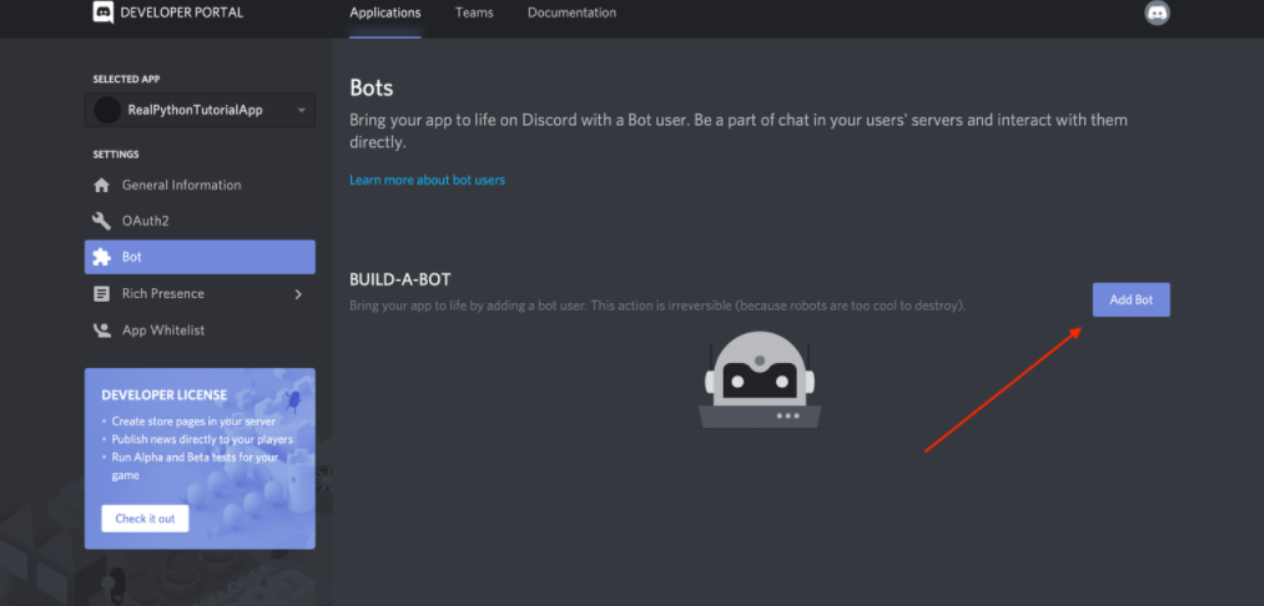
For your code to actually be manifested on Discord, you’ll need to create a bot user. To do so, select Add Bot:

Creating-a-Discord-boat

Once you confirm that you want to add the bot to your application, you’ll see the new bot user in the portal:

Creating-a-Discord-account-new-boat-user

Now, the bot’s all set and ready to go, but to where?

A bot user is not useful if it’s not interacting with other users. Next, you’ll create a guild so that your bot can interact with other users.

Creating a Guild

A guild (or a server, as it is often called in Discord’s user interface) is a specific group of channels where users congregate to chat.

You’d start by creating a guild. Then, in your guild, you could have multiple channels, such as:

  • General Discussion: A channel for users to talk about whatever they want
  • Spoilers, Beware: A channel for users who have finished your game to talk about all the end game reveals
  • Announcements: A channel for you to announce game updates and for users to discuss them

Once you’ve created your guild, you’d invite other users to populate it.

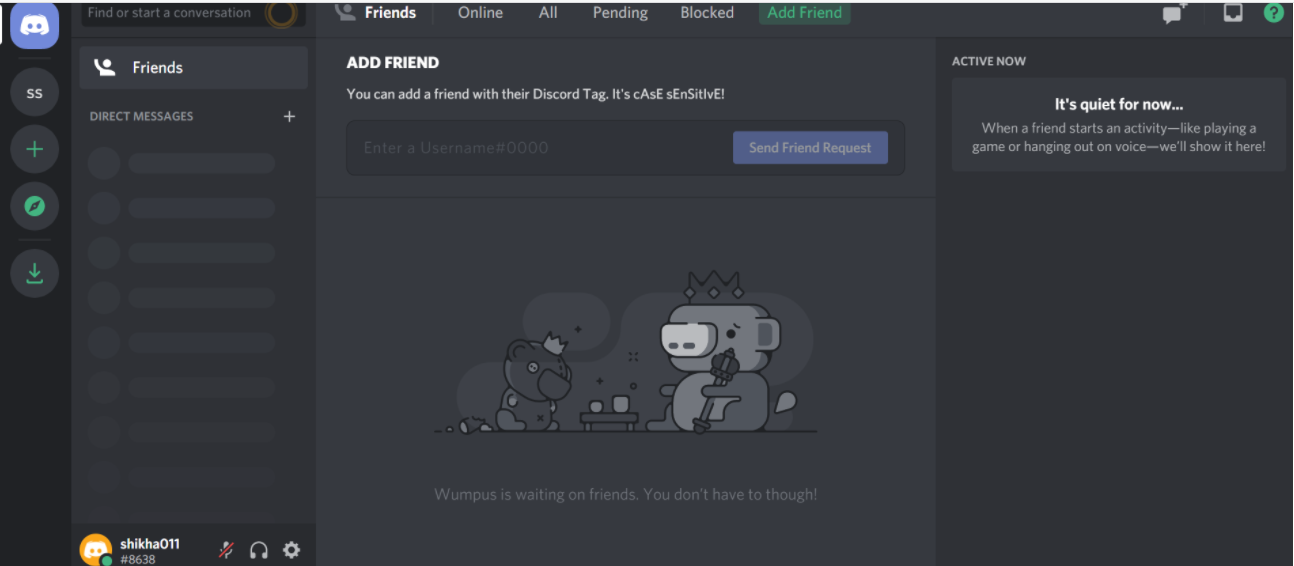
So, to create a guild, head to your Discord home page:

Creating-a-Discord-home-page

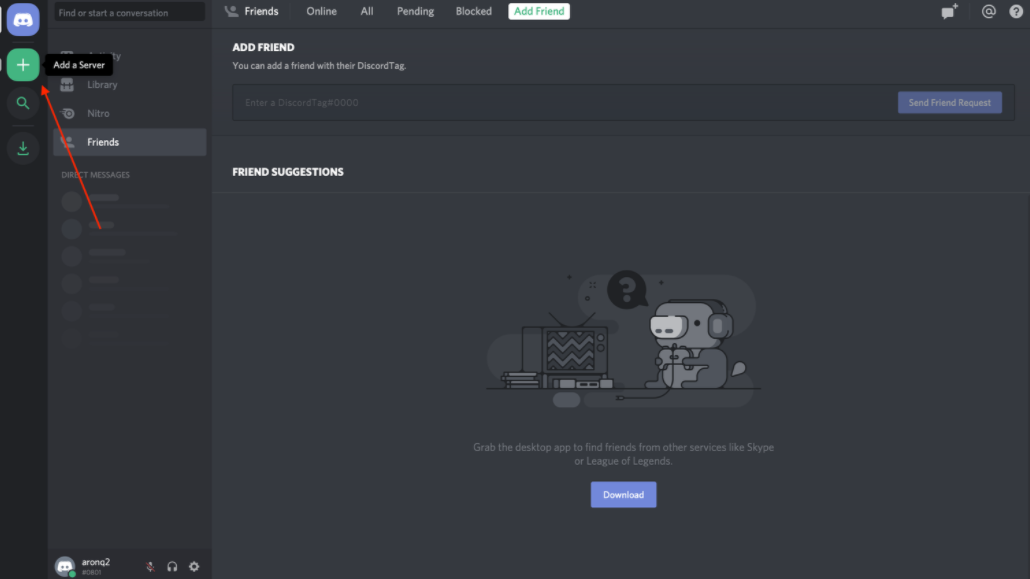
From this home page, you can view and add friends, direct messages, and guilds. From here, select the + icon on the left-hand side of the web page to Add a Server:

This will present two options, Create a server and Join a Server. In this case, select Create a server and enter a name for your guild.

Creating-a-Discord-creating-a-server

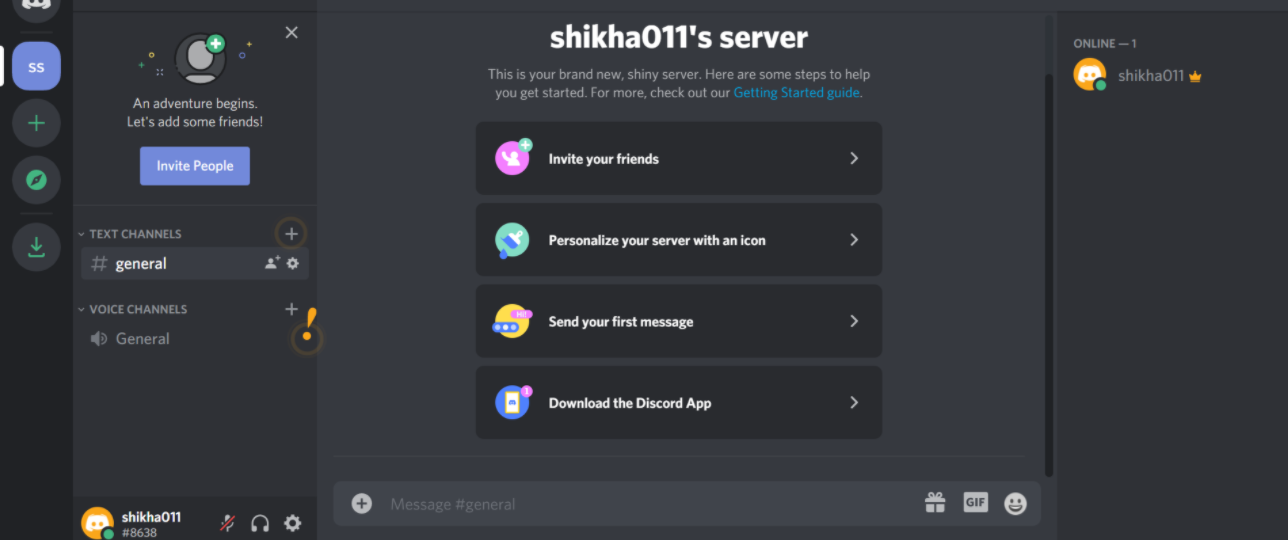
Once you’ve finished creating your guild, you’ll be able to see the users on the right-hand side and the channels on the left.

The final step on Discord is to register your bot with your new guild.

Adding a Bot to a Guild

A bot can’t accept invites like a normal user can. Instead, you’ll add your bot using the OAuth2 protocol.

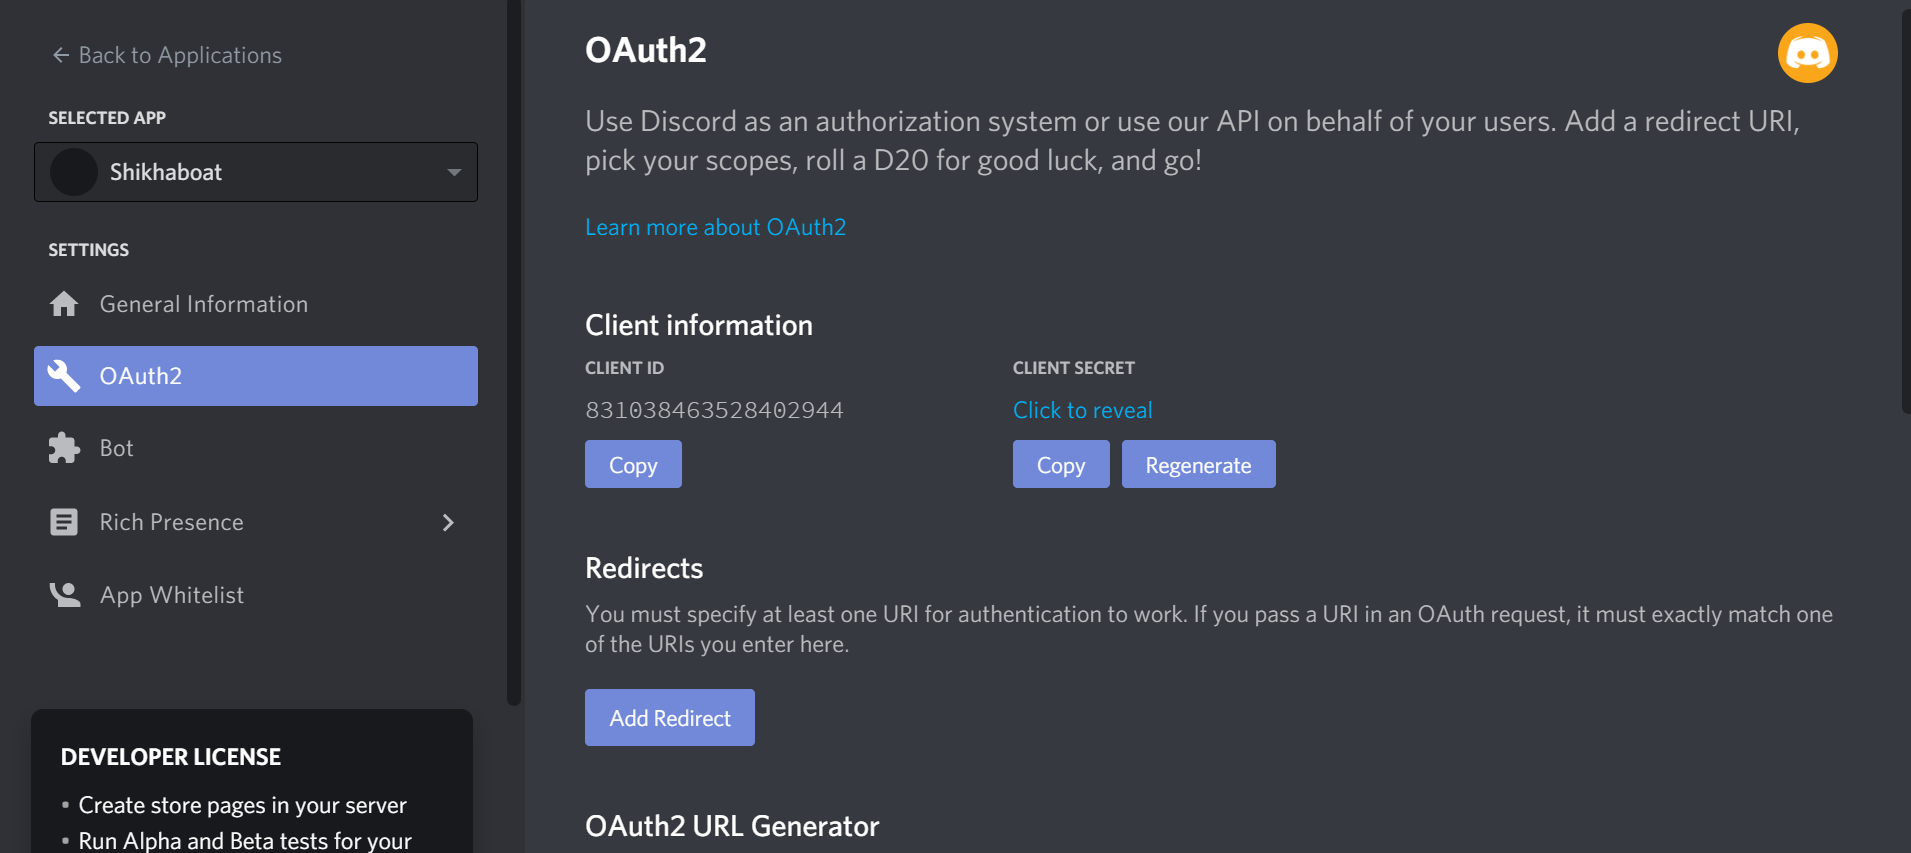
To do so, head back to the Developer Portal and select the OAuth2 page from the left-hand navigation:

Add your bot using the OAuth2 protocol.

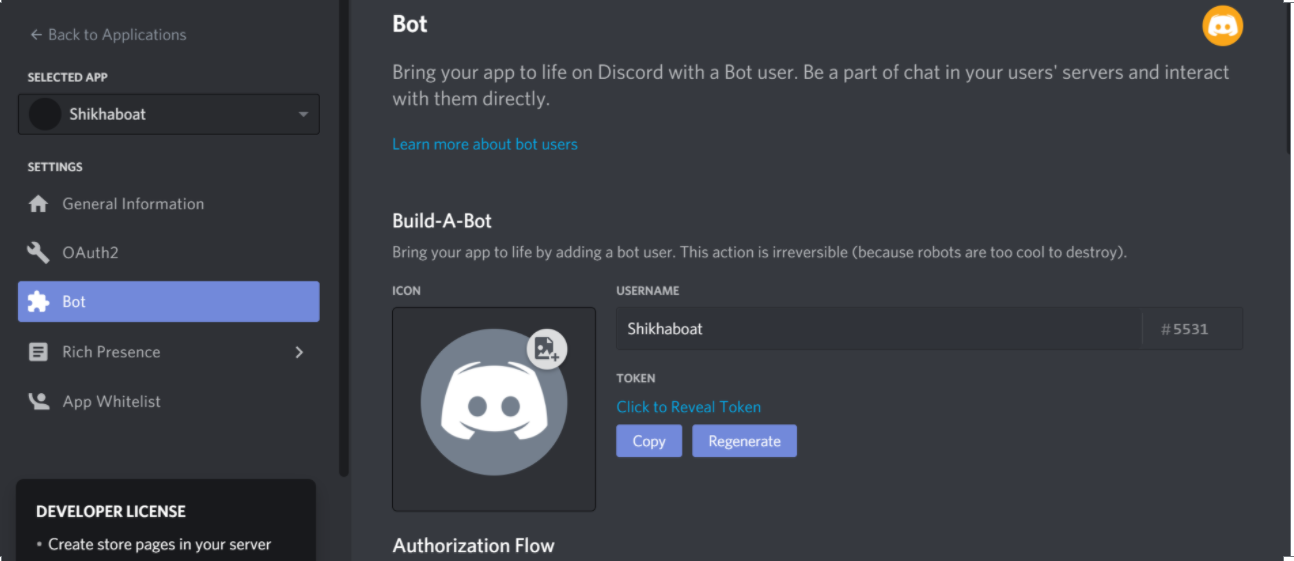
From this window, you’ll see the OAuth2 URL Generator.

This tool generates an authorization URL that hits Discord’s OAuth2 API and authorizes API access using your application’s credentials.

In this case, you’ll want to grant your application’s bot user access to Discord APIs using your application’s OAuth2 credentials.

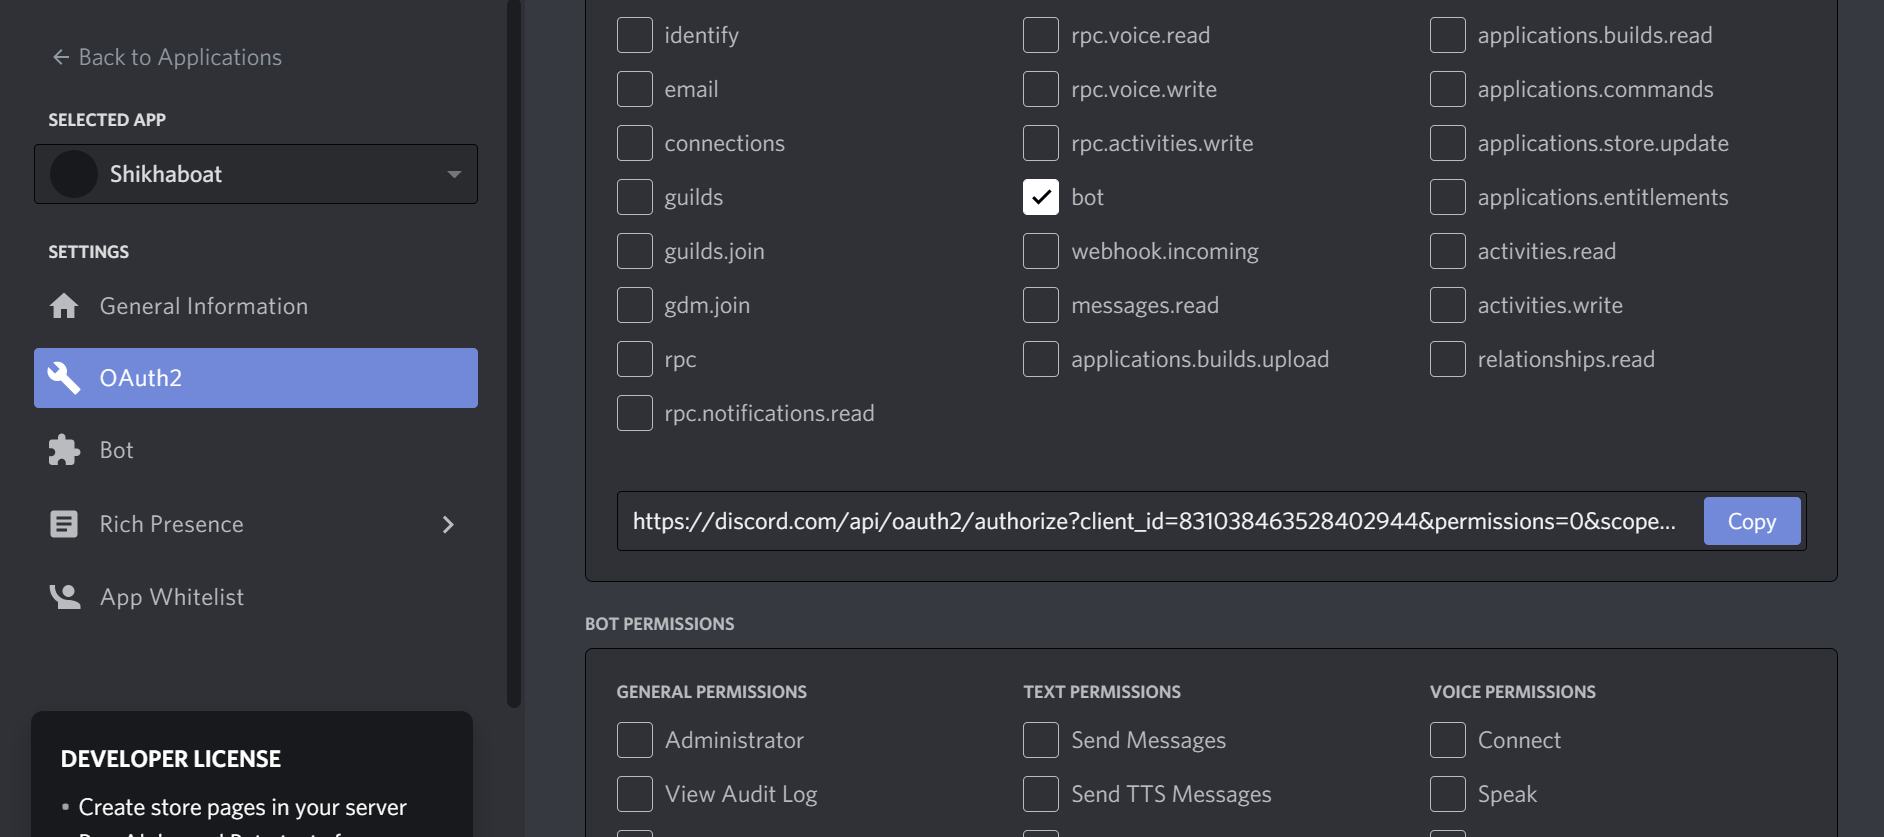
To do this, scroll down and select bot from the SCOPES options and Administrator from BOT PERMISSIONS:

BOT PERMISSIONS

Now, Discord has generated your application’s authorization URL with the selected scope and permissions.

Select Copy beside the URL that was generated for you, paste it into your browser, and select your guild from the dropdown options:

Creating-a-Discord-select-your-grid

Click Authorize, and you’re done!


Authorized
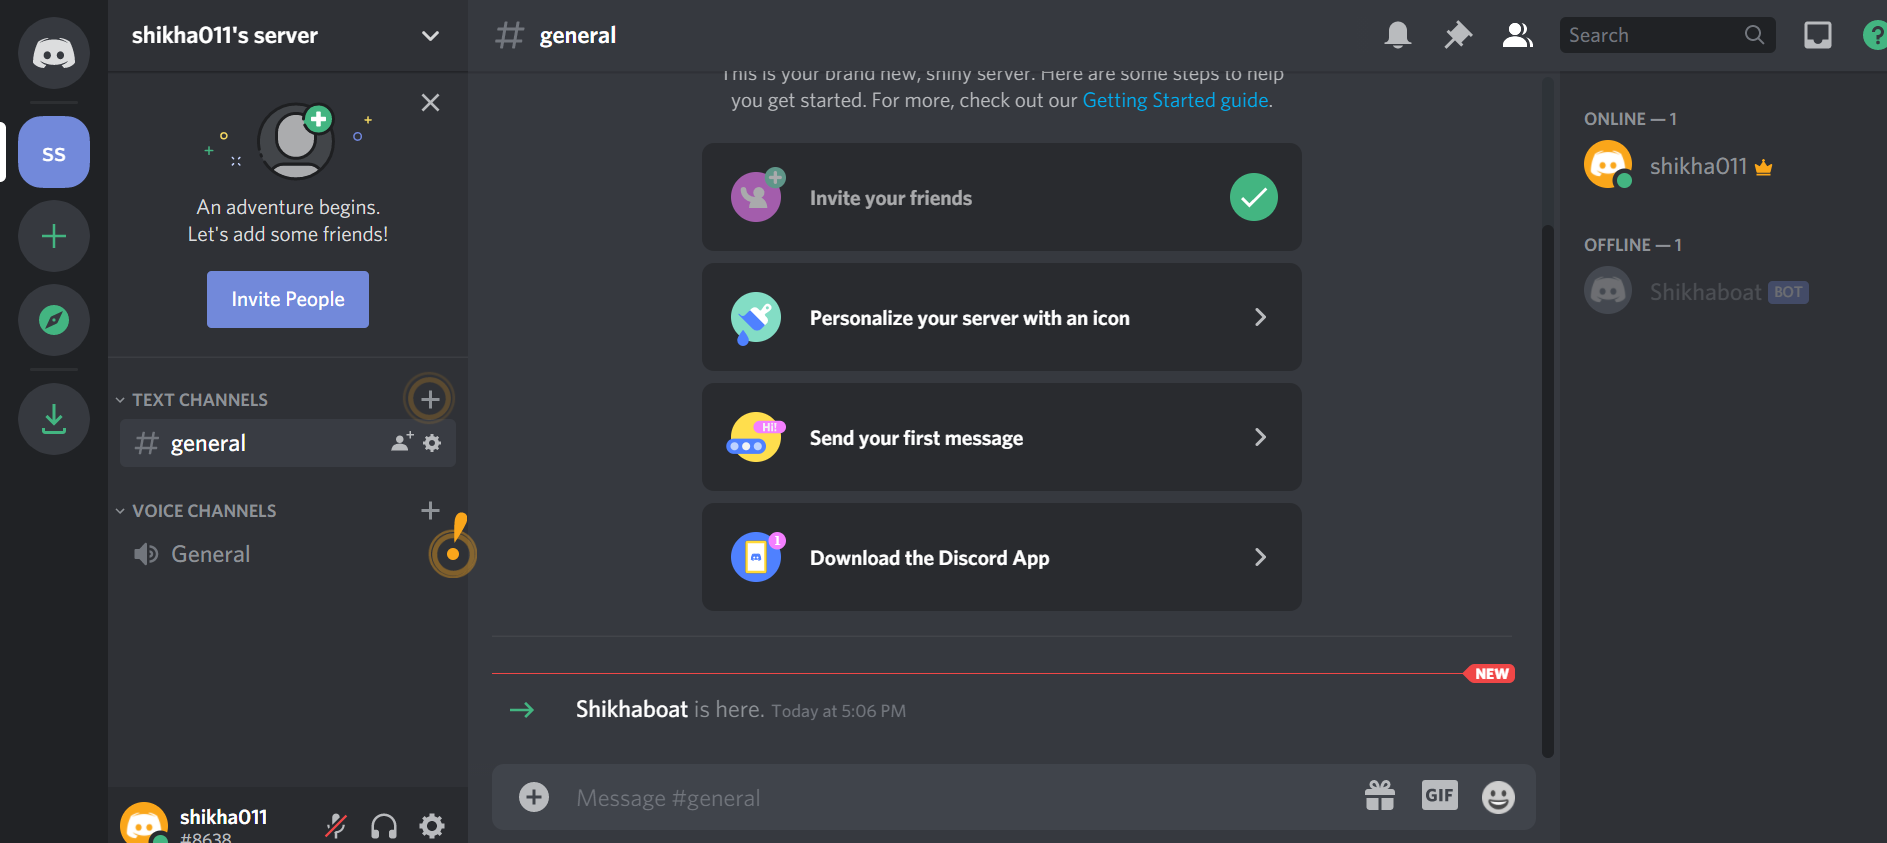
If you go back to your guild, then you’ll see that the bot has been added:

Bot added

In summary, you’ve created:

  • An application that your bot will use to authenticate with Discord’s APIs
  • A bot user that you’ll use to interact with other users and events in your guild
  • A guild in which your user account and your bot user will be active
  • ADiscordaccount with which you created everything else and that you’ll use to interact with your bot

Now, you know how to make a Discord bot using the Developer Portal. Next comes the fun stuff: implementing your bot in Python!

How to Make a Discord Bot in Python

Since you’re learning how to make a Discord bot with Python, you’ll be using discord.py.

discord.py is a Python library that exhaustively implements Discord’s APIs in an efficient and Pythonic way. This includes utilizing Python’s implementation of Async IO

Begin by installing discord.py with pip:

$ pip install -U discord.py

Now that you’ve installed discord.py, you’ll use it to create your first connection to Discord!

Creating a Discord Connection

The first step in implementing your bot user is to create a connection to Discord. With discord.py, you do this by creating an instance of Client:

# bot.py
import os

import discord
from dotenv import load_dotenv

load_dotenv()
TOKEN = os.getenv('DISCORD_TOKEN')

client = discord.Client()

@client.event
async def on_ready():
    print(f'{client.user} has connected to Discord!')

client.run(TOKEN)

A Client is an object that represents a connection to Discord. A Client handles events, tracks state, and generally interacts with Discord APIs.

Here, you’ve created a Client and implemented its on_ready() event handler, which handles the event when the Client has established a connection to Discord and it has finished preparing the data that Discord has sent, such as login state, guild and channel data, and more.

In other words, on_ready() will be called (and your message will be printed) once client is ready for further action. You’ll learn more about event handlers later in this article.

When you’re working with secrets such as your Discord token, it’s good practice to read it into your program from an environment variable. Using environment variables helps you:

  • Avoid putting the secrets into source control
  • Use different variables for development and production environments without changing your code

While you could export DISCORD_TOKEN={your-bot-token}, an easier solution is to save a .env file on all machines that will be running this code. This is not only easier, since you won’t have to export your token every time you clear your shell, but it also protects you from storing your secrets in your shell’s history.

Create a file named .env in the same directory as bot.py:

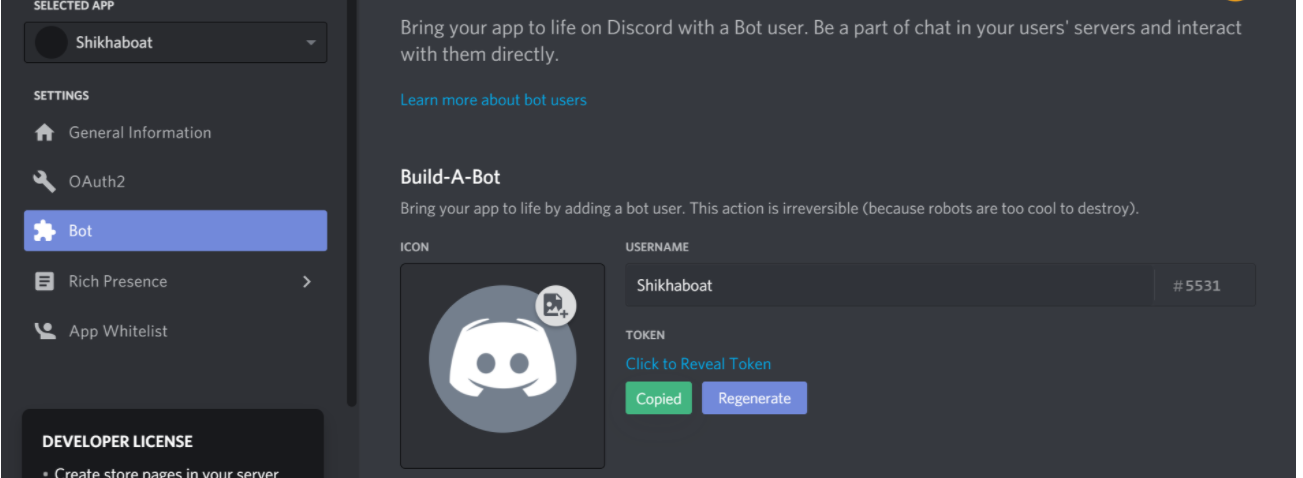
You’ll need to replace {your-bot-token} with your bot’s token, which you can get by going back to the Bot page on the Developer portal and clicking Copy under the TOKEN section:

 Creating-a-Discord-adding-bot-token

Looking back at the bot.py code, you’ll notice a library called dotnev. This library is handy for working with .env files. load_dotenv()loads environment variables from a .env file into your shell’s environment variables so that you can use them in your code.

Install dotenv with pip:

pip install -U python-dotenv

Finally, client.run() runs your Client using your bot’s token.

Now that you’ve set up both bot.py and .env, you can run your code:

python bot.py
Shikhaboat#5531 has connected to Discord!

Great! Your Client has connected to Discord using your bot’s token. In the next section, you’ll build on this Client by interacting with more Discord APIs.

Interacting With Discord APIs

Using a Client, you have access to a wide range of Discord APIs.

For example, let’s say you wanted to write the name and identifier of the guild that you registered your bot user with to the console.

First, you’ll need to add a new environment variable:

# .env
DISCORD_TOKEN={your-bot-token}
DISCORD_GUILD={your-guild-name}

Don’t forget that you’ll need to replace the two placeholders with actual values:

  1. {your-bot-token}
  2. {your-guild-name}

Remember that Discord calls on_ready(), which you used before, once the Client has made the connection and prepared the data. So, you can rely on the guild data being available inside on_ready():

# bot.py
import os

import discord
from dotenv import load_dotenv

load_dotenv()
TOKEN = os.getenv('DISCORD_TOKEN')
GUILD = os.getenv('DISCORD_GUILD')

client = discord.Client()

@client.event
async def on_ready():
    for guild in client.guilds:
        if guild.name == GUILD:
            break

    print(
        f'{client.user} is connected to the following guild:\n'
        f'{guild.name}(id: {guild.id})'
    )

client.run(TOKEN)

Here, you looped through the guild data that Discord has sent client, namely client.guilds. Then, you found the guild with the matching name and printed a formatted string to stdout.

Run the program to see the results:

 python bot.py
Shikhaboat#5531 is connected to the following guild:
Shikhaboat#5531(id: 571759877328732195)

Great! You can see the name of your bot, the name of your server, and the server’s identification number.

Another interesting bit of data you can pull from a guild is the list of users who are members of the guild:

# bot.py
import os

import discord
from dotenv import load_dotenv

load_dotenv()
TOKEN = os.getenv('DISCORD_TOKEN')
GUILD = os.getenv('DISCORD_GUILD')

client = discord.Client()

@client.event
async def on_ready():
    for guild in client.guilds:
        if guild.name == GUILD:
            break

    print(
        f'{client.user} is connected to the following guild:\n'
        f'{guild.name}(id: {guild.id})\n'
    )

    members = '\n - '.join([member.name for member in guild.members])
    print(f'Guild Members:\n - {members}')

client.run(TOKEN)

By looping through guild.members, you pulled the names of all of the members of the guild and printed them with a formatted string.

When you run the program, you should see at least the name of the account you created the guild with and the name of the bot user itself:

$ python bot.py
Shikhaboat#5531 is connected to the following guild:
Shikhaboat#5531(id: 571759877328732195)
Guild Members:
 - aronq2
 - RealPythonTutorialBot

These examples barely scratch the surface of the APIs available on Discord, be sure to check out their documentation to see all that they have to offer.

Next, you’ll learn about some utility functions and how they can simplify these examples.

Using Utility Functions

Let’s take another look at the example from the last section where you printed the name and identifier of the bot’s guild:

# bot.py
import os

import discord
from dotenv import load_dotenv

load_dotenv()
TOKEN = os.getenv('DISCORD_TOKEN')
GUILD = os.getenv('DISCORD_GUILD')

client = discord.Client()

@client.event
async def on_ready():
    for guild in client.guilds:
        if guild.name == GUILD:
            break

    print(
        f'{client.user} is connected to the following guild:\n'
        f'{guild.name}(id: {guild.id})'
    )

client.run(TOKEN)

You could clean up this code by using some of the utility functions available in discord.py.

discord.utils.find is one utility that can improve the simplicity and readability of this code by replacing the for loop with an intuitive, abstracted function:

# bot.py
import os

import discord
from dotenv import load_dotenv

load_dotenv()
TOKEN = os.getenv('DISCORD_TOKEN')
GUILD = os.getenv('DISCORD_GUILD')

client = discord.Client()

@client.event
async def on_ready():
    guild = discord.utils.find(lambda g: g.name == GUILD, client.guilds)
    print(
        f'{client.user} is connected to the following guild:\n'
        f'{guild.name}(id: {guild.id})'
    )

client.run(TOKEN)

<find() takes a function, called a predicate, which identifies some characteristic of the element in the iterable that you’re looking for. Here, you used a particular type of anonymous function, called a lambda, as the predicate.

In this case, you’re trying to find the guild with the same name as the one you stored in the DISCORD_GUILD environment variable. Once find() locates an element in the iterable that satisfies the predicate, it will return the element. This is essentially equivalent to the break statement in the previous example, but cleaner.

discord.py has even abstracted this concept one step further with the get.utility():

# bot.py
import os

import discord
from dotenv import load_dotenv

load_dotenv()
TOKEN = os.getenv('DISCORD_TOKEN')
GUILD = os.getenv('DISCORD_GUILD')

client = discord.Client()

@client.event
async def on_ready():
    guild = discord.utils.get(client.guilds, name=GUILD)
    print(
        f'{client.user} is connected to the following guild:\n'
        f'{guild.name}(id: {guild.id})'
    )

client.run(TOKEN)

get() takes the iterable and some keyword arguments. The keyword arguments represent attributes of the elements in the iterable that must all be satisfied for get() to return the element.

In this example, you’ve identified name=GUILD as the attribute that must be satisfied.

Now that you’ve learned the basics of interacting with APIs, you’ll dive a little deeper into the function that you’ve been using to access them: on_ready().

Responding to Events

You already learned that on_ready() is an event. In fact, you might have noticed that it is identified as such in the code by the client.event decorator.

But what is an event?

An event is something that happens on Discord that you can use to trigger a reaction in your code. Your code will listen for and then respond to events.

Using the example you’ve seen already, the on_ready() event handler handles the event that the Client has made a connection to Discord and prepared its response data.

So, when Discord fires an event, discord.py will route the event data to the corresponding event handler on your connected Client.

There are two ways in discord.py to implement an event handler:

  1. Using the client.event decorator
  2. Creating a subclass of Client and overriding its handler methods

You already saw the implementation using the decorator. Next, take a look at how to subclass Client:

# bot.py
import os

import discord
from dotenv import load_dotenv

load_dotenv()
TOKEN = os.getenv('DISCORD_TOKEN')

class CustomClient(discord.Client):
    async def on_ready(self):
        print(f'{self.user} has connected to Discord!')

client = CustomClient()
client.run(TOKEN)

Here, just like before, you’ve created a client variable and called <.run() with your Discord token. The actual Client is different, however. Instead of using the normal base class, client is an instance of CustomClient, which has an overridden on_ready() function.

There is no difference between the two implementation styles of events, but this tutorial will primarily use the decorator version because it looks similar to how you implement Bot commands, which is a topic you’ll cover in a bit.

Welcoming New Members

Previously, you saw the example of responding to the event where a member joins a guild. In that example, your bot user could send them a message, welcoming them to your Discord community.

Now, you’ll implement that behavior in your Client, using event handlers, and verify its behavior in Discord:

# bot.py
import os

import discord
from dotenv import load_dotenv

load_dotenv()
TOKEN = os.getenv('DISCORD_TOKEN')

client = discord.Client()

@client.event
async def on_ready():
    print(f'{client.user.name} has connected to Discord!')

@client.event
async def on_member_join(member):
    await member.create_dm()
    await member.dm_channel.send(
        f'Hi {member.name}, welcome to my Discord server!'
    )

client.run(TOKEN)

Like before, you handled the on_ready() event by printing the bot user’s name in a formatted string. New, however, is the implementation of the on_member_join() event handler.

on_member_join(), as its name suggests, handles the event of a new member joining a guild.

In this example, you used member.create_dm()to create a direct message channel. Then, you used that channel to send() a direct message to that new member.

Now, let’s test out your bot’s new behavior.

First, run your new version of bot.py and wait for the on_ready() event to fire, logging your message to stdout:

$ python bot.py
ShikhaBot has connected to Discord!

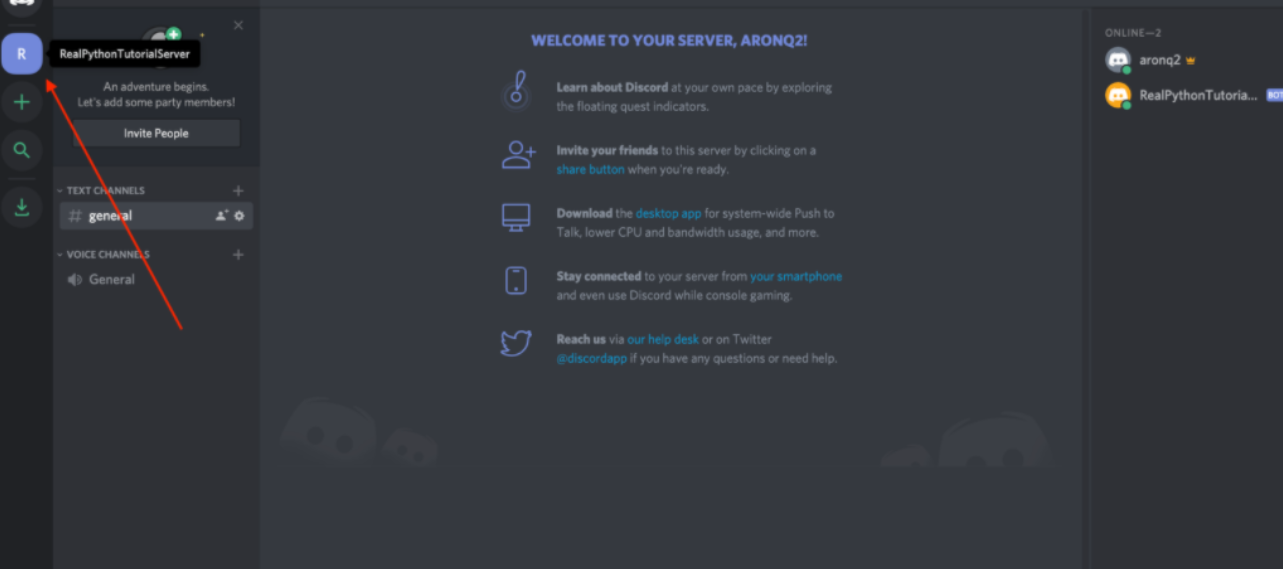
Now, head over to Discord, log in, and navigate to your guild by selecting it from the left-hand side of the screen:

Creating-a-Discord-navigate-to-server

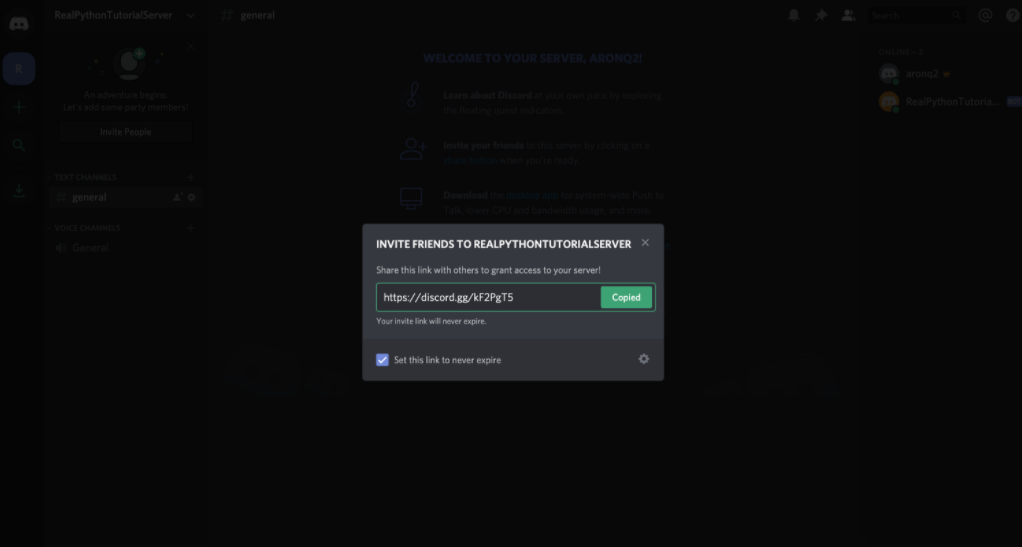
Select Invite People just beside the guild list where you selected your guild. Check the box that says Set this link to never expire and copy the link:

InvitePepole

Now, with the invite link copied, create a new account and join the guild using your invite link.

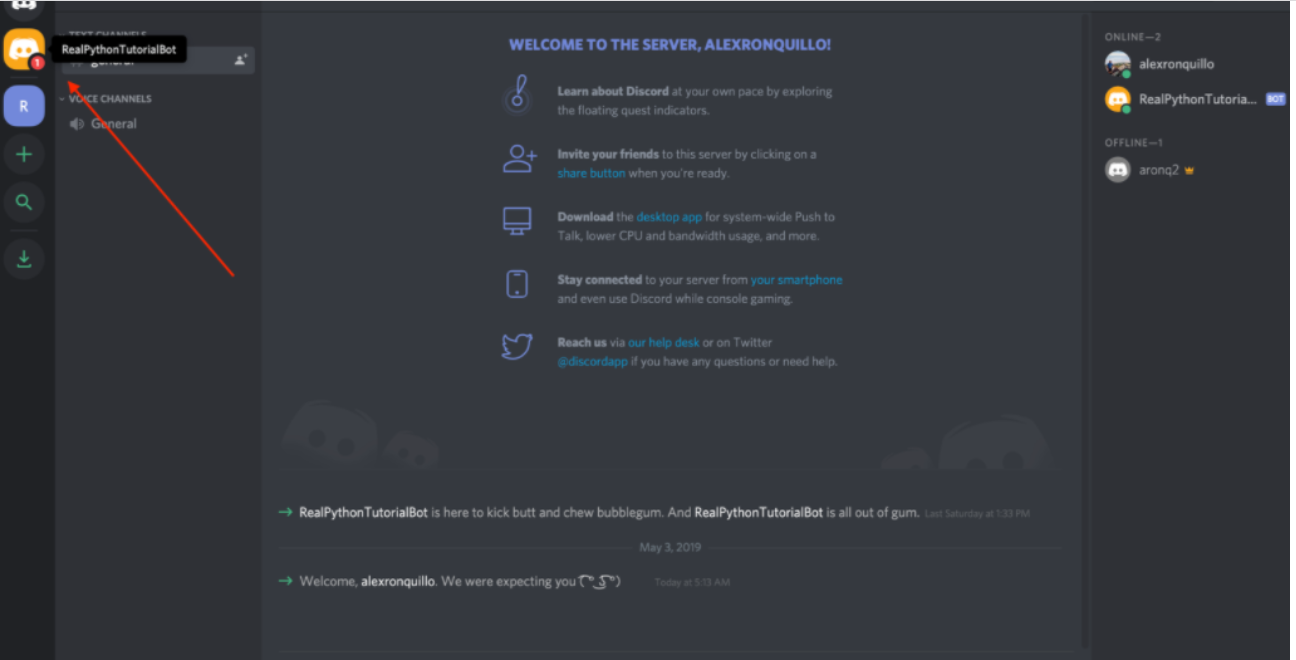
First, you’ll see that Discord introduced you to the guild by default with an automated message. More importantly though, notice the badge on the left-hand side of the screen that notifies you of a new message:

 Creating-a-Discord-account-new-message.
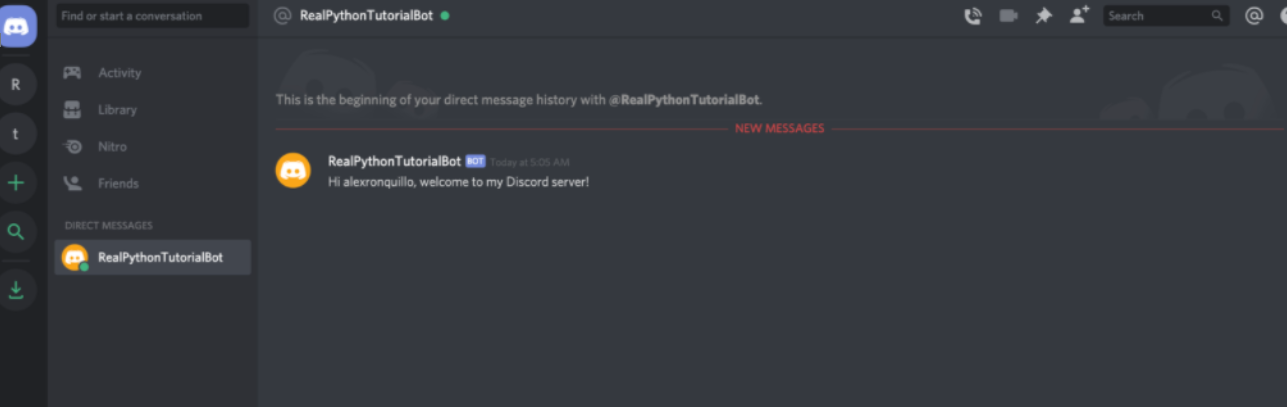
When you select it, you’ll see a private message from your bot user:

 Boat-is-created

Perfect! Your bot user is now interacting with other users with minimal code.

Conclusion

Congratulations! Now, you’ve learned how to make a Discord bot in Python. You’re able to build bots for interacting with users in guilds that you create or even bots that other users can invite to interact with their communities.


How to Make a Discord Bot Python Read More »

Understanding the Two Sum Problem

The two sum problem is a  very common interview question, asked in companies.For the two sum problem we will write two algorithm that runs in O(n2) & O(n) time.

Two Sum Problem

Given an array of integer return indices of the two numbers such that they add up to the specific target.

You may assume that each input would have exactly one solution and you are not going to use same element twice.

Example:

Given numbers=[ 3 , 4 , 6 ,7 ] , target = 7,

Because num[0]+num[1] = 3 + 4 = 7,

return[0,1]

Example has given above we have to execute two sum problem for any two number in list and give us targeted value.

There are mainly two way to execute two sum problem.

  1. Using Naive Method
  2. Using hash table

Implementing Naive Method:

In this method  we would be loop through each number and then loop again through the list looking for a pair that sums and give us final value. The running time for the below solution would be O(n2).

So for this we will write an algorithm which mentioned below-

def twoSum(nums, target):
    for i in range(len(nums)):
        for j in range(i+1,len(nums)):
            if target - nums[i] == nums[j]:
                return[i,j]

    return None            

test = [2,7,11,15]
target = 9
print(twoSum(test,target))

Output:

C:\New folder\Python project(APT)>py twosum.py
[0, 1]

C:\New folder\Python project(APT)>

So you can see that it has return us those indices which has given target value.If we change the target then value and indices both will change.This is what we want to do but it increases the complexity because we run two loop.

So for increasing complexity we will use second method which is hash table.

Implementing hash table:

Below we will show use of hash table. We can write an another faster algorithm that will find pairs that sum to numbers in same time. As we pass through each element in the array, we check to see if M minus the current element exists in the hash table.

Example:

If the array is: [6, 7, 1, 8] and the sum is 8.
class Solution:
    def twoSum(nums,target):
        prevMap = {}

        for i,n in enumerate(nums):
            diff = target - n
            if diff in prevMap:
               return[prevMap[diff],i]
            prevMap[n] = i
        return    
    nums=[6, 7, 1, 8]
    target= 8
    print(twoSum(nums,target))

Output:

C:\New folder\Python project(APT)>py twosum.py [1, 2] 
C:\New folder\Python project(APT)>

So you can see that above program gives us index value of the two number which gives us our target value.

Conclusion:

Great!So in this article we have seen two methods for two sum problem in python.Naive method has complexity O(n2)and Hash metod has complexity O(n),So best approach is Hash method and worst is Naive method.

Understanding the Two Sum Problem Read More »

Basics of Python – Operators and Operands

In this Page, We are Providing Basics of Python – Operators and Operands. Students can visit for more Detail and Explanation of Python Handwritten Notes Pdf.

Basics of Python – Operators and Operands

Operators and operands

An operator is a symbol (such as +, x, etc.) that represents an operation. An operation is an action or •procedure that produces a new value from one or more input values called operands. There are two types of operators: unary and binary. The unary operator operates only on one operand, such as negation. On the other hand, the binary operator operates on two operands, which include addition, subtraction, multiplication, division, exponentiation operators, etc. Consider an expression 3 + 8, here 3 and 8 are called operands, while V is called operator. The operators can also be categorized into:

  • Arithmetic operators.
  • Comparison (or Relational) operators.
  • Assignment operators.
  • Logical operators.
  • Bitwise operators.
  • Membership operators.
  • Identity operators.

Arithematics operators

Table 2-2 enlists the arithmetic operators with a short note on the operators.

Operator

Description

+

Addition operator- Add operands on either side of the operator.

Subtraction operator – Subtract the right-hand operand from the left-hand operand.

*

Multiplication operator – Multiply operands on either side of the operator.

/

Division operator – Divide left-hand operand by right-hand operand.

%

Modulus operator – Divide left-hand operand by right-hand operand and return the remainder.

**

Exponent operator – Perform exponential (power) calculation on operands.

//

Floor Division operator – The division of operands where the result is the quotient in which the digits after the decimal point are removed.

The following example illustrates the use of the above-discussed operators.

>>> a=20 
>>> b=45.0
>>> a+b
65.0
>>> a-b
-25.0
>>> a*b
900.0 
>>> b/a 
2.25 
>>> b%a
5.0
>>> a**b
3.5184372088832e+58 
>>> b//a
2.0

Relational operators

A relational operator is an operator that tests some kind of relation between two operands. Tables 2-3 enlist the relational operators with descriptions.

Operator

Description

==

Check if the values of the two operands are equal.

!=

Check if the values of the two operands are not equal.

<>

Check if the value of two operands is not equal (same as != operator).

>

Check if the value of the left operand is greater than the value of the right operand.

<

Check if the value of the left operand is less than the value of the right operand.

>=

Check if the value of the left operand is greater than or equal to the value of the right operand.

<=

Check if the value of the left operand is less than or equal to the value of the right operand.

The following example illustrates the use of the above-discussed operators.

>>> a,b=20,40
>>> a==b
False 
>>> a!=b 
True
>>> a<>b 
True 
>>> a>b 
False 
>>> a<b 
True
>>> a>=b 
False 
>>> a<=b 
True

Assignment operators

The assignment operator is an operator which is used to bind or rebind names to values. The augmented assignment is the combination, in a single statement, of a binary operation and an assignment statement. An augmented assignment expression like x+=l can be rewritten as x=x+l. Tables 2-4 enlist the assignment operators with descriptions.

Operator

Description

=

Assignment operator- Assigns values from right side operand to left side operand.

+=

Augmented assignment operator- It adds the right-side operand to the left side operand and assigns the result to the left side operand.

-=

Augmented assignment operator- It subtracts the right-side operand from the left side operand and assigns the result to the left side operand.

*=

Augmented assignment operator- It multiplies the right-side operand with the left side operand and assigns the result to the left side operand.

/=

Augmented assignment operator- It divides the left side operand with the right side operand and assigns the result to the left side operand.

%=

Augmented assignment operator- It takes modulus using two operands and assigns the result to left side operand.

* *=

Augmented assignment operator- Performs exponential (power) calculation on operands and assigns value to the left side operand.

//=

Augmented assignment operator- Performs floor division on operators and assigns value to the left side operand.

The following example illustrates the use of the above-discussed operators.

>>> a,b=20,40 
>>> c=a+b 
>>> c 
60
>>> a,b=2.0,4.5 
>>>c=a+b
>>> C
6.5
>>> c+=a 
>>> c
8.5
>>> c-=a 
>>> c
6.5
>>> c*=a 
>>> c
13.0
>>> c/=a 
>>> c 
6.5
>>> c%=a 
>>> c 
0.5
>>> c**=a 
>>> c 
0.25
>>> c//=a 
>>> c 
0.0

Bitwise operators

A bitwise operator operates on one or more bit patterns or binary numerals at the level of their individual bits. Tables 2-5 enlist the bitwise operators with descriptions.

Operator

Description

&

Binary AND operator- Copies corresponding binary 1 to the result, if it exists in both operands.

|

Binary OR operator- Copies corresponding binary 1 to the result, if it exists in either operand.

∧

Binary XOR operator- Copies corresponding binary 1 to the result, if it is set in one operand, but not both.

~

Binary ones complement operator- It is unary and has the effect of flipping bits.

<<

Binary left shift operator- The left side operand bits are moved to the left side by the number on the right-side operand.

>>

Binary right shift operator- The left side operand bits are moved to the right side by the number on the right-side operand.

The following example illustrates the use of the above-discussed operators.

>>> a,b=60,13 
>>> a&b 
12
>>> a | b
61 
>>> a∧b
49 
>>> ~a
-61 
>>> a< < 2
240 
>>> a>>2
15

In the above example, the binary representation of variables a and b are 00111100 and 00001101, respectively. The above binary operations example is tabulated in Tables 2-6.

Bitwise operation

Binary representationDecimal representation

a&b

00001100

12

a | b

00111101

61

a∧b

00110001

49

~a

11000011-61
a<<211110000

240

a>>200001111

15

Logical operators

Logical operators compare boolean expressions and return a boolean result. Tables 2-6 enlist the logical operators with descriptions.

Operator

Description

and

Logical AND operator- If both the operands are true (or non-zero), then the condition becomes true.

or

Logical OR’operator- If any of the two operands is true (or non-zero), then the condition becomes true.

not

Logical NOT operator- The result is reverse of the logical state of its operand. If the operand is true (or non-zero), then the condition becomes false.

The following example illustrates the use of the above-discussed operators.

>>> 5>2 and 4<8 
True
>>> 5>2 or 4>8 
True
>>> not (5>2)
False

Membership operators

A membership operator is an operator which tests for membership in a sequence, such as string, list, tuple, etc. Table 2-7 enlists the membership operators.

Operator

Description

In

Evaluate to true, if it finds a variable in the specified sequence; otherwise false.

not in

Evaluate to true, if it does not find a variable in the specified sequence; otherwise false.
>>> 5 in [0, 5, 10, 15]
True 
>>> 6 in [0, 5, 10, 15]
False
>>> 5 not in [0, 5, 10, 15]
False 
>>> 6 not in [0, 5, 10, 15]
True

Identity operators

Identity operators compare the memory locations of two objects. Table 2-8 provides a list of identity operators including a small explanation.

Operator

Description

is

Evaluates to true, if the operands on either side of the operator point to the same object, and false otherwise.

is not

Evaluates to false, if the operands on either side of the operator point to the same object, and true otherwise.

The following example illustrates the use of the above-discussed operators.

>>> a=b=3.1
>>> a is b 
True 
>>> id (a)
3 0 9 8 4 5 2 8 
>>> id (b)
30984528 
>>> c,d=3.1,3.1 
>>> c is d 
False 
>>> id (c)
35058472 
>>> id (d)
30984592
>>> c is not d
True 
>>> a is not b
False

Operator precedence

Operator precedence determines how an expression is evaluated. Certain operators have higher precedence than others; for example, the multiplication operator has higher precedence than the addition operator. In the expression x=7+3*2, x is assigned 13, not 20, because operator * has higher precedence than +, so it first multiplies 3*2 and then adds into 7.

Table 2-10 summarizes the operator’s precedence in Python, from lowest precedence to highest precedence (from top to bottom). Operators in the same box have the same precedence.

Operator
not, or, and
in, not in
is, is not
=, %, =/, =//, -=, +=, *=, **=
<>, ==, !=
<=, <, >, >=
∧, |
&
>>,<<
+, –
*, /, %, //
∼,+,-
**

Basics of Python – Operators and Operands Read More »

Building an RSS feed Scraper with Python

What is RSS?

RSS stands for Really Simple Syndication or Rich Site Summary. It is a type of web feed that allows users and applications to receive regular updates from a website or blog of their choice. Various website use their RSS feed to publish the frequently updated information like blog entries, news headlines etc, So this is where RSS feeds are mainly used.

So we can use that RSS feed to extract some important information from a particular website. In this article I will be showing how you will extract RSS feeds of any website.

Installing packages

You can install all packages using pip like the example below.

 pip install requests
 pip install bs4

Importing  libraries:

Now our project setup is ready, we can start writing the code.

Within our rssScrapy.py we’ll import the packages we’ve installed using pip.

import requests

from bs4 import BeautifulSoup

The above package will allow us to use the functions given to us by the Requests and BeautifulSoup libraries.

I am going to use the RSS feeds of a news website called Times of India.

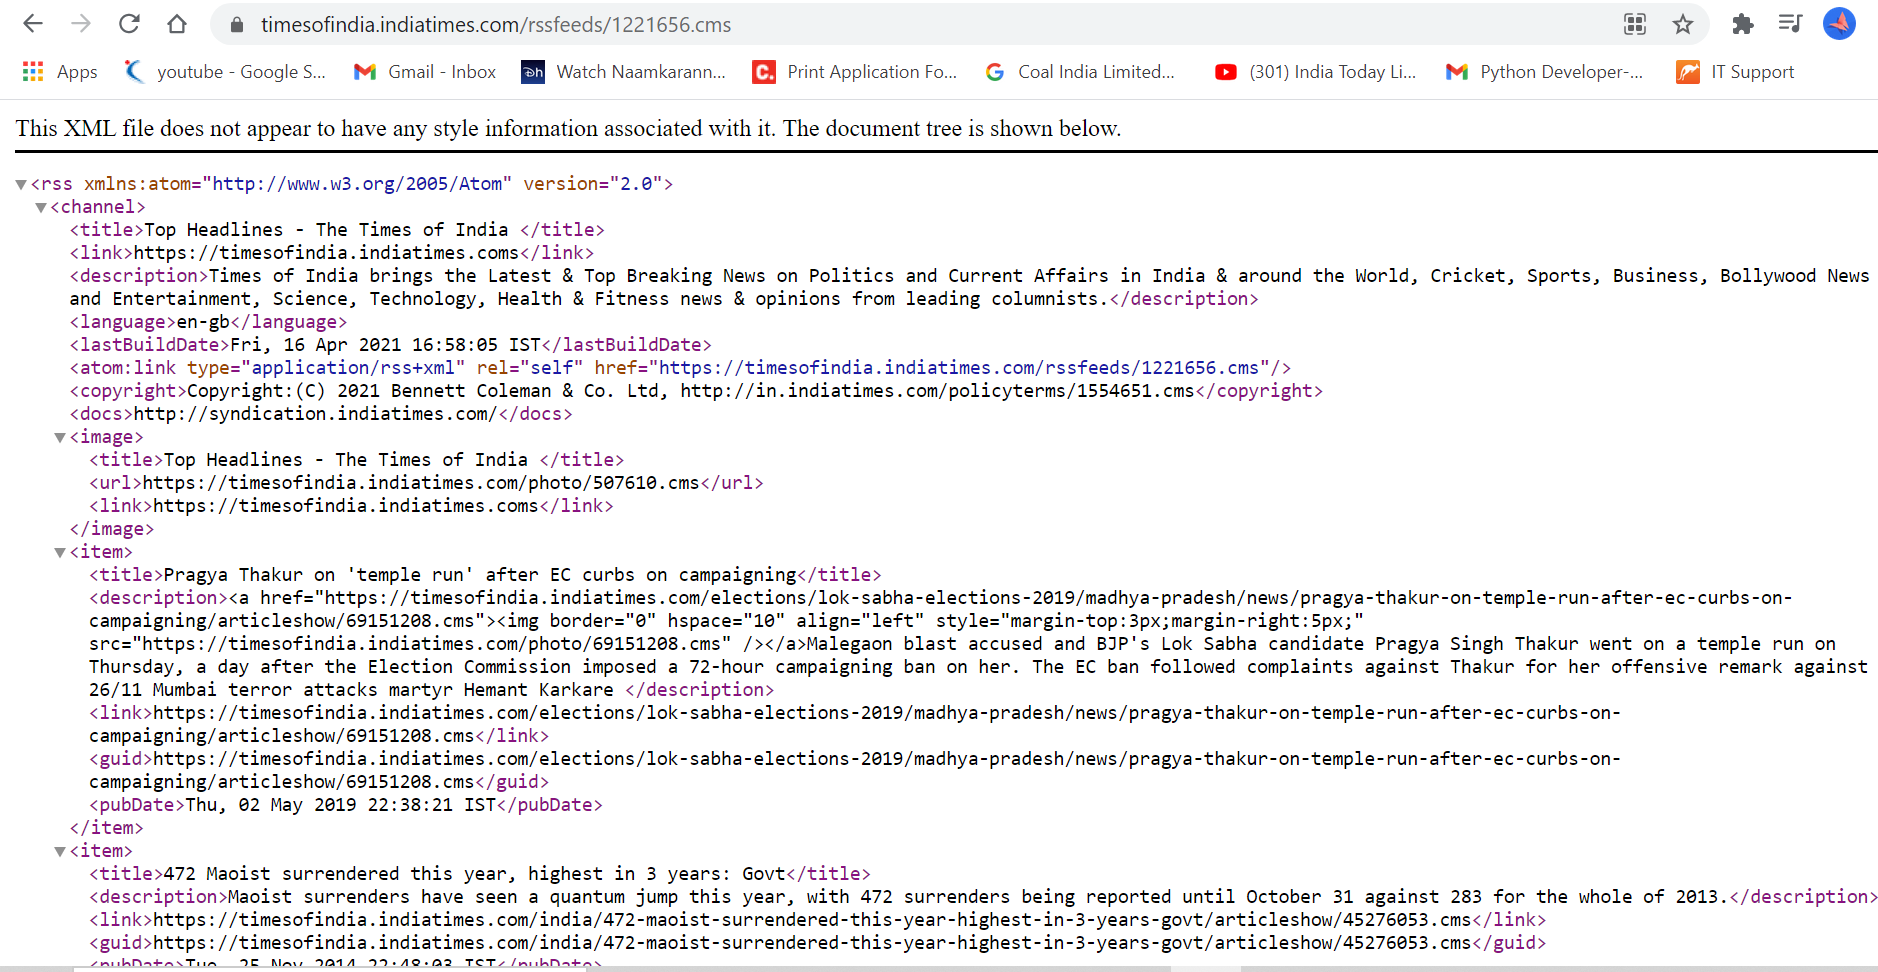
Link-"https://timesofindia.indiatimes.com/rssfeeds/1221656.cms"

This is basically an XML file.

Building-an-RSS-feed-scraper-with-Python_xml-file

So now I am going to show you how this particular xml file will scrape.

import requests
from bs4 import BeautifulSoup
url="https://timesofindia.indiatimes.com/rssfeeds/1221656.cms"
resp=requests.get(url)
soup=BeautifulSoup(resp.content,features="xml")
print(soup.prettify())

I have imported all necessary libraries.I have also defined url which give me link for news website RSS feed after that for get request I made resp object where I have pass that url.

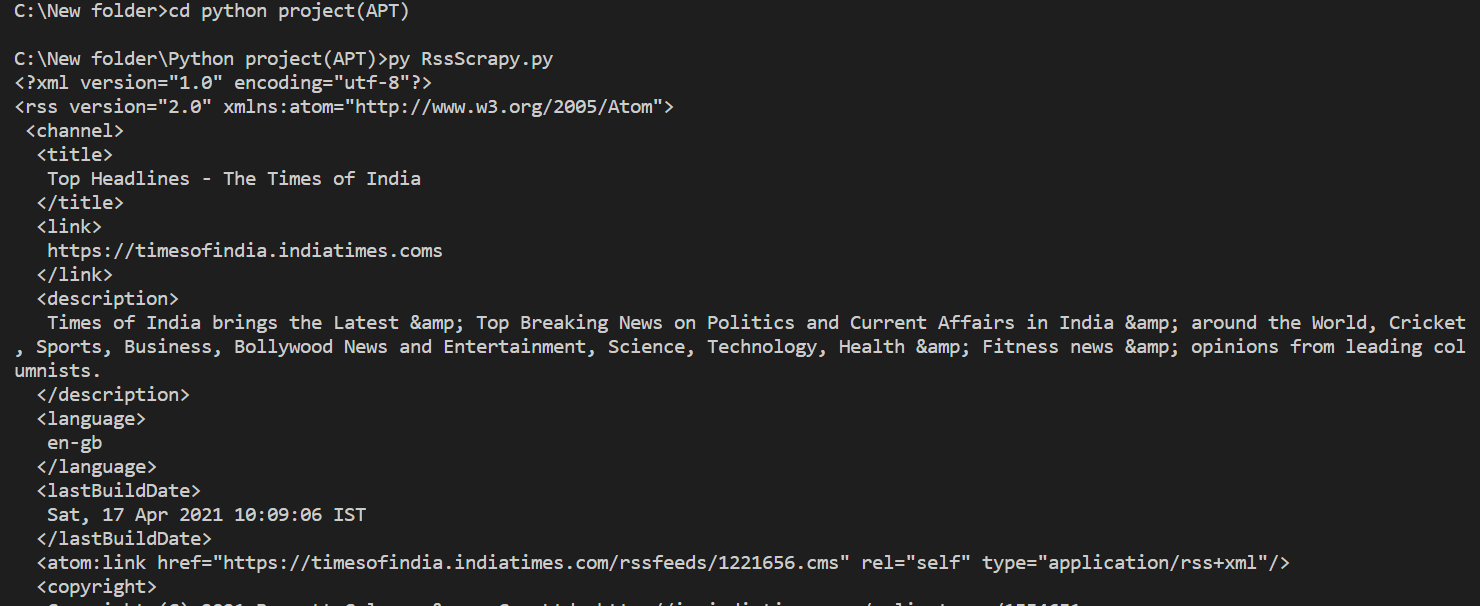
Now we have response object and we have also a beautiful soup object with me.Bydefault beautiful soup parse html file but we want xml file so we used features=”xml”.So now let me just show you the xml file we have parsed.

Building-an-RSS-feed-scraper-with-Python_output

We dont nedd all the data having in it.We want news description,title,publish date right.So for this we are going to create a list which contains all the content inside item tags.For this we have used   items=soup.findAll('item') 

You can also check the length of items using this len(items)

So now I am writing whole code for scrapping the news RSS feed-

import requests
from bs4 import BeautifulSoup
url="https://timesofindia.indiatimes.com/rssfeeds/1221656.cms"
resp=requests.get(url)
soup=BeautifulSoup(resp.content,features="xml")
items=soup.findAll('item')
item=items[0]
news_items=[]
for item in items:
    news_item={}
    news_item['title']=item.title.text
    news_item['description']=item.description.text
    news_item['link']=item.link.text
    news_item['guid']=item.guid.text
    news_item['pubDate']=item.pubDate.text
    news_items.append(news_item)
print(news_items[2])

So we can see that I have used item.title.textfor scrapping title because item is parent class and title is child class similarly we do for rest.

Each of the articles available on the RSS feed  containing all information within item tags <item>...</item>.
and follows the below structure-

<item>
    <title>...</title>
    <link>...</link>
    <pubDate>...</pubDate>
    <comments>...</comments>
    <description>...</description>
</item>

We’ll be taking advantage of the consistent item tags to parse our information.

I have also make an empty list news_items which append all in it.

So this is how we can parse particularly news item.

Building-an-RSS-feed-scraper-with-Python_final-output

Conclusion:

We have successfully created an RSS feed scraping tool using Python, Requests, and BeautifulSoup. This allows us to parse XML information into a suitable format for us to work with in the future.

Building an RSS feed Scraper with Python Read More »

Basics of Python – Variable, Identifier and Literal

In this Page, We are Providing Basics of Python – Variable, Identifier and Literal. Students can visit for more Detail and Explanation of Python Handwritten Notes Pdf.

Basics of Python – Variable, Identifier and Literal

Variable, identifier, and literal

A variable is a storage location that has an associated symbolic name (called “identifier”), which contains some value (can be literal or other data) that can change. An identifier is a name used to identify a variable, function, class, module, or another object. Literal is a notation for constant values of some built-in type. Literal can be string, plain integer, long integer, floating-point number, imaginary number. For e.g., in the expressions

var1=5 
var2= 'Tom'

var1 and var2 are identifiers, while 5 and ‘ Tom’ are integer and string literals, respectively.

Consider a scenario where a variable is referenced by the identifier a and the variable contains a list. If the same variable is referenced by the identifier b as well, and if an element in the list is changed, the change will be reflected in both identifiers of the same variable.

>>> a = [1, 2, 3]
>>> b =a 
>>> b 
[1, 2, 3]
>> a [ 1 ] =10
>>> a
[1, 10, 3]
>>> b
[1, 10, 3]

Now, the above scenario can be modified a bit, where a and b are two different variables.

>>> a= [1,2,3 ]
>>> b=a[:] # Copying data from a to b.
>>> b 
[1, 2, 3]
>>> a [1] =10 
>>> a 
(1, 10, 3]
>>> b
[1, 2, 3]

There are some rules that need to be followed for valid identifier naming:

  • The first character of the identifier must be a letter of the alphabet (uppercase or lowercase) or an underscore (‘_’).
  • The rest of the identifier name can consist of letters (uppercase or lowercase character), underscores (‘_’), or digits (0-9).
  • Identifier names are case-sensitive. For example, myname and myName are not the same.
  • Identifiers can be of unlimited length.

Basics of Python – Variable, Identifier and Literal Read More »

Python Programming – Introduction to Python

In this Page, We are Providing Python Programming – Introduction to Python. Students can visit for more Detail and Explanation of Python Handwritten Notes Pdf.

Python Programming – Introduction to Python

Open-source software

Before stepping into the world of programming using open source tools, one should try to understand the definition of open-source software given by “Open Source Initiative” (abbreviated as OSI). OSI is a non-profit corporation with global scope, formed to educate about and advocate the benefits of open source software, and to build bridges among different constituencies in the open-source community.

Open-source software is a defined as software whose source code is made available under a license that allows modification and re-distribution of the software at will. Sometimes a distinction is made between open source software and free software as given by GNU {http://www.gnu.org/). The detailed distribution terms of open-source software given by OSI are given on the website link: http://opensource. org/.

Python(x,y)

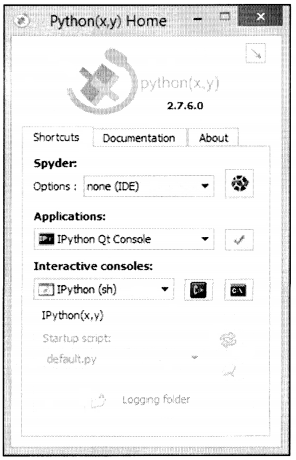
“Python(x,y)” is a free scientific and engineering development software for numerical computations, data analysis, and data visualization based on Python programming language and Spyder interactive development environment, the launcher (current version 2.7.6.0) is shown in figure 1-5. The executable file of Python(x,y) can be downloaded and then installed from the website link: http://code.google.eom/p/pythonxy/. The main features of Python(x,y) are:

  • Bundled with scientific-oriented Python libraries and development environment tools.
  • Extensive documentation of various Python packages.
  • Providing an all-in-one setup program, so that the user can install or uninstall all these packages and features by clicking one button only.

Python Handwritten Notes Chapter 1 img 5

EBNF

A “syntactic metalanguage” is a notation for defining the syntax of a language by the use of a number of rules. A syntactic metalanguage is an important tool of computer science. Since the definition of the programming language “Algol 60”, it has been a custom to define the syntax of a programming language formally. Algol 60 was defined with a notation now known as “Backus-Naur Form” (BNF). This notation has proved a suitable basis for subsequent languages but has frequently been extended or slightly altered.

There are many different notations that are confusing and have prevented the advantages of formal unambiguous definitions from being widely appreciated. “Extended BNF” (abbreviated as EBNF, based on Backus-Naur Form) brings some order to the formal definition of the syntax and is useful not just for the definition of programming languages, but for many other formal definitions. Please refer international standard document (ISO/IEC 14977:1996(E)) for detailed information on EBNF (website link: http://standards.iso.org/ittf/PubliclyAvailobleStandards/).

Python Programming – Introduction to Python Read More »

Python Data Persistence – @Property DGCOrator

Python Data Persistence – @Property DGCOrator

Although a detailed discussion on decorators is beyond the scope of this book, a brief introduction is necessary before we proceed to use @property decorator.

The function is often termed a callable object. A function is also a passable object. Just as we pass a built-in object viz. number, string, list, and so on. as an argument to a function, we can define a function that receives another function as an argument. Moreover, you can have a function defined in another function (nested function), and a function whose return value is a function itself. Because of all these features, a function is called a first-order object.

The decorator function receives a function argument. The behavior of the argument function is then extended by wrapping it in a nested function. Definition of function subjected to decoration is preceded by name of decorator prefixed with @ symbol.
Python-OOP – 113

Example

def adecorator(function): 
def wrapper():
function() 
return wrapper 
@adecorator 
def decorate( ): 
pass

We shall now use the property ( ) function as a decorator and define a name () method acting as a getter method for my name attribute in my class. py code above.

Example

@property 
def name(self):
return self. ___myname
@property 
def age(self):
return self. __myage

A property object’s getter, setter, and deleter methods are also decorators. Overloaded name ( ) and age ( ) methods are decorated with name, setter, and age. setter decorators respectively.

Example

@name.setter
def name(self,name):
self. ___myname=name
@age.setter
def age(self, age):
self. myage=age

When @property decorator is used, separate getter and setter methods defined previously are no longer needed. The complete code of myclass.py is as below:

Example

#myclass. py
class MyClass:
__slots__=['__myname', '__myage']
def__init__(self, name=None, age=None):
self.__myname=name
self.__myage=age

@property
def name(self) :
print ('name getter method')
return self.__myname

@property
def age(self) :
print ('age getter method')
return self. ___myage

@name.setter
def name(self,name):
print ('name setter method')
self.___myname=name

@age.setter
def age(self, age):
print ('age setter method')
self.__myage=age

def about(self):
print ('My name is { } and I am { } years old'.format(self. myname,self. myage))

Just import above class and test the functionality of property objects using decorators.

Example

>>> from myclass import MyClass
>>> obj1=MyClass('Ashok', 21)
>>> obj1.about() #initial values of object's attributes
My name is Ashok and I, am 21 years old
>>> #change age property
>>> obj1.age=30
age setter method
>>> #access name property
>>> obj1.name
name getter method
'Ashok'
> > > obj1.about()
My name is Ashok and I am 30 years old


Python Data Persistence – @Property DGCOrator Read More »