Bahija Siddiqui

Python : How to find keys by value in dictionary ?

In this article, we will see how to find all the keys associated with a single value or multiple values.

For instance, we have a dictionary of words.

dictOfWords = {"hello": 56,
"at" : 23 ,
"test" : 43,
"this" : 97,
"here" : 43,
"now" : 97
}

Now, we want all the keys in the dictionary having value 43, which means “here” and “test”.

Let’s see how to get it.

Find keys by value in the dictionary

Dict.items() is the module that returns all the key-value pairs in a dictionary. So, what we will do is check whether the condition is satisfied by iterating over the sequence. If the value is the same then we will add the key in a separate list.

def getKeysByValue(dictOfElements, valueToFind):
 listOfKeys = list()
listOfItems = dictOfElements.items()
for item in listOfitems:
if item[1] == valueToFind:
 listOfKeys.append(item[0])
return listOfKeys
We will use this function to get the keys by value 43.
listOfKeys = getKeysByValue(dictOfWords, 43)
print("Keys with value equal to 43")
#Iterate over the list of keys
for key in listOfKeys:
print(key)

Find keys by value in dictionary

We can achieve the same thing with a list comprehension.

listOfKeys = [key for (key, value) in dictOfWords.items() if value == 43]

Find keys in the dictionary by value list

Now, we want to find the keys in the dictionary whose values matches with the value we will give.

[43, 97]

We will do the same thing as we have done above but this time we will iterate the sequence and check whether the value matches with the given value.

def getKeysByValues(dictOfElements, listOfValues):
listOfKeys = list()
listOfItems = dictOfElements.items()
for item in listOfItems:
if item[1] in listOfValues:
 listOfKeys.append(item[0])
return listOfKeys

We will use the above function:

listOfKeys = getKeysByValues(dictOfWords, [43, 97] )
#Iterate over the list of values
for key in listOfKeys:
print(key)

Find keys in dictionary by value list

Complete Code:

'''Get a list of keys from dictionary which has the given value'''
def getKeysByValue(dictOfElements, valueToFind):
listOfKeys = list()
listOfItems = dictOfElements.items()
for item in listOfItems:
if item[1] == valueToFind:
listOfKeys.append(item[0])
return listOfKeys
'''
Get a list of keys from dictionary which has value that matches with any value in given list of values
'''
def getKeysByValues(dictOfElements, listOfValues):
listOfKeys = list()
listOfItems = dictOfElements.items()
for item in listOfItems:
if item[1] in listOfValues:
listOfKeys.append(item[0])
return listOfKeys
def main():
# Dictionary of strings and int
dictOfWords = {
"hello": 56,
"at" : 23 ,
"test" : 43,
"this" : 97,
"here" : 43,
"now" : 97}
print("Original Dictionary")
print(dictOfWords)
'''
Get list of keys with value 43
'''
listOfKeys = getKeysByValue(dictOfWords, 43)
print("Keys with value equal to 43")
#Iterate over the list of keys
for key in listOfKeys:
print(key)
print("Keys with value equal to 43")
'''
Get list of keys with value 43 using list comprehension
'''
listOfKeys = [key for (key, value) in dictOfWords.items() if value == 43]
#Iterate over the list of keys
for key in listOfKeys:
print(key)
print("Keys with value equal to any one from the list [43, 97] ")
'''
Get list of keys with any of the given values
'''
listOfKeys = getKeysByValues(dictOfWords, [43, 97] )
#Iterate over the list of values
for key in listOfKeys:
print(key)
if __name__ == '__main__':
main()


Hope this article was useful for you.

Enjoy Reading!

numpy.where() – Explained with examples

In this article, we will see various examples of numpy.where() function and how it works in python. For instance, like,

  • Using numpy.where() with single condition.
  • Using numpy.where() with multiple condition
  • Use numpy.where() to select indexes of elements that satisfy multiple conditions
  • Using numpy.where() without condition expression

In Python’s NumPy module, we can select elements with two different sequences based on conditions on the different array.

Syntax of np.where()

numpy.where(condition[, x, y])

Explanation:

  • The condition returns a NumPy array of bool.
  • X and Y are the arrays that are optional, which means either both are passed or not passed.
    • If it is passed then it returns the elements from x and y based on the condition depending on values in the bool array.
    • If x & y arguments are not passed and only condition argument is passed then it returns the indices of the elements that are True in bool numpy array.

Let’s dig in to see some examples.

Using numpy.where() with single condition

Let’s say we have two lists of the same size and a NumPy array.

arr = np.array([11, 12, 13, 14])
high_values = ['High', 'High', 'High', 'High']
low_values = ['Low', 'Low', 'Low', 'Low']

Now, we want to convert this numpy array to the array of the same size, where the values will be included from the list high_values and low_values. For instance, if the value in an array is less than 12, then replace it with the ‘low‘ and if the value in array arr is greater than 12 then replace it with the value ‘high‘.

So ultimately, the array will look like this:

['Low' 'Low' 'High' 'High']

We can also do this with for loops, but this numpy module is designed to carry out tasks like this only.

We will use numpy.where() to see the results.

arr = np.array([11, 12, 13, 14])
high_values = ['High', 'High', 'High', 'High']
low_values = ['Low', 'Low', 'Low', 'Low']
# numpy where() with condition argument
result = np.where(arr > 12,['High', 'High', 'High', 'High'],['Low', 'Low', 'Low', 'Low'])
print(result)

Using numpy.where() with single condition

We have converted the two arrays in a single array by using the where function like evaluating based on conditions of less than 12 and greater than 12.

The first value came out low because the value in the array arr is smaller than 12. Similarly, the last values returned are high because the value in array arr is greater than 12.

Let’s see how it worked.

Numpy.where() contains three arguments.

The first argument is the numpy array which got converted to a bool array.

arr > 12 ==> [False False True True]

Then numpy.where() iterated over the bool array and for every True, it yields corresponding element from list 1 i.e. high_values and for every False, it yields corresponding element from 2nd list i.e. low_values i.e.

[False False True True] ==> [‘Low’, ‘Low’, ‘High’, ‘High’]

This is how we created a new array from the older arrays.

Using numpy.where() with multiple conditions

In the above example, we have used single conditions. Here we will see the example with multiple conditions.

arr = np.array([11, 12, 14, 15, 16, 17])
# pass condition expression only
result = np.where((arr > 12) & (arr < 16),['A', 'A', 'A', 'A', 'A', 'A'],['B', 'B', 'B', 'B', 'B', 'B'])
print(result)

Using numpy.where() with multiple conditions

We executed multiple conditions on the array arr and it returned a bool value. Then numpy.where() iterated over the bool array and for every True it yields corresponding element from the first list and for every False it yields the corresponding element from the 2nd list. Then constructs a new array by the values selected from both the lists based on the result of multiple conditions on numpy array arr i.e.

  • Conditional expression returns true for 14 and 15 values, so they are replaced by values in list1.
  • Conditional expression returns False for 11,12,16, and 17, so they are replaced by values in list2.

Now, we will pass the different values and see what the array returns.

arr = np.array([11, 12, 14, 15, 16, 17])
# pass condition expression only
result = np.where((arr > 12) & (arr < 16),['A', 'B', 'C', 'D', 'E', 'F'],[1, 2, 3, 4, 5, 6])

Different values

Use np.where() to select indexes of elements that satisfy multiple conditions

We will take a new NumPy array:

arr = np.array([11, 12, 13, 14, 15, 16, 17, 15, 11, 12, 14, 15, 16, 17])

Now, we will give a condition and find the indexes of elements that satisfy that condition that is an element should be greater than 12 and less than 16. For this, we will use numpy.where(),

arr = np.array([11, 12, 13, 14, 15, 16, 17, 15, 11, 12, 14, 15, 16, 17])
# pass condition expression only
result = np.where((arr > 12) & (arr < 16))
print(result)

Use np.where() to select indexes of elements that satisfy multiple conditions

A tuple containing an array of indexes is returned where the conditions met True in the original array.

How did it work?

Here, the condition expression is evaluated to a bool numpy array, numpy.where() is passed to it. Then where() returned a tuple of arrays for each dimension. As our array was one dimension only, so it contained an element only i.e. a new array containing the indices of elements where the value was True in bool array i.e. indexes of items from original array arr where value is between 12 & 16.

Using np.where() without any condition expression

In this case, we will directly pass the bool array as a conditional expression.

result = np.where([True, False, False],[1, 2, 4],[7, 8, 9])
print(result)

Using np.where() without any condition expression

The True value is yielded from the first list and the False value is yielded from the second list when numpy.where()  iterates over the bool value.

So, basically, it returns an array of elements from the first list where the condition is True and elements from a second list elsewhere.

In the conclusion, we hope that you understood this article well.

Pandas: Apply a function to single or selected columns or rows in Dataframe

In this article, we will be applying given function to selected rows and column.

For example, we have a dataframe object,

matrix = [(22, 34, 23),
(33, 31, 11),
(44, 16, 21),
(55, 32, 22),
(66, 33, 27),
(77, 35, 11)
]
# Create a DataFrame object
dfObj = pd.DataFrame(matrix, columns=list('xyz'), index=list('abcdef'))
Contents of this dataframe object dgObj are,
Original Dataframe
    x    y   z
a 22 34 23
b 33 31 11
c 44 16 21
d 55 32 22
e 66 33 27
f 77 35 11

Now what if we want to apply different functions on all the elements of a single or multiple column or rows. Like,

  • Multiply all the values in column ‘x’ by 2
  • Multiply all the values in row ‘c’ by 10
  • Add 10 in all the values in column ‘y’ & ‘z’

We will use different techniques to see how we can do this.

Apply a function to a single column in Dataframe

What if we want to square all the values in any of the column for example x,y or z.

We can do such things by applying different methods. We will discuss few methods below:

Method 1: Using Dataframe.apply()

We will apply lambda function to all the columns using the above method. And then we will check if column name is whatever we want say x,y or z inside the lambda function. After this, we will square all the values. In this we will be taking z column.

dataframe.apply()

Code:

modDfObj = dfObj.apply(lambda x: np.square(x) if x.name == 'z' else x)
print("Modified Dataframe : Squared the values in column 'z'", modDfObj, sep='\n')
Output:
Modified Dataframe : Squared the values in column 'z'
 x y z
a 22 34 529
b 33 31 121
c 44 16 441
d 55 32 484
e 66 33 729
f 77 35 121

Method 2: Using [] operator

Using [] operator we will select the column from dataframe and apply numpy.square() method. Later, we will assign it back to the column.

dfObj['z'] = dfObj['z'].apply(np.square)

It will square all the values in column ‘z’.

Method 3: Using numpy.square()

dfObj['z'] = np.square(dfObj['z'])

This function will also square all the values in ‘z’.

Apply a function to a single row in Dataframe

Now, we saw what we have done with the columns. Same thing goes with rows. We will square all the values in row ‘b’. We can use different methods for that.

Method 1:Using Dataframe.apply()

We will apply lambda function to all the rows and will use the above function. We will check the label inside the lambda function and will square the row.

apply method on rows

Code:

modDfObj = dfObj.apply(lambda x: np.square(x) if x.name == 'b' else x, axis=1)
print("Modified Dataframe : Squared the values in row 'b'", modDfObj, sep='\n')

Output:

Modified Dataframe : Squared the values in row 'b'
 x y z
a 22 34 23
b 1089 961 121
c 44 16 21
d 55 32 22
e 66 33 27
f 77 35 11

Method 2 : Using [] Operator

We will do what we have done above. We will select the row from dataframe.loc[] operator and apply numpy.square() method on it. Later, we will assign it back to the row.

dfObj.loc['b'] = dfObj.loc['b'].apply(np.square)

It will square all the values in the row ‘b’.

Method 3 : Using numpy.square()

dfObj.loc['b'] = np.square(dfObj.loc['b'])

This will also square the values in row ‘b’.

Apply a function to a certain columns in Dataframe

We can apply the function in whichever column we want. For instance, squaring the values in ‘x’ and ‘y’.

function to a certain columns in Dataframe

Code:

modDfObj = dfObj.apply(lambda x: np.square(x) if x.name in ['x', 'y'] else x)
print("Modified Dataframe : Squared the values in column x & y :", modDfObj, sep='\n')
All we have to do is modify the if condition in lambda function and square the values with the name of the variables.

Apply a function to a certain rows in Dataframe

We can apply the function to specified row. For instance, row ‘b’ and ‘c’.

function to a certain rows in Dataframe

Code:

modDfObj = dfObj.apply(lambda x: np.square(x) if x.name in ['b', 'c'] else x, axis=1)
print("Modified Dataframe : Squared the values in row b & c :", modDfObj, sep='\n')

The complete code is:

import pandas as pd
import numpy as np
def main():
 # List of Tuples
 matrix = [(22, 34, 23),
(33, 31, 11),
(44, 16, 21),
(55, 32, 22),
(66, 33, 27),
(77, 35, 11)]
# Create a DataFrame object
 dfObj = pd.DataFrame(matrix, columns=list('xyz'), index=list('abcdef'))
print("Original Dataframe", dfObj, sep='\n')
print('********* Apply a function to a single row or column in DataFrame ********')
print('*** Apply a function to a single column *** ')
 # Method 1:
 # Apply function numpy.square() to square the value one column only i.e. with column name 'z'
 modDfObj = dfObj.apply(lambda x: np.square(x) if x.name == 'z' else x)
print("Modified Dataframe : Squared the values in column 'z'", modDfObj, sep='\n')
 # Method 2
 # Apply a function to one column and assign it back to the column in dataframe
dfObj['z'] = dfObj['z'].apply(np.square)
 # Method 3:
 # Apply a function to one column and assign it back to the column in dataframe
 dfObj['z'] = np.square(dfObj['z']
print('*** Apply a function to a single row *** ')
 dfObj = pd.DataFrame(matrix, columns=list('xyz'), index=list('abcdef'))
 # Method 1:
 # Apply function numpy.square() to square the values of one row only i.e. row with index name 'b'
 modDfObj = dfObj.apply(lambda x: np.square(x) if x.name == 'b' else x, axis=1)
print("Modified Dataframe : Squared the values in row 'b'", modDfObj, sep='\n')
 # Method 2:
 # Apply a function to one row and assign it back to the row in dataframe
 dfObj.loc['b'] = dfObj.loc['b'].apply(np.square)
 # Method 3:
 # Apply a function to one row and assign it back to the column in dataframe
dfObj.loc['b'] = np.square(dfObj.loc['b'])
print('********* Apply a function to certains row or column in DataFrame ********')
dfObj = pd.DataFrame(matrix, columns=list('xyz'), index=list('abcdef'))
print('Apply a function to certain columns only')
# Apply function numpy.square() to square the value 2 column only i.e. with column names 'x' and 'y' only
modDfObj = dfObj.apply(lambda x: np.square(x) if x.name in ['x', 'y'] else x)
print("Modified Dataframe : Squared the values in column x & y :", modDfObj, sep='\n')
print('Apply a function to certain rows only') # 
Apply function numpy.square() to square the values of 2 rows only i.e. with row index name 'b' and 'c' only
 modDfObj = dfObj.apply(lambda x: np.square(x) if x.name in ['b', 'c'] else x, axis=1)
print("Modified Dataframe : Squared the values in row b & c :", modDfObj, sep='\n')
if __name__ == '__main__':
main()
Output:
Original Dataframe
x y z
a 22 34 23
b 33 31 11
c 44 16 21
d 55 32 22
e 66 33 27
f 77 35 11
********* Apply a function to a single row or column in DataFrame ********
*** Apply a function to a single column *** 
Modified Dataframe : Squared the values in column 'z'
 x y z
a 22 34 529
b 33 31 121
c 44 16 441
d 55 32 484
e 66 33 729
f 77 35 121
*** Apply a function to a single row *** 
Modified Dataframe : Squared the values in row 'b'
 x y z
a 22 34 23
b 1089 961 121
c 44 16 21
d 55 32 22
e 66 33 27
f 77 35 11
********* Apply a function to certains row or column in DataFrame ********
Apply a function to certain columns only
Modified Dataframe : Squared the values in column x & y :
 x y z
a 484 1156 23
b 1089 961 11
c 1936 256 21
d 3025 1024 22
e 4356 1089 27
f 5929 1225 11
Apply a function to certain rows only
Modified Dataframe : Squared the values in row b & c :
 x y z
a 22 34 23
b 1089 961 121
c 1936 256 441
d 55 32 22
e 66 33 27
f 77 35 11

I hope you understood this article well.

Want to expert in the python programming language? Exploring Python Data Analysis using Pandas tutorial changes your knowledge from basic to advance level in python concepts.

Read more Articles on Python Data Analysis Using Padas – Modify a Dataframe

How to get Numpy Array Dimensions using numpy.ndarray.shape & numpy.ndarray.size() in Python

In this article, we will be discussing how to count several elements in 1D, 2D, and 3D Numpy array. Moreover, we will be discussing the counting of rows and columns in a 2D array and the number of elements per axis in a 3D Numpy array.

Let’s get started!

Get the Dimensions of a Numpy array using ndarray.shape()

NumPy.ndarray.shape

This module is used to get a current shape of an array, but it is also used to reshaping the array in place by assigning a tuple of arrays dimensions to it. The function is:

ndarray.shape

We will use this function for determining the dimensions of the 1D and 2D array.

Get Dimensions of a 2D NumPy array using ndarray.shape:

Let us start with a 2D Numpy array.

2D Numpy Array

Code:
arr2D = np.array([[11 ,12,13,11], [21, 22, 23, 24], [31,32,33,34]])
print(‘2D Numpy Array’)
print(arr2D)
Output:
2D Numpy Array 
[[11 12 13 11] 
[21 22 23 24] 
[31 32 33 34]]

Get the number of rows in this 2D NumPy array:

number of rows in this 2D numpy array

Code:

numOfRows = arr2D.shape[0]
print('Number of Rows : ', numOfRows)
Output:
Number of Rows : 3

Get a number of columns in this 2D NumPy array:

number of columns in this 2D numpy array

Code:

numOfColumns = arr2D.shape[1]
print('Number of Columns : ', numOfColumns)
Output:
Number of Columns: 4

Get the total number of elements in this 2D NumPy array:

total number of elements in this 2D numpy array

Code:

print('Total Number of elements in 2D Numpy array : ', arr2D.shape[0] * arr2D.shape[1])
Output:

Total Number of elements in 2D Numpy array: 12

Get Dimensions of a 1D NumPy array using ndarray.shape

Now, we will work on a 1D NumPy array.

number of elements of this 1D numpy array

Code:

arr = np.array([4, 5, 6, 7, 8, 9, 10, 11])
print(‘Shape of 1D numpy array : ‘, arr.shape)
print(‘length of 1D numpy array : ‘, arr.shape[0])
Output:
Shape of 1D numpy array : (8,)
length of 1D numpy array : 8

Get the Dimensions of a Numpy array using NumPy.shape()

Now, we will see the module which provides a function to get the number of elements in a Numpy array along the axis.

numpy.size(arr, axis=None)

We will use this module for getting the dimensions of a 2D and 1D Numpy array.

Get Dimensions of a 2D numpy array using numpy.size()

We will begin with a 2D Numpy array.

Dimensions of a 2D numpy array using numpy.size

Code:

arr2D = np.array([[11 ,12,13,11], [21, 22, 23, 24], [31,32,33,34]])
print('2D Numpy Array')
print(arr2D)

Output:

2D Numpy Array
[[11 12 13 11]
[21 22 23 24]
[31 32 33 34]]

Get a number of rows and columns of this 2D NumPy array:

number of rows and columns of this 2D numpy array

Code:

numOfRows = np.size(arr2D, 0)
# get number of columns in 2D numpy array
numOfColumns = np.size(arr2D, 1)
print('Number of Rows : ', numOfRows)
print('Number of Columns : ', numOfColumns)
Output:
Number of Rows : 3
Number of Columns: 4

Get a total number of elements in this 2D NumPy array:

 total number of elements in this 2D numpy array

Code:

print('Total Number of elements in 2D Numpy array : ', np.size(arr2D))

Output:

Total Number of elements in 2D Numpy array: 12

Get Dimensions of a 3D NumPy array using numpy.size()

Now, we will be working on the 3D Numpy array.

3D Numpy array

Code:

arr3D = np.array([ [[11, 12, 13, 11], [21, 22, 23, 24], [31, 32, 33, 34]],
[[1, 1, 1, 1], [2, 2, 2, 2], [3, 3, 3, 3]] ])
print(arr3D)
Output:
[[[11 12 13 11]
[21 22 23 24]
[31 32 33 34]]
[[ 1 1 1 1]
[ 2 2 2 2]
[ 3 3 3 3]]]

Get a number of elements per axis in 3D NumPy array:

number of elements per axis in 3D numpy array

Code:

print('Axis 0 size : ', np.size(arr3D, 0))
print('Axis 1 size : ', np.size(arr3D, 1))
print('Axis 2 size : ', np.size(arr3D, 2))

Output:

Axis 0 size : 2
Axis 1 size : 3
Axis 2 size : 4

Get the total number of elements in this 3D NumPy array:

total number of elements in this 3D numpy array

Code:

print(‘Total Number of elements in 3D Numpy array : ‘, np.size(arr3D))

Output:

Total Number of elements in 3D Numpy array : 24

Get Dimensions of a 1D NumPy array using numpy.size()

Let us create a 1D array.

Dimensions of a 1D numpy array using numpy.size()

Code:

arr = np.array([4, 5, 6, 7, 8, 9, 10, 11])
print('Length of 1D numpy array : ', np.size(arr))

Output:

Length of 1D numpy array : 8
A complete example is as follows:
import numpy as np
def main():
print('**** Get Dimensions of a 2D numpy array using ndarray.shape ****')
# Create a 2D Numpy array list of list
 arr2D = np.array([[11 ,12,13,11], [21, 22, 23, 24], [31,32,33,34]])
print('2D Numpy Array')
print(arr2D)
 # get number of rows in 2D numpy array
 numOfRows = arr2D.shape[0]
 # get number of columns in 2D numpy array
 numOfColumns = arr2D.shape[1]
print('Number of Rows : ', numOfRows)
print('Number of Columns : ', numOfColumns)
print('Total Number of elements in 2D Numpy array : ', arr2D.shape[0] * arr2D.shape[1])
print('**** Get Dimensions of a 1D numpy array using ndarray.shape ****')
 # Create a Numpy array from list of numbers
arr = np.array([4, 5, 6, 7, 8, 9, 10, 11])
print('Original Array : ', arr)
print('Shape of 1D numpy array : ', arr.shape)
print('length of 1D numpy array : ', arr.shape[0])
print('**** Get Dimensions of a 2D numpy array using np.size() ****')
 # Create a 2D Numpy array list of list
 arr2D = np.array([[11, 12, 13, 11], [21, 22, 23, 24], [31, 32, 33, 34]])
print('2D Numpy Array')
print(arr2D)
 # get number of rows in 2D numpy array
 numOfRows = np.size(arr2D, 0)
 # get number of columns in 2D numpy array
 numOfColumns = np.size(arr2D, 1)
print('Number of Rows : ', numOfRows)
print('Number of Columns : ', numOfColumns)
print('Total Number of elements in 2D Numpy array : ', np.size(arr2D))
print('**** Get Dimensions of a 3D numpy array using np.size() ****')
 # Create a 3D Numpy array list of list of list
 arr3D = np.array([ [[11, 12, 13, 11], [21, 22, 23, 24], [31, 32, 33, 34]],
[[1, 1, 1, 1], [2, 2, 2, 2], [3, 3, 3, 3]] ])
print('3D Numpy Array')
print(arr3D)
print('Axis 0 size : ', np.size(arr3D, 0))
print('Axis 1 size : ', np.size(arr3D, 1))
print('Axis 2 size : ', np.size(arr3D, 2))
print('Total Number of elements in 3D Numpy array : ', np.size(arr3D))
print('Dimension by axis : ', arr3D.shape)
print('**** Get Dimensions of a 1D numpy array using numpy.size() ****')
 # Create a Numpy array from list of numbers
arr = np.array([4, 5, 6, 7, 8, 9, 10, 11])
print('Original Array : ', arr)
print('Length of 1D numpy array : ', np.size(arr))
if __name__ == '__main__':
main()
Output:
**** Get Dimensions of a 2D numpy array using ndarray.shape ****
2D Numpy Array
[[11 12 13 11]
[21 22 23 24]
[31 32 33 34]]
Number of Rows : 3
Number of Columns : 4
Total Number of elements in 2D Numpy array : 12
**** Get Dimensions of a 1D numpy array using ndarray.shape ****
Original Array : [ 4 5 6 7 8 9 10 11]
Shape of 1D numpy array : (8,)
length of 1D numpy array : 8
**** Get Dimensions of a 2D numpy array using np.size() ****
2D Numpy Array
[[11 12 13 11]
[21 22 23 24]
[31 32 33 34]]
Number of Rows : 3
Number of Columns : 4
Total Number of elements in 2D Numpy array : 12
**** Get Dimensions of a 3D numpy array using np.size() ****
3D Numpy Array
[[[11 12 13 11]
[21 22 23 24]
[31 32 33 34]]
[[ 1 1 1 1]
[ 2 2 2 2]
[ 3 3 3 3]]]
Axis 0 size : 2
Axis 1 size : 3
Axis 2 size : 4
Total Number of elements in 3D Numpy array : 24
Dimension by axis : (2, 3, 4)
**** Get Dimensions of a 1D numpy array using numpy.size() ****
Original Array : [ 4 5 6 7 8 9 10 11]
Length of 1D numpy array : 8

I hope you understood this article well.

Web crawling and scraping in Python

In this article, we will be checking up few things:

  • Basic crawling setup In Python
  • Basic crawling with AsyncIO
  • Scraper Util service
  • Python scraping via Scrapy framework

Web Crawler

A web crawler is an automatic bot that extracts useful information by systematically browsing the world wide web.

The web crawler is also known as a spider or spider bot. Some websites use web crawling for updating their web content. Some websites do not allow crawling because of their security, so on that websites crawler works by either asking for permission or exiting out of the website.
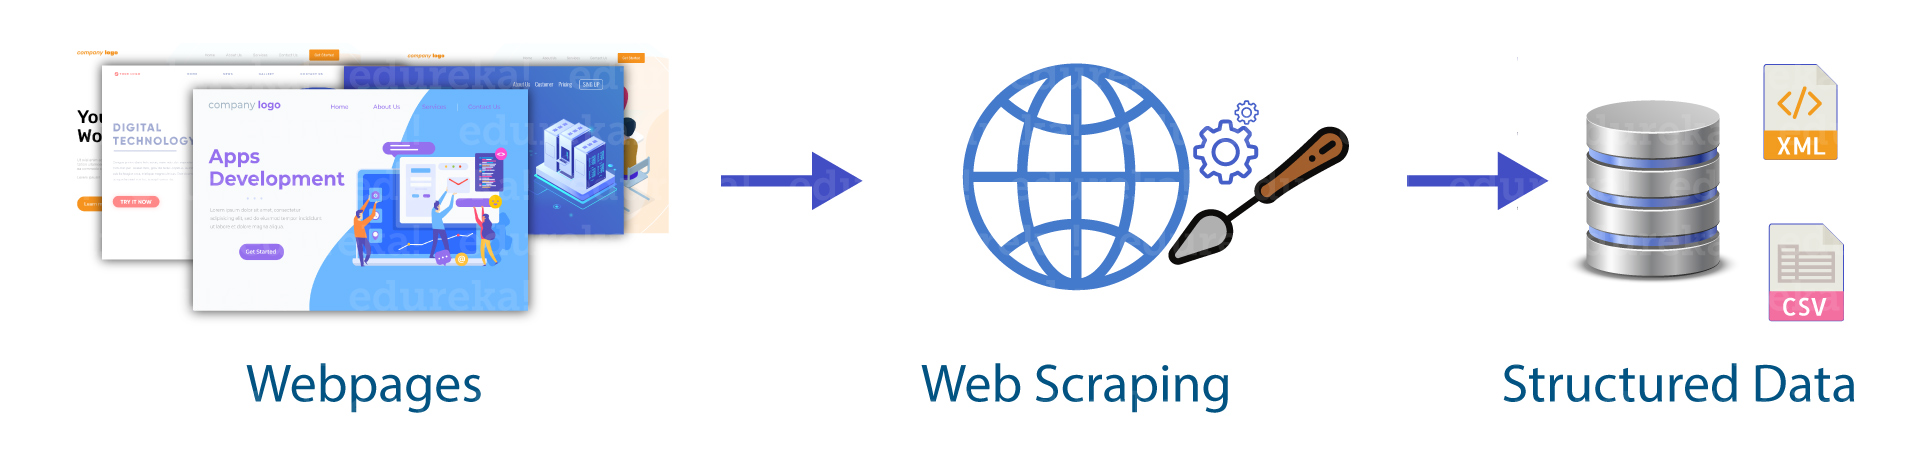
Web Crawler

Web Scraping

Extracting the data from the websites is known as web scraping. Web scraping requires two parts crawler and scraper.

Crawler is known to be an artificial intelligence algorithm and it browses the web which leads to searching of the links we want to crawl across the internet.

Scraper is the tool that was specifically used for extracting information from the internet.

By web scraping, we can obtain a large amount of data which is in unstructured data in an HTML format and then it is converted into structured data.

Web Scraping

Crawler Demo

Mainly, we have been using two tools:

Task I

Scrap recurship website is used for extracting all the links and images present on the page.

Demo Code:

Import requests

from parsel import Selector

import time

start = time.time()

response = requests.get('http://recurship.com/')

selector  = Selector(response.text)

href_links = selector.xpath('//a/@href').getall()

image_links = selector.xpath('//img/@src').getall()

print("********************href_links****************")

print(href_links)

print("******************image_links****************")

print(image_links)

end = time.time()

print("Time taken in seconds:", (end_start)


Task II

Scrap recurship site and extract links, one of one navigate to each link and extract information of the images.

Demo code:

import requests
from parsel import Selector

import time
start = time.time()


all_images = {} 
response = requests.get('http://recurship.com/')
selector = Selector(response.text)
href_links = selector.xpath('//a/@href').getall()
image_links = selector.xpath('//img/@src').getall()

for link in href_links:
try:
response = requests.get(link)
if response.status_code == 200:
image_links = selector.xpath('//img/@src').getall()
all_images[link] = image_links
except Exception as exp:
print('Error navigating to link : ', link)

print(all_images)
end = time.time()
print("Time taken in seconds : ", (end-start))


Task II takes 22 seconds to complete. We are constantly using the python parsel” and request” package.

Let’s see some features these packages use.

Request package:

Parsel package


Crawler service using Request and Parsel

The code:

import requests
import time
import random
from urllib.parse import urlparse
import logging

logger = logging.getLogger(__name__)

LOG_PREFIX = 'RequestManager:'


class RequestManager:
def __init__(self):
self.set_user_agents(); # This is to keep user-agent same throught out one request

crawler_name = None
session = requests.session()
# This is for agent spoofing...
user_agents = [
'Mozilla/5.0 (Windows NT 10.0; Win64; x64) AppleWebKit/537.36 (KHTML, like Gecko) Chrome/42.0.2311.135 Safari/537.36 Edge/12.246',
'Mozilla/4.0 (X11; Linux x86_64) AppleWebKit/567.36 (KHTML, like Gecko) Chrome/62.0.3239.108 Safari/537.36',
'Mozilla/5.0 (Macintosh; Intel Mac OS X 10_11_2) AppleWebKit/601.3.9 (KHTML, like Gecko) Version/9.0.2 Safari/601.3.9',
'Mozilla/5.0 (Windows NT 6.1; WOW64) AppleWebKit/537.36 (KHTML, like Gecko'
]

headers = {}

cookie = None
debug = True

def file_name(self, context: RequestContext, response, request_type: str = 'GET'):
url = urlparse(response.url).path.replace("/", "|")
return f'{time.time()}_{context.get("key")}_{context.get("category")}_{request_type}_{response.status_code}_{url}'

# write a file, safely
def write(self, name, text):
if self.debug:
file = open(f'logs/{name}.html', 'w')
file.write(text)
file.close()

def set_user_agents(self):
self.headers.update({
'user-agent': random.choice(self.user_agents)
})

def set_headers(self, headers):
logger.info(f'{LOG_PREFIX}:SETHEADER set headers {self.headers}')
self.session.headers.update(headers)

def get(self, url: str, withCookie: bool = False, context):
logger.info(f'{LOG_PREFIX}-{self.crawler_name}:GET making get request {url} {context} {withCookie}')
cookies = self.cookie if withCookie else None
response = self.session.get(url=url, cookies=cookies, headers=self.headers)
self.write(self.file_name(context, response), response.text)
return response

def post(self, url: str, data, withCookie: bool = False, allow_redirects=True, context: RequestContext = {}):
logger.info(f'{LOG_PREFIX}:POST making post request {url} {data} {context} {withCookie}')
cookies = self.cookie if withCookie else None
response = self.session.post(url=url, data=data, cookies=cookies, allow_redirects=allow_redirects)
self.write(self.file_name(context, response, request_type='POST'), response.text)
return response

def set_cookie(self, cookie):
self.cookie = cookie
logger.info(f'{LOG_PREFIX}-{self.crawler_name}:SET_COOKIE set cookie {self.cookie}')

Request = RequestManager()

context = {
"key": "demo",
"category": "history"
}
START_URI = "DUMMY_URL" # URL OF SIGNUP PORTAL
LOGIN_API = "DUMMY_LOGIN_API"
response = Request.get(url=START_URI, context=context)

Request.set_cookie('SOME_DUMMY_COOKIE')
Request.set_headers('DUMMY_HEADERS')

response = Request.post(url=LOGIN_API, data = {'username': '', 'passphrase': ''}, context=context)


Class “RequestManager” offers few functionalities listed below:

Scraping with AsyncIO

All we have to do is scrap the Recurship site and extract all the links, later we navigate each link asynchronously and extract information from the images.

Demo code

import requests
import aiohttp
import asyncio
from parsel import Selector
import time

start = time.time()
all_images = {} # website links as "keys" and images link as "values"

async def fetch(session, url):
try:
async with session.get(url) as response:
return await response.text()
except Exception as exp:
return '<html> <html>' #empty html for invalid uri case

async def main(urls):
tasks = []
async with aiohttp.ClientSession() as session:
for url in urls:
tasks.append(fetch(session, url))
htmls = await asyncio.gather(*tasks)
for index, html in enumerate(htmls):
selector = Selector(html)
image_links = selector.xpath('//img/@src').getall()
all_images[urls[index]] = image_links
print('*** all images : ', all_images)


response = requests.get('http://recurship.com/')
selector = Selector(response.text)
href_links = selector.xpath('//a/@href').getall()
loop = asyncio.get_event_loop()
loop.run_until_complete(main(href_links))


print ("All done !")
end = time.time()
print("Time taken in seconds : ", (end-start))

By AsyncIO, scraping took almost 21 seconds. We can achieve more good performance with this task.

Open-Source Python Frameworks for spiders

Python has multiple frameworks which take care of the optimization

It gives us different patterns. There are three popular frameworks, namely:

  1. Scrapy
  2. PySpider
  3. Mechanical soup

Let’s use Scrapy for further demo.

Scrapy

Scrapy is a framework used for scraping and is supported by an active community. We can build our own scraping tools.

There are few features which scrapy provides:

Now we have to do is scrap the Recurship site and extract all the links, later we navigate each link asynchronously and extract information from the images.

Demo Code

import scrapy


class AuthorSpider(scrapy.Spider):
name = 'Links'

start_urls = ['http://recurship.com/']
images_data = {}
def parse(self, response):
# follow links to author pages
for img in response.css('a::attr(href)'):
yield response.follow(img, self.parse_images)

# Below commented portion is for following all pages
# follow pagination links
# for href in response.css('a::attr(href)'):
# yield response.follow(href, self.parse)

def parse_images(self, response):
#print "URL: " + response.request.url
def extract_with_css(query):
return response.css(query).extract()
yield {
'URL': response.request.url,
'image_link': extract_with_css('img::attr(src)')
}

Commands

scrapy run spider -o output.json spider.py

The JSON file got export in 1 second.

Conclusion

We can see that the scrapy performed an excellent job. If we have to perform simple crawling, scrapy will give the best results.

Enjoy scraping!!


Automation of Whatsapp Messages to unknown Users using selenium and Python

Nowadays, we have to send messages to multiple users for either personal reasons or for commercial as well as business reasons. 

How amazing it will be if we don’t have to send messages again and again typing the same thing to more than 100 contacts. It will be hectic and boring.
In this article, we will be making a WhatsApp bot that will automate the messages and send the messages to multiple users at the same time without you typing it again and again.

This Bot will make your work easy and will be less time-consuming.

Let’s get ready to make an automation bot!

Importing the modules:

To make this automation Bot, we have to import some modules.

Firstly, we have to import selenium and python as a basic step.

To import selenium type the following command in your terminal:

python -m pip install selenium

Now we have to install WebDriver.

For doing so, go on geckodriver releases page and find the latest version suitable for your desktop.

Extract the file and copy the path and write it in your code.

Let’s get started with the code!

Working on the code:

The first and foremost task is to import the selenium modules which will be used in the code.

from selenium import webdriver
from csv import reader
import time