Bahija Siddiqui

Python: Read a CSV file line by line with or without header

In this article, we will be learning about how to read a CSV file line by line with or without a header. Along with that, we will be learning how to select a specified column while iterating over a file.

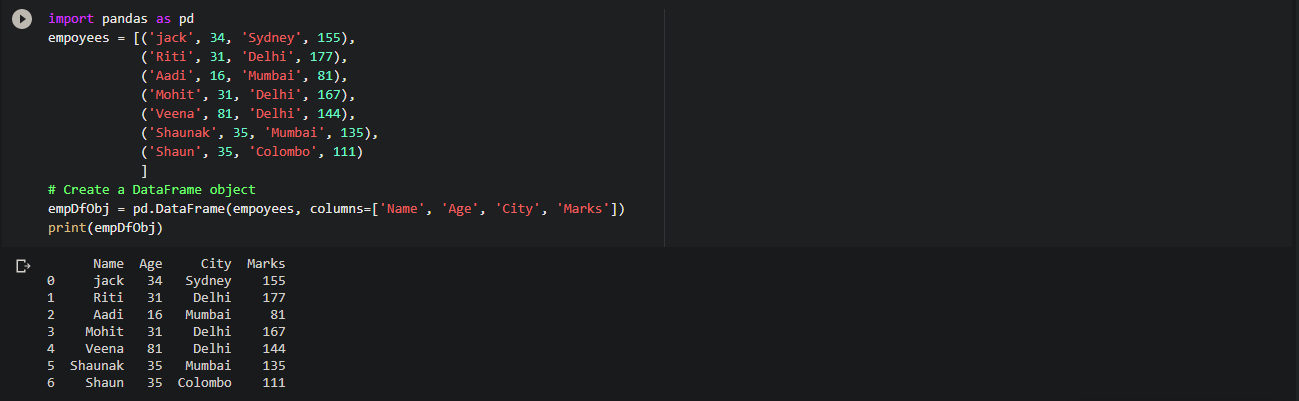
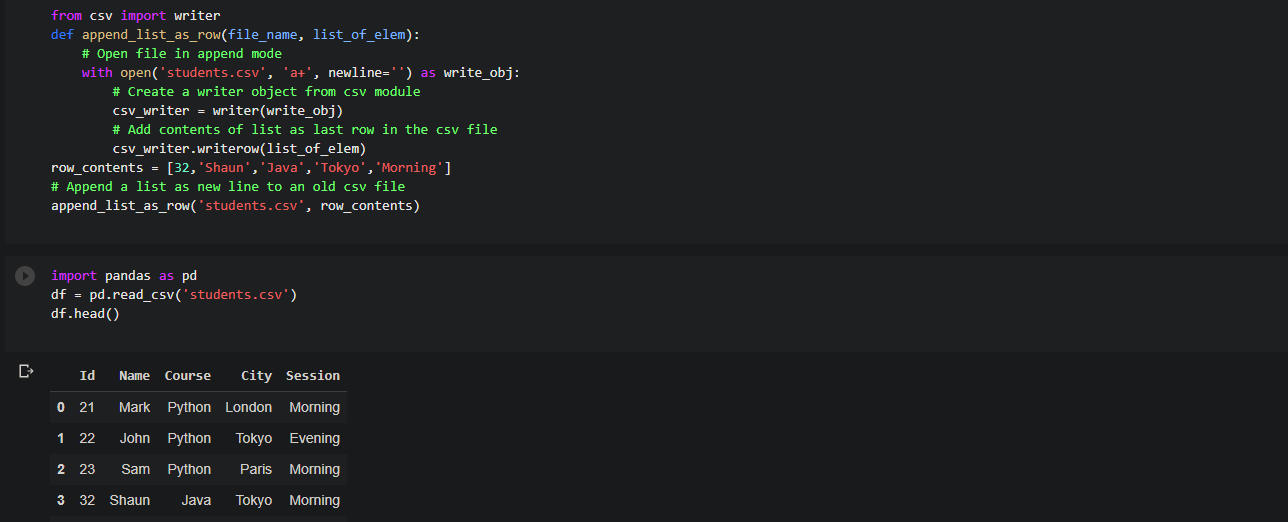
Let us take an example where we have a file named students.csv.

Id,Name,Course,City,Session
21,Mark,Python,London,Morning
22,John,Python,Tokyo,Evening
23,Sam,Python,Paris,Morning
32,Shaun,Java,Tokyo,Morning
What we want is to read all the rows of this file line by line.
Note that, we will not be reading this CSV file into lists of lists because that will be very space-consuming and time-consuming. It will also cause problems with the large data. We have to look for a solution that works as an interpreter where we can read a line one at a time so that less memory consumption will take place.
Let’s get started with it!
In python, we have two modules to read the CSV file, one is csv.reader and the second is csv.DictReader. We will use them one by one to read a CSV file line by line.

Read a CSV file line by line using csv.reader

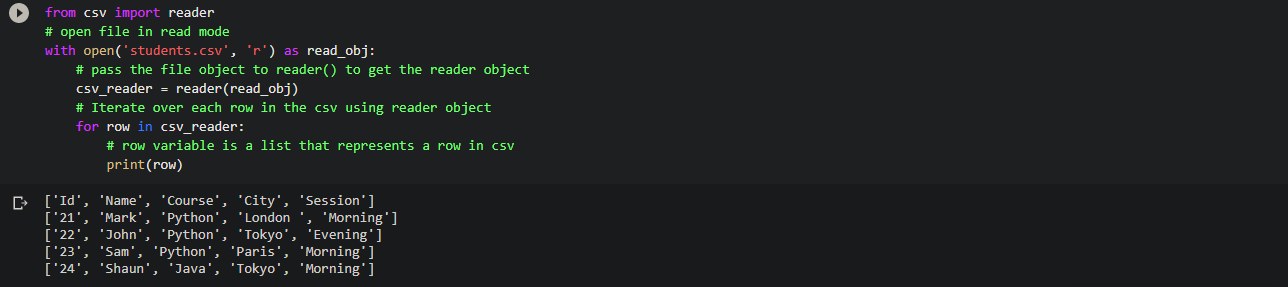
By using the csv.reader module, a reader class object is made through which we can iterate over the lines of a CSV file as a list of values, where each value in the list is a cell value.

Read a CSV file line by line using csv.reader

Code:

from csv import reader
# open file in read mode
with open('students.csv', 'r') as read_obj:
 # pass the file object to reader() to get the reader object
csv_reader = reader(read_obj)
# Iterate over each row in the csv using reader object
for row in csv_reader:
# row variable is a list that represents a row in csv
print(row)
The above code iterated over each row of the CSV file. It fetched the content of each row as a list and printed that generated list.

How did it work?

It performed a few steps:

  1. Opened the students.csv file and created a file object.
  2. In csv.reader() function, the reader object is created and passed.
  3. Now with the reader object, we iterated it by using the for loop so that it can read each row of the csv as a list of values.
  4. At last, we printed this list.

By using this module, only one line will consume memory at a time while iterating through a csv file.

Read csv file without header

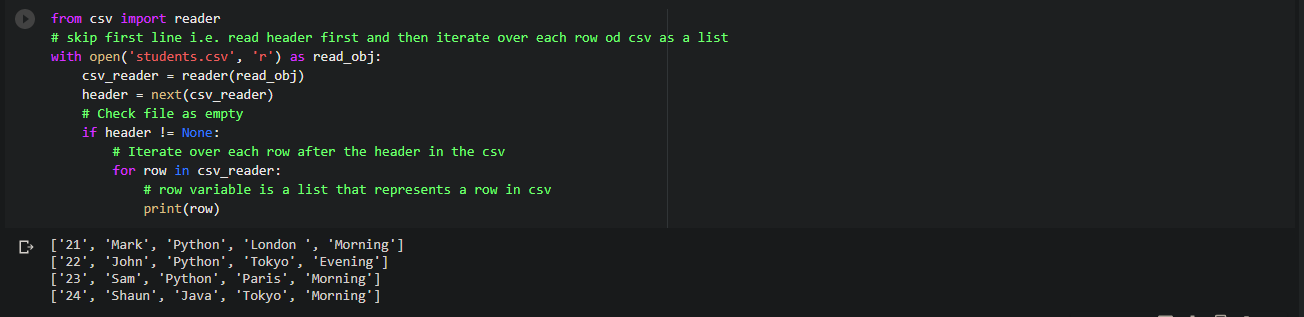
What if we want to skip a header and print the files without the header. In the previous example, we printed the values including the header but in this example, we will remove the header and print the values without the header.

Read csv file without header

Code:

from csv import reader
# skip first line i.e. read header first and then iterate over each row od csv as a list
with open('students.csv', 'r') as read_obj:
csv_reader = reader(read_obj)
header = next(csv_reader)
# Check file as empty
if header != None:
# Iterate over each row after the header in the csv
for row in csv_reader:
# row variable is a list that represents a row in csv
print(row)
We can see in the image above, that the header is not printed and the code is designed in such a way that it skipped the header and printed all the other values in a list.

Read csv file line by line using csv module DictReader object

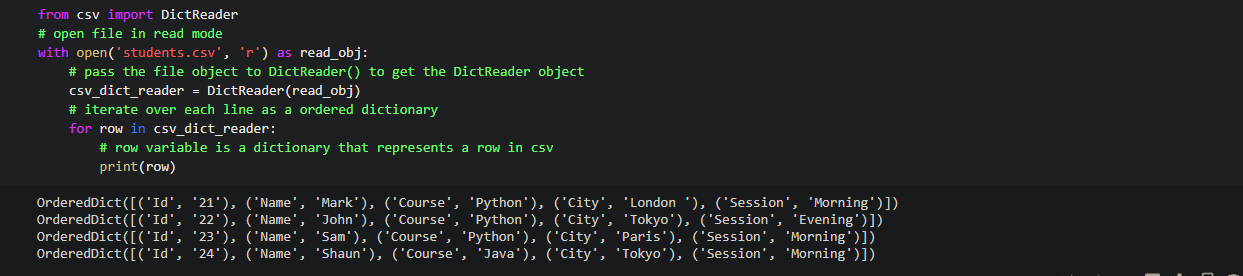
Now, we will see the example using csv.DictReader module. CSV’s module dictReader object class iterates over the lines of a CSV file as a dictionary, which means for each row it returns a dictionary containing the pair of column names and values for that row.

Read csv file line by line using csv module DictReader object

Code:

from csv import DictReader
# open file in read mode
with open('students.csv', 'r') as read_obj:
# pass the file object to DictReader() to get the DictReader object
csv_dict_reader = DictReader(read_obj)
# iterate over each line as a ordered dictionary
for row in csv_dict_reader:
# row variable is a dictionary that represents a row in csv
print(row)
The above code iterated over all the rows of the CSV file. It fetched the content of the row for each row and put it as a dictionary.

How did it work?

It performed a few steps:

  1. Opened the students.csv file and created a file object.
  2. In csv.DictReader() function, the reader object is created and passed.
  3. Now with the reader object, we iterated it by using the for loop so that it can read each row of the csv as a dictionary of values. Where each pair in this dictionary represents contains the column name & column value for that row.

It also saves the memory as only one row at a time is in the memory.

Get column names from the header in the CSV file

We have a member function in the DictReader class that returns the column names of a csv file as a list.

Get column names from the header in the CSV fileCode:

from csv import DictReader
# open file in read mode
with open(‘students.csv’, ‘r’) as read_obj:
# pass the file object to DictReader() to get the DictReader object
csv_dict_reader = DictReader(read_obj)
# get column names from a csv file
column_names = csv_dict_reader.fieldname
print(column_names)

Read specific columns from a csv file while iterating line by line

Read specific columns (by column name) in a CSV file while iterating row by row

We will iterate over all the rows of the CSV file line by line but will print only two columns of each row.
Read specific columns (by column name) in a csv file while iterating row by row
Code:
from csv import DictReader
# iterate over each line as a ordered dictionary and print only few column by column name
withopen('students.csv', 'r')as read_obj:
csv_dict_reader = DictReader(read_obj)
for row in csv_dict_reader:
print(row['Id'], row['Name'])
DictReader returns a dictionary for each line during iteration. As in this dictionary, keys are column names and values are cell values for that column. So, for selecting specific columns in every row, we used column name with the dictionary object.

Read specific columns (by column Number) in a CSV file while iterating row by row

We will iterate over all the rows of the CSV file line by line but will print the contents of the 2nd and 3rd column.

Read specific columns (by column Number) in a csv file while iterating row by row

Code:

from csv import reader
# iterate over each line as a ordered dictionary and print only few column by column Number
with open('students.csv', 'r') as read_obj:
csv_reader = reader(read_obj)
for row in csv_reader:
print(row[1], row[2])
With the csv.reader each row of the csv file is fetched as a list of values, where each value represents a column value. So, selecting the 2nd & 3rd column for each row, select elements at index 1 and 2 from the list.
The complete code:
from csv import reader
from csv import DictReader
def main():
print('*** Read csv file line by line using csv module reader object ***')
print('*** Iterate over each row of a csv file as list using reader object ***')
# open file in read mode
with open('students.csv', 'r') as read_obj:
# pass the file object to reader() to get the reader object
csv_reader = reader(read_obj)
# Iterate over each row in the csv using reader object
for row in csv_reader:
# row variable is a list that represents a row in csv
print(row)
print('*** Read csv line by line without header ***')
# skip first line i.e. read header first and then iterate over each row od csv as a list
with open('students.csv', 'r') as read_obj:
csv_reader = reader(read_obj)
header = next(csv_reader)
# Check file as empty
if header != None:
# Iterate over each row after the header in the csv
for row in csv_reader:
# row variable is a list that represents a row in csv
print(row)
print('Header was: ')
print(header)
print('*** Read csv file line by line using csv module DictReader object ***')
# open file in read mode
with open('students.csv', 'r') as read_obj:
# pass the file object to DictReader() to get the DictReader object
csv_dict_reader = DictReader(read_obj)
# iterate over each line as a ordered dictionary
for row in csv_dict_reader:
# row variable is a dictionary that represents a row in csv
print(row)
print('*** select elements by column name while reading csv file line by line ***')
# open file in read mode
with open('students.csv', 'r') as read_obj:
# pass the file object to DictReader() to get the DictReader object
csv_dict_reader = DictReader(read_obj)
# iterate over each line as a ordered dictionary
for row in csv_dict_reader:
# row variable is a dictionary that represents a row in csv
print(row['Name'], ' is from ' , row['City'] , ' and he is studying ', row['Course'])
print('*** Get column names from header in csv file ***')
# open file in read mode
with open('students.csv', 'r') as read_obj:
# pass the file object to DictReader() to get the DictReader object
csv_dict_reader = DictReader(read_obj)
# get column names from a csv file
column_names = csv_dict_reader.fieldnames
print(column_names)
print('*** Read specific columns from a csv file while iterating line by line ***')
print('*** Read specific columns (by column name) in a csv file while iterating row by row ***')
# iterate over each line as a ordered dictionary and print only few column by column name
with open('students.csv', 'r') as read_obj:
csv_dict_reader = DictReader(read_obj)
for row in csv_dict_reader:
print(row['Id'], row['Name'])
print('*** Read specific columns (by column Number) in a csv file while iterating row by row ***')
# iterate over each line as a ordered dictionary and print only few column by column Number
with open('students.csv', 'r') as read_obj:
csv_reader = reader(read_obj)
for row in csv_reader:
print(row[1], row[2])
if __name__ == '__main__':
main()

I hope you understood this article as well as the code.

Happy reading!

Simple Whatsapp Automation Using Python3 and Selenium

In this article, we will be using python and selenium to automate some messages on WhatsApp.

I hope the reader is well aware of python beforehand.

The first and the foremost step is to install python3 which you can download from https://www.python.org/  and follow up the install instruction. After the installation will be complete, install selenium for the automation of all the tasks we want to perform.

python3 -m pip install Selenium

Selenium Hello World:

After installing selenium, to check whether it is installed correctly or not, run the python code mentioned below and check if there are any errors.

from selenium import webdriver

import time

driver = webdriver.Chrome()

driver.get("http://google.com")

time.sleep(2)

driver.quit()

Save this code in a python file and name it according to your preference. If the program runs correctly without showing any errors, then the Google Chrome window will be opened automatically.

Automate Whatsapp:

Import the modules selenium and time like below.

from selenium import webdriver

import time

After the importing of the modules, the below code will open the WhatsApp web interface which will automatically ask you to scan the QR code and will be logged into your account.

driver = webdriver.Chrome()

driver.get("https://web.whatsapp.com")

print("Scan QR Code, And then Enter")

time.sleep(5)

The next step is entering the username to whom you want to send the message. In my case, I made a group named “WhatsApp bot” and then located an XPath using the inspect method and put it in.

As soon as the WhatsApp bot will be opened, it will automatically locate the WhatsApp bot and will enter that window.

user_name = 'Whatsapp Bot'

user = driver.find_element_by_xpath('//span[@title="{}"]'.format(user_name))

user.click()

After this, the message box will be opened and now you have to inspect the message box and enter the message you want to send. Later, you have to inspect the send button and click on it using the click() method. 

message_box = driver.find_element_by_xpath('//div[@class="_2A8P4"]')

message_box.send_keys('Hey, I am your whatsapp bot')

message_box = driver.find_element_by_xpath('//button[@class="_1E0Oz"]')

message_box.click()

As soon as you execute this code, the message will be sent and your work is done.

I am attaching the whole code for your reference.

from selenium import webdriver

import time


driver = webdriver.Chrome(executable_path=””)

time.sleep(5)

user_name = 'Whatsapp Bot'

user = driver.find_element_by_xpath('//span[@title="{}"]'.format(user_name))

user.click()


message_box = driver.find_element_by_xpath('//div[@class="_2A8P4"]')

message_box.send_keys('Hey, I am your whatsapp bot')

message_box = driver.find_element_by_xpath('//button[@class="_1E0Oz"]')

message_box.click()

driver.quit()

At the end we put driver.quit() method to end the execution of the task.

You did a great job making this bot!!


How to web scrape with Python in 4 minutes

Web Scraping:

Web scraping is used to extract the data from the website and it can save time as well as effort. In this article, we will be extracting hundreds of file from the New York MTA. Some people find web scraping tough, but it is not the case as this article will break the steps into easier ones to get you comfortable with web scraping.

New York MTA Data:

We will download the data from the below website:

http://web.mta.info/developers/turnstile.html

Turnstile data is compiled every week from May 2010 till now, so there are many files that exist on this site. For instance, below is an example of what data looks like.

You can right-click on the link and can save it to your desktop. That is web scraping!

Important Notes about Web scraping:

  1. Read through the website’s Terms and Conditions to understand how you can legally use the data. Most sites prohibit you from using the data for commercial purposes.
  2. Make sure you are not downloading data at too rapid a rate because this may break the website. You may potentially be blocked from the site as well.

Inspecting the website:

The first thing that we should find out is the information contained in the HTML tag from where we want to scrape it. As we know, there is a lot of code on the entire page and it contains multiple HTML tags, so we have to find out the one which we want to scrape and write it down in our code so that all the data related to it will be visible.

When you are on the website, right-click and then when you will scroll down you will get an option of “inspect”. Click on it and see the hidden code behind the page.

You can see the arrow symbol at the top of the console. 

If you will click on the arrow and then click any text or item on the website then the highlighted tag will appear related to the website on which you clicked.

I clicked on Saturday, September 2018 file and the console came in the blue highlighted part.

<a href=”data/nyct/turnstile/turnstile_180922.txt”>Saturday, September 22, 2018</a>

You will see that all the .txt files come in <a> tags. <a> tags are used for hyperlinks.

Now that we got the location, we will process the coding!

Python Code:

The first and foremost step is importing the libraries:

import requests

import urllib.request

import time

from bs4 import BeautifulSoup

Now we have to set the url and access the website:

url = 'http://web.mta.info/developers/turnstile.html'

response = requests.get(url)

Now, we can use the features of beautiful soup for scraping.

soup = BeautifulSoup(response.text, “html.parser”)

We will use the method findAll to get all the <a> tags.

soup.findAll('a')

This function will give us all the <a> tags.

Now, we will extract the actual link that we want.

one_a_tag = soup.findAll(‘a’)[38]

link = one_a_tag[‘href’]

This code will save the first .txt file to our variable link.

download_url = 'http://web.mta.info/developers/'+ link

urllib.request.urlretrieve(download_url,'./'+link[link.find('/turnstile_')+1:])

For pausing our code we will use the sleep function.

time.sleep(1)

To download the entire data we have to apply them for a loop. I am attaching the entire code so that you won’t face any problem.

I hope you understood the concept of web scraping.

Enjoy reading and have fun while scraping!

An Intro to Web Scraping with lxml and Python:

Sometimes we want that data from the API which cannot be accessed using it. Then, in the absence of API, the only choice left is to make a web scraper. The task of the scraper is to scrape all the information which we want in easily and in very little time.

The example of a typical API response in JSON. This is the response from Reddit.

 There are various kinds of python libraries that help in web scraping namely scrapy, lxml, and beautiful soup.

Many articles explain how to use beautiful soup and scrapy but I will be focusing on lxml. I will teach you how to use XPaths and how to use them to extract data from HTML documents.

Getting the data:

If you are into gaming, then you must be familiar with this website steam.

We will be extracting the data from the “popular new release” information.

Now, right-click on the website and you will see the inspect option. Click on it and select the HTML tag.

We want an anchor tag because every list is encapsulated in the <a> tag.

The anchor tag lies in the div tag with an id of tag_newreleasecontent. We are mentioning the id because there are two tabs on this page and we only want the information of popular release data.

Now, create your python file and start coding. You can name the file according to your preference. Start importing the below libraries:

import requests 

import lxml.html

If you don’t have requests to install then type the below code on your terminal:

$ pip install requests

Requests module helps us open the webpage in python.

Extracting and processing the information:

Now, let’s open the web page using the requests and pass that response to lxml.html.fromstring.

html = requests.get('https://store.steampowered.com/explore/new/') 

doc = lxml.html.fromstring(html.content)

This provides us with a structured way to extract information from an HTML document. Now we will be writing an XPath for extracting the div which contains the” popular release’ tab.

new_releases = doc.xpath('//div[@id="tab_newreleases_content"]')[0]

We are taking only one element ([0]) and that would be our required div. Let us break down the path and understand it.

  • // these tell lxml that we want to search for all tags in the HTML document which match our requirements.
  • Div tells lxml that we want to find div tags.
  • @id=”tab_newreleases_content tells the div tag that we are only interested in the id which contains tab_newrelease_content.

Awesome! Now we understand what it means so let’s go back to inspect and check under which tag the title lies.

The title name lies in the div tag inside the class tag_item_name. Now we will run the XPath queries to get the title name.

titles = new_releases.xpath('.//div[@class="tab_item_name"]/text()')


We can see that the names of the popular releases came. Now, we will extract the price by writing the following code:

prices = new_releases.xpath('.//div[@class="discount_final_price"]/text()')

Now, we can see that the prices are also scraped. We will extract the tags by writing the following command:

tags = new_releases.xpath('.//div[@class="tab_item_top_tags"]')

total_tags = []

for tag in tags:

total_tags.append(tag.text_content())

We are extracting the div containing the tags for the game. Then we loop over the list of extracted tags using the tag.text_content method.

Now, the only thing remaining is to extract the platforms associated with each title. Here is the the HTML markup:

The major difference here is that platforms are not contained as texts within a specific tag. They are listed as class name so some titles only have one platform associated with them:


<span class="platform_img win">&lt;/span>


While others have 5 platforms like this:


<span class="platform_img win"></span><span class="platform_img mac"></span><span class="platform_img linux"></span><span class="platform_img hmd_separator"></span> <span title="HTC Vive" class="platform_img htcvive"></span> <span title="Oculus Rift" class="platform_img oculusrift"></span>

The span tag contains platform types as the class name. The only thing common between them is they all contain platform_img class.

First of all, we have to extract the div tags containing the tab_item_details class. Then we will extract the span containing the platform_img class. Lastly, we will extract the second class name from those spans. Refer to the below code:

platforms_div = new_releases.xpath('.//div[@class="tab_item_details"]')

total_platforms = []

for game in platforms_div:    

temp = game.xpath('.//span[contains(@class, "platform_img")]')    

platforms = [t.get('class').split(' ')[-1] for t in temp]    

if 'hmd_separator' in platforms:        

platforms.remove('hmd_separator')   

 total_platforms.append(platforms)

Now we just need this to return a JSON response so that we can easily turn this into Flask based API.

output = []for info in zip(titles,prices, tags, total_platforms):    resp = {}    

resp['title'] = info[0]

resp['price'] = info[1]    

resp['tags'] = info[2]    

resp['platforms'] = info[3]    

output.append(resp)

We are using the zip function to loop over all of the lists in parallel. Then we create a dictionary for each game to assign the game name, price, and platforms as keys in the dictionary.

Wrapping up:

I hope this article is understandable and you find the coding easy.

Enjoy reading!


Best 5 stock markets APIs in 2020

There are various stock markets that are available online but among all of them, it’s hard to figure out from which site you should visit or which site will be useful.

In this article, we will be discussing the 5 best stock market APIs.

What is Stock market data API?

Real-time or historical data on financial assets that are currently being traded in the markets are offered by stock market data APIs.

Prices of public stocks, ETFs, and ETNs are specially offered by them.

Data:

In the article, we will be more inclined towards the price information. We will be talking about the following APIs and how they are useful:

  1. Yahoo Finance
  2. Google Finance in Google sheets.
  3. IEX cloud
  4. AlphaVantage
  5. World trading data
  6. Other APIs( Polygon.io, intrinio, Quandl)

1. Yahoo Finance:

The API was shut down in 2017. However, it got back up after 2019. The amazing thing is we can still use Yahoo Finance to get free stock data. It is employed by both individual and enterprise-level users.

It is free and reliable and provides access to more than 5 years of daily OHLC price data.

yFinance is the new python module that wraps the new yahoo finance API.

>pip install yfinance

 The GitHub link is provided for the code but I will be attaching the code below for your reference.

GoogleFinance:

Google Finance got shut down in 2012 but some features were still on the go. There is a feature in this API that supports you to get the stock market data and It is known as GoogleFinance in google sheets.

All we have to do is type the below command and we will get the data.


GOOGLEFINANCE("GOOG", "price")

Furthermore, the syntax is:

GOOGLEFINANCE(ticker, [attribute], [start_date], [end_date|num_days], [interval])

The ticker is used for security consideration.

Attribute(should be “price” by default).

Start_date: when you want to fetch the historical data.

End_date: Till when you want the data.

Intervals: return data frequency which is either “DAILY” or “WEEKLY”.

2. IEX Cloud:

IEX Cloud is a new financial service just released this year. It’s an independent business separate from IEX Group’s flagship stock exchange, is a high-performance, financial data platform that connects developers and financial data creators.

It is very cheap compared to others and you can get all the data you want easily. It also provides free trial.

You can easily check it out at :


Iexfinance

3. AlphaVantage:

You can refer to the website:

https://www.alphavantage.co/

It is the best and the leading provider of various free APIs. It provides gain to access the data related to the stock, FX-data, and cryptocurrency.

AlphaVantage provides access to 5-API request per minute and 500-API requests per day.

4. World Trading Data:

You can refer to the website for World Trading data:

https://www.worldtradingdata.com/

In this trading application, you can access the full intraday API and currency API. The availability ranges from $8 to $32 per month.

There are different types of plans available. You can get 5-stocks per request for free access. You can get 250 total requests per day.

The response will be in JSON format and there will be no python module to wrap their APIs.

5. Other APIs:

Website: https://polygon.io

Polygon.io
Polygon.io

It is only for the US stock market and is available at $199 per month. This is not a good choice for beginners.

Website: https://intrino.com/

intrino
intrino

It is only available for real-time stock data at $75 per month. For EOD price data it is $40 but you can get free access to this on different platforms. So, I guess it might not be a good choice for independent traders.

Website: https://www.quandl.com/

Quandl
Quandl

It is a marketplace for financial, economic, and other related APIs. It aggregates API from thor party so that users can purchase whatever APIs they want to use.

Every other API will have different prices and some APIs will be free and others will be charged.

Quandl contains its analysis tool inside the website which will be more convenient.

It is a platform which will be most suitable if you can spend a lot of money.

Wrapping up:

I hope you find this tutorial useful and will refer to the websites given for stock market data.

Trading is a quite complex field and learning it is not so easy. You have to spend some time and practice understanding the stock market data and its uses.

Create an empty NumPy Array of given length or shape and data type in Python

In this article, we will be exploring different ways to create an empty 1D,2D, and 3D NumPy array of different data types like int, string, etc.

We have a Python module in NumPy that provides a function to create an empty() array.

numpy.empty(shape, dtype=float, order='C')
  • The arguments are shape and data type.
  • It returns the new array of the shape and data type we have given without initialising entries which means the array which is returned contain garbage values.
  • If the data type argument is not provided then the array will take float as a default argument.

Now, we will use this empty() function to create an empty array of different data types and shape.

You can also delete column using numpy delete column tutorial.

Create an empty 1D Numpy array of a given length

To create a 1D NumPy array of a given length, we have to insert an integer in the shape argument.

For example, we will insert 5 in the shape argument to the empty() function.

Create an empty 1D Numpy array of given length

Code:

import numpy as np
# Create an empty 1D Numpy array of length 5
empty_array = np.empty(5)
print(empty_array)

Create an empty Numpy array of given shape using numpy.empty()

In the above code, we saw how to create a 1D empty array. Now in this example, we will see how to create a 2D and 3D NumPy array numpy.empty() method.

Create an empty 2D Numpy array using numpy.empty()

To create the 2D NumPy array, we will pass the shape of the 2D array that is rows and columns as a tuple to the numpy.empty() function.

For instance, here we will create a 2D NumPy array with 5 rows and 3 columns.

Create an empty 2D Numpy array using numpy.empty()

Code:

empty_array = np.empty((5, 3))
print(empty_array)

It returned an empty numpy array of 3 rows and 5 columns. Since we did not provide any data type so the function has taken a default value as a float.

Create an empty 3D Numpy array using numpy.empty()

As we have seen with the 2D array, we will be doing the same thing to create an empty 3D NumPy array. We will create a 3D NumPy array with 2 matrix of 3 rows and 3 columns.

Create an empty 3D Numpy array using numpy.empty()

Code:

empty_array = np.empty((2, 3, 3))
print(empty_array)

The above code creates a 3D NumPy array with 2 matrix of 3 rows and 3 columns without initialising values.

In all the above examples, we have not provided any data type argument. Therefore, by default, all the values which were returned were in the float data type.

Now in the next section, we customize the data type. Let’s see how to do that.

Create an empty Numpy array with custom data type

To create an empty NumPy array with different data types, all we have to do is initialise the data type in type argument in the numpy.empty() function.

Let’s see different data types examples.

Create an empty Numpy array of 5 Integers

To create a NumPy array of integer 5, we have to initialise int in the type argument in the numpy.empty() function.

Create an empty Numpy array of 5 Integers

Code:

# Create an empty Numpy array of 5 integers
empty_array = np.empty(5, dtype=int)
print(empty_array)

Create an empty Numpy array of 5 Complex Numbers

Now, to create the empty NumPy array of 5 complex numbers, all we have to do is write the data type complex in the dtype argument in numpy.empty() function.

Create an empty Numpy array of 5 Complex Numbers

Code:

empty_array = np.empty(5, dtype=complex)
print(empty_array)

Create an empty Numpy array of 5 strings

In this, we will write the dtype argument as a string in the numpy.empty() function.

Create an empty Numpy array of 5 strings

Code:

empty_array = np.empty(5, dtype='S3')
print(empty_array)

The complete code:

import numpy as np
def main():
print('*** Create an empty Numpy array of given length ***')
# Create an empty 1D Numpy array of length 5
empty_array = np.empty(5)
print(empty_array)
print('*** Create an empty Numpy array of given shape ***')
# Create an empty 2D Numpy array or matrix with 5 rows and 3 columns
empty_array = np.empty((5, 3))
print(empty_array)
# Create an empty 3D Numpy array
empty_array = np.empty((2, 3, 3))
print(empty_array)
print('*** Create an empty Numpy array with custom data type ***')
# Create an empty Numpy array of 5 integers
empty_array = np.empty(5, dtype=int)
print(empty_array)
# Create an empty Numpy array of 5 Complex Numbers
empty_array = np.empty(5, dtype=complex)
print(empty_array)
# Create an empty Numpy array of 5 strings of length 3, You also get an array with binary strings
empty_array = np.empty(5, dtype='S3')
print(empty_array)
if __name__ == '__main__':
main()

I hope this article was useful for you and you enjoyed reading it!

Happy learning guys!

Python- Find indexes of an element in pandas dataframe

Python: Find indexes of an element in pandas dataframe | Python Pandas Index.get_loc()

In this tutorial, we will learn how to find the indexes of a row and column numbers using pandas in a dataframe. By learning from this tutorial, you can easily get a good grip on how to get row names in Pandas dataframe. Also, there is a possibility to learn about the Python Pandas Index.get_loc() function along with syntax, parameters, and a sample example program.

Pandas Index.get_loc() Function in Python

PandasIndex.get_loc()function results integer location, slice, or boolean mask for the requested label. The function acts with both sorted as well as unsorted Indexes. It gives various options if the passed value is not present in the Index.

Syntax:

Index.get_loc(key, method=None, tolerance=None)

Parameters:

  • key: label
  • method: {None, ‘pad’/’ffill’, ‘backfill’/’bfill’, ‘nearest’}, optional
  • default: exact matches only.
  • pad / ffill: If not having the exact match, find the PREVIOUS index value.
  • backfill / bfill: Utilize NEXT index value if no exact match
  • nearest: Make use of the NEAREST index value if no exact match. Tied distances are broken by preferring the larger index value.

Return Value:

loc : int if unique index, slice if monotonic index, else mask

Example using Index.get_loc() function:

# importing pandas as pd
import pandas as pd
  
# Creating the Index
idx = pd.Index(['Labrador', 'Beagle', 'Labrador',
                     'Lhasa', 'Husky', 'Beagle'])
  
# Print the Index
idx

Also View:

Creating a Dataframe in Python

The initial step is creating a dataframe.

Code:

# List of Tuples
empoyees = [('jack', 34, 'Sydney', 155),
            ('Riti', 31, 'Delhi', 177),
            ('Aadi', 16, 'Mumbai', 81),
            ('Mohit', 31, 'Delhi', 167),
            ('Veena', 81, 'Delhi', 144),
            ('Shaunak', 35, 'Mumbai', 135),
            ('Shaun', 35, 'Colombo', 111)
            ]
# Create a DataFrame object
empDfObj = pd.DataFrame(empoyees, columns=['Name', 'Age', 'City', 'Marks'])
print(empDfObj)

Output:

Dataframe

Now, we want to find the location where the value ’81’ exists.

(4, 'Age')
(2, 'Marks')

We can see that value ’81’ exists at two different places in the data frame.

  1. At row index 4 & column “Age”
  2. At row index 2 & column “Marks”

Now, we will proceed to get the result of this.

Find all indexes of an item in pandas dataframe

Dataframe object and the value as an argument is accepted by the function we have created.

It returns the list of index positions at all occurrences.

Code:

def getIndexes(dfObj, value):
    ''' Get index positions of value in dataframe i.e. dfObj.'''
    listOfPos = list()
    # Get bool dataframe with True at positions where the given value exists
    result = dfObj.isin([value])
    # Get list of columns that contains the value
    seriesObj = result.any()
    columnNames = list(seriesObj[seriesObj == True].index)
    # Iterate over list of columns and fetch the rows indexes where value exists
    for col in columnNames:
        rows = list(result[col][result[col] == True].index)
        for row in rows:
            listOfPos.append((row, col))
    # Return a list of tuples indicating the positions of value in the dataframe
    return listOfPos

Output:

Find all indexes of an item in pandas dataframe

We got the exact row and column names of all the locations where the value ’81’ exists.

We will see what happened inside the getIndexes function.

How did it work?

Now, we will learn step by step process on what happened inside the getIndexes() function.

Step 1: Get bool dataframe with True at positions where the value is 81 in the dataframe using pandas.DataFrame.isin()

DataFrame.isin(self, values)

This isin() function accepts a value and returns a bool dataframe. The original size and the bool data frame size is the same. When the given value exists, it contains True otherwise False.

We will see the bool dataframe where the value is ’81’.

# Get bool dataframe with True at positions where value is 81
result = empDfObj.isin([81])
print('Bool Dataframe representing existence of value 81 as True')
print(result)

Output:

bool dataframe where the value is '81'

It is of the same size as empDfObj. As 81 exists at 2 places inside the dataframe, so this bool dataframe contains True at only those two places. In all other places, it contains False.

Step 2: Get the list of columns that contains the value

We will get the name of the columns that contain the value ’81’.We will achieve this by fetching names in a column in the bool dataframe which contains True value.

Code:

# Get list of columns that contains the value i.e. 81
seriesObj = result.any()
columnNames = list(seriesObj[seriesObj == True].index)

print('Names of columns which contains 81:', columnNames)

Output:

# Get list of columns that contains the value i.e. 81

Step 3: Iterate over selected columns and fetch the indexes of the rows which contains the value

We will iterate over each selected column and for each column, we will find the row which contains the True value.

Now these combinations of column names and row indexes where True exists are the index positions of 81 in the dataframe i.e.

Code:

# Iterate over each column and fetch the rows number where
for col in columnNames:
    rows = list(result[col][result[col] == True].index)
    for row in rows:
        print('Index : ', row, ' Col : ', col)

Output:

Iterate over selected columns and fetch the indexes of the rows which contains the value

Now it is clear that this is the way the getIndexes() function was working and finding the exact index positions of the given value & store each position as (row, column) tuple. In the end, it returns a list of tuples representing its index positions in the dataframe.

Find index positions of multiple elements in the DataFrame

Suppose we have multiple elements,

[81, 'Delhi', 'abc']

Now we want to find index positions of all these elements in our dataframe empDfObj, like this,

81  :  [(4, 'Age'), (2, 'Marks')]
Delhi  :  [(1, 'City'), (3, 'City'), (4, 'City')]
abc  :  []

Let’s use the getIndexes() and dictionary comprehension to find the indexes of all occurrences of multiple elements in the dataframe empDfObj.

listOfElems = [81, 'Delhi', 'abc']
# Use dict comprhension to club index positions of multiple elements in dataframe
dictOfPos = {elem: getIndexes(empDfObj, elem) for elem in listOfElems}
print('Position of given elements in Dataframe are : ')
for key, value in dictOfPos.items():
    print(key, ' : ', value)

Output:
getIndexes() and dictionary comprehension to find the indexes of all occurrences of multiple elements in the dataframe empDfObj.

dictOfPos is a dictionary of elements and their index positions in the dataframe. As ‘abc‘ doesn’t exist in the dataframe, therefore, its list is empty in dictionary dictOfPos.

Hope this article was understandable and easy for you!

Want to expert in the python programming language? Exploring Python Data Analysis using Pandas tutorial changes your knowledge from basic to advance level in python concepts.

Read more Articles on Python Data Analysis Using Padas – Find Elements in a Dataframe

Python-How to append a new row to an existing csv file

Python: How to append a new row to an existing csv file?

This tutorial will help you learn how to append a new row to an existing CSV file using some CSV modules like reader/writer and the most famous DictReader/DictWriter classes. Moreover, you can also get enough knowledge on all python concepts by visiting our provided tutorials.

How to Append a new row to an existing csv file?

There are multiple ways in Python by which we can append rows into the CSV file. But here we will discuss two effective methods. Before going to learn those two methods, we have to follow the standard step which is explained ahead.

The basic step to proceed in this is to have a CSV file. For instance, here we have a CSV file named students.csv having the following contents:

Id,Name,Course,City,Session
21,Mark,Python,London,Morning
22,John,Python,Tokyo,Evening
23,Sam,Python,Paris,Morning

For reading and writing CSV files python provides a CSV module. There are two different classes for writing CSV files that is writer and DictWriter.

We can append the rows in a CSV file by either of them but some solutions are better than the other. We will see it in the next section.

Do Refer:

Append a list as a new row to an old CSV file using csv.writer()

A writer class is in the CSV module which writes the rows in existing CSV files.

Let’s take a list of strings:

# List of strings
row_contents = [32,'Shaun','Java','Tokyo','Morning']

To add this list to an existing CSV file, we have to follow certain steps:

  • Import CSV module’s writer class.
  • Open our csv file in append mode and create a file object.
  • Pass this file object to the csv.writer(), we can get a writer class object.
  • This writer object has a function writerow(), pass the list to it and it will add the list’s contents as a new row in the associated csv file.
  • A new row is added in the csv file, now close the file object.

By following the above steps, the list will be appended as a row in the CSV file as it is a simple process.

from csv import writer

def append_list_as_row(file_name, list_of_elem):
    # Open file in append mode
    with open(file_name, 'a+', newline='') as write_obj:
        # Create a writer object from csv module
        csv_writer = writer(write_obj)
        # Add contents of list as last row in the csv file
        csv_writer.writerow(list_of_elem)

Another Code:

Append a list as new row to an old csv file using csv.writer()

We can see that the list has been added.

Appending a row to csv with missing entries?

Suppose we have a list that does not contain all the values and we have to append it into the CSV file.

Suppose the list is:

list = [33, ‘Sahil’, ‘Morning’]

Example:

# A list with missing entries
row_contents = [33, 'Sahil', 'Morning']
# Appending a row to csv with missing entries
append_list_as_row('students.csv', row_contents)

some entries are missing in the list

Output:

output of missing files

We can see the data get appended at the wrong positions as the session got appended at the course.

csv’s writer class has no functionality to check if any of the intermediate column values are missing in the list or if they are in the correct order. It will just add the items in the list as column values of the last row in sequential order.

Therefore while adding a list as a row using csv.writer() we need to make sure that all elements are provided and are in the correct order.

If any element is missing like in the above example, then we should pass empty strings in the list like this,

row_contents = [33, 'Sahil', '' , '', 'Morning']

Since we have a huge amount of data in the CSV file, adding the empty strings in all of that will be a hectic task.

To save us from hectic work, the CSV provided us with the DictWriter class.

Append a dictionary as a row to an existing csv file using DictWriter in python

As the name suggests, we can append a dictionary as a row to an existing CSV file using DictWriter in Python. Let’s see how we can use them.

Suppose, we have a dictionary-like below,

{'Id': 81,'Name': 'Sachin','Course':'Maths','City':'Mumbai','Session':'Evening'}

We can see that the keys are the columns of the CSV and the values will be the ones we will provide.

To append it, we have to follow some steps given below:

  • import csv module’s DictWriter class,
  • Open our csv file in append mode and create a file object,
  • Pass the file object & a list of csv column names to the csv.DictWriter(), we can get a DictWriter class object
  • This DictWriter object has a function writerow() that accepts a dictionary. pass our dictionary to this function, it adds them as a new row in the associated csv file,
  • A new line is added in the csv file, now close the file object,

The above steps will append our dictionary as a new row in the csv. To make our life easier, we have created a separate function that performs the above steps,

Code:

from csv import DictWriter
def append_dict_as_row(file_name, dict_of_elem, field_names):
    # Open file in append mode
    with open(file_name, 'a+', newline='') as write_obj:
        # Create a writer object from csv module
        dict_writer = DictWriter(write_obj, fieldnames=field_names)
        # Add dictionary as wor in the csv
        dict_writer.writerow(dict_of_elem)

Append a dictionary as a row to an existing csv file using DictWriter in python

Output:

output of appending the dict

We can see that it added the row successfully. We can also consider this thought that what if our dictionary will have any missing entries? Or the items are in a different order?

The advantage of using DictWriter is that it will automatically handle the sort of things and columns with missing entries will remain empty. Let’s check an example:

field_names = ['Id','Name','Course','City','Session']
row_dict = {'Id': 81,'Name': 'Sachin','Course':'Maths','City':'Mumbai','Session':'Evening'}
# Append a dict as a row in csv file
append_dict_as_row('students.csv', row_dict, field_names)

Output:

column with missing entries will remain empty

We can see this module has its wonders.

Hope this article was useful and informative for you.

Pandas : Convert Data frame index into column using dataframe.reset_index() in python

In this article, we will be exploring ways to convert indexes of a data frame or a multi-index data frame into its a column.

There is a function provided in the Pandas Data frame class to reset the indexes of the data frame.

Dataframe.reset_index()

DataFrame.reset_index(self, level=None, drop=False, inplace=False, col_level=0, col_fill='')

It returns a data frame with the new index after resetting the indexes of the data frame.

  • level: By default, reset_index() resets all the indexes of the data frame. In the case of a multi-index dataframe, if we want to reset some specific indexes, then we can specify it as int, str, or list of str, i.e., index names.
  • Drop: If False, then converts the index to a column else removes the index from the dataframe.
  • Inplace: If true, it modifies the data frame in place.

Let’s use this function to convert the indexes of dataframe to columns.

The first and the foremost thing we will do is to create a dataframe and initialize it’s index.

Code:
empoyees = [(11, ‘jack’, 34, ‘Sydney’, 70000) ,
(12, ‘Riti’, 31, ‘Delhi’ , 77000) ,
(13, ‘Aadi’, 16, ‘Mumbai’, 81000) ,
(14, ‘Mohit’, 31,‘Delhi’ , 90000) ,
(15, ‘Veena’, 12, ‘Delhi’ , 91000) ,
(16, ‘Shaunak’, 35, ‘Mumbai’, 75000 ),
(17, ‘Shaun’, 35, ‘Colombo’, 63000)]
# Create a DataFrame object
empDfObj = pd.DataFrame(empoyees, columns=[‘ID’ , ‘Name’, ‘Age’, ‘City’, ‘Salary’])
# Set ‘ID’ as the index of the dataframe
empDfObj.set_index(‘ID’, inplace=True)
print(empDfObj)

dataframe

Now, we will try different things with this dataframe.

Convert index of a Dataframe into a column of dataframe

To convert the index ‘ID‘ of the dataframe empDfObj into a column, call the reset_index() function on that dataframe,

Code:
modified = empDfObj.reset_index()
print(“Modified Dataframe : “)
print(modified)

Modified Dataframe

Since we haven’t provided the inplace argument, so by default it returned the modified copy of a dataframe.

In which the indexID is converted into a column named ‘ID’ and automatically the new index is assigned to it.

Now, we will pass the inplace argument as True to proceed with the process.

Code:
empDfObj.reset_index(inplace=True)
print(empDfObj)

dataframe with inplace argument

Now, we will set the column’ID’ as the index of the dataframe.

Code:
empDfObj.set_index('ID', inplace=True)

Remove index  of dataframe instead of converting into column

Previously, what we have done is convert the index of the dataframe into the column of the dataframe but now we want to just remove it. We can do that by passing drop argument as True in the reset_index() function,

Code:
modified = empDfObj.reset_index(drop=True)
print("Modified Dataframe : ")
print(modified)

Remove index of dataframe instead of converting into column

We can see that it removed the dataframe index.

Resetting indexes of a Multi-Index Dataframe

Let’s convert the dataframe object empDfObj  into a multi-index dataframe with two indexes i.e. ID & Name.

Code:
empDfObj = pd.DataFrame(empoyees, columns=['ID', 'Name', 'Age', 'City', 'Salary'])
# set multiple columns as the index of the the dataframe to
# make it multi-index dataframe.
empDfObj.set_index(['ID', 'Name'], inplace=True)
print(empDfObj)

Resetting indexes of a Multi-Index Dataframe

Convert all the indexes of Multi-index Dataframe to the columns of Dataframe

In the previous module, we have made a dataframe with the multi-index but now here we will convert the indexes of multi-index dataframe to the columns of the dataframe.

To do this, all we have to do is just call the reset_index() on the dataframe object.

Code:
modified = empDfObj.reset_index()
print(modified)

Convert all the indexes of Multi-index Dataframe to the columns of Dataframe

It converted the index ID and Name to the column of the same name.

Suppose, we want to convert only one index from the multiple indexes. We can do that by passing a single parameter in the level argument.

Code:
modified = empDfObj.reset_index(level='ID')
print("Modified Dataframe: ")
print(modified)

convert only one index from the multiple indexes

It converted the index’ID’ to the column with the same index name. Similarly, we can follow this same procedure to carry out the task for converting the name index to the column.

You should try converting the code for changing Name index to column.

We can change both the indexes and make them columns by passing mutiple arguments in the level  parameter.

Code:
modified = empDfObj.reset_index(level=['ID', 'Name'])
print("Modified Dataframe: ")
print(modified)

change both the indexes and make them columns

The complete code:

import pandas as pd
def main():
 # List of Tuples
 empoyees = [(11, 'jack', 34, 'Sydney', 70000) ,
(12, 'Riti', 31, 'Delhi' , 77000) ,
(13, 'Aadi', 16, 'Mumbai', 81000) ,
(14, 'Mohit', 31,'Delhi' , 90000) ,
(15, 'Veena', 12, 'Delhi' , 91000) ,
(16, 'Shaunak', 35, 'Mumbai', 75000 ),
(17, 'Shaun', 35, 'Colombo', 63000)]
 # Create a DataFrame object
 empDfObj = pd.DataFrame(empoyees, columns=['ID' , 'Name', 'Age', 'City', 'Salary'])
 # Set 'ID' as the index of the dataframe
 empDfObj.set_index('ID', inplace=True)
print("Contents of the Dataframe : ")
print(empDfObj)
print('Convert the index of Dataframe to the column')
 # Reset the index of dataframe
 modified = empDfObj.reset_index()
print("Modified Dataframe : ")
print(modified)
print('Convert the index of Dataframe to the column - in place ')
 empDfObj.reset_index(inplace=True)
print("Contents of the Dataframe : ")
print(empDfObj)
 # Set 'ID' as the index of the dataframe
 empDfObj.set_index('ID', inplace=True)
print('Remove the index of Dataframe to the column')
 # Remove index ID instead of converting into a column
 modified = empDfObj.reset_index(drop=True)
print("Modified Dataframe : ")
print(modified)
print('Reseting indexes of a Multi-Index Dataframe')
 # Create a DataFrame object
 empDfObj = pd.DataFrame(empoyees, columns=['ID', 'Name', 'Age', 'City', 'Salary'])
 # set multiple columns as the index of the the dataframe to
 # make it multi-index dataframe.
 empDfObj.set_index(['ID', 'Name'], inplace=True)
print("Contents of the Multi-Index Dataframe : ")
print(empDfObj)
print('Convert all the indexes of Multi-index Dataframe to the columns of Dataframe')
 # Reset all indexes of a multi-index dataframe
 modified = empDfObj.reset_index()
print("Modified Mult-Index Datafrme : ")
print(modified)
print("Contents of the original Multi-Index Dataframe : ")
print(empDfObj)
 modified = empDfObj.reset_index(level='ID')
print("Modified Dataframe: ")
print(modified)
 modified = empDfObj.reset_index(level='Name')
print("Modified Dataframe: ")
print(modified)
 modified = empDfObj.reset_index(level=['ID', 'Name'])
print("Modified Dataframe: ")
print(modified)
if __name__ == '__main__':
main()

Hope this article was useful for you and you grabbed the knowledge from it.

Want to expert in the python programming language? Exploring Python Data Analysis using Pandas tutorial changes your knowledge from basic to advance level in python concepts.

Read more Articles on Python Data Analysis Using Padas – Modify a Dataframe

Python : How to copy files from one location to another using shutil.copy()

In this article, we will discuss how to copy files from one directory to another using shutil.copy().

shutil.copy()

We have a function named shutil.copy() provided by python shutil module.

shutil.copy(src, dst, *, follow_symlinks=True)

It copies the file pointed by src to the directory pointed by dst.

Parameters:

  • src is the file path.
  • dst can be a directory path or file path.
  • if src is a path of symlinks then,
    • if follow_symlinks is True, it will copy the path.
    • if follow_symlinks is False, then it will create a new dst directory in a symbolic link.

It returns the path string of a newly created file.

Now, we will see what module is required, the first step is to import the module.

import shutil

Now, we will use this function to copy the files.

Copy a file to another directory

newPath = shutil.copy('sample1.txt', '/home/bahija/test')

The file ‘sample1.txt’ will be copied to the home directory ‘/home/bahija/test’ and after being copied it will return the path of the newly created file that is,

/home/bahija/test/sample1.txt
  • If the file name already exists in the destination directory, then it will be overwritten.
  • If no directory exists with the name test inside the /home/bahija then the source file will be copied with the name test.
  • If there is no existence of the source file, then it will give an error that is, FileNotFoundError.

Copy a File to another directory with a new name

Copy a file with new name
newPath = shutil.copy('sample1.txt', '/home/bahijaj/test/sample2.txt')
The new name will be assigned to the ‘sample1.txt’ as ‘sample2.txt’ and the file will be saved to another directory.
Few points to note:
  • The file will be overwritten if the destination file exists.
  • If the file is not available, then it will give FileNotFoundError.

Copy symbolic links using shutil.copy()

Suppose we are using a symbolic link named link.csv which points towards sample.csv.

link.csv -> sample.csv

Now, we will copy the symbolic link using shutil.copy() function.

shutil.copy(src, dst, *, follow_symlinks=True)

We can see that the follow_symlinks is True by default. So it will copy the file to the destination directory.

newPath = shutil.copy('/home/bahijaj/test/link.csv', '/home/bahijaj/test/sample2.csv')

The new path will be:

/home/bahijaj/test/sample2.csv

Sample2.txt is the actual copy of sample1.txt.

If follow_symlinks will be False,

newPath = shutil.copy('/home/bahijaj/test/link.csv', '/home/bahijaj/test/newlink.csv', follow_symlinks=False)

It will copy the symbolic link i.e. newlink.csv will be a link pointing to the same target file sample1.csv i.e.
newlink.csv -> sample1.txt.

If the file does not exist, then it will give an error.

Complete Code:

import shutil
def main():
 # Copy file to another directory
 newPath = shutil.copy('sample1.txt', '/home/bahijaj/test')
print("Path of copied file : ", newPath)
 #Copy a file with new name
 newPath = shutil.copy('sample1.txt', '/home/bahijaj/test/sample2.txt')
print("Path of copied file : ", newPath)
 # Copy a symbolic link as a new link
 newPath = shutil.copy('/home/bahijaj/test/link.csv', '/home/bahijaj/test/sample2.csv')
print("Path of copied file : ", newPath)
 # Copy target file pointed by symbolic link
 newPath = shutil.copy('/home/bahijaj/test/link.csv', '/home/bahijaj/test/newlink.csv', follow_symlinks=False)
print("Path of copied file : ", newPath)
if __name__ == '__main__':
main()

Hope this article was useful for you. Enjoy Reading!


Pandas: Replace NaN with mean or average in Dataframe using fillna()

In this article, we will discuss the replacement of NaN values with a mean of the values in rows and columns using two functions: fillna() and mean().

In data analytics, we have a large dataset in which values are missing and we have to fill those values to continue the analysis more accurately.

Python provides the built-in methods to rectify the NaN values or missing values for cleaner data set.

These functions are:

Dataframe.fillna():

This method is used to replace the NaN in the data frame.

The mean() method:

mean(axis=None, skipna=None, level=None, numeric_only=None, **kwargs)

Parameters::

  • Axis is the parameter on which the function will be applied. It denotes a boolean value for rows and column.
  • Skipna excludes the null values when computing the results.
  • If the axis is a MultiIndex (hierarchical), count along with a particular level, collapsing into a Series.
  • Numeric_only will use the numeric values when None is there.
  • **kwargs: Additional keyword arguments to be passed to the function.

This function returns the mean of the values.

Let’s dig in deeper to get a thorough understanding!

Pandas: Replace NaN with column mean

We can replace the NaN values in the whole dataset or just in a column by getting the mean values of the column.

For instance, we will take a dataset that has the information about 4 students S1 to S4 with marks in different subjects.

Pandas: Replace NaN with column mean

Code:

import numpy as np
import pandas as pd
# A dictionary with list as values
sample_dict = { ‘S1’: [10, 20, np.NaN, np.NaN],
‘S2’: [5, np.NaN, np.NaN, 29],
‘S3’: [15, np.NaN, np.NaN, 11],
‘S4’: [21, 22, 23, 25],
‘Subjects’: [‘Maths’, ‘Finance’, ‘History’, ‘Geography’]}
# Create a DataFrame from dictionary
df = pd.DataFrame(sample_dict)
# Set column ‘Subjects’ as Index of DataFrame
df = df.set_index(‘Subjects’)
print(df)

Suppose we have to calculate the mean value of S2 columns, then we will see that a single value of float type is returned.

Mean values of S2 column

Code:

mean_value=df[‘S2’].mean()
print(‘Mean of values in column S2:’)
print(mean_value)

Replace NaN values in a column with mean of column values

Let’s see how to replace the NaN values in column S2 with the mean of column values.

Replace NaN values in a column with mean of column values

Code:

df['S2'].fillna(value=df['S2'].mean(), inplace=True)
print('Updated Dataframe:')
print(df)

We can see that the mean() method is called by the S2 column, therefore the value argument had the mean of column values. So the NaN values are replaced with the mean values.

Replace all NaN values in a Dataframe with mean of column values

Now, we will see how to replace all the NaN values in a data frame with the mean of S2 columns values.

We can simply apply the fillna() function with the entire data frame instead of a particular column.

Replace all NaN values in a Dataframe with mean of column values

Code:

df.fillna(value=df['S2'].mean(), inplace=True)
print('Updated Dataframe:')
print(df)

We can see that all the values got replaced with the mean value of the S2 column. The inplace = True has been assigned to make the permanent change.

Pandas: Replace NANs with mean of multiple columns

We will reinitialize our data frame with NaN values.

Pandas: Replace NANs with mean of multiple columns

Code:

df = pd.DataFrame(sample_dict)
# Set column 'Subjects' as Index of DataFrame
df = df.set_index('Subjects')
# Dataframe with NaNs
print(df)

If we want to make changes to multiple columns then we will mention multiple columns while calling the mean() functions.

Mean of values in column S2 & S3

Code:

mean_values=df[['S2','S3']].mean()
print(mean_values)

It returned the calculated mean of two columns that are S2 and the S3.

Now, we will replace the NaN values in columns S2 and S3 with the mean values of these columns.

replace the NaN values in the columns ‘S2’ and ‘S3’ by the mean of values in ‘S2’ and ‘S3’

Code:

df[['S2','S3']] = df[['S2','S3']].fillna(value=df[['S2','S3']].mean())
print('Updated Dataframe:')
print(df)

Pandas: Replace NANs with row mean

We can apply the same method as we have done above with the row. Previously, we replaced the NaN values with the mean of the columns but here we will replace the NaN values in the row by calculating the mean of the row.

For this, we need to use .loc(‘index name’) to access a row and then use fillna() and mean() methods.

Pandas: Replace NANs with row mean

Code:

df.loc['History'] = df.loc['History'].fillna(value=df.loc['History'].mean())
print('Updated Dataframe:')
print(df)

Conclusion

So, these were different ways to replace NaN values in a column, row or complete data frame with mean or average values.

Hope this article was useful for you!