Author name: Prasanna

Python Data Persistence – Using pymysql Module

Python Data Persistence – Using pymysql Module

To make a Python program interact with a MySQL database, we need to install a DB-API compliant module. As mentioned earlier in this chapter, there are many alternatives available for this purpose. In this section, we shall discuss the use of pymysql module. In any case, the functionality of any DB-API compatible module is more or less similar, with a few differences.

The pymysql module is not a part of Python’s standard library. Hence, we have to install it using pip utility.

E:\python37>pip3 install pymysql

As per the DB-API standards, the first step is to establish a connection with the database to be used. Usage of connecting () function in pymysql module is a little different. Remember that MySQL databases are hosted on a server. Hence, the server’s URL and login credentials (user ID and password) must be passed to connect () function. Additionally, if you are trying to connect to an existing database, its name should also be provided. If you are going to create a new database (or use an existing database later), you needn’t provide its name in the connect ( ) function’s parameter list and just connect to the server.

Example

>>> import pymysql
>>> con=pymysql . connect ( ' localhost ' , 'root' , '***' )

MySQL provides the ‘CREATE DATABASE’ statement to start a new database. Execute this statement through the cursor object obtained from the connection object.

Example

>>> cur=con.cursor ( )
>>> cur.execute('create database mynewdb')

You can now start using this (or any other existing database) either by select_db () method or executing the ‘USE DATABASE’ statement.

Example

>>> con.select_db('mynewdb')
>>> #or
>>> cur.execute('use mynewdb')

Now that the new database has been created and is in use, you are now in a position to create a table and perform insert, update, delete and select operations on it exactly as we did on an SQLite database. The only thing you need to take into account is MySQL data types which are different from SQLite data types. (Table 8,2)

Integer typesTINYINT, SMALLINT, MEDIUMINT, INTEGER, BIGINT
Float typesFLOAT, DOUBLE , DECIMAL, NUMERIC
String typesVARCHAR, TEXT, BLOB, CHAR, NCHAR
Date/time typesDATE , TIME, DATETIME
Binary typesBLOB, LONGBLOB

Example

>>> qry=' ' '
CREATE TABLE Products (
ProductID INTEGER PRIMARY KEY AUTO_INCREMENT,
Name VARCHAR (20),
Price INTEGER
)
' ' '
>>> cur.execute(qry)

You can follow the process, as detailed in previous sections of this chapter, for insert, delete, and select operations.

Python Data Persistence – Using pymysql Module Read More »

Python Data Presistence – Nested Loops

Python Data Presistence – Nested Loops

Nesting is a very popular term in programming parlance. It indicates the existence of a certain entity inside another that is of the same type. If you have a situation where an if statement appears inside another if statement, it is termed as nested if. Similarly, a loop within another loop constitutes nested loops. It is also possible to have nested functions, classes, and so on. We are going to discuss nested loops here.
As mentioned above, a nested loop means the existence of a loop within a loop. The following diagram illustrates the situation (figure 2.19):

Python Data Presistence - Nested Loops chapter 2 img 1

What happens when such nesting of the loop is done? Each repetition of the outer loop encounters the inner loop which has to complete its own repetitions before the next round of the outer loop starts. As a result, if the outer loop is designed to perform m iterations and the inner loop is designed to perform n iterations, the innermost statement will be executed men times.

There are a number of instances around us where looping activities are performed in a nested manner. The clock for example has three loops. Outer loop counting hours has a nested loop for minutes, which in turn has a seconds loop.

Any type of loop (while or for) can appear in any other type. However, in practice, we find nesting for loops. The following example displays all prime numbers between 1 and 100. Outer loop iterates over a range object. Inner loop checks whether each number in the outer range is prime or not.

Example

#nestedfor.py
for num in range ( 1 , 101):
for x in range(2,num):
if num%x==0:
break
x=x+1
else:
print (num,sep=’ ‘, end = ‘ ‘ )

Output:

E:\python37>python nestedfor.py
1 2 3 5 7 11 13 17 19 23 29 31 37 41 43 47 93 59 61 67 71 73 79 83 89 97
E:\python37>


Python Data Presistence – Nested Loops Read More »

Python Data Presistence – Variables

Python Data Presistence – Variables

When you use an object of any of the above types – of any type for that matter – (as a matter of fact everything in Python is an object!) it is stored in the computer’s memory. Any random location is allotted to it. Its location can be obtained by the built-in id ( ) function.

Example

>>> id(10)
1812229424
>>> id(‘Hello’)
2097577807520
>>> id([10,20,30])
2097577803464

However, order to refer to the same object repetitively with its id() is difficult. If a suitable name (by following rules of forming identifier) is given to an object, it becomes convenient while referring to it as and when needed. To bind the object with a name, the ‘=’ symbol is used. It is called the assignment operator.

Here, an int object 5 is assigned a name ‘radius’. The id( ) of both is same.

Example

>>> id(5)
1812229264
>>> radius=5
>>> id(radius)
1812229264

The name ‘radius’ can now be used in different expressions instead of its id ( ) value.

Example

>>> diameter=radius*2
>>> diameter
10
>>> area=3. 142*radius*radius
>>> area
78.55
>>> circumference=2*3.142*radius
>>> circumference
31.419999999999998

Dynamic Typing

Python is a dynamically typed language. This feature distinguishes it from C Family languages like C, C++, Java, and so on. These languages are statically typed. What is the difference?

The difference is the manner in which a variable behaves. In statically typed languages, the variable is in fact a named location in the memory. Moreover, it is configured to store data of a certain type before assigning it any value. Data of any other type is not acceptable to the respective language compiler. Type of Variable is announced first, and data of only that type is acceptable. This makes these languages statically typed.

Look at the following statements in a Java program. A string variable is declared and assigned a string value. However, if we try storing the value of any other type then the Java compiler reports an error.

Example

String somevar;
somevar=”some string value”;
somevar=999;

Java Compiler error

Error: incompatible types: int cannot be converted to java. lang.String

On the other hand, a variable in Python is not bound permanently to a specific data type. In fact, it is only a label to an object in memory. Hence, Java-like prior declaration of variable’s data type is not possible, nor is it required. In Python, the data assigned to a variable decides its data type and not the other way round.

Let us define a variable and check its id ( ) as well as type ( ).

Example

>>> somevar=’some string value’
>>> id(somevar)
2166930029568
> > > type(somevar)
<class ‘str’>

‘somevar’ is a string variable here. But it’s just a label. So you can put the same label on some other object.

Let us assign an integer to Somevar’ and check id () as well as type () again.

Example

>>> somevar=999
>>> id(somevar)
2166929456976
>>> type(somevar)
<class 1int’>

Two things to note here:

  1. You didn’t need a prior declaration of variable and its type.
  2. Variable’s type changed according to data assigned to it. That’s why Python is called a dynamically typed language.

Sequence Operators

As described earlier, string, list, and tuple objects are sequence types. Obviously, arithmetic operators won’t work with them. However, the symbols ‘+’ and can. In this context, they are defined as concatenation and repetition operators respectively.
The concatenation operator (‘+’) appends the contents of the second operand to the first. Of course, both operands must be of the same type.

Example

>>> #concatenation of strings
>>> str1=’Hello World.’
>>> str2=’Hello Python.’
> > > str1+str2
‘Hello World.Hello Python.’
> > > #concatenation of lists
. . .
>>> list1= [1,2,3,4]
> > > list2= [‘one’, ‘two’, ‘three’ ,’four’ ]
> > > listl+list2
[1, 2 , 3 , 4 , ‘ one ‘ , ” two ‘ , ‘ three ‘ , ‘ four’]
>>> ttconcatenation of tuples
. . .
>>> tup1=(1,2,3,4)
>>> tup2=(‘one’,’two’,’three’, ‘four’)
>>> tupl+tup2
(1, 2 , 3, 4, ‘one’, ‘two’, ‘three’, ‘ four’)

Repetition operator(‘*’) concatenates multiple copies of a sequence. The sequence to be replicated is the first operand, the second operand is an integer that specifies the number of copies.

Example

>>> #repetition operator with string
. . .
>>> strl=’Hello.’
>>> str1*3
‘Hello.Hello.Hello.’
>>> #repetition operator with list
. . .
>>> list1= [1,2,3,4]
>>> list1*3
[1, 2, 3, 4, 1, 2, 3, 4, 1, 2, 3, 4]
>>> #repetition operator with tuple
tup1=(1,2,3,4)
>>> tup1*3
(1, 2, 3, 4, 1, 2, 3, 4, 1, 2, 3, 4)

Index operator (‘[]!) extracts an item at a given position in a sequence. As you know, the sequence is an ordered collection of items and each item has a positional index starting from 0. The expression seq[i] fetches ill item from a given sequence.

Example

>>> #indexing of string
. . .
>>> str1=’Monty Python and the Holy Grail ‘
>>> str1 [21]
‘ H ‘
>>> #indexing of list
. . .
>>> list1=[l,2,3,4,5,6,7,8,9,10]
>>> list1 [6]
7
>>> list1= [‘Python ‘ , ‘‘Java’, ‘C++’, ‘Ruby’, ‘Kotlin’]
>>> .list1 [3]
‘Ruby’
>>> #indexing of tuple
. . .
>>> tup1=(-50, 3.142, 2+3j, True, 50
>>> tup1[2]
(2+3j) )

Slice operator (‘[:]’) fetches a part of the sequence object. The expression has two integers on either side of the symbol inside square brackets. The first integer is an index of the first item in the sequence and the second integer is an index of the next item up to which slice is desired. For example seqflj] returns items from i* position to (j-l)the position. The first integer is 0 by default. Second integer defaults to the last index of the sequence. Remember index starts from 0.

Example

>>> #slicing of string
… strl=’Monty Python and the Holy Grail’
>>> strl [13:16]
‘and’
>>> listl=[‘Python’, ‘Java’, ‘C++’, ‘Ruby’, ‘Kotlin’]
>>> listl [1:3]
[‘Java’, ‘C++’]
>>> tupl=(-50, 3.142, 2 + 3j, True, 50)
>>> tupl[2:4]
( (2 + 3j), True)

There are two ‘Membership’ operators in Python. The in operator checks if an operand exists as one of the items in a given sequence and returns True if so, otherwise, it returns False. The not-in operator does the opposite. It returns False if the operand doesn’t belong to a given sequence, otherwise it returns True.

Example

>>> #membership operator with string
. . .
>>> str1=’Monty Python and the Holy Grail’
>>> ‘Holy’ in str1
True
>>> ‘Grill’ not in str1
True
>>> #membership operator with list
. . .
>>> list1=[‘Python’, ‘Java’, ‘C++’, ‘Ruby’, ‘Kotlin’]
>>> ‘C#’ in list1
False
>>> ‘Ruby’ not in list1
False
>>> #membership operator with tuple
. . .
>>> tup1=(-50, 3.142, 2+3j, True, 50)
>>> 3.142 in tup1
True
>>> 3.142 not in tup1
False

Mutability

As already mentioned, everything in Python is an object. A Python object is either mutable or immutable. What is the difference?
To put it simply, the object whose contents can be changed in place is mutable. As a result, changes are not possible in the contents of immutable objects. Of the built-in objects numbers, string, and tuple objects are immutable. On the other hand, list and dictionary objects are mutable.

Let us try to understand the concept of mutability with the help of the id() function that we have earlier used. First, define a variable and assign an integer to it.

Example

>>> x=100
>>> id(x)
1780447344

Remember that a variable is just a label of the object in memory. The object is stored in a location whose id() is given as shown in example 1.31 above. (The location is allotted randomly. So, when you try it on your machine, it may be different.) To understand what goes on inside the memory, have a look at the diagram (figure 1.4) below. Figure 1.4 (a) shows a label assigned to an integer object 100.
Next, assign x to another variable y.

Python Data Presistence - Variables chapter 1 img 1

Example

>>> y=x
>>> id(y)
1780447344
>>> y
100

Figure 1.4 (b) shows that id() of y is the same as id ( ) of x. It means both x and y are labels of the same object in memory, in this case, the number 100.
Now, increment x by 1 (x=x+l). A new integer object 101 is located at a different location and it is bound to name x. Now x label is detached from 100 but y still remains on 100. (refer figure 1.4 (c))

Example

>>> x=x+1
>>> X
101
>>> id(x)
1780447376
>>> id(y)
1780447344

id (x) has changed but id (y) remains as earlier.

It is clear that the location containing object 100 doesn’t get replaced by 101, instead, it is stored in a new location. Hence, we say that a Number object is immutable. String and tuple objects are also immutable. If we try to change the sequence of characters in a string or any of the items in a tuple, the TypeError message appears effectively meaning that items in a string/tuple sequence can’t be altered because they are immutable.

Example

>>> str1=’Hello World’
>>> str1[6]
‘ W’
>>> str1 [6] = ‘ z ‘
Traceback (most recent call last):
File “<stdin>”, line 1, in <module>
TypeError: ‘str’ object does not support item
assignment
>>> tup1=(-50, 3.142, 2+3j, True, 50)
>>> tup1[1]
3.142
>>> tup1[1]=2.303
Traceback (most recent call last):
File “<stdin>”, line 1, in <module>
TypeError: ‘tuple’ object does not support item assignment

This restriction doesn’t apply to list or dictionary objects. You can add, remove, or modify a list or dictionary. Hence, they are mutable.
Following code demonstrates how an item in list/dictionary is modified.

Example

>>> list1=[‘python’, ‘java’,’C++’ , ‘Ruby’, ‘kotlin’]
>>> list[2] = ‘c#’
>>> list1
[‘Python’ , ‘Java’ , ‘C#’ , ‘Ruby’ , ‘ Kotlin’ ]
>>> dict1= {“Mumbai’ , : ‘Maharastra’ , ‘Hyderebad’ : ‘Telangana’ , ‘patna’ , : ‘Bihar’}
>>>dict1 [‘Hyderabad’ ] = ‘Andhra pradesh’
>>>dict1
{‘Mumbai’ : ‘ Maharastra’ , ‘Hyderabad’ : ‘Andhra pradesh’ ‘patna’ : ‘Bihar’ }

Addition/removal of items in list and dictionary is being explained later in this chapter. That brings us to one of the questions left unanswered earlier. What is the difference between list and tuple? Now the answer is clear. Tuple is immutable. List is mutable.

Python Data Presistence – Variables Read More »

Python Data Presistence – Methods of Built-in Data Type Classes

Python Data Persistence – Methods of Built-in Data Type Classes

Python built-in object of a certain type is characterized by attributes and methods, and as defined in the built-in class of the corresponding name. Methods defined in s tr class for example are available for use to each string object. So is the case of list, tuple, and dictionary objects.

In this section, some commonly used methods of built-in type classes are described. (Two new terms pop up here – class and methods. You’ll come to know about them in the chapter on Object-oriented programming. For the time being treat a method as a function only.)

String Methods

Various methods in str class fall into the following categories:

Related to Case of Alphabets

1. capitalize ( ): Method changes the first letter of the given string to uppercase and returns another string object.

Example

>>> str1=1 python string’
>>> str2=str1.capitalize( )
>>> str2
‘Python string’

2. lower ( ): Method returns a string object by replacing all alphabets in given string with respective lowercase equivalents.

Example

>>> str1=’Python String’
>>> str2=strl.lower( )
>>> str2
‘python string’

3. upper ( ): Method ensures that the resulting string consists of all uppercase alphabets.

Example

>>> str1=’Python String’
>>> str2=str1.upper()
>>> str2
‘PYTHON STRING’

4. title ( ): Method titlecases the string having first alphabet of each word in uppercase.

Example

>>> str1=’python string’
>>> str2=strl.title()
>>> str2
‘Python String’

5. swapcase ( ): Method replaces uppercase alphabets by lowercase and vice versa.

Example

>>> str1=’Simple is Better than Complex.’
>>> str2=str1.swapcase()
>>> str2
‘SIMPLE IS bETTER THAN COMPLEX.’
>>> str1=str2.swapcase()
>>> str1
‘Simple is Better than Complex.’

Find/Replace Methods

1. find( ): Method returns index of first occurrence of a substring in given string. If not found, the method returns -1

Example

>>> str1=’Simple is Better than Complex.’
>>> str1 .find (‘p1’ )
3
>>> strl .find (‘bet’ )
-1

2. index( ): Method is similar to find() except this one raises ValueError if the substring is not found.

Example

>>> str1=’Simple is Better than Complex.’
>>> str1. index (‘p1’ )
3
>>> strl.index(‘bet’)
Traceback (most recent call last):
File “<stdin>”, line 1, in <module>
ValueError: substring not found

3. replace ( ): Method requires two string parameters. All occurrences of first parameter get replaced by second parameter.

Example

>>> str1=’all animals are equal. Some are more equal
>>> str1.replace(‘are’, ‘were’)
‘all animals were equal. Some were more equal’

4. count( ): Method returns an integer corresponding to the number of times a substring occurs in a given string.

Example

>>> str1=’Simple is Better than Complex.’
>>> str1.count(‘pi1)
2

Methods Returning Boolean Result

1. isalpha ( ): Method returns True if all characters in given string are alphabetic i.e a-z or A-Z.

Example 

>>> str1=’BpbOnline’
>>> str1.isalpha()
True
>>> str2=’BPB Publications’
>>> str2.isalpha()
False

2. isdigit ( ): Method returns True if the string is made of all digits. If not, it returns False.

Example

>>> str1= ‘8860322236’
>>> str1.isdigit ( )
True
>>> str1= ‘ (+91) 8860322236’
>>> str1 . isdigit ( )
False

3. islower( ) : If all alphabets in given string are in lowercase,this method returns True otherwise returns False.

Example

>>> str1=’pythonrocks’
>>> str1.is lower( )
True

4. isupper ( ): Method returns True if all alphabets in given string are in uppercase not considering other characters.

Example

>>> str1=’IIT JEE’
>>> str1.isupper( )
True

5. startswith( ): method returns True if the given string has substring parameter or any of string items is in a tuple parameter. If it doesn’t, then False is returned.

Example

>>> name=1 Mr. John’
>>> name.startswith(‘Mr’)
True
>>> name=’Dr. Watson’
>>> name.startswith((‘Mr’ , True ‘Dr’))
True

6. endswith ( ): Method checks whether the substring parameter is at the end of a given string and returns True if so, otherwise returns False. The substring to be checked can also be in the tuple parameter.

Example

>>> name=’Mr. John’
>>> name.endswith(‘on’)
False
>>> name=’Dr. Watson’
>>> name.endswith((‘on’, True 1 ‘hn’))
True

Join/split

1. join( ): Method concatenates all string objects in a list or tuple. Items in list/tuple are separated by given string object.

>>> list1= [‘Python’, 1 C++’, ‘Ruby’, 1Kotlin’]
>>> sep=’ and ‘
>>> sep.join(list1)
‘Python and C++ and Ruby and Kotlin’
>>> listl= [‘192’, ‘168’, ‘0’ , ‘1’ ]
>>> sep=’.’
>>> sep.join(listl)
‘192.168.0.1’

2. split ( ): Method separates splits given string into parts wherever the substring parameter is found. The parts are returned in the form of a list object.

Example

>>> str1=’all animals are equal. Some are more equal’
>>> strl.split(‘ ‘)
[‘all’, ‘animals’, ‘are’, ‘equal.’, ‘Some’, ‘are’, ‘more’, ‘equal’]
>>> strl=’192.168.0.1′
>>> strl.split(‘.’)
[ ‘ 192’, ‘ 168’, ‘O’, ‘1’ ]

3. strip ( ): If no parameter is present in the parentheses of this method, then leading and trailing spaces are removed. The parameter can be a string of one or more characters. It acts as a set of characters to be removed.

Example

>>> str1=’ Hello Python ‘
>>> strl.strip( )
‘Hello Python’
>>> str1=’all animals ‘are equal’
>>> str1.strip(‘alu’)
‘ animals are eq’

4. format( ): Method returns a formatted string by interpolating placeholders in the given string by values of objects. Values of parameters in the method’s parentheses fillup the place holders marked by {}.

Example

>>> name=’Virat Kohli’
>>> runs=10385
>>> print (‘{ } is Captain of India. He has scored {} runs in ODI.’.format(name,runs))
Virat Kohli is Captain of India. He has scored 10385 runs in ODI.

The curly bracket placeholders in the string are filled in the same order in which parameters appear in parentheses. You can also refer to the parameter by name and use them in any order.

Example

>>> name=’Virat Kohli’
>>> runs=10385
>>> print (‘{nm} is Captain of India. He has scored {r} runs in ODI.1.format(r=runs,nm=name))
Virat Kohli is Captain of India. He has scored 10385 runs in ODI.

Python also supports C-style string formatting using the ‘ %’ sign as a substitution character. The format specification symbols (like %d, %f, %c, and so on; famously used in print( ) statement of C program) are available for use in Python too.

Example

>>> name=1Virat Kohli’
>>> runs=10385
>>> print (“%s is Captain of India. He has scored %d runs in ODI.” % (name,runs))
Virat Kohli is Captain of India. He has scored 10385 runs in ODI.

List Methods

As described earlier, the list is a mutable data type. It means, it is possible to change the contents of a list object after it has been defined. In this section, you will learn to handle methods in list class that can add/modify/rein o ve items in a list object.

1. append ( ): Method adds a new item at the end of the given list.

Example

>>> list1=[‘Python’,’C++’ ’Ruby’, Kotlin’]
>>> list1.append(‘JS’)
>>> list1
[‘Python’, ‘C++’, ‘Ruby’, ‘Kotlin , ‘JS’]
>>>

2. insert ( ): Method needs two parameters. the Second parameter is the new object to be added. The first parameter is the index at which it will be inserted. Again, the sequence index starts from 0.

Example

>>> list1=[‘Python’,’C++’ ‘Ruby’ ‘Kotlin’]
>>> list1.insert(2,’Java’)
>>> list1
[‘Python’, ‘C++’, ‘Java’, ‘Ruby’ ‘Kotlin’]
>>>

3 . count ( ): Method returns an integer corresponding to number of times a certain item appears in given list.

Example

>>> list1= [3,5,9,3,6]
>>> list1.count(3)
2
>>> str1=’all animals are equal. Some are more equal’
>>> list1=strl.split(‘ ‘)
>>> list1
[‘all’, ‘animals’, ‘are’, ‘equal.’, ‘Some’, ‘are’, ‘more’, ‘equal’]
>>> list1.count(‘are’)
2
> > >

4. index ( ): method returns the index of the first occurrence of a certain value if found in a given list. If it is not found, then the method raises ValueError.

Example

>>> list1= [‘ all’ , ‘animals’, ‘are’, ‘equal.’, ‘Some’, ‘are’, ‘more’, ‘equal’]
>>> list1.index(‘are’)
2
>>> listl.index(‘were’)
Traceback (most recent call last):
File “<stdin>”, line 1, in <module>
ValueError: ‘were’ is not in list
>>>

5 . reverse ( ): Order of items in given list is reversed by using this

>>> list1=[‘Python’, ‘C++ , ‘Ruby’, ‘ Kotlin’, 1 JS’ ]
> > > listl.reverse( )
> > > list1
[ ‘ JS ‘, ‘Kotlin’, ‘Ruby’, C++’, ‘Python’]
> > >

6 . sort ( ): Items in the given list object are rearranged in ascending order unless the method’s ‘reverse’ parameter set to True.

Example

>>> list1= [‘Python’, ‘C++’, ‘Ruby’, ‘Kotlin’, ‘JS’]
>>> list1.sort()
>>> list1
[‘C++’, ‘JS’, ‘Kotlin’, ‘Python’, ‘Ruby’]
>>> list2= [‘all’, ‘animals’, ‘are’, ‘equal.’,
‘Some’, ‘are’, ‘more’, ‘equal’]
>>> list2.sort(reverse=True)
>>> list2
[‘more’, ‘equal.’, ‘equal’, ‘are’, ‘are’, ‘animals’, ‘all’, ‘Some’]
> > >

7. remove ( ): Method causes removal of an item’s first occurrence from the given list. If the item to be removed is not found in the list, then ValueError is raised.

Example

8 . pop ( ): Method is similar to remove() method. However, this method returns the removed item. The pop( ) method by default removes the last item in the list. If it contains an index parameter, the item at the specified index is removed and returned.

Example

>>> list1= [‘Python’, ‘C++’, ‘Ruby’, ‘Kotlin’, ‘JS’]
>>>lang=list1.pop( )
>>>>>> list1.sort( )
>>> list1
[‘C++’, ‘JS’, ‘Kotlin’, ‘Python’, ‘Ruby’]
>>> list2= [‘all’, ‘animals’, ‘are’, ‘equal.’,
‘Some’, ‘are’, ‘more’, ‘equal’]
>>> list2.sort(reverse=True)
>>> list2
[‘more’, ‘equal.’, ‘equal’, ‘are’, ‘are’, ‘animals’,
‘all’, ‘Some’] ‘
> > >

If you remember, a tuple is an immutable object. As a result, the above methods performing addition, removal, sorting, and so on; can’t be used with tuple. Only count ( ) and index ( ) methods are available for a tuple object. Their behavior is similar to list methods of the same name.

Dictionary Methods

Like List, a dictionary object is also mutable. However, the dictionary is not a sequence. Its items do not have an index. So, index-based insertion or removal is not supported. Following methods are defined in the built-in dictionary class:

1. get ( ): Method retrieves value component corresponding to key parameter.

Example

>>> dict1 = {‘Mumbai 1 :’Maharashtra’, ‘Hyderabad’:’Telangana’, ‘Patna1:’Bihar’}
>>> dict1.get(‘Patna’)
‘Bihar’
>>>

2. pop ( ): Method removes k-v pair item from given dictionary object corresponding to key parameter, an returns its value component.

Example

>>> dict1 = {1 Mumbai’: Maharashtra’ , ‘Hyderabad’:’Telangana’, ‘Patna’:’Bihar’}
>>> state=dictl.pop( ‘Mumbai’)
>>> state
‘Maharashtra’
>>>

3 . popitem ( ): Method returns a k-v pair in the form of a tuple.

Example

>>> dictl={‘Mumbai’:’Maharashtra’,
‘Hyderabad’:1Telangana’, ‘Patna’:’Bihar’}
>>> t=dictl.popitem()
>>> t
(‘Patna’, ‘Bihar’)
>>>

4. update ( ): Method is used to add a new k-v pair item as well as modify the value of the existing key. The update() method takes another • dictionary object as a parameter. There may be one or more items in it. If its key is not used in a given dictionary, a new k-v pair is added. If the key is already present, its value is replaced by the new value. This process takes place for all items in the diet parameter.
In following code snippet, dictl is updated by adding a new state- capital pair.

Example

>>> dict1={‘MaharashtraBombay’Andhra Pradesh1:1 Hyderabad’, ‘UP’ :’Lucknow’}
>>> dict1.update({‘MP’ :’Bhopal1})
>>> dict1
{‘Maharashtra’: ‘Bombay’, ‘Andhra Pradesh’: ‘Hyderabad’, ‘UP’: ‘Lucknow’, ‘MP’: ‘Bhopal’}
>>>

The initial dictionary object gets updated by another diet parameter. Capitals of two states are modified and one pair is added.

Example

>>> dict1={‘Maharashtra’: ‘Bombay’, ‘Andhra Pradesh’: ‘Hyderabad’, ‘UP’: ‘Lucknow’, ‘MP’: ‘Bhopal’}
>>> dict2={‘AndhraPradesh’:’Amaravati’,’Telangana’:’Hyderabad’, ‘Maharashtra’:’Mumbai’}
>>> dictl.update(dict2)
>>> dict1
{‘Maharashtra’: ‘Mumbai’, ‘Andhra Pradesh’: ‘Amaravati’, ‘UP’: ‘Lucknow’, ‘MP’: ‘Bhopal’, ‘Telangana’: ‘Hyderabad’}
>>>

You can also add a new k-v pair simply by assigning value to the unused key by the following syntax:

dict1[newkey]=value

Here is an example:

Example

>>> dict1 ={‘Maharashtra’: ‘Bombay’ , ‘Andhra Pradesh ‘ : ‘ Hyderabad ‘ , ‘ UP’ : ‘Lucknow’ , ‘MP’ , ‘Bhopal’}
>>> dict1 [‘Maharastra’] = ‘Mumbai’
>>> dict1
{‘Maharashtra’: ‘Bombay’ , ‘Andhra Pradesh ‘ : ‘ Hyderabad ‘ , ‘ UP’ : ‘Lucknow’ , ‘MP’ , ‘Bhopal’}
>>>

Dictionary View Methods

1. items ( ): Method returns a view object consisting of two-item tuples, one for each k-v pair. This view object can be converted to a list of k-v tuples.

Example

>>> dict1 = {‘Maharastra’: ‘Mumbai’ , “Andhra pradesh’ :’Amaravati’ , ‘UP’: ‘Lucknow’ , ‘MP’: ‘Bhopal’, ‘Telangana’ : ‘Hyderabad’}

>>> items=dict1.items( )

>>> items

dict_items([{‘Maharastra’ , ‘Mumbai’), (‘Andhra pradesh’ , ‘Amaravati’), (‘UP’, ‘Lucknow’), (‘MP’, ‘Bhopal’), (‘Telangana’ , ‘Hyderabad’}])

>>> list(items)

[(‘Maharastra’ , ‘Mumbai’), (‘Andhra pradesh’, ‘Amaravati’), (‘UP’, ‘Lucknow’), (‘MP’, ‘Bhopal’), (‘Telangana’ , ‘Hyderabad’}])

>>>

2.keys ( ):

The method returns a view object consisting of all keys in a given dictionary. This view object can be converted to a list of keys.

Example

>>> dict1 = {‘Maharastra’: ‘Mumbai’ , ‘Andhra pradesh’ :’Amaravati’ , ‘UP’: ‘Lucknow’ , ‘MP’: ‘Bhopal’, ‘Telangana’ : ‘Hyderabad’}

>>> keys=dict1.keys( )

>>> keys

dict_keys([‘Maharastra’ , ‘Andhra pradesh’ , ‘UP’ , ‘MP’ , ‘Telangana’])

>>> list (keys)

[‘Maharastra’ , ‘Andhra pradesh’ , ‘UP’ , ‘MP’ , ‘Telangana’]

>>>

3 . values ( ): Method returns a view object consisting of all values in a given dictionary. This view object can be converted to a list of values.

Example 

>>> dictl={1 Maharashtra’: ‘Mumbai’, ‘Andhra Pradesh’: ‘Amaravati’, ‘UP’: ‘Lucknow’, ‘MP’:
‘Bhopal’, ‘Telangana’: ‘Hyderabad’}
>>> values=dictl.values()
>>> values
dict_values([‘Mumbai’, ‘Amaravati’, ‘Lucknow’,
‘Bhopal’, ‘Hyderabad’])
>>> list(values)
[‘Mumbai’, ‘Amaravati’, ‘Lucknow’, ‘Bhopal’,
‘Hyderabad’3
>>>

All view objects returned by items(), keys(), and values() methods get automatically refreshed whenever the underlying dictionary object gets updated.

Example

>>> dictl={‘Maharashtra’:’Bombay’,’Andhra Pradesh’:
‘Hyderabad’, ‘UP’:’Lucknow’}
>>> items=dictl.items()
>>> keys=dictl.keys >>> values=dictl.values >>> items
dict_items([(‘Maharashtra’ , ‘Bombay’), (‘Andhra Pradesh’, ‘Hyderabad’), (‘UP’, ‘Lucknow’)])
>>> dict2={‘Andhra
Pradesh’:’Amaravati’,’Telangana’:’Hyderabad’,
‘Maharashtra’:’Mumbai’}
>>> dictl.update(dict2)
>>> items
dict_items([(‘Maharashtra’, ‘Mumbai’), (‘Andhra
Pradesh’, ‘Amaravati’), (‘UP’, ‘Lucknow’),
(1Telangana’, ‘Hyderabad’)])
>>>

We have thus reached the end of a fairly lengthy introductory chapter of this book. As mentioned in the preface, this (and next) chapter is intended to be a quick-start tutorial for Python. So try and explore Python as much as you can with Python’s interactive shell. The next chapter explains how Python’s scripting mode works. Python’s conditional and looping techniques are also discussed there.

Python Data Presistence – Methods of Built-in Data Type Classes Read More »

Python Data Presistence – Data Types

Python Data Presistence – Data Types

Data and information, these two words are so common nowadays – they are on the lips of everybody around us. But many seem to be confused about the exact meaning of these words. So much so, people use them almost as if they are synonymous. But they are not.
The computer is a data processing device. Hence, data is a raw and factual representation of objects, which when processed by the computer program, generates meaningful information.

Various pieces of data items are classified into data types. Python’s data model recognizes the following data types (figure 1.3):

Python Data Presistence - Data Types chapter 1 img 1

Number Types

Any data object having a numerical value (as in mathematical context) is a Number. Python identifies integer, real, complex, and Boolean number types by the built-in type names int, float, complex, and bool respectively. Any number (positive or negative) without a fractional component is an integer, and the fractional component is afloat. The boolean object represents truth values True and False, corresponding to 1 and 0 respectively.

A number object is created with a literal representation using digit characters. Python has a built-in type ( ) function to identify the type of any object.

Example

>>> #this is an integer
. . . 100
100
>>> type ( 100 )
<class ‘ int ‘ >
>>> #this is a float
. . . 5.65
5.65
>>> type ( 5 . 65 )
<class ‘float’>
>>> #this is bool object
. . . True
True
>>> type ( True )
<class ‘ bool ‘ >

Any number with a fractional component (sometimes called the mantissa) is identified as a floating object. The fractional component is the digits after the decimal point symbol. To shorten the representation of a float literal with more digits after the decimal point, symbols ‘e’ or ‘E’ are used.

Example

>>> #this is float with scientific notation
. . . 1 . 5e – 3
0 . 0015
>>> type ( 1 . 5e – 3 )
<class ‘ float ‘ >

A complex number consists of two parts – real and imaginary – separated by ‘+’ or sign. The imaginary part is suffixed by ‘j’ which is defined as an imaginary number which is the square root of \(\sqrt{-1}\) (• A complex number is represented as x+yj.

Example

>>> 2 + 3j
( 2+3j )
>>> type ( 2+3j )
<class ‘ complex ‘ >

Arithmetic Operators

All number types can undergo arithmetic operations. Addition (‘+’), subtraction multiplication (‘*’) and division (7’) operators work as per their traditional meaning. In addition, few more arithmetic operators are defined in Python, which are:

  • Modulus or remainder operator (‘%’), returns the remainder of the division of the first operand by the second. For example, 10%3 returns 1.
  • Exponent operator (‘**’), computes the first operand raised to second. For example, 10**2 returns 100.
  • The floor division operator (7/’) returns an integer not greater than the division of the first operand by the second. For example, 9//2 returns 4.

Example

>>> #addition operator
. . . 10+3
13
>>> #subtraction operator
. . . 10-3
7
>>> #multiplication operator
. . . 10*3
30
>>> #division operator
. . . 10/3
3.3333333333333335
>>> #modulus operator
. . . 10%3
1
>>> #exponent operator
. . . 10**3
1000
>>> #floor division operator
. . . 10//3
3

Sequence Types

An ordered collection of items is called a sequence. Items in the sequence have a positional index starting with 0. There are three sequence types defined in Python.
1. String: Ordered sequence of any characters enclosed in single, double, or triple quotation marks forms a string object. Each character in the string object is accessible by index.

Example

>>> #string using single quotes
. . . ‘Hello. How are you?’
‘Hello. How are you?’
>>> #string using double quotes
. . .  “Hello. How are you?”
‘Hello. How are you?’
>>> #string using triple quotes
. . . ”’Hello. How are you?”’
‘Hello. How are you?’

2. List: An ordered collection of data items, not necessarily of the same type, separated by a comma and enclosed in square brackets [ ] constitutes a List object. The list is a sequence type because its items have a positional index starting from 0.

3. Tuple: A tuple is also an ordered collection of items, which may be of dissimilar types, each separated by a comma and enclosed in parentheses ( ). Again each item in tuple has a unique index.

Example

>>> [ ‘ pen ‘ , 15 , 25 . 50 , True ]
[ ‘pen ‘ , 15 , 25 . 5 , True ]
>>> type ( [ ‘ pen ‘ , 15 , 25 . 50 , True ] )
<class ‘ list’ >
>>> ( ‘ Python ‘ , 3 . 72 , ‘ Windows ‘ , 10 , 2 . 5E04 )
( ‘ Python ‘ ,  3 . 72 ,  ‘ Windows ‘ , 10 , 25000 . 0 )
>>> type ( ( ‘ Python ‘ ,  3 . 72 , ‘ Windows ‘ , 10 , 2 . 5E04 ) )
<class ‘ tuple ‘ >

Apart from the type of brackets – [ ] or ( ) – List and Tuple appear similar. However, there is a crucial difference between them – that of mutability. This will come up for explanation just a few topics afterward.

Mappings Type

A mapping object ‘maps’ the value of one object with that of other. Python’s dictionary object is an example of mapping. A language dictionary is a collection of pairs of words and corresponding meanings. Two parts of the pair are key (word) and value (meaning). Similarly, a Python dictionary is also a collection of key-value pairs, separated by a comma and is put inside curly brackets {}. The Association of the key with its value is represented by putting V between the two.

Each key in a dictionary object must be unique. The key should be a number, string, or tuple. (All are immutable objects). Any type of object can be used as the value in the pair. The same object can appear as the value of multiple keys.

Example

>>> {1:’one’, 2:’two’, 3 :’three’}
{1: ‘one’ , 2: ‘two’ , 3 : ‘three’}
>>> type({1:’one’, 2:’two’, 3:’three’})
<class ‘diet’>
>>> {‘Mumbai’:’Maharashtra’ ,
‘Hyderabad’:’Telangana’, ‘Patna’: Bihar ‘}
{‘Mumbai’: ‘Maharashtra’ , ‘Hyderabad’: ‘Telangana’,
‘Patna’: ‘Bihar’}
>>> type({‘Mumbai’:’Maharashtra’ ,
‘Hyderabad’:’Telangana’ , eclass 1 diet’> ‘Patna’: Bihar ‘})
>>> {‘Windows’: t’Windows XP’, ‘Windows 10 ‘ ] ,
‘Languages’: [‘Python’, ‘ Java’] }
{‘Windows’: [‘Windows XP ‘Windows 10’ 1 ,
‘Languages’: [‘Python’, ‘Java’]}
>>> type({‘Windows’:[‘Windows XP’ ‘Windows 10’],
‘Languages’ : [‘Python’, ‘Java’]})
<class ‘diet’>


Python Data Presistence – Data Types Read More »

Python Data Presistence – Indents

Python Data Presistence – Indents

The use of indents is one of the most unique features of Python syntax. As mentioned above, each statement starts at the first character position of the next available line on the online shell. In the case of the script, blank lines are ignored. In many situations, statements need to be grouped together to form a block of certain significance. Such circumstances are the definitions of function or class, a repetitive block of statements in the loop, and so on. Languages such as C/C++ or Java put series of statements in a pair of opening and closing curly brackets. Python uses the indentation technique to mark the blocks. This makes the code visually cleaner than clumsy curly brackets.

Whenever you need to start a block, use: symbol as the last character in the current line, after that press Enter, and then press Tab key once to leave fixed whitespace before writing the first statement in the new block. Subsequent statements in the block should follow the same indent space. If there is a block within the block you may need to press the Tab key for each level of block. Look at the following examples:

Indented Block in Function

Example

>>> def calculate_tax (sal) :
. . .            tax=sal*10/100
. . .           if tax>5000:
. . .                     tax=5000
. . .          netsal=sal-tax
. . .          return netsal
. . .
>>>

Indents in Class

Example 

>>> class Example:
. . .              def init_(self, x) :
. . .              self.x=x
. . .             if x>100:
. . .                      self.x=100
. . .
> > >

Indents in Loop

Example

>>> for i in range (4) :
. . .         for j in range(4) :
. . .                       print ( i , j )
. . .


Python Data Presistence – Indents Read More »

Python Data Presistence – Statements

Python Data Presistence – Statements

Python interpreter treats any text (either in interactive mode or in a script) that ends with the Entering key (translated as ‘\n’ and called newline character) as a statement. If it is valid as per syntax rules of Python, it will be executed otherwise a relevant error message is displayed.

Example

>>> “Hello World”
‘Hello World’
>>> Hello world
File “<stdin>”, line 1
Hello world
∧
SyntaxError: invalid syntax

In the first case, the sequence of characters enclosed within quotes is a valid Python string object. However, the second statement is invalid because it doesn’t qualify as a representation of any Python object or identifier or statement, hence the message as SyntaxError is displayed.

Normally one physical line corresponds to one statement. Each statement starts at the first character position in the line, although it may leave certain leading whitespace in some cases (See Indents – next topic). Occasionally you may want to show a long statement spanning multiple lines. The ‘V character works as a continuation symbol in such a case.

Example

>>> zen=”Beautiful is better than ugly. \
… Explicit is better than implicit. \
… Simple is better than complex.”
>>> zen
‘Beautiful is better than ugly. Explicit is better than implicit. Simple is better than complex.’

This is applicable for script also. In order to write an expression you would like to use two separate lines for numerator and denominator instead of a single line as shown below:

Example

>>> a=10
>>> b=5
>>> ratio=( pow ( a , 2 ) + ( pow ( b , 2 ) ) ) /  \
. . . ( pow ( a , 2 ) – ( pow ( b , 2 ) ) )
>>>

Here pow ( ) is a built-in function that computes the square of a number. You will learn more built-in functions later in this book.
The use of a backslash symbol (\) is not necessary if items in a list, tuple, or dictionary object spill over multiple lines. (Plenty of new terms, isn’t it? Never mind. Have patience!)

Example

>>> marks=[34,65,92,55,71,
. . . 21,82,39,60,41]
>>> marks
[34, 65, 92, 55, 71, 21, 82, 39, 60, 41]


Python Data Presistence – Statements Read More »

Python Data Presistence – Identifiers

Python Data Presistence – Identifiers

Python identifiers are the various programming elements such as keywords, variables, functions/methods, modules, packages, and classes by suitable name. Keywords are reserved words with predefined meanings in Python interpreter. Obviously, keywords can’t be used as the name of other elements as functions etc. Python language currently has 33 keywords. Enter the following statement in Python’s interactive console. The list of keywords gets displayed!

Example

>>> import keyword
>>> print (keyword.kwlist)
[‘False ‘, ‘None’, ‘True’, ‘ and’, ‘as’, ‘assert’, ‘break’ , ‘class’, ‘continue ‘, ‘def’, ‘del’, ‘elif’, ‘ else’ , ‘except’, ‘finally’, ‘for’, ‘from’, ‘global’, ‘ if’, 1 import’, ‘in’, ‘is’ , ‘lambda’, ‘nonlocal’, ‘ not’ , ‘while’ ‘or’, ‘pass’, ‘raise ‘return’, ‘try’, ‘with’, ‘yield’]

Apart from keywords, you can choose any name (preferably cryptic but indicative of its purpose) to identify other elements in your program. However, only alphabets (upper or lowercase), digits, and underscore symbols (‘_’) may be used. As a convention, the name of the class starts with an uppercase alphabet, whereas the name of the function/method starts with the lowercase alphabet. The name of a variable normally starts with an alphabet, but in special cases, an underscore symbol (sometimes double underscore ) is seen to be the first character of the variable’s name.

Some examples of valid and invalid identifiers:

Valid identifiers

Invalid identifiers

name, FileName, yrlseml, EMP, roll_no, sum_of_dig,

_price, _salary, _ function_

123, sub-1, yr1.sem1, roll no, ‘price’, *marks*


Python Data Presistence – Identifiers Read More »

Selenium Grid Tutorial: Hub & Node (with Example) | What is Selenium Grid?

Selenium Python – Selenium-Grid

Parallel execution of tests is made possible through Seleniumthrough its Grid component. We come across scenarios like executing tests for cross-browser verification or executing a huge test suite by splitting it into smaller suites in parallel to save time. For all these, the Grid component is useful and effective as it allows parallel test execution.

Structure

  • Selenium-Grid
  • Creating hub
  • Creating nodes
  • Executing tests in parallel

Objective

In this chapter, we learn how to s tup Selenium-Grid in our local system. We understand what is a hub and a node, and how we set them up. In this chapter, we will set up a hub that will act as a central server and receive requests. We will have a Chrome node and a
Firefox node to complete the Grid for execution.

Selenium-Grid

An important component of Selenium is the Selenium-Grid. It allows us to run our tests in parallel, which helps in saving time and cost. To set up the Selenium-Grid, we need to first download the Selenium standalone server from: https://www.seleniumhq.org/download/
After we have downloaded the server JAR file, we will store it in a folder. This JAR file can now be invoked in two different modes to set up the Grid:

  • The hub
  • The node

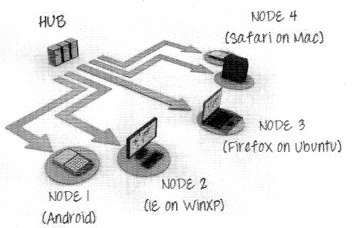
A hub is a central server that receives the request to execute the test. It will send the test to the node in the Grid which matches the description in the test. While anode is a machine and browser combination where the actual execution of the test takes place.
Let us see a Grid setup, with the help of the following diagram:


Selenium Python - Selenium-Grid chapter 12 img 1

In the above diagram, we can see that the hub will receive the test execution request, which will get passed on to the matching node for actual execution. As the test is executed at the node, the result is passed back to the hub. The information, about the browser, and the operating system on which the test is to be executed, is present in the test script which the hub receives. Then the test commands are sent to the matched node for the actual execution.

We will now set up a Grid with one hub and two nodes—one for Chrome and another for Firefox. Let us see the commands for it.

Setting up the hub

To set up the hub, we need to open the Command Prompt window and go to the folder where our standalone JAR file is present. There we need to type the following command:

D:\work\jarfile>java . jan selenium.server-standalone-3.141.59.jan-role hub

In the above command, we are executing the standalone JAR file using the role flag that uses the value hub. So it will execute the server in the hub mode. By default, it will start the hub on port 4444.
If we want to change the port, we can use the – port flag and provide a value to it. For example:

D:\work\jarfile>java . jan selenium-server-standalone-3.141.59.jan-role hub-port 6666

If you are working with a different Selenium standalone server version, the version number will change for you in here.
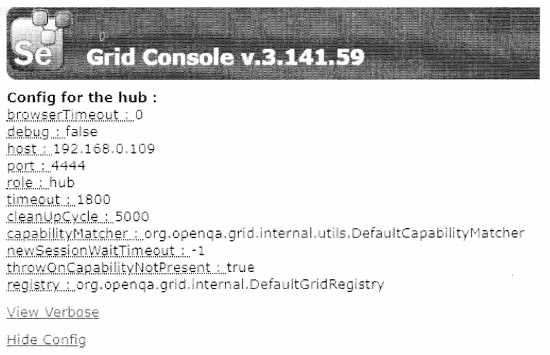
Once the hub has started, you can verify it using the following steps:

  1. Open a browser.
  2. Type this URL:
    http://localhost:4444/grid/console
  3. If all is working fine, you should be able to see the following:


Selenium Python - Selenium-Grid chapter 12 img 4

At the Command Prompt, we will see the following:

D:\work\Jarfiles>java - jar selenium-server-standalone-3.141.59.jar - role hub
17:17:17.540 INFO [GridLaunchV3.parse] - selenium server version: 3.141.59, revision: e82
be7d358
17:17:17.540 INFO [GridLaunchV3.lambda$buildLaunchers$5] - Launching selenium Grid hub on port: 4444
2019-05-27 17:17:18.139: INFO: : main : Logging initialized @1218ms to org.seleniumhq.jetty9.util.log.stdErrLog
17:17:18.576 INFO [Hub.start] - selenium Grid hub is up and running
17:17:18.576 INFO [Hub.start] - Nodes should register to http://192.168.0.109:4444/grid/register/
17:17:18.576 INFO [Hub.start] - Clients should connect to http://192.168.0.109:4444/wb/hub

Setting a Chrome node on a Windows machine

To set a Chrome node on a Windows machine, we will have to download the Selenium standalone server on that machine and execute it in the node mode. To do this, we will have to execute this command:

D:\work\JarFiles>java - Dwebdriver.chrome.driver="D:\work\JarFiles\resource\chromedriver.exe" - jar selenium-server-standalone-3.141.59-Jar-role - hub http://localhost:4444/grid/register - browser "browsername-chrome" - post5556

In this command, we are providing a path to the Chrome driver as per the location in our system, that is, Dwebdriver. chrome. driver=”D: \ WORK\DarFiles\nesource\chromedriver.exe”. Then we set the role flag to be the node. Then we provide the hub flag, where we point to the hub location: http://localhost:4444/grid/register. We set the browser flag to chrome and the port flag to 5556.
At the script level, we will be making some changes in the setup method, which is as follows:

def setup(self):
    self.driver = webdriver.Remote(
         command_executor="http://Localhost:4444/wd/hub",
         desired_capabilities={
              "browserName":"chrome",
     })
   self.base_url = "http://practice.bpbonline.com/catalog/index.php"

Here, we create an instance of the remote WebDriver, pass the details of the hub and in desired capabilities variable, we pass information for the browser, on which we want to execute our test, in this case, Chrome. We will discuss more desired capabilities a little later in the chapter. So when we execute the script, the commands are sent to the hub. It fetches the information to find the node on which the actual test is to be executed and sends the commands to it. In this case, it will send the commands to a node that is registered with a Chrome browser.

Please take a look at the following screenshot where we have entered all the details:


Selenium Python - Selenium-Grid chapter 12 img 8

Setting a Firefox node on a Windows machine

To set a Firefox node on a Windows machine, we will have to download the Selenium standalone server on that machine and execute it in the node mode. To do this we will have to execute this command:

D:\work\JarFiles>java - Dwebdriver.chrome.driver="D:\work\JarFiles\resource\getkodriver.exe" - jar selenium-server-standalone-3.141.59-Jar-role - hub http://localhost:4444/grid/register - browser "browsername-firebox" - post5557

In this command, we are providing the path to the gecko driver as per the location in our system: Dwebdriver. gecko. driver=”D: \WORK\ DarFiles\resource\geckodriver. exe”. Then we set the role flag to be a node. Then we provide the hub flag, where we point to the hub location: http: //localhost:4444/grid/register. We set the browser flag to firefox and the port flag to 5557.

At the script level, we will be making some changes in the setup method:

def setup(self):
    self.driver = webdriver.Remote(
         command_executor="http://Localhost:4444/wd/hub",
         desired_capabilities={
               "browserName":"firebox",
})
self.base_url = "http://practice.bpbonline.com/catalog/index.php"

Here, we create an instance of the remote WebDriver, pass the details of the hub and in desired capabilities variable, we pass information for the browser, on which we want to execute our test, in this case, the Firefox browser. We will discuss more desired capabilities a little later in the chapter. So when we execute the script, the commands are sent to the hub. It fetches the information to find the node on which the actual test is to be executed and sends the commands to it. In this case, it will send the commands to a node that is registered with a Firefox browser:


Selenium Python - Selenium-Grid chapter 12 img 11

Executing tests in parallel

To execute the tests in parallel, on the Chrome and Firefox browser together, we will initiate them. So the test execution commands will reach the hub, and the hub will direct them to their respective nodes. In this case, the tests are directed to Chrome browser machine, and Firefox browser machine:


Selenium Python - Selenium-Grid chapter 12 img 12

Desired capabilities

To set the test environment settings at the browser level, we have some properties associated with each browser that we can set. So at the time of execution, whenever the browser instance will be invoked it will be set with those browser properties. Internet Explorer, Chrome, and Firefox come with their own key-value pair.
In our above test scripts, we have used desired capabilities, to set the browser key-value to Firefox or Chrome, respectively:

desired_capabilities={
“browserName”: “firefox”.,}

desired_capabilities={
“browserName”: “chrome”,}

Conclusion

In this chapter, we understood the usage of an important component of Selenium which allows us to run tests in parallel. We understood how we establish the Selenium server in hub mode and node mode, and instantiate the remote WebՉ۪)river at the script level to run our tests in the Grid.

Related Articles:

Selenium Grid Tutorial: Hub & Node (with Example) | What is Selenium Grid? Read More »

Locators in Selenium- How To Locate Elements On Web-page?

Selenium Python – Locators in Selenium

Introduction

When we try to automate a web application, there are two important steps to consider. One is to identify the object uniquely on which we would want to perform the action. The second is to perform the action on the identified object. To identify the object uniquely on the web page, Selenium provides us with some locator strategies. In this chapter, we will discuss and explore them.

Structure

  • What is a locator?
  • Different types of locators
  • Where are locators used?

Objective

When working with open source technology like Selenium, it is crucial for us to understand that as end-user what strategy Selenium uses to identify an object on a page. As we are going to write scripts to automate applications at hand, we will have to provide object information using one of the locator strategies which Selenium will use to identify the object on the page so that the required action can be performed on it.

What is a locator?

Locator is a technique to identify the object on a page uniquely by using different identification methods. Once the object is identified, the action can be performed on it. Selenium provides us with the following locator techniques to identify the object on the page:

  • ID
  • NAME
  • XPATH
  • CSS
  • DOM
  • LINKTEXT
  • PARTIALLINKTEXT

To understand the different strategies of the locators, which Selenium uses to identify the object on the page, we will take the example of an HTML code snippet from our web application: http://practice.bpbonline.com/catalog/index.php my account page, which we see,
when we click the My Account link of the home page. The idea is to explore the HTML code associated with the E-mail Address field,
Password field, and the Sign In button. So let us have a look at it:

Selenium Python - Locators in Selenium chapter 3 img 1

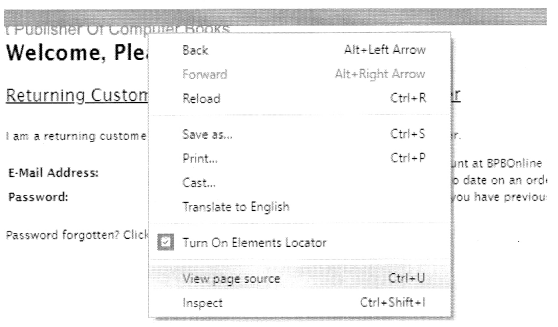
If we right-click the HTML page and select View page source. Refer to the following screenshot:

Selenium Python - Locators in Selenium chapter 3 img 2

We can see the HTML content associated with the web page. It is displayed as follows:


    <form name"login" action="http://practice.bpbonline.com/catalog/login.php"action=process" method="post"><input type="hidden"
name="formid" value="46fedd827e8b83241e4cebff3c6046ae"/>
   <table border="0" cellspecing="e" cellpadding="2" width"100%">
   <tr>
    <td class="filedkey">E-mail Address:</td>
    <td class="filedvalue"><input type="text" name="email..address"/><td>
 </tr>
 <tr>
   <td class="filedkey"password:</td>
   <td class="filedvalue"><input type="password" name="password" maxlength="40"></td>
</tr>
</table>

<P><a href="http://practice.bpbonline.com/catalog/password_forgotten.php">password forgotten? click here.</a></p>

<p> align="right"><span class="tdblink"><button id="tdb1" type="submit">sign In</button></span><script type="text/javascript $("#tdb1").button({icons:{primary::ui.icon-key"}}).addclass("ui-priority-primary").parent( ).removeClass("tdblink"):
</script></p>

</form>

As we have seen, the above HTML content is associated with three objects – username and password fields, and sign-in button, let us try to understand the different locator strategies Selenium can use to identify them so that an action can be performed on them as our automation script executes. So, the following is explained below:

• ID: The ID locator is fetched from the ID attribute of an HTML element. If the HTML element of interest has an ID attribute, we use it to identify the object uniquely. The example of this is the Sign In button, which has the id = tdblxbutton id=”tdbl” type=”submit”>Sign In</button>

• NAME: This attribute is fetched from the NAME attribute of the HTML element. The data associated with this property of the HTML element is used to identify the object uniquely on the web page. Examples of this property username, and password fields:
<input type=”text” name=”email_address” />
<input type=”password” name=”password” maxlength=”40″ />

• XPATH: The path traversed to reach the node of interest in an XML document is known as XPATH. To create the XPATH locator for an element, we look at an HTML document as if it is an XML document, and then traverse the path to reach it. The XPATH can either be a relative or an absolute one:

  • A relative XPATH will be in relation to a landmark node. A node that has a strong identifier like an ID or NAME. It uses / / in its path creation. Example: // input[@name=”email_addpess”]
  • An absolute XPATH starts from the root node HTML. It uses a single slash /. It is more prone to changes if the document structure undergoes changes during the development of the application, so it is generally avoided.
    Example:/HTML/body/div[2] / f orm[0] /table/ tbody/tr[2]/input

• CSS: It stands for Cascading Style Sheets. We can use this as well to identify the objects uniquely on the web page. The syntax is as follows:

  • If the HTML of the object has an ID attribute then, css=#ID, for example, css=#tdbl
  • Else, css=HTMLtag[prop=value], for example, css=input [namie^ email_address’ ]

• DOM: It stands for Document Object Model. It allows object identification by using the HTML tag name associated with the object.

• LINKTEXT: Generally, whenever we encounter a link in the application we can use it to identify the object on the page. For example, the My Account link can be identified using the same link text as seen on the web page

• PARTIAL LINK TEXT: We can also use a subpart of a complete text of the link to identify it on the web page and then perform actions on it.

It is important to use an appropriate locator to identify the object on the page, which is unique, helps in quick identification of the object, and is robust to application changes during the development process. Generally, if the object HTML has IDor NAME we use it to identify the object on the page. Then we use XPATH, followed by CSS and the last option is DOM. If it is a link, we always use LINKTEXT or PARTIAL LINK TEXT to identify the element on the page. So ideally, this should be the approach we need to take.

Conclusion

In this chapter we discussed the concept of locators; we understood its various types. We also saw where and how they would be needed. These locator strategies are standard in Selenium. They are not going to get modified in any version, and have been consistent with old versions as well. Lastly, we need to keep in mind that the locator strategy we are choosing to identify the object has to be robust and help to locate the object quickly on the page. In the next chapter, we will learn the steps to set up Selenium and Eclipse IDE on Windows OS.

Related Articles:

Locators in Selenium- How To Locate Elements On Web-page? Read More »