Author name: Vikram Chiluka

How to Install Mahotas Library in Python?

Mahotas Library in Python:

Mahotas is a Python library for computer vision, image processing, and manipulation. A library is a set of functions and methods that allow you to do a variety of tasks without writing hundreds of lines of code. Mahotas incorporates several array-based algorithms. Mahotas now has over 100 functions for image processing and computer vision and is constantly expanding.

Mahotas is a good tool for discovering patterns in images. For example, the “Where’s Wally Problem” can be simply performed with Mahotas.

It also contains plenty of algorithms for working with numpy arrays. Thresholding, Convolution, Watershed, Spline interpolation, and so on are examples.

The Python’s pip package manager can be used to install the Mahotas library on both Windows and Linux platforms.

Installation of  Mahotas Library in windows

Open the command prompt and type the below command for the installation of the Mahotas library

pip install mahotas

Output:

Collecting mahotas
Downloading mahotas-1.4.12-cp37-cp37m-manylinux_2_12_x86_64.manylinux2010_x86_64.whl (5.7 MB)
|████████████████████████████████| 5.7 MB 3.9 MB/s 
Requirement already satisfied: numpy in /usr/local/lib/python3.7/dist-packages
(from mahotas) (1.21.5)
Installing collected packages: mahotas
Successfully installed mahotas-1.4.12

Another Way to Install Mahotas Library in Windows

We can install the mahotas package using the pip package manager; however, if the above technique fails to install the package, we may still install the package manually from the official website on Windows.

Steps to be followed:

  1. To install the Mahotas package, go to the official website (https://pypi.org/project/mahotas/)
  2. Navigate to the Download Files option and click on the mahotas-x.x.x-win amd64.whl link to download the package. (The version number of the package is denoted by x.x.x here)
  3. Downloading mahotas package from official website
  4. Open the command prompt(CMD )console and change the working directory to the Downloads directory.
  5. Install the .whl Mahotas package file that we downloaded from the website just a little time ago using the pip command.
  6. pip install mahotas-1.4.12-cp310-cp310-win_amd64.whl

We successfully installed the mahotas package on our Windows PC using this way.

Installing Mahotas from web

Installation of  Mahotas Library in Linux

We may also use the pip package manager to install the Mahotas package on a Linux system.

Steps to be followed:

  • Open the Linux terminal using Ctrl+Alt+T 
  • Type the below pip command for the installation of the Mahotas library.
sudo pip install mahotas

The package was successfully installed on the Linux system.

Installation of  Mahotas Library using conda

Use any of the below commands:

conda install -c conda-forge mahotas
conda install -c conda-forge/label/gcc7 mahotas


How to Install Mahotas Library in Python? Read More »

How to Extract Tables from a PDF in Python?

What is PDF?

PDFs are a popular format for distributing text. PDF is an abbreviation for Portable Document Format, and it utilizes the .pdf file extension. Adobe Systems designed it in the early 1990s.

Reading PDF documents in Python can assist you in automating a wide range of operations.

In many scenarios, we must work with table data when programming. However, if they are in the PDF, we must first extract them.

Let us see the two simple methods for extracting tables from PDFs in Python.

  • Using Tabulate
  • Using Camelot

Extracting Tables from a PDF in Python

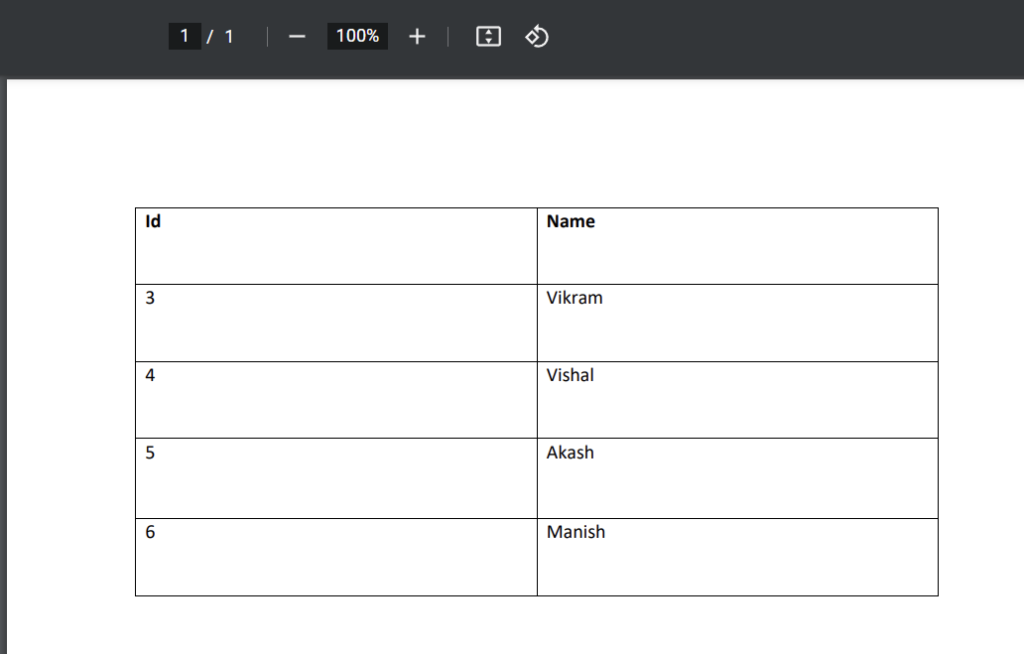
Here we consider the PDF say “demopdf.pdf” which has the following table data:

demopdf.pdf:

sample pdf image

Using Tabulate

In Python, you can pretty-print tabular data using a library and a command-line application.

The library’s primary use cases are as follows:

  • Without difficulty, print small tables: Formatting is dictated by the data itself and requires only one function call.
  • tabular data writing for lightweight plain-text markup: numerous output formats appropriate for additional modification or transformation
  • readable display of mixed textual and numerical data: Smart column alignment, customizable number formatting, and decimal point placement

Install the below commands before working on tabulate for extracting tables from a PDF.

pip install tabula-py
pip install tabulate

Code

Approach:

  • Import function from tabula module using the import keyword
  • Import tabulate function from tabulate module using the import keyword
  • Read all the pages and extract the tables from the PDF using the read_pdf() function by passing pdf name, pages=”all” as arguments to it.
  • Pass the above tables in a pdf varibale to the tabulate() function to rearrange the data from the table.
  • The Exit of the Program.

Below is the implementation:

# Import function from tabula module using the import keyword
from tabula import read_pdf
# Import tabulate function from tabulate module using the import keyword
from tabulate import tabulate
# Read all the pages and extract the tables from the PDF using the read_pdf() function 
# by passing pdf name, pages="all" as arguments to it.
tables_in_pdf = read_pdf("demopdf.pdf", pages="all")
# Pass the above tables in a pdf varibale to the tabulate() function to rearrange
# the data from the table
print(tabulate(tables_in_pdf))

Output:

---------------------- -------------------------
0 3 0 Vikram
1 4 1 Vishal
2 5 2 Akash
3 6 3 Manish
Name: Id, dtype: int64 Name: Name, dtype: object
---------------------- -------------------------


How to Extract Tables from a PDF in Python? Read More »

Python Numpy matrix.tobytes() Function

NumPy Library 

NumPy is a library in python that is created to work efficiently with arrays in python. It is fast, easy to learn, and provides efficient storage. It also provides a better way of handling data for the process. We can create an n-dimensional array in NumPy. To use NumPy simply have to import it in our program and then we can easily use the functionality of NumPy in our program.

NumPy is a Python library that is frequently used for scientific and statistical analysis. NumPy arrays are grids of the same datatype’s values.

Numpy matrix.tobytes() Function:

The matrix.tobytes() method in the Numpy module can be used to get the byte code for the matrix.

Syntax:

 matrix.tobytes()

Return Value:

The byte code for the given matrix is returned by the tobytes() function.

Numpy matrix.tobytes() Function in Python

For 2-Dimensional (2D) Matrix

Approach:

  • Import numpy module using the import keyword
  • Create a matrix(2-Dimensional) using the matrix() function of numpy module by passing some random 2D matrix as an argument to it and store it in a variable
  • Apply tobytes() function on the given matrix to get the byte code for the given matrix.
  • Store it in another variable
  • Print the byte code for the given matrix.
  • The Exit of the Program.

Below is the implementation:

# Import numpy module using the import keyword
import numpy as np
            
# Create a matrix(2-Dimensional) using the matrix() function of numpy module by passing 
# some random 2D matrix as an argument to it and store it in a variable
gvn_matrx = np.matrix('[2, 1; 6, 3]')
            
# Apply tobytes() function on the given matrix to get the byte code for the given matrix.
# Store it in another variable
rslt = gvn_matrx.tobytes()
# Print the byte code for the given matrix.
print(rslt)

Output:

b'\x02\x00\x00\x00\x00\x00\x00\x00\x01\x00\x00\x00\x00\x00\x00\x00\x06\x00\
x00\x00\x00\x00\x00\x00\x03\x00\x00\x00\x00\x00\x00\x00'

For 3-Dimensional (3D) Matrix

Approach:

  • Import numpy module using the import keyword
  • Create a matrix(3-Dimensional) using the matrix() function of numpy module by passing some random 3D matrix as an argument to it and store it in a variable
  • Apply tobytes() function on the given matrix to get the byte code for the given matrix.
  • Store it in another variable
  • Print the byte code for the given matrix.
  • The Exit of the Program.

Below is the implementation:

# Import numpy module using the import keyword
import numpy as np
            
# Create a matrix(3-Dimensional) using the matrix() function of numpy module by passing 
# some random 3D matrix as an argument to it and store it in a variable
gvn_matrx = np.matrix('[2, 4, 1; 8, 7, 3; 10, 9, 5]')
            
# Apply tobytes() function on the given matrix to get the byte code for the given matrix.
# Store it in another variable
rslt = gvn_matrx.tobytes()
# Print the byte code for the given matrix.
print(rslt)

Output:

b'\x02\x00\x00\x00\x00\x00\x00\x00\x04\x00\x00\x00\x00\x00\x00\x00\x01\x00\
x00\x00\x00\x00\x00\x00\x08\x00\x00\x00\x00\x00\x00\x00\x07\x00\x00\x00\x00\
x00\x00\x00\x03\x00\x00\x00\x00\x00\x00\x00\n\x00\x00\x00\x00\x00\x00\x00\t\
x00\x00\x00\x00\x00\x00\x00\x05\x00\x00\x00\x00\x00\x00\x00'

Python Numpy matrix.tobytes() Function Read More »

Python Numpy matrix.trace() Function

NumPy Library 

NumPy is a library in python that is created to work efficiently with arrays in python. It is fast, easy to learn, and provides efficient storage. It also provides a better way of handling data for the process. We can create an n-dimensional array in NumPy. To use NumPy simply have to import it in our program and then we can easily use the functionality of NumPy in our program.

NumPy is a Python library that is frequently used for scientific and statistical analysis. NumPy arrays are grids of the same datatype’s values.

Numpy matrix.trace() Function:

We can find the sum of all the diagonal elements of a matrix using the matrix.trace() method of the Numpy module.

Syntax:

 matrix.trace()

Return Value:

The sum of all the diagonal elements of a given matrix is returned by the trace() function.

Numpy matrix.trace() Function in Python

For 2-Dimensional (2D) Matrix

Approach:

  • Import numpy module using the import keyword
  • Create a matrix(2-Dimensional) using the matrix() function of numpy module by passing some random 2D matrix as an argument to it and store it in a variable
  • Apply trace() function on the given matrix to get the sum of all the diagonal elements of a given matrix
  • Store it in another variable
  • Print the sum of all the diagonal elements of a given matrix.
  • The Exit of the Program.

Below is the implementation:

# Import numpy module using the import keyword
import numpy as np
            
# Create a matrix(2-Dimensional) using the matrix() function of numpy module by passing 
# some random 2D matrix as an argument to it and store it in a variable
gvn_matrx = np.matrix('[2, 1; 6, 3]')
            
# Apply trace() function on the given matrix to get the sum of all the diagonal 
# elements of a given matrix
# Store it in another variable
rslt = gvn_matrx.trace()
# Print the sum of all the diagonal elements of a given matrix
print("The sum of all the diagonal elements of a given matrix:")
print(rslt)

Output:

The sum of all the diagonal elements of a given matrix:
[[5]]

For 3-Dimensional (3D) Matrix

Approach:

  • Import numpy module using the import keyword
  • Create a matrix(3-Dimensional) using the matrix() function of numpy module by passing some random 3D matrix as an argument to it and store it in a variable
  • Apply trace() function on the given matrix to get the sum of all the diagonal elements of a given matrix
  • Store it in another variable
  • Print the sum of all the diagonal elements of a given matrix.
  • The Exit of the Program.

Below is the implementation:

# Import numpy module using the import keyword
import numpy as np
            
# Create a matrix(3-Dimensional) using the matrix() function of numpy module by passing 
# some random 3D matrix as an argument to it and store it in a variable
gvn_matrx = np.matrix('[2, 4, 1; 8, 7, 3; 10, 9, 5]')
            
# Apply trace() function on the given matrix to get the sum of all the diagonal 
# elements of a given matrix
# Store it in another variable
rslt = gvn_matrx.trace()
# Print the sum of all the diagonal elements of a given matrix
print("The sum of all the diagonal elements of a given matrix:")
print(rslt)

Output:

The sum of all the diagonal elements of a given matrix:
[[14]]

Python Numpy matrix.trace() Function Read More »

Python Numpy matrix.tolist() Function

NumPy Library 

NumPy is a library in python that is created to work efficiently with arrays in python. It is fast, easy to learn, and provides efficient storage. It also provides a better way of handling data for the process. We can create an n-dimensional array in NumPy. To use NumPy simply have to import it in our program and then we can easily use the functionality of NumPy in our program.

NumPy is a Python library that is frequently used for scientific and statistical analysis. NumPy arrays are grids of the same datatype’s values.

Numpy matrix.tolist() Function:

The matrix.tolist() method in Numpy allows us to convert the given matrix into a list.

Syntax:

 matrix.tolist()

Return Value:

A new list is returned by the tolist() function.

Numpy matrix.tolist() Function in Python

For 2-Dimensional (2D) Matrix

Approach:

  • Import numpy module using the import keyword
  • Create a matrix(2-Dimensional) using the matrix() function of numpy module by passing some random 2D matrix as an argument to it and store it in a variable
  • Apply tolist() function on the given matrix to convert the given matrix to a list.
  • Store it in another variable
  • Print the given matrix after converting it into a list.
  • The Exit of the Program.

Below is the implementation:

# Import numpy module using the import keyword
import numpy as np
            
# Create a matrix(2-Dimensional) using the matrix() function of numpy module by passing 
# some random 2D matrix as an argument to it and store it in a variable
gvn_matrx = np.matrix('[2, 1; 6, 3]')
            
# Apply tolist() function on the given matrix to convert the given matrix to a list.
# Store it in another variable
rslt = gvn_matrx.tolist()
# Print the given matrix after converting it into a list.
print(rslt)

Output:

[[2, 1], [6, 3]]

For 3-Dimensional (3D) Matrix

Approach:

  • Import numpy module using the import keyword
  • Create a matrix(3-Dimensional) using the matrix() function of numpy module by passing some random 3D matrix as an argument to it and store it in a variable
  • Apply tolist() function on the given matrix to convert the given matrix to a list.
  • Store it in another variable
  • Print the given matrix after converting it into a list.
  • The Exit of the Program.

Below is the implementation:

# Import numpy module using the import keyword
import numpy as np
            
# Create a matrix(3-Dimensional) using the matrix() function of numpy module by passing 
# some random 3D matrix as an argument to it and store it in a variable
gvn_matrx = np.matrix('[2, 4, 1; 8, 7, 3; 10, 9, 5]')
            
# Apply tolist() function on the given matrix to convert the given matrix to a list.
# Store it in another variable
rslt = gvn_matrx.tolist()
# Print the given matrix after converting it into a list.
print(rslt)

Output:

[[2, 4, 1], [8, 7, 3], [10, 9, 5]]

Python Numpy matrix.tolist() Function Read More »

Python Numpy matrix.tostring() Function

NumPy Library 

NumPy is a library in python that is created to work efficiently with arrays in python. It is fast, easy to learn, and provides efficient storage. It also provides a better way of handling data for the process. We can create an n-dimensional array in NumPy. To use NumPy simply have to import it in our program and then we can easily use the functionality of NumPy in our program.

NumPy is a Python library that is frequently used for scientific and statistical analysis. NumPy arrays are grids of the same datatype’s values.

Numpy matrix.tostring() Function:

We can get the byte code in string format for the matrix by using the Numpy matrix.tostring() method.

Syntax:

 matrix.tostring()

Return Value:

The byte code string for the matrix is returned by the tostring() function.

Numpy matrix.tostring() Function in Python

For 2-Dimensional (2D) Matrix

Approach:

  • Import numpy module using the import keyword
  • Create a matrix(2-Dimensional) using the matrix() function of numpy module by passing some random 2D matrix as an argument to it and store it in a variable
  • Apply tostring() function on the given matrix to get the byte code in string format for the given matrix.
  • Store it in another variable
  • Print the byte code in string format for the above-given matrix.
  • The Exit of the Program.

Below is the implementation:

# Import numpy module using the import keyword
import numpy as np
            
# Create a matrix(2-Dimensional) using the matrix() function of numpy module by passing 
# some random 2D matrix as an argument to it and store it in a variable
gvn_matrx = np.matrix('[2, 1; 6, 3]')
            
# Apply tostring() function on the given matrix to get the byte code in string format 
# for the given matrix.
# Store it in another variable
rslt = gvn_matrx.tostring()
# Print the byte code in string format for the above given matrix
print(rslt)

Output:

b'\x02\x00\x00\x00\x00\x00\x00\x00\x01\x00\x00\x00\x00\x00\x00\x00\x06\x00\
x00\x00\x00\x00\x00\x00\x03\x00\x00\x00\x00\x00\x00\x00'

For 3-Dimensional (3D) Matrix

Approach:

  • Import numpy module using the import keyword
  • Create a matrix(3-Dimensional) using the matrix() function of numpy module by passing some random 3D matrix as an argument to it and store it in a variable
  • Apply tostring() function on the given matrix to get the byte code in string format for the given matrix.
  • Store it in another variable
  • Print the byte code in string format for the above-given matrix.
  • The Exit of the Program.

Below is the implementation:

# Import numpy module using the import keyword
import numpy as np
            
# Create a matrix(3-Dimensional) using the matrix() function of numpy module by passing 
# some random 3D matrix as an argument to it and store it in a variable
gvn_matrx = np.matrix('[2, 4, 1; 8, 7, 3; 10, 9, 5]')
            
# Apply tostring() function on the given matrix to get the byte code in string format 
# for the given matrix.
# Store it in another variable
rslt = gvn_matrx.tostring()
# Print the byte code in string format for the above given matrix
print(rslt)

Output:

b'\x02\x00\x00\x00\x00\x00\x00\x00\x04\x00\x00\x00\x00\x00\x00\x00\x01\x00\
x00\x00\x00\x00\x00\x00\x08\x00\x00\x00\x00\x00\x00\x00\x07\x00\x00\x00\x00\
x00\x00\x00\x03\x00\x00\x00\x00\x00\x00\x00\n\x00\x00\x00\x00\x00\x00\x00\t\
x00\x00\x00\x00\x00\x00\x00\x05\x00\x00\x00\x00\x00\x00\x00'

Python Numpy matrix.tostring() Function Read More »

Python hashlib.shake_128() Function

Python hashlib Module:

To generate a message digest or secure hash from the source message, we can utilize the Python hashlib library.

The hashlib module is required to generate a secure hash message in Python.

The hashlib hashing function in Python takes a variable length of bytes and converts it to a fixed-length sequence. This function only works in one direction. This means that when you hash a message, you obtain a fixed-length sequence. However, those fixed-length sequences do not allow you to obtain the original message.

A hash algorithm is considered better in cryptography if the original message cannot be decoded from the hash message. Changing one byte in the original message also has a big impact(change) on the message digest value.

Python secure hash values are used to store encrypted passwords. So that even the application’s owner does not have access to the user’s password, passwords are matched when the user enters the password again, and the hash value is calculated and compared to the stored value.

Hashing Algorithms That Are Available:

  • The algorithms_available function returns a list of all the algorithms available in the system, including those accessible via OpenSSl. Duplicate algorithm names can also be found.
  • The algorithms in the module can be viewed by using the algorithms_guaranteed function.
import hashlib
# Printing list of all the algorithms
print(hashlib.algorithms_available)
# Viewing algorithms
print(hashlib.algorithms_guaranteed)

Output:

{'sha384', 'blake2s', 'sha3_384', 'sha224', 'md5', 'shake_256', 'blake2b', 'sha3_512', 'sha1', 'shake_128', 'sha512', 'sha3_256', 'sha256', 'sha3_224'}

Functions:

You only need to know a few functions to use the Python hashlib module.

  • You can hash the entire message at once by using the hashlib.encryption_algorithm_name(b”message”) function.
  • Additionally, the update() function can be used to append a byte message to the secure hash value. The output will be the same in both cases. Finally, the secure hash can be obtained by using the digest() function.
  • It’s worth noting that b is written to the left of the message to be hashed. This b indicates that the string is a byte string.

hashlib.shake_128() Function:

We can convert a normal string in byte format to an encrypted form using the hashlib.shake_128 method. Passwords and important files can be hashed to secure them using the hashlib.shake_128 function.
NOTE: Please keep in mind that we can change the length of the encrypted data.

Syntax:

hashlib.shake_128()

Return Value:

The hash code for the string given is returned by the shake_128() function.

hashlib.shake_128() Function in Python

Method #1: Using shake_128Function (Static Input)

Here, we encrypt the byte string or passwords to secure them using the hashlib.shake_128() function.

Approach:

  • Import hashlib module using the import keyword
  • Create a reference/Instance variable(Object) for the hashlib module and call shake_128() function and store it in a variable
  • Give the string as static input(here b represents byte string) and store it in another variable.
  • Call the update() function using the above-created object by passing the above-given string as an argument to it
  • Here it converts the given string in byte format to an encrypted form.
  • Get the secure hash using the digest() function.
  • The Exit of the Program.

Below is the implementation:

# Import hashlib module using the import keyword
import hashlib

# Creating a reference/Instance variable(Object) for the hashlib module and 
# call shake_128() function and store it in a variable
obj = hashlib.shake_128()

# Give the string as static input(here b represents byte string) and store it in another variable.
gvn_str = b'Python-programs'

# Call the update() function using the above created object by passing the above given string as 
# an argument to it
# Here it converts the given string in byte format to an encrypted form.
obj.update(gvn_str)
# Get the secure hash using the digest() function.
print(obj.digest(12))

Output:

b'\xeb&\xbb\xab\xd5\xf4\xc1\xa6Y\x86(W'

Method #2: Using shake_128Function (User Input)

Approach:

  • Import hashlib module using the import keyword
  • Create a reference/Instance variable(Object) for the hashlib module and call shake_128() function and store it in a variable
  • Give the string as user input using the input() function and store it in another variable.
  • Convert the given string into a byte string using the bytes() function by passing the given string, ‘utf-8’ as arguments to it.
  • Call the update() function using the above-created object by passing the above-given string as an argument to it
  • Here it converts the given string in byte format to an encrypted form.
  • Get the secure hash using the digest() function.
  • The Exit of the Program.

Below is the implementation:

# Import hashlib module using the import keyword
import hashlib

# Creating a reference/Instance variable(Object) for the hashlib module and 
# call shake_128() function and store it in a variable
obj = hashlib.shake_128()

# Give the string as user input using the input() function and store it in another variable.
gvn_str = input("Enter some random string = ")
# Convert the given string into byte string using the bytes() function by passing given string, 
# 'utf-8' as arguments to it 
gvn_str=bytes(gvn_str, 'utf-8')

# Call the update() function using the above created object by passing the above given string as 
# an argument to it
# Here it converts the given string in byte format to an encrypted form.
obj.update(gvn_str)
# Get the secure hash using the digest() function.
print(obj.digest(14))

Output:

Enter some random string = welcome to Python-programs
b'\xc9J\xc6\x91\x8d\x9e> \xb1!\xb9\xb3\xf7X'

Python hashlib.shake_128() Function Read More »

Python hashlib.sha3_512() Function

Python hashlib Module:

To generate a message digest or secure hash from the source message, we can utilize the Python hashlib library.

The hashlib module is required to generate a secure hash message in Python.

The hashlib hashing function in Python takes a variable length of bytes and converts it to a fixed-length sequence. This function only works in one direction. This means that when you hash a message, you obtain a fixed-length sequence. However, those fixed-length sequences do not allow you to obtain the original message.

A hash algorithm is considered better in cryptography if the original message cannot be decoded from the hash message. Changing one byte in the original message also has a big impact(change) on the message digest value.

Python secure hash values are used to store encrypted passwords. So that even the application’s owner does not have access to the user’s password, passwords are matched when the user enters the password again, and the hash value is calculated and compared to the stored value.

Hashing Algorithms That Are Available:

  • The algorithms_available function returns a list of all the algorithms available in the system, including those accessible via OpenSSl. Duplicate algorithm names can also be found.
  • The algorithms in the module can be viewed by using the algorithms_guaranteed function.
import hashlib
# Printing list of all the algorithms
print(hashlib.algorithms_available)
# Viewing algorithms
print(hashlib.algorithms_guaranteed)

Output:

{'sha384', 'blake2s', 'sha3_384', 'sha224', 'md5', 'shake_256', 'blake2b', 'sha3_512', 'sha1', 'shake_128', 'sha512', 'sha3_256', 'sha256', 'sha3_224'}

Functions:

You only need to know a few functions to use the Python hashlib module.

  • You can hash the entire message at once by using the hashlib.encryption_algorithm_name(b”message”) function.
  • Additionally, the update() function can be used to append a byte message to the secure hash value. The output will be the same in both cases. Finally, the secure hash can be obtained by using the digest() function.
  • It’s worth noting that b is written to the left of the message to be hashed. This b indicates that the string is a byte string.

hashlib.sha3_512() Function:

We can convert a normal string in byte format to an encrypted form using the hashlib.sha3_512() function. Passwords and important files can be hashed to secure them using the hashlib.sha3_512() method.

Syntax:

hashlib.sha3_512()

Return Value:

The hash code for the string given is returned by the sha3_512() function.

Differences

Shortly after the discovery of cost-effective brute force operations against SHA-1, SHA-2 was created. It is a family of two similar hash algorithms, SHA-256 and SHA-512, with varying block sizes.

  • The fundamental distinction between SHA-256 and SHA-512 is word size.
  • SHA-256 uses 32-byte words, whereas SHA-512 employs 64-byte words.
  • Each standard also has modified versions called SHA-224, SHA-384, SHA-512/224, and SHA-512/256. Today, the most often used SHA function is SHA-256, which provides adequate safety at current computer processing capabilities.
  • SHA-384 is a cryptographic hash that belongs to the SHA-2 family. It generates a 384-bit digest of a message.
  • On 64-bit processors, SHA-384 is around 50% faster than SHA-224 and SHA-256, despite having a longer digest. The increased speed is due to the internal computation using 64-bit words, whereas the other two hash algorithms use 32-bit words.
  • For the same reason, SHA-512, SHA-512/224, and SHA-512/256 are faster on 64-bit processors.

Algorithm – digest size (the larger the better):

MD5 –> 128 bits
SHA-1 –> 160 bits
SHA-256 –> 256 bits
SHA-512 –> 512 bits

hashlib.sha3_512() Function in Python

Method #1: Using sha3_512() Function (Static Input)

Here, we encrypt the byte string or passwords to secure them using the hashlib.sha3_512() function.

Approach:

  • Import hashlib module using the import keyword
  • Create a reference/Instance variable(Object) for the hashlib module and call sha3_512() function and store it in a variable
  • Give the string as static input(here b represents byte string) and store it in another variable.
  • Call the update() function using the above-created object by passing the above-given string as an argument to it
  • Here it converts the given string in byte format to an encrypted form.
  • Get the secure hash using the digest() function.
  • The Exit of the Program.

Below is the implementation:

# Import hashlib module using the import keyword
import hashlib

# Creating a reference/Instance variable(Object) for the hashlib module and 
# call sha3_512() function and store it in a variable
obj = hashlib.sha3_512()

# Give the string as static input(here b represents byte string) and store it in another variable.
gvn_str = b'Python-programs'

# Call the update() function using the above created object by passing the above given string as 
# an argument to it
# Here it converts the given string in byte format to an encrypted form.
obj.update(gvn_str)
# Get the secure hash using the digest() function.
print(obj.digest())

Output:

b'\xd2n!\xed\xf2\x8d\x0b\xdb9a\xc7hp\xadb\xeb\xa8\xaa\xf4\x1c\x8b1\xb8\xcf\x98\x12\
x8b~\xfe\x98\xe6\x8a\xd3\x9b\xf3\xd5\x90\xddD\xbdU8\xff\x9b\x8d\xb7\xdctl\x0c\xc5\
x11v\xdb|F\t\xaaw\xf1\x85\x12\x87M'

Method #2: Using sha3_512() Function (User Input)

Approach:

  • Import hashlib module using the import keyword
  • Create a reference/Instance variable(Object) for the hashlib module and call sha3_512() function and store it in a variable
  • Give the string as user input using the input() function and store it in another variable.
  • Convert the given string into a byte string using the bytes() function by passing the given string, ‘utf-8’ as arguments to it.
  • Call the update() function using the above-created object by passing the above-given string as an argument to it
  • Here it converts the given string in byte format to an encrypted form.
  • Get the secure hash using the digest() function.
  • The Exit of the Program.

Below is the implementation:

# Import hashlib module using the import keyword
import hashlib

# Creating a reference/Instance variable(Object) for the hashlib module and 
# call sha3_512() function and store it in a variable
obj = hashlib.sha3_512()

# Give the string as user input using the input() function and store it in another variable.
gvn_str = input("Enter some random string = ")
# Convert the given string into byte string using the bytes() function by passing given string, 
# 'utf-8' as arguments to it 
gvn_str=bytes(gvn_str, 'utf-8')

# Call the update() function using the above created object by passing the above given string as 
# an argument to it
# Here it converts the given string in byte format to an encrypted form.
obj.update(gvn_str)
# Get the secure hash using the digest() function.
print(obj.digest())

Output:

Enter some random string = welcome to Python-programs
b'\xad5\xb57y7\x84x\xa6@y\xf0\xda\xac\xf7C\x01z\xe7[\xf8\x8e\x1d\xb44\xa0\x1d\x89\
xa2\xb7>@\xb9p\xa5\x16\x1a\x8a\xda\n\x99\x97\xfd\x0f\xa5K\x9f`\xd9\x9329\x82\r\xaa\
x1b\xb1_}\xbb:{\xa6\xbb'

Python hashlib.sha3_512() Function Read More »

Python hashlib.sha3_224() Function

Python hashlib Module:

To generate a message digest or secure hash from the source message, we can utilize the Python hashlib library.

The hashlib module is required to generate a secure hash message in Python.

The hashlib hashing function in Python takes a variable length of bytes and converts it to a fixed-length sequence. This function only works in one direction. This means that when you hash a message, you obtain a fixed-length sequence. However, those fixed-length sequences do not allow you to obtain the original message.

A hash algorithm is considered better in cryptography if the original message cannot be decoded from the hash message. Changing one byte in the original message also has a big impact(change) on the message digest value.

Python secure hash values are used to store encrypted passwords. So that even the application’s owner does not have access to the user’s password, passwords are matched when the user enters the password again, and the hash value is calculated and compared to the stored value.

Hashing Algorithms That Are Available:

  • The algorithms_available function returns a list of all the algorithms available in the system, including those accessible via OpenSSl. Duplicate algorithm names can also be found.
  • The algorithms in the module can be viewed by using the algorithms_guaranteed function.
import hashlib
# Printing list of all the algorithms
print(hashlib.algorithms_available)
# Viewing algorithms
print(hashlib.algorithms_guaranteed)

Output:

{'sha384', 'blake2s', 'sha3_384', 'sha224', 'md5', 'shake_256', 'blake2b', 'sha3_512', 'sha1', 'shake_128', 'sha512', 'sha3_256', 'sha256', 'sha3_224'}

Functions:

You only need to know a few functions to use the Python hashlib module.

  • You can hash the entire message at once by using the hashlib.encryption_algorithm_name(b”message”) function.
  • Additionally, the update() function can be used to append a byte message to the secure hash value. The output will be the same in both cases. Finally, the secure hash can be obtained by using the digest() function.
  • It’s worth noting that b is written to the left of the message to be hashed. This b indicates that the string is a byte string.

hashlib.sha3_224() Function:

We can convert a normal string in byte format to an encrypted form using the hashlib.sha3_224() function. Passwords and important files can be hashed to secure them using the hashlib.sha3_224() method.

Syntax:

hashlib.sha3_224()

Return Value:

The hash code for the string given is returned by the sha3_224() function.

Differences

Shortly after the discovery of cost-effective brute force operations against SHA-1, SHA-2 was created. It is a family of two similar hash algorithms, SHA-256 and SHA-512, with varying block sizes.

  • The fundamental distinction between SHA-256 and SHA-512 is word size.
  • SHA-256 uses 32-byte words, whereas SHA-512 employs 64-byte words.
  • Each standard also has modified versions called SHA-224, SHA-384, SHA-512/224, and SHA-512/256. Today, the most often used SHA function is SHA-256, which provides adequate safety at current computer processing capabilities.
  • SHA-384 is a cryptographic hash that belongs to the SHA-2 family. It generates a 384-bit digest of a message.
  • On 64-bit processors, SHA-384 is around 50% faster than SHA-224 and SHA-256, despite having a longer digest. The increased speed is due to the internal computation using 64-bit words, whereas the other two hash algorithms use 32-bit words.
  • For the same reason, SHA-512, SHA-512/224, and SHA-512/256 are faster on 64-bit processors.

Algorithm – digest size (the larger the better):

MD5 –> 128 bits
SHA-1 –> 160 bits
SHA-256 –> 256 bits
SHA-512 –> 512 bits

hashlib.sha3_224() Function in Python

Method #1: Using sha3_224() Function (Static Input)

Here, we encrypt the byte string or passwords to secure them using the hashlib.sha3_224() function.

Approach:

  • Import hashlib module using the import keyword
  • Create a reference/Instance variable(Object) for the hashlib module and call sha3_224() function and store it in a variable
  • Give the string as static input(here b represents byte string) and store it in another variable.
  • Call the update() function using the above-created object by passing the above-given string as an argument to it
  • Here it converts the given string in byte format to an encrypted form.
  • Get the secure hash using the digest() function.
  • The Exit of the Program.

Below is the implementation:

# Import hashlib module using the import keyword
import hashlib

# Creating a reference/Instance variable(Object) for the hashlib module and 
# call sha3_224() function and store it in a variable
obj = hashlib.sha3_224()

# Give the string as static input(here b represents byte string) and store it in another variable.
gvn_str = b'Python-programs'

# Call the update() function using the above created object by passing the above given string as 
# an argument to it
# Here it converts the given string in byte format to an encrypted form.
obj.update(gvn_str)
# Get the secure hash using the digest() function.
print(obj.digest())

Output:

b'\xd61\xed\x10\xa7Ne\x89\x9e\xf2\x11\x17\xf3\x06\xe0\xabd\x1dT\x9fO\xceQ\xb3\xbc\xb8h\xba'

Method #2: Using sha3_224() Function (User Input)

Approach:

  • Import hashlib module using the import keyword
  • Create a reference/Instance variable(Object) for the hashlib module and call sha3_224() function and store it in a variable
  • Give the string as user input using the input() function and store it in another variable.
  • Convert the given string into a byte string using the bytes() function by passing the given string, ‘utf-8’ as arguments to it.
  • Call the update() function using the above-created object by passing the above-given string as an argument to it
  • Here it converts the given string in byte format to an encrypted form.
  • Get the secure hash using the digest() function.
  • The Exit of the Program.

Below is the implementation:

# Import hashlib module using the import keyword
import hashlib

# Creating a reference/Instance variable(Object) for the hashlib module and 
# call sha3_224() function and store it in a variable
obj = hashlib.sha3_224()

# Give the string as user input using the input() function and store it in another variable.
gvn_str = input("Enter some random string = ")
# Convert the given string into byte string using the bytes() function by passing given string, 
# 'utf-8' as arguments to it 
gvn_str=bytes(gvn_str, 'utf-8')

# Call the update() function using the above created object by passing the above given string as 
# an argument to it
# Here it converts the given string in byte format to an encrypted form.
obj.update(gvn_str)
# Get the secure hash using the digest() function.
print(obj.digest())

Output:

Enter some random string = welcome to Python-programs
b'J\xa5oQ\x86DS(\xbf\xfcX\xb4$8\xa5\xf6\xe35\xa0\x99\xe8\x89 \x99\xcf9\x15)'

Python hashlib.sha3_224() Function Read More »

Python NLTK nltk.tokenize.SExprTokenizer() Function

NLTK in Python:

NLTK is a Python toolkit for working with natural language processing (NLP). It provides us with a large number of test datasets for various text processing libraries. NLTK can be used to perform a variety of tasks such as tokenizing, parse tree visualization, and so on.

Tokenization

Tokenization is the process of dividing a large amount of text into smaller pieces known as tokens. These tokens are extremely valuable for detecting patterns and are regarded as the first stage in stemming and lemmatization. Tokenization also aids in the replacement of sensitive data elements with non-sensitive data elements.

Natural language processing is utilized in the development of applications such as text classification, intelligent chatbots, sentiment analysis, language translation, and so on. To attain the above target, it is essential to consider the pattern in the text.

Natural Language Toolkit features an important module called NLTK tokenize sentences, which is further divided into sub-modules.

  • word tokenize
  • sentence tokenize

nltk.tokenize.SExprTokenizer() Function:

Using nltk.tokenize.SExprTokenizer() method, we can extract tokens from a string of characters or numbers. It is actually looking for correct brackets to produce tokens.

Syntax:

tokenize.SExprTokenizer()

Parameters: This method doesn’t accept any parameters

Return Value:

The tokens from a string of characters or numbers are returned.

NLTK nltk.tokenize.SExprTokenizer() Function in Python

Method #1: Using tokenize.SExprTokenizer() Function (Static Input)

Here, we are using the tokenize.SExprTokenizer() method to extract tokens from a stream of characters or numbers while taking brackets into account.

Approach:

  • Import SExprTokenizer() function from tokenize of nltk using the import keyword
  • Create a reference/Instance variable(Object) for the SExprTokenizer Class
  • Give the string as static input and store it in a variable.
  • Pass the above-given string as an argument to the tokenize() function to extract tokens from the given string (taking brackets into account).
  • Store it in another variable.
  • Print the above result.
  • The Exit of the Program.

Below is the implementation:

# Import SExprTokenizer() function from tokenize of nltk using the import keyword
from nltk.tokenize import SExprTokenizer
    
# Creating a reference/Instance variable(Object) for the SExprTokenizer Class
tkn = SExprTokenizer()
    
# Give the string as static input and store it in a variable.
gvn_str = "( p * ( q + r ))st( u-v )"
    
# Pass the above given string as an argument to the tokenize() function to extract 
# tokens from the given string (taking brackets into account).
# Store it in another variable.
rslt = tkn.tokenize(gvn_str)
# Print the above result
print(rslt)

Output:

['( p * ( q + r ))', 'st', '( u-v )']

Method #2: Using tokenize.SExprTokenizer() Function (User Input)

Approach:

  • Import SExprTokenizer() function from tokenize of nltk using the import keyword
  • Create a reference/Instance variable(Object) for the SExprTokenizer Class
  • Give the string as static input and store it in a variable.
  • Pass the above-given string as an argument to the tokenize() function to extract tokens from the given string (taking brackets into account).
  • Store it in another variable.
  • Print the above result.
  • The Exit of the Program.

Below is the implementation:

# Import SExprTokenizer() function from tokenize of nltk using the import keyword
from nltk.tokenize import SExprTokenizer
    
# Creating a reference/Instance variable(Object) for the SExprTokenizer Class
tkn = SExprTokenizer()
    
# Give the string as user input using the input() function and store it in a variable.
gvn_str = input("Enter some random string = ")
    
# Pass the above given string as an argument to the tokenize() function to extract 
# tokens from the given string (taking brackets into account).
# Store it in another variable.
rslt = tkn.tokenize(gvn_str)
# Print the above result
print(rslt)

Output:

Enter some random string = (p q r) st (u v w) xy
['(p q r)', 'st', '(u v w)', ' xy']


Python NLTK nltk.tokenize.SExprTokenizer() Function Read More »