Author name: Vikram Chiluka

Use of Right Shift “>>” and Left Shift “<<" Operators in Python

In Python, they are Bitwise Operators known as Bitwise left shift(<<) and Bitwise right shift(>>).

What are Operators?

Operators are the special symbols used to do arithmetic and logical computations. Operators are used to alter values and variables. The value on which the operator operates is referred to as the Operand.

Python Shift Operators

The shift operators are used to shift(move) the bits of a number to the left or right. The number is then multiplied or divided by two. In shifting operators, there are two types of shifting Processes.

  • Bitwise Left Shift.
  • Bitwise Right Shift.

Bitwise Left Shift

The Bitwise Left shift shifts/moves the bits of a number to the Left. We use the “left shift”(<<) symbol for this. It multiplies the number of bits by two respectively.

For example, let the number = 3

Its binary form = 0000 0011

0000 0011<<1 bit = 0000 0110 = 6

Example1

Approach:

  • Give the number as static input and store it in a variable
  • Left Shift 1 bit of the given number and print the result.
  • Left Shift 2 bits of the given number and print the result.
  • The Exit of the Program.

Below is the implementation:

# Give the number as static input and store it in a variable
gvn_numb = 3
# Left Shift 1 bit of the given number and print the result
print("The number after left shifting given number by 1 bit:")
print(gvn_numb<<1)
# Left Shift 2 bits of the given number and print the result
print("The number after left shifting given number by 2 bits:")
print(gvn_numb<<2)

Output:

The number after left shifting given number by 1 bit:
6
The number after left shifting given number by 2 bits:
12

Bitwise Right Shift

The Bitwise Right Shift shifts/moves the bits of a number to the right. We use the “right shift”(>>) symbol for this. It divides the number of bits by two respectively.

For example, let the number = 3

Its binary form = 0000 0011

0000 0011>>1 bit = 0000 0001 = 1

Approach:

  • Give the number as static input and store it in a variable
  • Right Shift 1 bit of the given number and print the result.
  • Right Shift 2 bits of the given number and print the result.
  • The Exit of the Program.

Below is the implementation:

# Give the number as static input and store it in a variable
gvn_numb = 3
# Right Shift 1 bit of the given number and print the result
print("The number after Right shifting given number by 1 bit:")
print(gvn_numb>>1)
# Right Shift 2 bits of the given number and print the result
print("The number after Right shifting given number by 2 bits:")
print(gvn_numb>>2)

Output:

The number after Right shifting given number by 1 bit:
1
The number after Right shifting given number by 2 bits:
0


Use of Right Shift “>>” and Left Shift “<<" Operators in Python Read More »
How to Save Multiple matplotlib Figures in Single PDF File in Python?

In this article, we’ll learn how to save several plots in a single pdf file. In many scenarios, we need our output to be in a specific format, which we can easily acquire in Python by utilizing the following method.

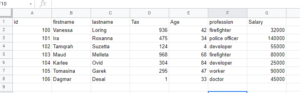
Let us take the demo.csv file as an example here to perform the task.

Example CSV File

Saving Multiple matplotlib Figures in Single PDF File in Python

1)Importing libraries

# Import pandas module using the import keyword
import pandas as pd
# Import pyplot from matplotlib module using the import keyword
from matplotlib import pyplot as pplot
# Import seaborn module using the import keyword
import seaborn as sns

2)Reading a CSV File

# Pass some random CSV file to the read_csv() function of the pandas module 
# to read the given csv file
gvn_datafrme = pd.read_csv("demo.csv")

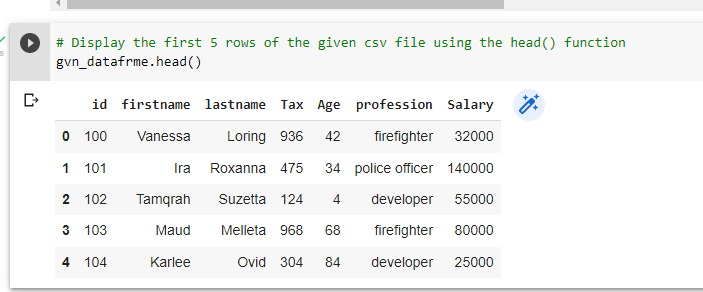
3)Displaying the first 5 rows of the CSV file

# Display the first 5 rows of the given csv file using the head() function
gvn_datafrme.head()

Output:

First 5 rows of the given CSV File

4)Plotting Multiple plots of a Given CSV File in a Single PDF File

# Passing some random plot size(width, length) to the figure() function
pplot.figure(figsize=(10, 4))
# Plot the subplot by passing the arguments rows, columns and order of the plot to the 
# subplot() function
pplot.subplot(1, 2, 1)
# Plot the graph of id, Salary columns in a given CSV file using the countplot() function
# of the seaborn module
sns.countplot('id', hue='Salary', data= gvn_datafrme)
pplot.subplot(1, 2, 2)
# Plot the graph of id, Tax columns in a given CSV file using the countplot() function
# of the seaborn module
# Here we are plotting multiple plots in a single PDF file.
sns.countplot('id', hue='Tax', data= gvn_datafrme)
# Save the plots in a single PDF file by passing some random name to the savefig() function
pplot.savefig('Output.pdf')

Total Code

Approach:

  • Import pandas module using the import keyword
  • Import pyplot from matplotlib module using the import keyword
  • Import seaborn module using the import keyword
  • Pass some random CSV file to the read_csv() function of the pandas module to read the given csv file
  • Display the first 5 rows of the given csv file using the head() function
  • Passing some random plot size(width, length) to the figure() function
  • Plot the graph of id, Salary columns in a given CSV file using the countplot() function of the seaborn module
  • Plot the subplot by passing the arguments rows, columns and order of the plot to the subplot() function
  • Plot the graph of id, Tax columns in a given CSV file using the countplot() function of the seaborn module
  • Here we are plotting multiple plots in a single PDF file.
  • Save the plots in a single PDF file by passing some random name to the savefig() function.
  • The Exit of the Program.

Below is the implementation:

# Import pandas module using the import keyword
import pandas as pd
# Import pyplot from matplotlib module using the import keyword
from matplotlib import pyplot as pplot
# Import seaborn module using the import keyword
import seaborn as sns
# Pass some random CSV file to the read_csv() function of the pandas module 
# to read the given csv file
gvn_datafrme = pd.read_csv("demo.csv")
# Display the first 5 rows of the given csv file using the head() function
gvn_datafrme.head()
# Passing some random plot size(width, length) to the figure() function
pplot.figure(figsize=(10, 4))
pplot.subplot(1, 2, 1)
# Plot the graph of id, Salary columns in a given CSV file using the countplot() function
# of the seaborn module
sns.countplot('id', hue='Salary', data= gvn_datafrme)
# Plot the subplot by passing the arguments rows, columns and order of the plot to the 
# subplot() function
pplot.subplot(1, 2, 2)
# Plot the graph of id, Tax columns in a given CSV file using the countplot() function
# of the seaborn module
# Here we are plotting multiple plots in a single PDF file.
sns.countplot('id', hue='Tax', data= gvn_datafrme)
# Save the plots in a single PDF file by passing some random name to the savefig() function
pplot.savefig('Output.pdf')

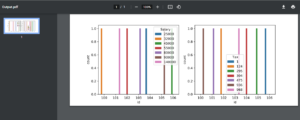
Output:

Output PDF File of Multiple Plots

How to Save Multiple matplotlib Figures in Single PDF File in Python? Read More »

Mobile Number validation Using Python

If you’re working on a Python project and want to add a mobile number validation feature, you should follow some validation criteria.

Mobile Number Validation Criteria:

  • The mobile number should only have 10 digits.
  • The mobile number should only begin with 7, 8, or 9 digits.
  • There should be no characters or strings in the mobile number.

All of the criteria listed above must be met in order to validate a mobile number.

NOTE: Here, we used the Indian mobile number validation requirements. You can easily edit the code to fit your country’s criteria.

We can Validate a mobile number using two methods:

  1. Using If-Else conditional statements.
  2. Using Regex

Mobile Number validation Using Python

Below are the ways to validate the given mobile number using python:

Method #1: Using If-Else conditional statements

Approach:

  • Give some random 10 digit mobile number as user input using the input() function and store it in a variable.
  • Check if the length of the given mobile number is greater than or less than 10 using the if conditional statement
  • If it is true then print “Invalid Mobile number. Mobile number must have 10 digits”
  • Else Check if the first digit of the given mobile number is 7 or 8 or 9 using the if conditional statement.
  • Handling the errors using the try-except blocks.
  • If it is true, then convert the given mobile number to an Integer using the int() function and store it in the same variable.
  • Print the given mobile number is a valid number
  • Print “Invalid Mobile number. Mobile number must not contain any characters”
  • Else print “Invalid Mobile number. Mobile number must begin with 7 or 8 or 9”.
  • The Exit of the Program.

Below is the implementation:

# Give some random 10 digit mobile number as user input using the input() 
# function and store it in a variable.
gvn_mobilenumb = input("Enter some random 10 digit mobile number = ")

# Check if the length of the given mobile number is greater than or less than 10
# using the if conditional statement
if len(gvn_mobilenumb) > 10 or len(gvn_mobilenumb) < 10:
    # If it is true then print "Invalid Mobile number. Mobile number must have 10 digits"
    print("Invalid Mobile number. Mobile number must have 10 digits")
else:
    # Else Check if first digit of the given mobile number is 7 or 8 or 9 using the if conditional statement
    if gvn_mobilenumb[0] == '7' or gvn_mobilenumb[0] == '8' or gvn_mobilenumb[0] == '9':
        # Handling the errors using the try-except blocks
        try:
            # If it is true, then convert the given mobile number to an Integer using the
            # int() function and store it in the same variable.
            gvn_mobilenumb = int(gvn_mobilenumb)
            # Print the given mobile number is a valid number
            print("The given mobile number is a Valid Number")
        except:
            # Print "Invalid Mobile number. Mobile number must not contain any characters"
            print('Invalid Mobile number. Mobile number must not contain any characters')
    else:
        # Else print "Invalid Mobile number. Mobile number must begin with 7 or 8 or 9"
        print("Invalid Mobile number. Mobile number must begin with 7 or 8 or 9")

Output:

Enter some random 10 digit mobile number = 9989593198
The given mobile number is a Valid Number
Enter some random 10 digit mobile number = 4567890182
Invalid Mobile number. Mobile number must begin with 7 or 8 or 9
Enter some random 10 digit mobile number = 9989583v99
Invalid Mobile number. Mobile number must not contain any characters

Method #2: Using Regex Module

fullmatch() function:
fullmatch() is a function that accepts two inputs: pattern and the string for validation.

If and only if the full string matches the pattern, it returns a match object; otherwise, it returns None.
We can determine whether or not the return value is a valid number based on the return value.

Mobile Number Validation Criteria:

  • The first digit should have values ranging from 6 to 9.
  • The remaining 9 numbers might be any integer between 0 and 9.

Example Pattern:

‘[6-9][0-9]{9}’: It means the starting should be between 6 to 9 and the next nine digits can be any number between 0 and 9.

‘[6-9] [0-9] [0-9] [0-9] [0-9] [0-9] [0-9] [0-9] [0-9] [0-9]’: This pattern works in the same way as the above one.

Approach:

  • Import re(regex) module using the import keyword
  • Give some random mobile number as user input using the input() function and store it in a variable.
  • Pass the Pattern, given mobile number as arguments to the fullmatch() function to check if the entire
  • mobile number matches the pattern else it returns None.
  • Store it in a variable
  • Here the pattern represents that the starting number should be between 6-9 and the next nine digits can be any number between 0 and 9.
  • Check if the above result is not Equal to None Using the if conditional statement
  • If it is true, i.e the output is Not None then print “Valid Number”
  • Else print “Invalid Number”.
  • The Exit of the Program.

Below is the implementation:

# Import re(regex) module using the import keyword
import re
# Give some random mobile number as user input using the input() 
# function and store it in a variable.
gvn_mobilenumb = input("Enter some random mobile number = ")
# Pass the Pattern, given mobile number as arguments to the fullmatch() function to 
# check if the entire mobile number matches the pattern else it returns None.
# Store it in a variable
# Here the pattern represents that the starting number should be between 6-9
# and the next nine digits can be any number between 0 and 9.
rslt = re.fullmatch('[6-9][0-9]{9}',gvn_mobilenumb) 
# Check if the above result is not Equal to None Using the if conditional statement
if rslt!=None: 
     # If it is true, i.e the output is not None then print "Valid Number"
     print('The given mobile number is a Valid Number')
else:
     # Else print "Invalid Number"
     print('The given mobile number is Invalid')

Output:

Enter some random mobile number = 9494580181
The given mobile number is a Valid Number

Mobile Number validation Using Python Read More »

How to Convert a Positive Number to a Negative Number in Python?

In this article, let us see how to convert positive numbers to negative numbers in Python. There are basically four ways to go about doing this. They are:

Nowadays, developers must incorporate this type of mechanism into a variety of applications, particularly gaming apps.

Converting Positive Number to a Negative Number in Python

Method #1: Using -abs() method

Approach:

  • Loop until the given range(1 to 10) using the for loop
  • Convert each number in the given range to a negative number using the -abs() function.
  • The Exit of the Program.

Below is the implementation:

# Loop until the given range(1 to 10) using the for loop
for k in range(1, 10):
    # Convert each number in the given range to a negative
    # number using the -abs() function
    print(-abs(k))

Output:

-1
-2
-3
-4
-5
-6
-7
-8
-9

Method #2: Using string concatenation

Approach:

  • Loop in the given range from 1 to 6(not included) using the for loop
  • Convert the iterator value to string using the str() and concatenate it with the minus(-) sign to make it a negative number.
  • Store it in the same variable.
  • Print the iterator value.
  • The Exit of the Program.

Below is the implementation:

# Loop in the given range from 1 to 6(not included) using the for loop
for k in range(1, 6):
    # Convert the iterator value to string using the str() and concatenate it
    # with the minus(-) sign to make it a negative number.
    # Store it in the same variable.
    k ='-' + str(k)
    # Print the iterator value
    print(k)

Output:

-1
-2
-3
-4
-5

Method #3: Multiplying with -1

Approach:

  • Give the list as static input and store it in a variable.
  • Loop in the given list using the for loop
  • Multiply each element of the given list with -1 and store it in another variable.
  • Print the above obtained negative value of each list element.
  • The Exit of the Program.

Below is the implementation:

# Give the list as static input and store it in a variable.
gvn_lst =[10, 20, 30, 40, 50]
# Loop in the given list using the for loop
for itr in gvn_lst:
    # Multiply each element of the given list with -1 and store it 
    # in another variable.
    negative_num = itr * (-1)
    # Print the above obtained negative value of each list element
    print(negative_num)

Output:

-10
-20
-30
-40
-50

Method #4: Similar to 3rd method but for random Numbers

Approach:

  • Import random module using the import keyword
  • Create a new empty list and store it in a variable
  • Give some random length of the list as static input and store it in another variable.
  • Loop till the given list length using the for loop
  • Generate some random numbers in the range 0 to the given list length using the randint() function, multiply it with -1 to convert it into a negative number and append it to the above created empty list.
  • Print the above list.
  • The Exit of the Program.

Below is the implementation:

# Import random module using the import keyword
import random
# Create a new empty list and store it in a variable
gvn_lst = []
# Give some random length of the list as static input and store it in another variable.
len_lst = 4
# Loop till the given list length using the for loop
for i in range(len_lst):
   # Generate some random numbers in the range 0 to given list length 
   # using the randint() function, multiply it with -1 to convert it into 
   # a negative number and append it to the above created empty list 
   gvn_lst.append((random.randint(0, len_lst)*-1))
# Print the above list
print(gvn_lst)

Output:

[-1, -4, -1, -3]

How to Convert a Positive Number to a Negative Number in Python? Read More »

How to Create Dynamic Variable Name in Python?

A dynamic variable name, often known as a variable, is a variable whose name is an estimation of another variable.

It is nothing but a user-given name.
Despite the fact that Python is a highly dynamic language in which almost everything is an object, dynamic variables can be created in Python.

We use the below methods to create a dynamic variable name:

  • Using globals() function
  • Using locals() function
  • Using exec() function
  • Using vars() function

globals() function in python:

The globals() function in Python returns a dictionary that contains the current global symbol table.

The globals() method retrieves the current global symbol table’s dictionary.

A symbol table is a data structure maintained by a compiler that contains all relevant program information.

Variable names, methods, classes, and so forth are examples of this.

There are two types of symbol tables:

  • Local symbol table
  • Global symbol table

locals() function in python:

The local symbol table maintains all information relating to the program’s local scope and is accessed in Python via the locals() function.

Creating Dynamic Variable Name in Python

Method #1: Using globals() function

Approach:

  • Give some random dynamic variable name as static input and store it in a variable.
  • Assign the above dynamic variable name with some other random name using the globals() function
  • Print the value of the dynamic variable which is initialized at the first.
  • The Exit of the Program.

Below is the implementation:

# Give some random dynamic variable name as static input and store it in a variable.
dynamicvariable= "hello"

# Assign the above dynamic variable name with some other random name using the 
# globals() function 
globals()[dynamicvariable] = "Python-programs"

# Print the value of the dynamicvariable which is initialized at the first.
print(hello)

Output:

Python-programs

Method #2: Using locals() function

Approach:

  • Give some random dynamic variable name as static input and store it in a variable.
  • Assign the above dynamic variable name with some other random name using the locals() function
  • Print the value of the dynamic variable which is initialized at the first.
  • The Exit of the Program.

Below is the implementation:

# Give some random dynamic variable name as static input and store it in a variable.
dynamicvariable= "hello"

# Assign the above dynamic variable name with some other random name using the 
# locals() function 
locals()[dynamicvariable] = "Python-programs"

# Print the value of the dynamicvariable which is initialized at the first.
print(hello)

Output:

Python-programs

Method #3: Using exec() function

Approach:

  • Give some random dynamic variable name as static input and store it in a variable.
  • Assign the above dynamic variable name with some other random name(here we used number) using the exec() function
  • Print the value of the dynamic variable which is initialized at the first.
  • The Exit of the Program.

Below is the implementation:

# Give some random dynamic variable name as static input and store it in a variable.
dynamicvariable= "hello"

# Assign the above dynamic variable name with some other random name using the 
# exec() function 
exec("%s = %d" % (dynamicvariable, 2011))

# Print the value of the dynamicvariable which is initialized at the first.
print(hello)

Output:

2011

Method #4: Using vars() function

Approach:

  • Give some random dynamic variable name as static input and store it in a variable.
  • Assign the above dynamic variable name with some other random name using the vars() function
  • Print the value of the dynamic variable which is initialized at the first.
  • The Exit of the Program.

Below is the implementation:

# Give some random dynamic variable name as static input and store it in a variable.
dynamicvariable= "welcome"

# Assign the above dynamic variable name with some other random name using the 
# vars() function 
vars()[dynamicvariable] = "Python-programs"

# Print the value of the dynamicvariable which is initialized at the first.
print(welcome)

Output:

Python-programs


How to Create Dynamic Variable Name in Python? Read More »

How to Find Unique Lines from two Text(.txt) Files in Python?

In this article, let us see how to use Python to find only the unique lines in two text files (.txt files). We may also state that we will use Python to remove the lines that already exist in both of the text (.txt) files and place the new lines in another.txt file.

Let us consider the below two text files as an example:

demotextfile_1.txt:

hello this is Python-programs
good morning all

demotextfile_2.txt:

hello this is Python-programs
Are you good at coding? 
Then give a start to it
welcome to the greatest python coding platform
good morning all

The output of our code must be as follows:

Are you good at coding? 
Then give a start to it
welcome to the greatest python coding platform

Finding Unique Lines from two Text(.txt) Files in Python

Approach:

  • Open some random text file in read-only mode using the open() function and read all the lines of the file using the readlines() function.
  • Store it in a variable.
  • Similarly, Open the second text file in read-only mode using the open() function and read all the lines of the file using the readlines() function.
  • Store it in another variable.
  • Take a new empty list and store it in another variable.
  • Loop in the given second text file using the for loop
  • Check if each line of the second file is NOT present in the given first text file using the if conditional statement.
  • If it is true(unique), then append that line to the above created new list
  • Open some random new file in write mode using the open() function
  • Loop the above created new list(which contains unique lines) using the for loop
  • Write the corresponding line to the given output file using the write() function
  • The Exit of the Program.

Below is the implementation:

# Open some random text file in read-only mode using the open() function 
# and read all the lines of the file using the readlines() function.
# Store it in a variable.
gvn_txtfile_1= open('demotextfile_1.txt','r').readlines()
# Similarly, Open the second text file in read-only mode using the open() function 
# and read all the lines of the file using the readlines() function.
# Store it in another variable.
gvn_txtfile_2 = open('demotextfile_2.txt','r').readlines()
# Take a new empty list and store it in another variable.
lines_lst= []
# Loop in the given second text file using the for loop
for line in gvn_txtfile_2:
  # Check if each line of the second file is NOT present in the given first text 
  # file using the if conditional statement.
  if line not in gvn_txtfile_1:
    # If it is true(unique), then append that line to the above created new list
    lines_lst.append(line)

# Open some random new file in write mode using the open() function 
with open('output_file.txt','w') as outfile:
    # Loop the above created new list(which contains unique lines) using the for loop
    for line in lines_lst:
        # Write the corresponding line to the given outputfile using the write() function
        outfile.write(line)

Output:(output_file.txt)

Are you good at coding? 
Then give a start to it
welcome to the greatest python coding platform

NOTE: If the file output_file.txt already exists, it will simply be updated.

How to Find Unique Lines from two Text(.txt) Files in Python? Read More »

How to Print Particular JSON Value in Python?

JSON is an abbreviation for JavaScript Object Notation. It means that data is stored and transferred using a script (executable) file comprised of text in a computer language. Python has a built-in library named json that handles JSON. In order to use this feature, we must first load the json package into our Python script. The text in JSON is represented by a quoted-string, which contains the value in the key-value mapping within flower braces { }.

How to Read from JSON?

In Python, loading a JSON object is simple. Python includes a library named json that may be used to work with JSON data. It is accomplished by utilizing the JSON module, which gives us a plethora of methods, among which the loads() and load() methods will assist us in reading the JSON file.

Here we take demo.json as an Example

{
"id": 1,
 "name": "virat",
 "Address": [{
   "city" : "hyderabad",
   "state": "telangana",
   "geo": {
        "lat": 90,
        "long": 100
          }
        }]
 }

Printing Particular JSON Value in Python

Approach:

  • Import json module using the import keyword
  • Open some random json file using the open() function by passing the filename/path as an argument to it and store it in a variable
  • Load/get the content of the given json file using the load() function of the json module and store it in another variable
  • Print the data of the given JSON file
  • Get a specific value from the json file using slicing
  • Printing Address details from a given JSON file.
  • Printing ‘geo’ details in Address.
  • Printing ‘lat’ details in Address/geo.
  • The Exit of the Program.

Below is the implementation:

# Import json module using the import keyword
import json
# Open some random json file using the open() function by passing the
# filename/path as an argument to it and store it in a variable
gvn_jsonfile = open("demo.json")
# Load/get the content of the given json file using the load() function of the
# json module and store it in another variable
json_data = json.load(gvn_jsonfile)
# Print the data of the given JSON file
print("The data of the given JSON file:\n", json_data)
print()
# Get a specific value from the json file using slicing
# Printing Address details from a given JSON file
print("Printing Address details:")
print(json_data["Address"])
print()
# Printing 'geo' details in Address
print("Printing 'geo' details in Address:")
print(json_data["Address"][0]["geo"])
print()
# Printing 'lat' details in Address/geo
print("Printing 'lat' details in Address/geo:")
print(json_data["Address"][0]["geo"]["lat"])

Output:

The data of the given JSON file:
{'id': 1, 'name': 'virat', 'Address': [{'city': 'hyderabad', 'state': 'telangana', 'geo': {'lat': 90, 'long': 100}}]}

Printing Address details:
[{'city': 'hyderabad', 'state': 'telangana', 'geo': {'lat': 90, 'long': 100}}]

Printing 'geo' details in Address:
{'lat': 90, 'long': 100}

Printing 'lat' details in Address/geo:
90

How to Print Particular JSON Value in Python? Read More »

How to Convert Image into a Pencil Sketch Using Python

An image in Python is simply a two-dimensional array of integers. So, using several Python tools, one can perform a few matrix operations to obtain some quite amazing effects. To convert a regular image to a sketch, we will change its original RGB values and assign them RGB values equivalent to grey, resulting in a sketch of the input image.

Here we use OpenCV  and matplotlib modules(for plotting figures/images)

Converting Image into a Pencil Sketch Using Python

1)Importing Modules

# Import cv2(OpenCV) module using the import keyword
import cv2
# Import pyplot of matplotlib module using the import keyword
import matplotlib.pyplot as plt
# Use the seaborn library using use() function
plt.style.use('seaborn')

2)Plotting the given Original Image

# Load some random image by passing the filepath/name of the image to the imread() 
# function and store it in a variable
gvn_image = cv2.imread("sampleimage.png")
# Change the color code of the given image to RGB format using the cvtColor() function
# to get the original colors
gvn_image = cv2.cvtColor(gvn_image, cv2.COLOR_BGR2RGB)
# Pass some random image size to be plotted(width, length) to the figure() function
plt.figure(figsize=(6,6))
# Plot the given original image using the imshow() function
plt.imshow(gvn_image)
plt.axis("off")
# Give the Title of the image using the title() function
plt.title("Given Sample Image")
# Display the plot(image) using the plot function
plt.show()

Output:

Sample Image of Pencil Sketch Article

3)Convert the given image to the Grayscale

The cvtColor () function to used to convert the image to a grayscale image to reduce the image’s complexity and make it easier to work with.

# Pass the given image, COLOR_BGR2GRAY as arguments to the cvtColor() function
# to convert the given image to grayscale image
# Store it in a variable
grayscle_image = cv2.cvtColor(gvn_image, cv2.COLOR_BGR2GRAY)
# Pass some random image size to be plotted(width, length) to the figure() function
plt.figure(figsize=(6,6))
# Plot the above Grayscale image for the given image using the imshow() function
plt.imshow(grayscle_image, cmap="gray")
plt.axis("off")
# Give the Title of the image using the title() function
plt.title("Grayscale Image")
# Display the grayscale image using the plot function
plt.show()

Output:

Converting to Grayscale Image

4)Getting the Inverted Image

Inverting the image is the next process. Now you’re probably wondering why you’d do something like that. The reason is that inverting an image helps in the analysis of the image with greater precision and detail.

For the sketch generation, a more detailed study is necessary because the sketches must be exact and good.

# Get the inverted image of by passing the above grayscale image as an 
# argument to the bitwise_not() function
invertd_image = cv2.bitwise_not(grayscle_image)
plt.figure(figsize=(6,6))
plt.imshow(invertd_image, cmap="gray")
plt.axis("off")
plt.title("Inverted Image")
plt.show()

Output:

Getting Inverted Image from the Grayscale Image

5)Getting a Smoothened Image

we will smooth the image to ensure that the sketch we obtain is less edgy and smooth. The corresponding code is displayed below.

# Get the Smoothened image from the above inverted image using the
# GaussianBlur() function
smooth_image = cv2.GaussianBlur(invertd_image, (21, 21),sigmaX=0, sigmaY=0)
plt.figure(figsize=(6, 6))
plt.imshow(smooth_image, cmap="gray")
plt.axis("off")
plt.title("Smoothened Image using GaussianBlur() function")
plt.show()

Output:

Smoothened Image using GaussianBlur() function

6)Getting a Pencil Sketch Image

Now that we’ve completed the image processing, we’ll provide the previous outputs to the function, together with the correct and precise parameters, to make the necessary alterations to the image.

# Get the output pencil sktech image for the given image using the divide() function 
# by passing the above gray scale image, smoothened image, scale as arguments to it.
pencil_skecth = cv2.divide(grayscle_image, 255 - smooth_image, scale=255)
plt.figure(figsize=(6, 6))
plt.imshow(pencil_skecth, cmap="gray")
plt.axis("off")
plt.title("Output Pencil Sketch Image")
plt.show()

Output:

Final Pencil Sketch Image for the given Sample Image


How to Convert Image into a Pencil Sketch Using Python Read More »

Image Based Steganography using Python

What is Steganography?

Steganography is the process of hiding a secret message within a larger one in such a way that the presence or contents of the hidden message are unknown. The goal of steganography is to keep communication between two parties hidden. Unlike cryptography, which allows us to hide the content of a secret message, Steganography hides the fact that a message has been sent. Despite the fact that Steganography and Cryptography are not the same, there are some parallels between the two. Steganography is classified as a type of cryptography by some writers since hidden communication appears to be a secret message.

Steganography is the process of hiding confidential data within an ordinary file during transmission. Secret data and ordinary files can both take the form of a text message, image, audio clip, or video file.
Image steganography is the practice of hiding sensitive data within an image or video file.

A simple example of hiding a text message within an image is provided below. The two main steps are as follows:

Encryption is the process of storing a text message within an image.

Decryption is the process of extracting the message hidden within an image.

Before going to the coding part we should first install the pillow and stepic libraries into our system

Installation:

pip install Pillow
pip install stepic

Output:

Collecting stepic
Downloading stepic-0.5.0.tar.gz (219 kB)
|████████████████████████████████| 219 kB 4.1 MB/s 
Requirement already satisfied: pillow in /usr/local/lib/python3.7/
dist-packages
 (from stepic) (7.1.2)
Building wheels for collected packages: stepic
Building wheel for stepic (setup.py) ... done
Created wheel for stepic: filename=stepic-0.5.0-py3-none-any.whl size=12428
 sha256=bcf777c1de2853e6fd38c63e0ba14b7d95c6803aebac77f72f18752979b216a2
Stored in directory: /root/.cache/pip/wheels/47/8d/57/322e721ace59cf72d3282
42bbc636e6affc672344cf5480f33
Successfully built stepic
Installing collected packages: stepic
Successfully installed stepic-0.5.0

pillow module in Python:

Pillow is a Python Imaging Library (PIL) that allows you to open, manipulate, and save images in a variety of formats.

stepic module in Python:
stepic is a Python package for hiding data within an image by slightly altering the image’s colors. These changes are normally unnoticeable to the naked eye, but they are detectable by machines.

Image-Based Steganography using Python

1)Encryption

Approach:

  • Import Image from PIL module using the import keyword
  • Import stepic module using the import keyword
  • Open the image using the open() function of the Image module by passing the image filename/path as an argument to it in which the secret message will be stored.
  • Give some random secret message and store it in a variable
  • Convert the above given secret message into UTF-8 format using the encode() function and store it in the same variable
  • Pass the given image and secret message into the encode() function of the stepic module which gives a new image within which the secret message is hidden.
  • Save the above encoded/encrypted image with some random name and extension using the save() function
  • Print some random text for acknowledgment.
  • The Exit of the Program.

Below is the implementation:

# Import Image from PIL module using the import keyword
from PIL import Image
# Import stepic module using the import keyword
import stepic

# Open the image using the open() function of the Image module 
# by passing the image filename/path as an argument to it
# in which the secret message will be stored.
gvn_image = Image.open("sampleimage.jpg")
# Give some random secret message and store it in a variable
secret_msg = "Welcome to Python-programs"
# Convert the above given secret message into UTF-8 format using the encode() function
# and store it in the same variable
secret_msg = secret_msg.encode()
# Pass the given image and secret message into the encode() function of the stepic module
# which gives a new image within which the secret message is hidden.
encodedimage = stepic.encode(gvn_image, secret_msg)
# Save the above encoded/encrypted image with some random name and extension using the 
# save() function
encodedimage.save("EncryptedImage.png")
# Print some random text for acknowledgment
print("Encryption has done successfully")

Output:

Encryption has done successfully

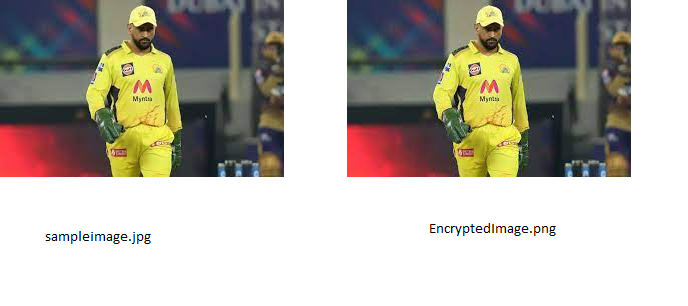
Comparing Original and Encrypted Images

As seen in the preceding image, the original image and the image acquired after encryption appears identical. The secret text message hiding within the latter image is not apparent to us, nor does this image appear altered in terms of pixel intensities to the human eye.

2)Decryption 

Approach:

  • Import Image from PIL module using the import keyword
  • Import stepic module using the import keyword
  • Open the image from which you want to extract the secret message(encrypted image) using the open() function by passing filename/path as an argument to it.
  • Store it in a variable
  • Pass the above encrypted image to the decode() function of the stepic module to give the encrypted secret message in the string format.
  • Store it in another variable
  • Print some random text for acknowledgment
  •  Print the decrypted/decoded message.
  • The Exit of the Program.

Below is the implementation:

# Import Image from PIL module using the import keyword
from PIL import Image
# Import stepic module using the import keyword
import stepic

# Open the image from which you want to extract the secret message(encrypted image) using the
# open() function by passing filename/path as an argument to it.
# Store it in a variable
encryptd_image = Image.open("EncryptedImage.png")

# Pass the above encrypted image to the decode() function of the stepic module 
# to give the encrypted secret message in the string format.
# Store it in another variable
decryptedmessage = stepic.decode(encryptd_image)
# Print some random text for acknowledgment
print("Decryption has done successfully")
# Print the decrypted/decoded message
print("The decrypted message = ", decryptedmessage)

Output:

Decryption has done successfully
The decrypted message = Welcome to Python-programs

Image Based Steganography using Python Read More »

How to Extract Images from a PDF in Python?

What is PDF?

PDFs are a popular format for distributing text. PDF is an abbreviation for Portable Document Format, and it utilizes the .pdf file extension. Adobe Systems designed it in the early 1990s.

Reading PDF documents in Python can assist you in automating a wide range of operations.

Let us now see how to extract images from a PDF file in python. For this purpose, we use the PyMuPDF and Pillow modules.

Installation

pip install PyMuPDF
pip install Pillow
Output:
Collecting PyMuPDF
Downloading PyMuPDF-1.19.6-cp37-cp37m-manylinux_2_17_x86_64.manylinux2014
_x86_64.whl (8.8 MB)
|████████████████████████████████| 8.8 MB 4.5 MB/s 
Installing collected packages: PyMuPDF
Successfully installed PyMuPDF-1.19.6
PyMuPDF module: PyMuPDF is binding for MuPDF in Python, a lightweight PDF viewer.
Pillow Module: Pillow is a Python Imaging Library (PIL) that allows you to open, manipulate, and save images in a variety of formats.

Extract Images from a PDF in Python

Approach:

  • Import fitz module using the import keyword
  • Import io(input-output) module using the import keyword
  • Import Image from PIL module using the import keyword
  • Open some random PDF file using the open() function of the fitz module by passing the filename/path as an argument to it.
  • Calculate the number of pages in a given PDF file using the len() function by passing the given pdf file as an argument to it.
  • Loop in each page of the pdf till the number of pages using the for loop
  • Get the page at iterator index
  • Get all image objects present in this page using the getImageList() function and store it in a variable
  • Loop in these image objects using the for loop and enumerate() function
  • Get the XREF of the image information.
  • Extract image information by passing the above image xref to the extractImage() function
  • Extract image bytes by passing “image” to the above image information
  • Access the image extension by passing “ext” to the above image information
  • Load this image to PIL using the BytesIO() function by passing the above image bytes as an argument to it.
  • Save this above result image using the save() function with the given image count and extension.
  • The Exit of the Program.

Below is the implementation:

# Import fitz module using the import keyword
import fitz
# Import io(input-output) module using the import keyword
import io
# Import Image from PIL module using the import keyword
from PIL import Image

# Open some random PDF file using the open() function of the fitz module 
# by passing the filename/path as an argument to it.
gvn_pdf= fitz.open("samplepdf_file.pdf")
# Calculate the number of pages in a given PDF file using the len() function
# by passing the given pdf file as an argument to it.
no_of_pages = len(gvn_pdf)

# Loop in each page of the pdf till the number of pages using the for loop
for k in range(no_of_pages):
    # Get the page at iterator index
    page = gvn_pdf[k]
    # Get all image objects present in this page using the getImageList() function
    # and store it in a variable
    img_lst = page.getImageList()
    # Loop in these image objects using the for loop and enumerate() function
    for imgcount, image in enumerate(img_lst, start=1):
        # Get the XREF of the image information.
        img_xref = image[0]
        # Extract image information by passing the above image xref to the extractImage() function
        imageinformation = gvn_pdf.extractImage(img_xref)
        # Extract image bytes by passing "image" to the above imageinformation
        img_bytes = imageinformation["image"]
        # Access the image extension by passing "ext" to the above imageinformation
        img_extension = imageinformation["ext"]
        # Load this image to PIL using the BytesIO() function by passing the above 
        # image bytes as argument to it.
        rslt_img= Image.open(io.BytesIO(img_bytes))
        # Save this above result image using the save() function with the given image count and extension
        rslt_img.save(open(f"page{k+1}_img{imgcount}.{img_extension}", "wb"))

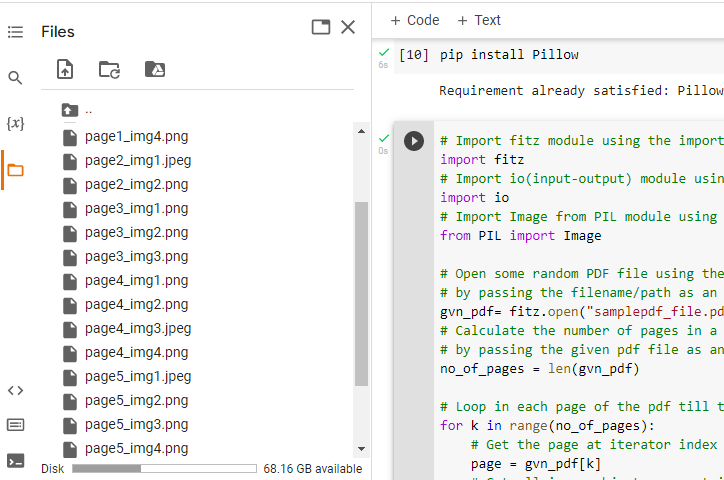
Output:

Deprecation: 'getImageList' removed from class 'Page' after v1.19 - use
'get_images'.
Deprecation: 'extractImage' removed from class 'Document' after v1.19 - 
use 'extract_image'.

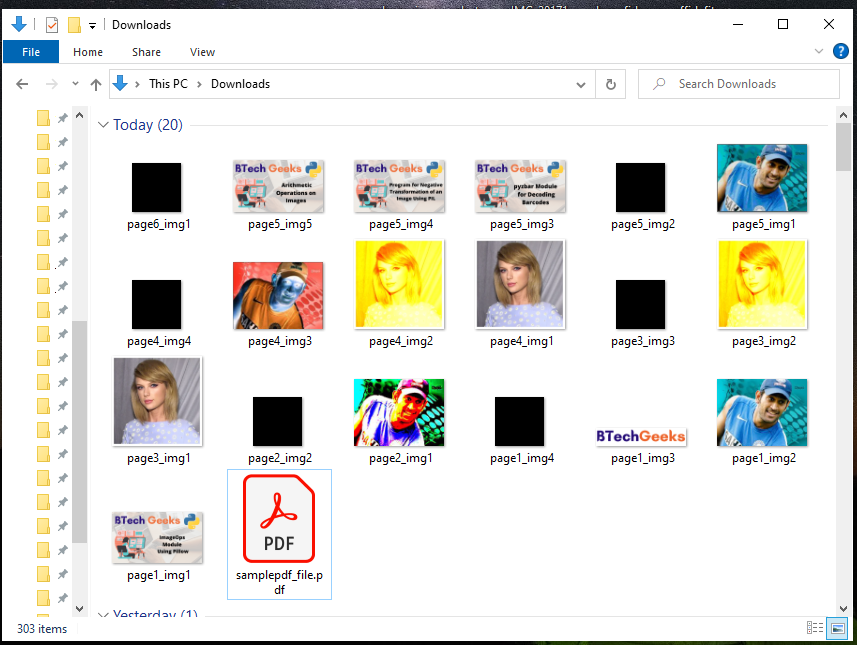
Output Images in google colab


How to Extract Images from a PDF in Python? Read More »