Author name: Vikram Chiluka

Python Absolute vs Relative Imports

Python – import:

Import in Python is identical to C/C++’s include header files. Python modules can access code from another module by using import to import the file/function. The import statement is the most commonly used method of initiating the import machinery, although it is not the only method. The import statement includes the import keyword as well as the name of the module.

The import statement does two operations: it searches for a module and then binds the search result to a name in local scope. When you import a module, Python executes all of the code in the module file and makes it available to the importer file.

When a module is imported, the interpreter first looks for it in sys.modules, which is a cache of all previously imported modules. If it is not found, it examines all built-in modules with that name; if it is found, the interpreter runs all of the code and saves it to a file. If the module is not found, it looks for a file with the same name in the list of directories specified by the sys.path variable.

sys.path is a variable that includes a list of paths to Python libraries, packages, and the input script’s directory. If a module named math is imported, the interpreter looks for it in the built-in modules; if it is not found, it looks for a file named math.py in the list of directories specified by sys.path.

Absolute Import

When we import modules using absolute importing, we must specify the module’s complete path following the import keyword.

The whole path comprises the main module/library as well as any submodules or functions that will be used in the program.

For Example:

└── My_project
    ├── package_1
    │   ├── My_module1.py
    │   └── My_module2.py
    └── package_2
        ├── __init__.py
        ├── My_module3.py
        ├── My_module4.py
        └── subpackage_1
            └── My_module5.py

There is a directory called My_project, which has two subdirectories called package_1and package_2. My_module1.py and My_module2.py can be found in the package_1directory.

There are three files in the package_2directory: two modules, My_module3.py and My_module4.py, and an initialization file, init .py. It also includes a subdirectory called subpackage_1, which contains a file called My_module5.py.

Let us consider the following:

  • package_1/My_module2.py contains a function, function1.
  • package_2/__init__.py contains a class, class1.
  • package_2/subpackage_1/My_module5.py contains a function, function2.

Practical Implementation:

from package_1 import My_module1
from package_1.My_module2 import function1
from package_2 import class1
from package_2.subpackage_1.My_module5 import function2

Advantages and Disadvantages

Advantages:

  • Absolute imports are quite helpful because they are concise and to the point.
  • Even if the current position of the import statement is modified later, the absolute import statements remain valid.
  • Absolute import may be determined simply by glancing at the statement and determining the location of the imported resource.

Disadvantages:

Absolute imports are ineffective when the directory structure is large. In this scenario, relative imports work fine.

Assume we need to import a function from a higher-level module in the root module. The absolute import command for such a module would look like this:

from packg_1.subpackg_2.subpackg_3.subpackg_4.module_5 import functn_6

If the desired function is present any farther down in the layers, things will become quite complex and difficult.

Relative Import

The relative technique allows us to import a function relative to the location of a specific package or subpackage, making it a more efficient method of importing modules and functions.

We have two types of relative importing ways, implicit and explicit, but the implicit strategy no longer works with Python3.x versions.

The relative importing method is depicted below:

from .subpackg_a.module_5 import functn_4

Advantages and Disadvantages

Advantages:

  • The relative import statements are short and to the point.
  • It lowers the complexity of an import statement based on current location.

Disadvantages:

  • This technique is difficult to read, as the programmer is unaware of numerous root modules.
  • The programmer has no idea where the function we’re importing came from.

Bullet-point Differences:

                         Absolute Import                       Relative Import
In absolute import, we supply the module’s full path from its root directory or package.In relative import, we supply the path to the module’s location from the currently running or active Python program or script.
Absolute imports are usually lengthy.Usually, relative imports are short.
Absolute imports are easier to read and understand, i.e., more clearThese imports are less clear and a bit tough to read.


Python Absolute vs Relative Imports Read More »

Requests in Python: Using Python to Request Web Pages

Requests in Python is a great module that allows you to use Python to send HTTP/1.1 requests to web pages.

Python 2.7 and 3.5+ are both officially supported. Keep – Alive, Connection Pooling, Sessions with permanent cookies, and Browser Style SSL verification make it the preferred solution for developers.

In this post, we’ll go over some of these features in greater detail and show you how to get started with the Python Requests module to construct web requests.

Installation of Requests in Python

Installing requests in Python is simple and straightforward. There are various ways to install a module in Python. However, in this tutorial, we will demonstrate how to use it using the pip module.

Open your terminal or command prompt (if you’re using Windows) and enter the following command.

pip install requests 
#Alternatively, if the first command does not work, use the below:
pip3 install requests

It should have installed the requests module successfully on your device.

Python Requests

To understand how the requests module works, you must first understand what happens when you browse the web and how it instantaneously displays the data we were hoping to see.

When you click a link, we make an HTTP (Hypertext Transfer Protocol) request to the server that hosts the requested page.

When the server receives the request, it returns the requested content to us.

The two most useful HTTP requests are GET and POST.

Importing Requests:

import requests

What is GET Request?

This approach indicates that we are requesting the contents of our chosen URL from the server. So, let’s suppose we want to retrieve Amazon’s homepage utilizing HTTP requests.

Then Enter the below code:

import requests
my_req = requests.get("http://amazon.com")

What the single line of code accomplishes here?

It uses the get() method to send an HTTP GET request to Amazon’s homepage, with the URL as the argument. The response object is then saved in our ‘my_req ‘ variable.

Our Response object instance further classifies the retained data and saves it in the appropriate attributes.

Example:

import requests
my_req = requests.get("http://amazon.com")
# The result contains the url's status code.
# The result of a successful full attempt is 200.
print(my_req.status_code)


# This attribute returns a Python dictionary containing the
# headers' key-value pairs.
print(my_req.headers)

# It displays the server's response content or Static Source Code.
print(my_req.text)

# we could also view or modify the encoding of the response content
# using the Requests library.
print(my_req.encoding)
my_req.encoding = 'utf-8'

Output:

503
{'Server': 'Server', 'Content-Type': 'text/html', 'Content-Length': '1203', 'x-amz-rid': 'T4PK7QWJPVK62Z0FZM5M', 'Last-Modified': 'Fri, 03 Dec 2021 19:33:54 GMT', 'ETag': '"a6f-5d242fcc50c80-gzip"', 'Accept-Ranges': 'bytes', 'Content-Encoding': 'gzip', 'Strict-Transport-Security': 'max-age=47474747; includeSubDomains; preload', 'Permissions-Policy': 'interest-cohort=()', 'Date': 'Wed, 15 Dec 2021 02:21:45 GMT', 'Connection': 'keep-alive', 'Vary': 'Accept-Encoding'}
<!--
        To discuss automated access to Amazon data please contact [email protected].
        For information about migrating to our APIs refer to our Marketplace APIs at https://developer.amazonservices.com/ref=rm_5_sv, or our Product Advertising API at https://affiliate-program.amazon.com/gp/advertising/api/detail/main.html/ref=rm_5_ac for advertising use cases.
-->
<!doctype html>
<html>
<head>
  <meta charset="utf-8">
  <meta http-equiv="x-ua-compatible" content="ie=edge">
  <meta name="viewport" content="width=device-width, initial-scale=1, shrink-to-fit=no">
  <title>Sorry! Something went wrong!</title>
  <style>
  html, body {
    padding: 0;
    margin: 0
  }

  img {
    border: 0
  }

  #a {
    background: #232f3e;
    padding: 11px 11px 11px 192px
  }

  #b {
    position: absolute;
    left: 22px;
    top: 12px
  }

  #c {
    position: relative;
    max-width: 800px;
    padding: 0 40px 0 0
  }

  #e, #f {
    height: 35px;
    border: 0;
    font-size: 1em
  }

  #e {
    width: 100%;
    margin: 0;
    padding: 0 10px;
    border-radius: 4px 0 0 4px
  }

  #f {
    cursor: pointer;
    background: #febd69;
    font-weight: bold;
    border-radius: 0 4px 4px 0;
    -webkit-appearance: none;
    position: absolute;
    top: 0;
    right: 0;
    padding: 0 12px
  }

  @media (max-width: 500px) {
    #a {
      padding: 55px 10px 10px
    }

    #b {
      left: 6px
    }
  }

  #g {
    text-align: center;
    margin: 30px 0
  }

  #g img {
    max-width: 90%
  }

  #d {
    display: none
  }

  #d[src] {
    display: inline
  }
  </style>
</head>
<body>
    <a href="/ref=cs_503_logo"><img id="b" src="https://images-na.ssl-images-amazon.com/images/G/01/error/logo._TTD_.png" alt="Amazon.com"></a>
    <form id="a" accept-charset="utf-8" action="/s" method="GET" role="search">
        <div id="c">
            <input id="e" name="field-keywords" placeholder="Search">
            <input name="ref" type="hidden" value="cs_503_search">
            <input id="f" type="submit" value="Go">
        </div>
    </form>
<div id="g">
  <div><a href="/ref=cs_503_link"><img src="https://images-na.ssl-images-amazon.com/images/G/01/error/500_503.png"
                                        alt="Sorry! Something went wrong on our end. Please go back and try again or go to Amazon's home page."></a>
  </div>
  <a href="/dogsofamazon/ref=cs_503_d" target="_blank" rel="noopener noreferrer"><img id="d" alt="Dogs of Amazon"></a>
  <script>document.getElementById("d").src = "https://images-na.ssl-images-amazon.com/images/G/01/error/" + (Math.floor(Math.random() * 43) + 1) + "._TTD_.jpg";</script>
</div>
</body>
</html>

ISO-8859-1

Passing Arguments with the GET Method

Usually, a single GET method does not allow us to get all of the information we require, so we must send additional parameters with our original get request.

Parameters are mostly key-value pairs of data wrapped in a tuple or list. We can send it using the params parameter of our get() method.

Example:

# Import requests using the import keyword
import requests 
# Give the dictionary as static input and store it in a variable.
payload_val = {'key1': 'value1', 'key2': 'value2'}
# Get the requests by passing some random URl and payload values as the arguments to it.
my_req = requests.get('http://httpbin.org/get', params=payload_val)
# print the above request
print(my_req.text)

Output:

{
  "args": {
    "key1": "value1", 
    "key2": "value2"
  }, 
  "headers": {
    "Accept": "*/*", 
    "Accept-Encoding": "gzip, deflate", 
    "Host": "httpbin.org", 
    "User-Agent": "python-requests/2.23.0", 
    "X-Amzn-Trace-Id": "Root=1-61b95330-4018303804e1772e3f298164"
  }, 
  "origin": "34.86.125.144", 
  "url": "http://httpbin.org/get?key1=value1&key2=value2"
}

What is POST Request?

In contrast, to GET requests in Python, the POST Method in HTTP requires a payload to be sent along with it. Instead of retrieving data directly, this method is used to transfer it to a server. Using the post() method in our requests module, we can access POST.

Example

# Import requests module using the import keyword
import requests 
# Give the payload dictionary as static input and store it in a variable
payload_val  = {'key_1': 'value_1', 'key_2': 'value_2'}
# Pass the Url and above payload dictionary as arguments to the post() method
# and store in another variable
my_req  = requests.post("https://httpbin.org/post", data=payload_val)
# print the above request
print(my_req .text)

Output:

{
"args": {}, 
"data": "", 
"files": {}, 
"form": {
"key_1": "value_1", 
"key_2": "value_2"
}, 
"headers": {
"Accept": "*/*", 
"Accept-Encoding": "gzip, deflate", 
"Content-Length": "27", 
"Content-Type": "application/x-www-form-urlencoded", 
"Host": "httpbin.org", 
"User-Agent": "python-requests/2.23.0", 
"X-Amzn-Trace-Id": "Root=1-61cf20c7-4887ec7502308d5a0671e1ae"
}, 
"json": null, 
"origin": "35.245.205.160", 
"url": "https://httpbin.org/post"
}

Python Advanced Request Features

GET and POST are the most fundamental and important HTTP methods. However, the requests module allows a variety of such methods such as PUT, PATCH, DELETE, and so on.

These are some of the main reasons why the ‘requests’ module is so popular among developers is because of advanced features such as:

Sessions Object: It is mostly used to store the same cookies across multiple requests, resulting in a speedier response.

SOCKS Proxies are supported: Although a second requirement (called’requests[socks]’ must be installed, it can considerably improve your performance for many requests, especially if the server rate limits your IP.

SSL Verification: By passing an extra parameter “verify=True” within the get() method, you can force check if a website fully supports SSL. If the website does not support SSL properly, the script will throw an error.


Requests in Python: Using Python to Request Web Pages Read More »

Python Program for Dot Notation with Examples

Object-Oriented Programming is a programming paradigm that is built on the idea of real-world Objects. Every object includes attributes that describe its state and methods that allow it to perform a specific task (equivalent to executing a function). Python is one of these languages.

Almost every entity in Python is traded as an Object. Knowing this is essential for understanding the importance of dot (.) notation.

Dot Notation

To put it simply, the dot (.) notation is a method of accessing the attributes and methods of each method of instances of various object classes.

It is normally preceded by the object instance, while the right end of the dot notation contains the attributes and methods.

Here is an example to create a class with many methods and then access them with the dot(.) notation.

Example

Approach:

  • Create a class say Employdetails.
  • Inside the class, initialize a constructor by passing the arguments as id, jobrole.
  • Initialize the value of id with the argument value(id).
  • Initialize the value of jobrole with the argument value(jobrole).
  • Create a function which prints some sample text.
  • Create a function that prints the value of the variables.
  • Create an object for the above class by passing the arguments as id and jobrole.
  • Print the attribute values using the dot notation.
  • Access the attribute values using the dot notation.
  • The Exit of the Program.

Below is the implementation:

# Create a class say Employdetails.
class Employdetails():
    # Initialize a constructor by passing the arguments as id, jobrole
    def __init__(self, id, jobrole):
        # Initialize the value of id with the argument value(id)
        self.id = id
        # Initialize the value of jobrole with the argument value(jobrole)
        self.jobrole = jobrole
    # Create a function which prints some sample text

    def printSample(self):
        print("welcome to Python-programs")
    # Create a function  which prints the value of the variables

    def printjobrole(self):

        print(f"He is a {self.jobrole} at TCS")

# Create an object for the above class by passing the arguments as id and jobrole
Employdetails_obj = Employdetails(2122, "developer")

# Print the attribute values using the dot notation
print("Employee ID: ", Employdetails_obj.id)
print("Employee jobrole: ", Employdetails_obj.jobrole)
print()
# Access the attribute values using the dot notation
Employdetails_obj.printSample()
Employdetails_obj.printjobrole()

Output:

Employee ID:  2122
Employee jobrole:  developer

welcome to Python-programs
He is a developer at TCS
Where does the dot notation is used?

Anyone who has dealt with Python will be familiar with (.) notations. Here are a few instances you’ve probably seen before.

Example1: To get the list length

Approach:

  • Give the list as static input and store it in a variable.
  • Calculate the length of the list using the len() function and store it in another variable.
  • Print the length of the given list.
  • The Exit of the Program.

Below is the implementation:

# Give the list as static input and store it in a variable.
gvn_lst = [1, 2, 3, 4, 5]
# Calculate the length of the list using the len() function
# and store it in another variable.
lst_len = len(gvn_lst)
# Print the length of the given list.
print("The length of the given list = ", lst_len)

Output:

The length of the given list =  5

The len() method is accessed using dot notation.

Example2: To split the string

# Give the list as static input and store it in a variable.
gvn_str = "welcome to-python programs-helloall"
# Split the given string by using the split() function based on the
# separator given and store it in another variable.
# If no separator is given it takes space by default.
rslt = gvn_str.split("-")
# Print the splitted string based on the separator given.
print("The splitted string based on the separator given:")
print(rslt)

Output:

The splitted string based on the separator given:
['welcome to', 'python programs', 'helloall']


Python Program for Dot Notation with Examples Read More »

Python predict() Function With Examples

predict() Function in Python:

In the field of data science, we must apply various machine learning models to data sets in order to train the data. We then attempt to predict the values for the untrained data.

This is when the predict() function comes into play.

The Python predict() function predicts the labels of data values based on the training model.

Syntax:

model.predict(data)

The predict() function only accepts one parameter, which is often the data to be tested.

It returns the labels of the data supplied as an argument based on the model’s learned or trained data.

Thus, the predict() method operates on top of the trained model, mapping and predicting the labels for the data to be tested using the learned label.

Implementation:

  • Because the dataset contains categorical variables, use the pandas.get dummies() function to build dummies of the category features for the convenience of modeling.
  • Use the train_test_split() function to divide the dataset into training and testing datasets.
# Import train_test_split from sklearn.model_selection using the import keyword.
from sklearn.model_selection import train_test_split
# Import os module using the import keyword
import os
# Import pandas module using the import keyword
import pandas
# Import dataset using read_csv() function by pasing the dataset name as
# an argument to it.
# Store it in a variable.
bike_dataset = pandas.read_csv("bikeDataset.csv")
# Make a copy of the original given dataset and store it in another variable.
bike = bike_dataset.copy()
# Give the columns to be updated list as static input and store it in a variable
categorical_column_updated = ['season', 'yr', 'mnth', 'weathersit', 'holiday']
bike = pandas.get_dummies(bike, columns=categorical_column_updated)

# separate the dependent and independent variables into two data frames.

X = bike.drop(['cnt'], axis=1)
Y = bike['cnt']

# Divide the dataset into 80 percent training and 20 percent testing.
X_train, X_test, Y_train, Y_test = train_test_split(
    X, Y, test_size=.20, random_state=0)

predict() Function with Decision Tree Algorithm

Decision Tree Algorithm:

Decision Tree is a Supervised learning technique that may be used to solve classification and regression problems, however, it is most commonly used to solve classification problems. It is a tree-structured classifier in which internal nodes contain dataset characteristics, branches represent decision rules, and each leaf node represents the result.
A Decision tree has two nodes: the Decision Node and the Leaf Node. Decision nodes are used to make any decision and have several branches, whereas Leaf nodes are the result of those decisions and have no additional branches.
The decisions or tests are based on the characteristics of the given dataset.
It is a graphical representation of all possible solutions to a problem/decision given certain parameters.
It is named a decision tree because, like a tree, it begins at the root node and spreads from there.

Example:

Use the Decision Tree algorithm on the previously split dataset using the predict() function to predict the labels of the testing dataset based on the values predicted by the decision tree model.

#On our dataset, we're going to build a Decision Tree Model.
from sklearn.tree import DecisionTreeRegressor
#We pass max_depth as argument to decision Tree Regressor
DT_model = DecisionTreeRegressor(max_depth=5).fit(X_train,Y_train)
#Predictions based on data testing
DT_prediction = DT_model.predict(X_test) 
#Print the value of prediction
print(DT_prediction)

Output:

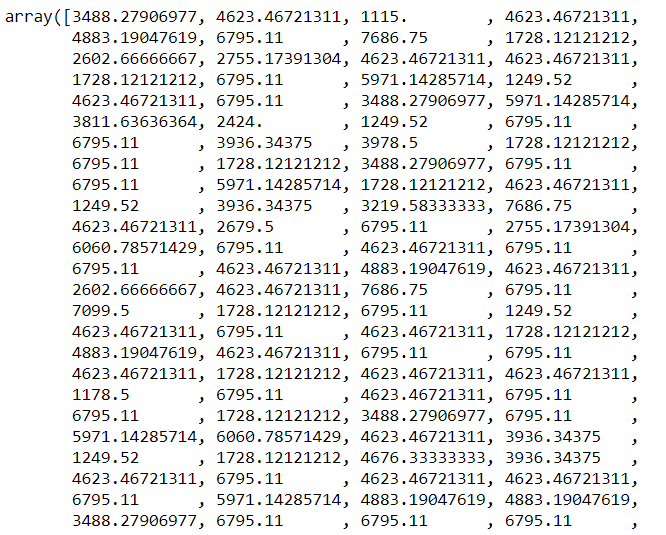
Decision Tree Prediction

predict() Function with KNN Algorithm

K-Nearest Neighbor(KNN) Algorithm:

  • K-Nearest Neighbor is a simple Machine Learning method that uses the Supervised Learning technique.
  • The K-NN method assumes similarity between the new case/data and existing cases and places the new case in the category that is most similar to the existing categories.
  • K-NN method stores all the available data and classifies a new data point based on the similarity. This means that when fresh data is generated, it may be quickly classified into a well-suited category using the K- NN algorithm.
  • The K-NN approach can be used for both regression and classification, but it is more commonly utilized for classification tasks.
  • K-NN is a non-parametric algorithm, which means it makes no assumptions about the underlying data.
  • It is also termed a lazy learner algorithm since it does not learn from the training set instantly instead it saves the dataset and at the time of classification, it takes an action on the dataset.
  • During the training phase, the KNN algorithm simply saves the dataset, and when new data is received, it classifies it into a category that is quite similar to the new data.

In this case, we used the Knn algorithm to make predictions from the dataset. On the training data, we used the KNeighborsRegressor() function.

In addition, we used the predict() function to make predictions on the testing dataset.

#On our dataset, we're going to build a KNN model.
from sklearn.neighbors import KNeighborsRegressor
#We pass n_neighborss as argument to KNeighborsRegressor
KNN_model = KNeighborsRegressor(n_neighbors=3).fit(X_train,Y_train)
#Predictions based on data testing
KNN_predict = KNN_model.predict(X_test)
#Print the value of prediction
print(KNN_predict)

Output:

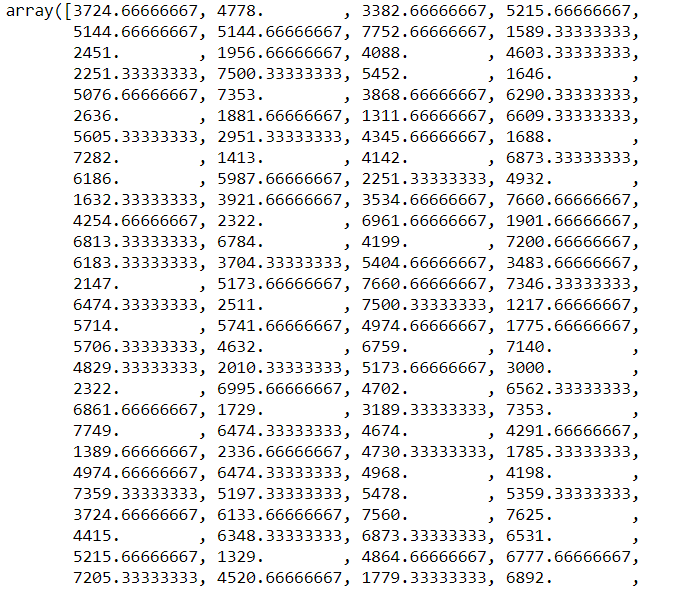
KNN Prediction


Python predict() Function With Examples Read More »

Python Signal Module with Examples

The Signal module comes in useful when we need to handle specific signals in Python.

Signal

A Signal is a way for a program to receive information from the Operating System. When the operating system receives specific events, it can send that programs in the form of signals.

When we press the keystrokes Ctrl + C on our keyboard, for example, the Operating System generates a signal that is sent on to programs. The signal SIGINT is generated and sent to the programs for this particular combination.

There is a standard protocol for assigning these signals, which are commonly short for integers, in all common operating systems.

The signal module in Python is where these signals are defined.

Importing signal module

import signal

You can use signal.valid _signals to see all of the valid signals in your system (depending on the operating system)

Example

Approach:

  • Import signal module using the import keyword.
  • Get all the valid signals on our OS using the valid_signals() function.
  • Store it in another variable.
  • Print all the above valid signals.
  • The Exit of the Program.

Below is the implementation:

# Import signal module using the import keyword
import signal
# Get all the valid signals on our OS using the valid_signals() function
# Store it in another variable.
validsignls = signal.valid_signals()
# Print all the above valid signals 
print(validsignls)

Output:

{<Signals.SIGINT: 2>, <Signals.SIGILL: 4>, <Signals.SIGFPE: 8>,
 <Signals.SIGSEGV: 11>, <Signals.SIGTERM: 15>, <Signals.SIGBREAK: 21>,
 <Signals.SIGABRT: 22>}

Now, for all signals, the OS will assign some default actions to each program.

Instead, we can use signal handlers to achieve our desired behavior.

Signal Handler in Python

A Signal Handler is a user-defined function that handles Python signals.

If we consider the signal SIGINT (Interrupt Signal), the default behavior is to terminate the current program.

Instead, we may set a signal handler to detect this signal and perform our custom processing!

Example

Approach:

  • Import signal module using the import keyword
  • Import time module using the import keyword
  • create a function signalHandler which accepts the signal number and framenumber as arguments
  • print the value of signal number and frame
  • create a function exitHandler which accepts the signal number and framenumber as arguments
  • print a random text(acknowledgment) for exiting
  • exit using the exit() function
  • With ‘SIGINT’ (CTRL + C), we can register our signal handler.
  • ‘SIGTSTP’ (Ctrl + Z) is used to register the exit handler.
  • Loop infinite times using the while(1) which is always true
  • print the text ctrl+c
  • sleep for 3 seconds using the sleep() function in time
  • The Exit of the Program

Below is the implementation:

# Import signal module using the import keyword
import signal  
# Import time module using the import keyword
import time  
# create a function signalHandler which accepts the signal number and framenumber as arguments 
def signalHandler(signalnumb, frame):  
  #print the value of signal number and frame
    print("Signal Number:", signalnumb, " Frame: ", frame)  
# create a function exitHandler which accepts the signal number and framenumber as arguments 
def exitHandler(signalnumb, frame):
  # print a random text(acknowledgment) for exiting 
    print('Exiting!!!!')
    #exit using the exit() function
    exit(0)
 
# With 'SIGINT' (CTRL + C), we can register our signal handler.
signal.signal(signal.SIGINT, signalHandler)
 
# 'SIGTSTP' (Ctrl + Z) is used to register the exit handler.
signal.signal(signal.SIGTSTP, exitHandler)
 
# Loop infinite times using the while(1) which is always true
while 1:  
    #print the text ctrl+c
    print("Please Press Ctrl + C")
    #sleep for 3 seconds using the sleep() function in time 
    time.sleep(3)

After we execute our program, pressing Ctrl + C will take us to the signalHandler() function, because we have registered the handler with SIGINT (Ctrl + C).

Another handler, exitHandler(), exits the program when we press Ctrl + Z, which sends a SIGTSTP signal.

Output:

Please Press Ctrl + C 
Signal Number: 2 Frame: <frame at 0x7fae4a6badd0, file '<ipython-input-1-adfb4209d24a>', line 27, code <module>>
Exiting!!!

Alarm Signals

To transmit alarm signals to our code, we can utilize the SIGALARM signal.

Example

# Import signal module using the import keyword
import signal  
# Import time module using the import keyword
import time  
# create a function alarmhandler which accepts the signal number and framenumber as arguments 
def alarmhandler(signalnumb, frame):  
    # print the alarm time using the ctime() function in time module
    print('The Alarm Time is:', time.ctime())  
 
# Initiate our handler of the alarm signal
signal.signal(signal.SIGALRM, alarmhandler)
# After 3 seconds, set the alarm by passing 3 as an argument to the alarm() function.
signal.alarm(3) 
# Print the current Time using the ctime() function in time module
print('The current Time is:', time.ctime())  
# sleep for 3 seconds using the sleep() function in time 
time.sleep(3)

Output:

The current Time is: Fri Dec 31 16:41:52 2021
The Alarm Time is: Fri Dec 31 16:41:55 2021

In the final line, we sleep for 3 seconds to allow the alarm signal to reach our program. Otherwise, the signal would not be received because the program would have ended.

Python Signal Module with Examples Read More »

Python iloc() Function with Examples

iloc[] Function in Python:

Python is a fantastic language for data analysis, owing to its fantastic ecosystem of data-centric Python packages. Pandas is one of these packages, and it greatly simplifies data import and analysis.

Pandas have a one-of-a-kind method for retrieving rows from a Data frame. When the index label of a data frame is something other than a numeric series of 0, 1, 2, 3….n, or when the user does not know the index label, the Dataframe.iloc[] method is used. Rows can be extracted by using an imaginary index position that is not visible in the data frame.

The Python iloc() function allows us to select a specific cell of a dataset, that is, to select a value from a set of values in a data frame or dataset that belongs to a specific row or column.
Using the index values assigned to it, we can retrieve a specific value from a row and column using the iloc() function.

Keep in mind that the iloc() function only accepts integer type values as index values for the values to be accessed and displayed.

As previously stated, boolean values cannot be used as an index to retrieve records. It must be supplied with integer values.

Syntax:

dataframe.iloc[]

For Example:

Let us take the first 5 rows of the dataset to understand the dataframe.iloc[] function

Apply head() function to the above dataset to get the first 5 rows.

# Import pandas module as pd using the import keyword
import pandas as pd
# Import dataset using read_csv() function by pasing the dataset name as
# an argument to it.
# Store it in a variable.
cereal_dataset = pd.read_csv('cereal.csv')
# Apply head() function to the above dataset to get the first 5 rows.
cereal_dataset.head()

Output:

namemfrtypecaloriesproteinfatsodiumfibercarbosugarspotassvitaminsshelfweightcupsrating
0100% BranNC704113010.05.062802531.00.3368.402973
1100% Natural BranQC12035152.08.08135031.01.0033.983679
2All-BranKC70412609.07.053202531.00.3359.425505
3All-Bran with Extra FiberKC504014014.08.003302531.00.5093.704912
4Almond DelightRC110222001.014.08-12531.00.7534.384843

If you want to retrieve all of the data values from the 2nd index of each column of the dataset, do as shown below:

# Import pandas module as pd using the import keyword
import pandas as pd
# Import numpy module as np using the import keyword
import numpy as np
# Import os module using the import keyword
import os
# Import dataset using read_csv() function by pasing the dataset name as
# an argument to it.
# Store it in a variable.
cereal_dataset = pd.read_csv('cereal.csv')
# Apply iloc() function to the above dataset to get all of the data values 
# from the 2nd index of each column and print it.
print(cereal_dataset.iloc[2])

Output:

name        All-Bran
mfr                K
type               C
calories          70
protein            4
fat                1
sodium           260
fiber              9
carbo              7
sugars             5
potass           320
vitamins          25
shelf              3
weight             1
cups            0.33
rating       59.4255
Name: 2, dtype: object

If you want to get the data values of 2, 3 and 4th rows, then do as below:

# Import pandas module as pd using the import keyword
import pandas as pd
# Import numpy module as np using the import keyword
import numpy as np
# Import os module using the import keyword
import os
# Import dataset using read_csv() function by pasing the dataset name as
# an argument to it.
# Store it in a variable.
cereal_dataset = pd.read_csv('cereal.csv')
# Apply iloc() function to the above dataset to get the data values of 2, 3 and 4th rows
# using slicing (It excludes the last row i.e, 5)
cereal_dataset.iloc[2:5]

Output:

namemfrtypecaloriesproteinfatsodiumfibercarbosugarspotassvitaminsshelfweightcupsrating
2All-BranKC70412609.07.053202531.00.3359.425505
3All-Bran with Extra FiberKC504014014.08.003302531.00.5093.704912
4Almond DelightRC110222001.014.08-12531.00.7534.384843

For columns:

If you want to get the data values of 2 and 3 rd columns, then do as below:

Syntax:

dataframe.iloc[:, startcolumn : endcolumn]

Example:

# Import pandas module as pd using the import keyword
import pandas as pd
# Import numpy module as np using the import keyword
import numpy as np
# Import os module using the import keyword
import os
# Import dataset using read_csv() function by pasing the dataset name as
# an argument to it.
# Store it in a variable.
cereal_dataset = pd.read_csv('cereal.csv')
# Apply iloc() function to the above dataset to get the data values of 2 and 3rd columns
# using slicing (It excludes the last column i.e, 4)
cereal_dataset.iloc[:,2:4]

Output:

      type     calories
0	C	70
1	C	120
2	C	70
3	C	50
4	C	110
...	...	...
72	C	110
73	C	110
74	C	100
75	C	100
76	C	110
Brief Recall:

In this article, we learned about the Python iloc() function and how it works.

  • It can be used to retrieve records from datasets based on index values.
  • Using index as a parameter to the iloc() function, multiple records can be fetched.
  • Only integer indexes are accepted as parameters by the iloc() function.


Python iloc() Function with Examples Read More »

Python Program for Sorting a Dataframe

Python provides us with a number of data structures through which we can interact with data and perform operations on it. Particularly when it comes to data science and analysis, the data structures provided by Python have given shape to the processing it.

Dataframe:

Python provides one such data structure, DataFrame. It saves data in the form of rows and columns. The datasets can be analyzed within the environment. These synchronized rows and columns are ready for data preprocessing and manipulation.

The Python Pandas module provides a data structure called a DataFrame. It organizes data into rows and columns and stores it. As a result, we can have the data in the form of a matrix, with the entities represented as rows and columns.

Sorting a Dataframe

sort_values() Method:

The sort_values() function in Pandas sorts a dataframe in the ascending or descending order of the passed Column. It differs from the sorted Python function in that it cannot sort a data frame and no specific column can be selected.

Syntax:

pandas.DataFrame.sort_values(by, axis=0, ascending=True, kind=’mergesort’)

Parameters

by: It is the list of columns to be sorted.

axis: axis= 1 represents column-wise operations and 0 represents row-wise operations.

ascending: If It is set to True, the dataframe is sorted in ascending order.

kind: It has three possible values: ‘Quicksort, mergesort, or heapsort.’

Example1:

Approach:

  • Import pandas module using the import keyword.
  • Give some random list of data(as dictionary) and store it in a variable.
  • Pass the given data to the DataFrame() function and store it in another variable.
  • Print the above result.
  • Pass the column name, axis=0, and ascending = True as the arguments to the sort_values() function to sort the salary column values in Ascending Order.
  • Print the data after sorting the salary column in Ascending Order.
  • The Exit of the Program.

Below is the implementation:

# Import pandas module using the import keyword
import pandas as pd
# Give some random list of data(as dictionary) and store it in a variable
gvn_data = {"ID": [11, 12, 13, 14, 15, 16], "Name": ["peter", "irfan", "mary",
                                                     "riya", "virat", "sunny"], "salary": [10000, 25000, 15000, 50000, 30000, 22000]}
# Pass the given data to the DataFrame() function and store it in another variable
block_data = pd.DataFrame(gvn_data)
# Print the above result.
print("The given input Dataframe: ")
print(block_data)
print()
# Pass the column name, axis=0 and ascending = True as the arguments to the sort_values()
# function to sort the salary column values in Ascending Order
sortd_saly = block_data.sort_values('salary', axis = 0, ascending = True)
# Print the data after sorting the salary column in Ascending Order.
print("The given data after sorting the salary column in Ascending Order:")
print(sortd_saly)

Output:

The given input Dataframe: 
   ID   Name  salary
0  11  peter   10000
1  12  irfan   25000
2  13   mary   15000
3  14   riya   50000
4  15  virat   30000
5  16  sunny   22000

The given data after sorting the salary column in Ascending Order:
   ID   Name  salary
0  11  peter   10000
2  13   mary   15000
5  16  sunny   22000
1  12  irfan   25000
4  15  virat   30000
3  14   riya   50000

Example2:

Here we sort the two columns ID and salary in descending order.

# Import pandas module using the import keyword
import pandas as pd
# Give some random list of data(as dictionary) and store it in a variable
gvn_data = {"ID": [11, 12, 13, 14, 15, 16], "Name": ["peter", "irfan", "mary",
                                                     "riya", "virat", "sunny"], "salary": [10000, 25000, 15000, 50000, 30000, 22000]}
# Pass the given data to the DataFrame() function and store it in another variable
block_data = pd.DataFrame(gvn_data)
# Print the above result.
print("The given input Dataframe: ")
print(block_data)
print()
# Pass the list of columnnames('ID','salary'), axis=0 and ascending = False as the arguments to the sort_values()
# function to sort the 'ID','salary' columns values in Descending Order
sortd_data = block_data.sort_values(['ID','salary'], axis = 0, ascending = False)
# Print the given data after sorting the ('ID','salary') columns in Descending Order.
print("The given data after sorting the ('ID','salary') columns in Descending Order:")
print(sortd_data)

Output:

The given input Dataframe: 
   ID   Name  salary
0  11  peter   10000
1  12  irfan   25000
2  13   mary   15000
3  14   riya   50000
4  15  virat   30000
5  16  sunny   22000

The given data after sorting the ('ID','salary') columns in Descending Order:
   ID   Name  salary
5  16  sunny   22000
4  15  virat   30000
3  14   riya   50000
2  13   mary   15000
1  12  irfan   25000
0  11  peter   10000


Python Program for Sorting a Dataframe Read More »

Python DataFrames – Quick Overview and Summary

Pandas DataFrames really amazing. DataFrames in Python makes data manipulation very user-friendly.

Pandas allow you to import large datasets and then manipulate them effectively. CSV data can be easily imported into a Pandas DataFrame.

What are Python Dataframes and How Do You Use Them?

Dataframes are two-dimensional labeled data structures with columns of various types.
DataFrames can be used for a wide range of analyses.

Often, the dataset is too large, and it is impossible to examine the entire dataset at once. Instead, we’d like to see the Dataframe’s summary.
We can get the first five rows of the dataset as well as a quick statistical summary of the data. Aside from that, we can gain information about the types of columns in our dataset.

Let us take a cereal dataset as an example.

1)Importing the Dataset

Import the dataset into a Pandas Dataframe.

# Import pandas module as pd using the import keyword
import pandas as pd
# Import dataset using read_csv() function by pasing the dataset name as
# an argument to it.
# Store it in a variable.
cereal_dataset = pd.read_csv('cereal.csv')

This will save the dataset in the variable ‘cereal_dataset ‘ as a DataFrame.

2)Getting First 5 Rows

It is common for data scientists to look at the first five rows of the Dataframe after importing a dataset for the first time. It provides a rough idea of how the data looks and what is all about.

Apply head() function to the above dataset to get the first 5 rows.

cereal_dataset.head()
# Import pandas module as pd using the import keyword
import pandas as pd
# Import dataset using read_csv() function by pasing the dataset name as
# an argument to it.
# Store it in a variable.
cereal_dataset = pd.read_csv('cereal.csv')
# Apply head() function to the above dataset to get the first 5 rows.
cereal_dataset.head()

Output:

namemfrtypecaloriesproteinfatsodiumfibercarbosugarspotassvitaminsshelfweightcupsrating
0100% BranNC704113010.05.062802531.00.3368.402973
1100% Natural BranQC12035152.08.08135031.01.0033.983679
2All-BranKC70412609.07.053202531.00.3359.425505
3All-Bran with Extra FiberKC504014014.08.003302531.00.5093.704912
4Almond DelightRC110222001.014.08-12531.00.7534.384843

3)To Obtain a statistical summary

The describe() method in pandas is used to get a statistical summary of your Dataframe.

cereal_dataset.describe()

For Example:

# Import pandas module as pd using the import keyword
import pandas as pd
# Import dataset using read_csv() function by pasing the dataset name as
# an argument to it.
# Store it in a variable.
cereal_dataset = pd.read_csv('cereal.csv')
# Apply describe() function to the above dataset to get the statistical summary
# of the given above dataset 
cereal_dataset.describe()

Output:

caloriesproteinfatsodiumfibercarbosugarspotassvitaminsshelfweightcupsrating
count77.00000077.00000077.00000077.00000077.00000077.00000077.00000077.00000077.00000077.00000077.00000077.00000077.000000
mean106.8831172.5454551.012987159.6753252.15194814.5974036.92207896.07792228.2467532.2077921.0296100.82103942.665705
std19.4841191.0947901.00647383.8322952.3833644.2789564.44488571.28681322.3425230.8325240.1504770.23271614.047289
min50.0000001.0000000.0000000.0000000.000000-1.000000-1.000000-1.0000000.0000001.0000000.5000000.25000018.042851
25%100.0000002.0000000.000000130.0000001.00000012.0000003.00000040.00000025.0000001.0000001.0000000.67000033.174094
50%110.0000003.0000001.000000180.0000002.00000014.0000007.00000090.00000025.0000002.0000001.0000000.75000040.400208
75%110.0000003.0000002.000000210.0000003.00000017.00000011.000000120.00000025.0000003.0000001.0000001.00000050.828392
max160.0000006.0000005.000000320.00000014.00000023.00000015.000000330.000000100.0000003.0000001.5000001.50000093.704912

4)To Obtain a quick description of the dataset

The info() method in pandas is used to get get a quick description of the type of data in the table.

cereal_dataset.info()
# Import pandas module as pd using the import keyword
import pandas as pd
# Import dataset using read_csv() function by pasing the dataset name as
# an argument to it.
# Store it in a variable.
cereal_dataset = pd.read_csv('cereal.csv')
# Apply info() function to the above dataset to get a quick description of the 
# type of data in the table.
cereal_dataset.info()

Output:

<class 'pandas.core.frame.DataFrame'>
RangeIndex: 77 entries, 0 to 76
Data columns (total 16 columns):
 #   Column    Non-Null Count  Dtype  
---  ------    --------------  -----  
 0   name      77 non-null     object 
 1   mfr       77 non-null     object 
 2   type      77 non-null     object 
 3   calories  77 non-null     int64  
 4   protein   77 non-null     int64  
 5   fat       77 non-null     int64  
 6   sodium    77 non-null     int64  
 7   fiber     77 non-null     float64
 8   carbo     77 non-null     float64
 9   sugars    77 non-null     int64  
 10  potass    77 non-null     int64  
 11  vitamins  77 non-null     int64  
 12  shelf     77 non-null     int64  
 13  weight    77 non-null     float64
 14  cups      77 non-null     float64
 15  rating    77 non-null     float64
dtypes: float64(5), int64(8), object(3)
memory usage: 9.8+ KB

Each column of the dataset contains a row in the output. For each column label, the number of non-null entries and the data type of the entry are returned.

Knowing the data type of your dataset’s columns allows you to make better decisions when it comes to using the data to train models.

5) To Obtain a count for each column.

In Pandas, you can directly get the count of entries in each column by using the count() method.

cereal_dataset.count()
# Import pandas module as pd using the import keyword
import pandas as pd
# Import dataset using read_csv() function by pasing the dataset name as
# an argument to it.
# Store it in a variable.
cereal_dataset = pd.read_csv('cereal.csv')
# Apply count() function to the above dataset to directly get the count of
# entries in each column
cereal_dataset.count()

Output:

name        77
mfr         77
type        77
calories    77
protein     77
fat         77
sodium      77
fiber       77
carbo       77
sugars      77
potass      77
vitamins    77
shelf       77
weight      77
cups        77
rating      77
dtype: int64

Seeing the count for each column can help you identify any missing entries in your data. Following that, you can plan your data cleaning strategy.

6)To Generate a Histogram for each column in the dataset.

Pandas enable you to display histograms for each column with a single line of code.

cereal_dataset.hist()

For Example:

# Import pandas module as pd using the import keyword
import pandas as pd
# Import dataset using read_csv() function by pasing the dataset name as
# an argument to it.
# Store it in a variable.
cereal_dataset = pd.read_csv('cereal.csv')
# Apply hist() function to the above dataset to generate histograms for each column
# in the given dataset
cereal_dataset.hist()

Output:

Histograms are frequently used by data scientists to gain a better understanding of the data.

Python DataFrames – Quick Overview and Summary Read More »

Python Program for Root Mean Square Error (RMSE)

Root Mean Square Error (RMSE):

The Root Mean Square Error (RMSE) is a method of calculating the difference between a model’s predicted and actual values.

Prior to actually delving into the concept of RMSE, let us first understand Python error metrics.

Error metrics allow us to track efficiency and accuracy using various of metrics.

  • Mean Square Error(MSE)
  • Root Mean Square Error(RMSE)
  • R-square
  • Accuracy
  • MAPE

One such error metric for judging the accuracy and error rate of any machine learning algorithm for a regression problem is Mean Square Error(MSE).

As such, MSE is a risk function that allows us to calculate the average squared difference between a feature’s or variable’s predicted and actual value.

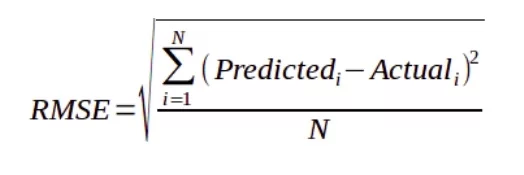
RMSE is an abbreviation for Root Mean Square Error, which is the square root of the value obtained from the Mean Square Error function.

We can easily plot a difference between the estimated and actual values of a model parameter using RMSE.

This allows us to clearly assess the model’s efficiency.

An RMSE score of less than 180 is usually considered a good score for a moderately or well-functioning algorithm. If the RMSE value exceeds 180, we must perform feature selection and hyper parameter tuning on the model’s parameters.

RMSE using Numpy Library

Formula:


As previously stated, Root Mean Square Error is defined as the square root of the average of the squared differences between the estimated and actual value of the variable or feature.

Example:

Approach:

  • Import numpy module as np using the import keyword.
  • Import math module using the import keyword.
  • Give the list of actual values as static input and store it in a variable.
  • Give the list of predicted values as static input and store it in another variable.
  • Pass the above actual and predicted lists as the arguments to the np.subtract() function to get the difference between the predicted and the actual values.
  • Store it in another variable.
  • Square the above-obtained difference using the np.square() function.
  • Store it in another variable.
  • Apply the mean() function to the above obtained squared value to get the mean of the squared value(MSE).
  • Store it in another variable.
  •  Pass the above obtained mean square error as an argument to the math.sqrt() function to get the Root mean square error.
  • Store it in another variable.
  • Print the Root mean square error for the given predicted and actual values.
  • The Exit of the Program.

Below is the implementation:

# Import numpy module as np using the import keyword
import numpy as np
# Import math module using the import keyword
import math
# Give the list of actual values as static input and store it in a variable.
gvn_actul_vals = [5, 6, 1, 7, 3]
# Give the list of predicted values as static input and store it in another
# variable.
gvn_predictd_vals = [2.4, 1.5, 1.4, 2.7, 3.1]
# Pass the above actual and predicted lists as the arguments to the np.subtract()
# function to get the difference between the predicted and the actual values.
# store it in another variable.
diffrnce = np.subtract(gvn_actul_vals, gvn_predictd_vals)
# Square the above obtained difference using the np.square() function
# store it in another variable.
sqre_err = np.square(diffrnce)
# Apply mean() function to the above obtained squared value to
# get the mean of the squared value(MSE).
# store it in another variable.
rslt_meansqre_err = sqre_err.mean()
# Pass the above obtained mean square error as an argument to the math.sqrt()
# function to get the Root mean square error
# store it in another variable.
root_meansqre_err = math.sqrt(rslt_meansqre_err)
# Print the Root mean square error for the given predicted and actual values
print("The RMSE for the given predicted and actual values = ")
print(root_meansqre_err)

Output:

The RMSE for the given predicted and actual values = 
3.0222508168581905

RMSE using Scikit learn Library

Example:

Approach:

  • Import mean_squared_error function from sklearn.metrics module using the import keyword.
  • Import math module using the import keyword.
  • Give the list of actual values as static input and store it in a variable.
  • Give the list of predicted values as static input and store it in another variable.
  • Pass the above actual and predicted lists as the arguments to the mean_squared_error() function to get the Mean Square Error(MSE).
  • Store it in another variable.
  •  Pass the above obtained mean square error as an argument to the math.sqrt() function to get the Root mean square error.
  • Store it in another variable.
  • Print the Root mean square error for the given predicted and actual values.
  • The Exit of the Program.

Below is the implementation:

# Import mean_squared_error function from sklearn.metrics module using the
# import keyword
from sklearn.metrics import mean_squared_error
# Import math module using the import keyword
import math
# Give the list of actual values as static input and store it in a variable.
gvn_actul_vals = [5, 6, 1, 7, 3]
# Give the list of predicted values as static input and store it in another
# variable.
gvn_predictd_vals = [2.4, 1.5, 1.4, 2.7, 3.1] 
# Pass the above actual and predicted lists as the arguments to the
# mean_squared_error() function to get the Mean Square Error(MSE).
# store it in another variable.
rslt_meansqre_err = mean_squared_error(gvn_actul_vals, gvn_predictd_vals)
# Pass the above obtained mean square error as an argument to the math.sqrt()
# function to get the Root mean square error
# store it in another variable.
root_meansqre_err = math.sqrt(rslt_meansqre_err)
# Print the RMSE for the given predicted and actual values
print("The RMSE for the given predicted and actual values = ")
print(root_meansqre_err)

Output:

The RMSE for the given predicted and actual values = 
3.0222508168581905


Python Program for Root Mean Square Error (RMSE) Read More »

How Do I Save a File in.npy Format in Python?

Have you ever come across a .npy file?

Let us see how to save in .npy format in this article. Numpy’s binary data storage format is NPY.

Numpy is a necessary module for performing data science operations efficiently. Importing, saving, and processing data consumes a significant amount of time in the field of Data Science. CSV files are a good choice for importing and exporting data.

However, there are times when you need to save data in order to use it again in Python. Numpy provides the.npy format in such cases.

Importing and exporting data from and to .npy files are faster and efficient than other methods.

Numpy provides the numpy.save() method for saving files in.npy format. It only allows you to save data in array format. Before saving, it converts the array to a binary file. It is ultimately this binary file that is saved.

numpy.save() method : The numpy.save() function saves the input array to a disc file with the npy extension (.npy).

Using numpy.save() Method To save a File

Approach:

  • Import numpy module as np using the import keyword.
  • Pass some random number to the np.arange() method to get an array from 0 to 7.
  • Store it in a variable.
  • Print the above-obtained array.
  • Save the above-obtained array to ‘Python-programs’ using the np.save() method.
  • Print some random message to check whether the file is saved or not.
  • The Exit of the Program.

Below is the implementation:

# Import numpy module as np using the import keyword
import numpy as np
# Pass some random number to the np.arange() method to get an array from 0 to 7
# Store it in a variable.
got_arry = np.arange(8)
# Print the above obtained array.
print("The above obtained array is:")
print(got_arry)
# Save the above obtained array to 'Python-programs' file using the np.save() method
np.save('Python-programs', got_arry)
print("File saved succesfully in Python-programs.npy")

Output:

The above obtained array is: 
[0 1 2 3 4 5 6 7] 
File saved succesfully in Python-programs.npy

The above code will save your array to a binary file called ‘Python-programs.npy’ as file name.

How to Import .npy File?

To load the data back into Python, we’ll use numpy.load() method.

Approach:

  • Import numpy module as np using the import keyword.
  • Pass the file name to the np.load() method to get back the data from the file (Python-programs.npy).
  • Store it in a variable.
  • Print the data from the file after loading back the File.
  • The Exit of the Program.

Below is the implementation:

# Import numpy module as np using the import keyword
import numpy as np
# Pass the file name to the np.load() method to get back the data from the file
# (Python-programs.npy)
# Store it in a variable.
rslt_data = np.load('Python-programs.npy')
# Print the data from the file after loading back the File
print("The result data after loading back the File:")
print(rslt_data)

Output:

The result data after loading back the File: 
[0 1 2 3 4 5 6 7]

How Do I Save a File in.npy Format in Python? Read More »