Author name: Prasanna

Python Data Presistence – Row Object

Python Data Presistence – Row Object

By default, each row in the query result set is a tuple of values belonging to the column list in the SELECT statement. In the above example, the row object returns a tuple.

Example

>>> row=cur. f etchone ( )
> > > row
(2, 'TV', 40000)
>>> type(row)
<class 'tuple'>

The order of columns in the tuple cannot be ascertained from the object itself. The connection object has a useful ‘row_£actory’ property with which row in the result set can be converted into some meaningful representation. This can be done either by assigning a row factory to a user-defined function that will return a custom object or by setting it to the constructor of the Row class.

Row class has been defined in the sqlite3 module, whose primary purpose is to be used as a row factory. As a result, the row of the result set is returned as a Row object. Row class defines a keys () method that returns column names used in the SELECT statement. Values are accessible using the index as well as by name.

Example

>>> r=cur.fetchone( )
>>> type(r)
<class 'sqlite3.Row'>
>>> r.keysO
t'ProductID', 'Name', 'Price']
>>> fields=r .keys ( )
>>> r[1]
'TV'
> > > r['name']
'TV'
>>> for nm in fields:
print (nm, r[nm])
ProductID 2
Name TV
Price 40000


Python Data Presistence – Row Object Read More »

Python Data Presistence – while Statement

Python Data Presistence – while Statement

The while keyword constructs a conditional loop. Python interpreter evaluates the boolean expression and keeps on executing the subsequent
uniformly indented block of statements as long as it holds true. The moment it is no longer true, the repetition stops, and the program flow proceeds to the next statement in the script. A syntactical representation of usage of while loop is as follows:

Example

#using while statement
while expression==True:
#while block
. . .
end of while block
#rest of the statements

One way to control repetition is to keep its count and allow the next round of execution of block till the count exceeds the desired limit. In the following code snippet, the block executes repeatedly till the count is <= 5.

Example

#while-1.py
count=0
while count<5:
#count repetitions
count=count+1
print ("This is count number",count)
print ("end of 5 repetitions")

Output

E:\python 3 7>python whi1e- 1.py 
This is count number 1 
This is count number 2 
This is count number 3 
This is count number 4 
This is count number 5 
end of 5 repetitions 

E:\python37>

The expression in while statement is executed before each round of repetition (also called iteration). Here is another example to consolidate your understanding of the while loop.

The following code generates the list of numbers in the Fibonacci series. First, the two numbers in the list are 0 and 1. Each subsequent number is the sum of the previous two numbers. The while loop in the code adds the next 10 numbers. The iterations are counted with the help of variable ‘i’. the sum of numbers at i* and (Ml)* position is appended to the list till ‘i’ reaches 10.

Example

#fibolist . py
FiboList= [ ]
i = 0
max=1
FiboList.append(i)
FiboList.append(max)
while i<10:
#next number is sum of previous two
max=FiboList[i]+FiboList[i+1]
FiboList.append(max)
i = i + l
print ('Fibonacci series:1,FiboList)

Output

E : \py thon3 7 >py thon fibolist.py 
Fibonacci series: [ 0 , 1 , 1 , 2 , 3 , 5 , 8 , 13 , 21 , 34 , 55 , 89] 

E:\python37>

Python Data Presistence – while Statement Read More »

Python Data Presistence – os Module

Python Data Presistence – os Module

This is another module containing useful utilities for manipulating files and directories programmatically. The usual operating system commands for directory management have equivalents in this module. There is mkdir ( ) function that creates a new directory inside the current directory by default. To create it at any other location in the file system, its absolute path has to be given.

Example

import os
os.mkdir(1newdir’) # inside current directory
os.mkdir(‘c:\\newdir’) #in C drive

The chdir ( ) function (to set current working directory) and rmdir ( ) function (to remove a directory) also take relative path by default. A ge tcwd ( ) function is also available to know which is the current working directory. All these operations are demonstrated in following interpreter session:

Example

>> import os
>>> os.mkdir(“newdir”) #new directory in current path
>>> os.chdir(“newdir”) #set current directory
>>> os.getcwdO #displays current working directory
‘E:\\python37\\newdir’
>>> os.rmdir(“newdir”) #shouldn’t be current directory and should be empty Traceback (most recent call last):
File “<stdin>”, line 1, in <module> FileNotFoundError: [WinError 2] The system cannot
find the file specified: ‘newdir’
>>> os.chdir) #sets current directory to parent
directory
>>> os.getcwd ( )
‘ E:\\python3 7 ‘
>>> os.rmdir(“newdir”) #now it can be deleted
>>> os.listdirO #returns list of files and directories in current path
[‘abcdemo.py’, ‘aifftest.py’, ‘checkindent.py’,
‘clbr.py’, 1combinations-2.py’, ‘combinations.py’,
‘comprehensionl.py’, ‘conditionals.jpg’, ‘continue- example.py’, ‘data_class.py’, ‘DLLs’, ‘Doc’, ‘else- in-loop.py’, ‘ equitriangle .py’ , ‘fibolist.py’ ,
‘ findertest.py’, ‘for-l.py’, ‘for-2.py’, ‘for-3.
py’, ‘for-4.py’, ‘for-5.py’, ‘for-6.py’, ‘for-7.
py’, ‘gcexample.py’, ‘hello.py’, ‘include’, ‘Lib’,
‘libs’, ‘LICENSE.txt’, ‘modfinder.py’, ‘modspec. py’, ‘modulel.py’, ‘module2.py’, ‘mydb.sqlite3’,
‘myfunctions.cover’, ‘myfunctions.py’, ‘mymain.
cover’, ‘mymain.py’, ‘nestedfor.py’, ‘newdirbak’,
‘NEWS.txt’, ‘out.aiff’, ‘out.au’, ‘out.mp3’,
‘out.wma’, ‘polar.png’, ‘python.exe’, ‘python3. dll’, ‘python37.dll’, ‘pythonw.exe’, ‘report.txt’,
‘runpyexample.py’, ‘sample.wav’, ‘Scripts’, ‘secret- number.py’, ‘securepwd.py’, ‘sound.aiff’, ‘sound,
wav’, ‘sqrmodule.py’, ‘structexample.py’, ‘tabdemo.py’, ‘taxl.py’, ‘tax2.py’, ‘tax3.py'( ‘tax4. py’, ‘tel’, ‘testindent.py’, ‘Tools’, ‘triangle, py’, ‘trianglebrowser.py’, ‘vcruntimel40.dll’,
‘warningexample.py’, ‘wavetest.py’, ‘while-1.py’, ‘_threadexample.py’, ‘ pycache ‘]
>>>

The os module also has functions to create a new file and perform read/ write operations on it. We shall learn about these functions in the chapter on File Handling.

Python Data Presistence – os Module Read More »

Synchronization in Selenium Python

Synchronization in Selenium Python | Synchronizing Test

Selenium Python – Synchronizing Test

In our earlier chapters, we have learned how do we automate scenarios, identify objects uniquely on a web page and perform actions on them. During the automation of scenarios, it is important that we synchronize our tests. So the time it takes for the web application to process, the automation command should match with the speed at which the command is sent by the script to the application.

Structure

  • Synchronizing test
  • Why synchronization
  • Implicit wait
  • Explicit wait

Objective

In this chapter, we will leam how we can establish synchronization in our tests so that we ensure our tests are not flaky. Reliable execution is crucial during testing cycles as they help save time, and ensure reliability in test automation exercises. We will learn how we implement that concept in our test scripts.

Synchronization

If we have not implemented synchronization in our tests, then our tests may hover between passing and failing, resulting in flaky tests. To avoid this we should synchronize our tests so that we have basic reliability in our test behavior. To achieve it we have to apply synchronization in our tests.
There are two kinds of synchronization techniques that we use in test scenarios of Selenium:

  • Implicit wait
  • Explicit wait

Implicit wait

The implicit wait is a global wait, which applies to every statement in the written test script. An implicit wait, when implemented in the script, tries to find the element on the web page. It will keep polling the web page until the element is found, or till the time is over. If the element is not found within the provided implicit wait, we get an exception NoSuchElementException.

In the following program, we will implement implicit wait:

from selenium import webdriver
import unittest

class Login(unittest.Testcase):
      def setup(self):
          self.driver = webdriver.chrome(executable_path="D:\Eclipse\BPB\seleniumpython\seleniumpyhon\drivers\chromedriver.exe")
          self.base_url = "http://practice.bpbonline.com/catalog/index.php"

def test_login(self):
    driver=self.driver
    driver.get(self.base_url)
    driver.find_element_by_link_test("My Account").click( )
    driver.find_element_by_name("email_address").clear( )
    driver.find_element_by_name("email_address").send_keys("[email protected])
    driver.find_element_by_name("password").clear( )
    driver.find_element_by_name("password").send_keys("bpb@123")
    driver.find_element_by_id("tab1").click( )
    driver.find_element_by_lik_text("log off").click( )
    driver.find_element_by_lik_text("continue").click( )

def tearDown(self):
    self.driver.quit( )

If_name_==_main_":
   unittest.main( )

The commanding self .driven.implicity_wait(30) will apply the wait on every find element command used in the program. So for every statement, it will wait for 30 seconds for the object to appear with the given By locator. It will keep polling the website until it finds the object. If the object is found, the action will be performed on the object. Else after the 30 seconds are over, we will get an exception.

Explicit wait

The explicit wait is basically a local wait which can be implemented either as:

• Static wait: It is a forced wait, which is introduced by using time.sleep(n seconds) in the code line, whenever we wish to wait in the code for n number of seconds. It is not advisable to use static wait in the code because we generally do not know if the time allocated to wait is less or more. We cannot provide a lot of time to wait in the code, because that will delay our test automation script, and if we provide very little time, it may result in a flaky test, so such waits are generally unreliable and not advisable.

• Dynamic wait: The dynamic wait is implemented in the code with the help of a class called as WebDriverWait. This class has a method called as until ( ). In this method, we pass an event which may occur and the time units for which we wish to wait for that event to occur. So in this method of WebDriverWait, we either wait for an event to occur or it times out. The exception we get in here, in case the event doesn’t occur, is TimedOutException. But in case the event has occurred, we do not wait for the entire amount of time to finish, we get out of the until loop as soon as it’s finished.

So, we will have a look at two sets of code here. In the first example, we will run a positive scenario of login logout using WebDriverWait. In the second example, we will execute a negative scenario in which we will fail forcefully by passing wrong object information in the code. So the method will wait for the timeout object to appear:

from selenium import webdriver
from selenium.webdriver.common.by import By
from selenium.webdriver.support.ui import webDriverwait
from selenium.webdriver.support import expected_conditions as EC
import unitest

class Login(unitest.TestCase):
      def setup(self):
          self.driver = webdriver.chrome(executable_path="D:\Eclipse\BPB\seleniumpython\seleniumpython\drivers\chromedriver.exe")
          self.base_url="http://practice.bpbonline.com/catalog/index.php"

dex test_login(self):
    driver=self.driver
    driver.get(self.base_url)
    driver.find_element_by_link_text("My Account").click( )
    driver.find_element_by_name("email_address").clear( )
    driver.find_element_by_name("email_address").send_keys("[email protected]")
    driver.find_element_by_name("password").clear( )
    driver.find_element_by_name("password").send_keys("bpb@123")
    driver.find_element_by_id("tab1").click( )
    webdriverwait(driver, 1e).until(
    Ec.presence_of_element_located((By.LINK_TEXT, "log off")))
    driver.find_element_by_link_text("log off").click( )
    driver.find_element_by_link_text("continue").click( )

def tearDown(self):
    self.driver.quit( )

if _name_ ==" _main_ ":
    unitest.main( )

The code lines using which we have implemented explicit wait are: WebDriverWait(driver, 10).until(
EC.presence_of_element_located((By.LINK_TEXT, “Log Off”)))

In the preceding until( ) method, we take an input argument called EC. presence_of_element_located(By.LINK_TEXT, ” Log Off”), here the EC is basically the class called as expected_ conditions exported from selenium.web driver.support import expected_conditions asEC. It has a lot of methods available with it which can help trace an event. In the preceding code, we have used a method presence_of_element_located, so this will basically look for the link with the text Log Off, for 10 seconds. If it finds the link within 10 seconds it will exit the until loop and execute the next command, which is clicking on the link, otherwise, it will timeout and throw a TimedOutException.

Let us try another code example, where we will give a bad locator for the Log Off link, causing the WebDriver wait method to timeout:

WebOriverHait(driver, 10}.until(
EC:presence_of_elenent_located((By.LIHK_TEXT, “Log ££”})) driver.find_eleinent_by_link_text(“Log Off”).click()

The exception which is thrown is an follows:
raise TiraeoutException(message, screen., stacktrace)
selenium.common,exceptions.TimeoutrExceptions Message;

Conclusion

In this chapter, we have seen how we can use the concept of waits, implicit and explicit wait, in our test automation code and ensure that the scripts are reliable during execution time. By implementing the concept of synchronization we have tried to achieve less flaky tests and introduce predictability in them during execution time. In the next chapter, we will discuss advanced types of web elements like table, dropdown, alerts, and frame. We will see how to automate these elements and what all methods are associated with them.

Related Articles:

Synchronization in Selenium Python | Synchronizing Test Read More »

How to Do Parameterization In Pytest With Selenium?

How To Do Parameterization In Pytest With Selenium?

Selenium Python – Concept of Parameterization

Sometimes, we come across situations where we need to execute the same test case, but with every execution, we need to use a different data set. Or sometimes, we need to create test data prior to our test suite execution. To resolve all these requirements, we should be familiar with the concept of parameterization.

Structure

  • Why do we need parameterization
  • What is parameterization
  • Creation of test data file
  • Parameterizing and login logout scenario

Objective

In this chapter, we will learn how we can use a text file to pass data to our tests and run it as many times as rows are available in our file. With this, we will understand the concept of parameterization.

Test data file

Test cases generally need test data for execution. When we write scripts to automate the test, it could be possible that we have hard-coded the test data within the test scripts. The drawback of this approach is if our test data needs to be changed for a test execution cycle, we will need to make changes at the test script level, thus making it prone to errors. So a good test script is when test data is kept outside the code.

To achieve the same, we need to parameterize our tests. In this, we replace the hard code values in the test with variables. At the time of execution, these variables are replaced by values that are picked from external data sources. These data sources could be text files, excel sheets, databases, JSON, XML, and others.

Parameterization and login logout scenario

Selenium doesn’t provide any provision to parameterize the tests. We write the code to parameterize the test using the programming language. In this chapter we will see how we can parameterize our test using a CSV file, and an excel file. The scenario we are going to pick is the login logout scenario, and we will parameterize it using two datasets—the first dataset will be for valid user and password combination. And the second dataset will be for a bad username and password combination.

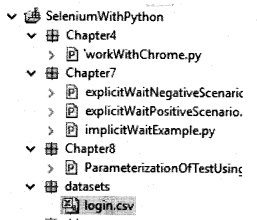
The data to be picked for the test is available in a file called login. CSV, which is kept in the dataset folder in the project. Refer to the following screenshot:

Selenium Python - Concept of Parameterization chapter 8 img 1

The dataset file login. CSV has the following data:

[email protected], bpb@123
[email protected],demo123

In a CSV file, the data is separated by a comma. The test script provided below reads the data using Python file handling commands and splits it based on a comma. It then passes these values for username and password in the script. The following test iterates twice, which is equal to the number of rows in this file:

from selenium import webdriver
import unitest

class Login(unitest.TestCase):
      def setup(self):
          self.driver = webdriver.chrome(executable_path="D:\Eclipse\BPB\seleniumpython\seleniumpython\drivers\chromedriver.exe")
          self.driver.implicitly_wait(30) 
          self.base_url="http://practice.bpbonline.com/catalog/index.php"

dex test_login(self):
    driver=self.driver
    driver.get(self.base_url)
    file = open("D:\Eclipse\BPB\seleniumpython\seleniumpython\datasets\login.csv", "r")
    for line in file:
         driver.find_element_by_link_text("My Account").click( )
         data=line.spilt(",")
         print(data)
         driver.find_element_by_name("email_address").send_keys(data[0])
         driver.find_element_by_name("password").send_keys(data[1].strip())
         driver.find_element_by_id("tab1").click( )
         if(driver.page_source.find("My Account Information")l=-1):
            driver.find_element_by_link_text("log off").click( )
            driver.find_element_by_link_text("continue").click( )
            print("valid user credentail")
   else:
       print("Bad user credentail")
  file.close( )

def tearDown(self):
    self.driver.quit( )

if_name_=="_main_":
    unitest.main( )

In the preceding program, we have written the scenario of login logout, but it is wrapped around a while loop. This while loop is basically reading file contents, until the end of the file is reached. So the entire script will execute as many times as the number of rows in the file.

As we execute the test, we will see that it passes for the first data set picked from the file, as it is a combination of a valid username and password. But for the second dataset, the test reports a failure. The preceding test will execute for as many rows as available in our login.csv dataset file.

Conclusion

In this chapter we have learned how to use test data for our tests, and the importance of keeping test data separate from the actual tests. We also saw how we can read data from a CSV file or a text-based file, and pass them to our test code.

In our next chapter, we will learn how to handle different types of web elements.

Related Articles:

How To Do Parameterization In Pytest With Selenium? Read More »

Page Object Model in Selenium Python | POM in Selenium Python

Page Object Model in Selenium Python | POM in Selenium Python

Selenium Python – Page Object Model

Selenium is an open-source test automation tool. Like other commercial tools in the market, it doesn’t come up with an inbuilt feature to manage object information which we use in creating test scripts. So we need to take the help of design patterns like POM to manage these artifacts. In this chapter, we will understand how to create them and what benefits they bring to the table.

Structure

  • Page Object Model (POM)
  • Implementing the POM • Example of login logout scenario

Objective

This chapter will help us understand the concept of a design pattern called Page Object Model (POM), and how to implement it to make our scripts more robust.

Page Object Model (POM)

Page Object Model (POM) is a design pattern that helps us to separate the object information from the business logic of a page from the application. The idea behind this is, if the object information changes from one build release to another, the business logic is not impacted at the code level, and we only make changes at the object information level. To achieve this we need to implement a POM design pattern at our code level.

Creating Selenium test cases can result in an unmaintainable project. One of the reasons is that too much-duplicated code is used. Duplicated code could be caused by duplicated functionality and this will result in duplicated usage of locator information to identify the objects on a page. The disadvantage of duplicated code is that the project is less maintainable. If some locator will change, you have to walk through the whole test code to adjust locators where necessary.

Implementing the POM

By using the POM we can make non-brittle test code and reduce or eliminate duplicate test code. Besides, it improves readability and allows us to create interactive documentation. Last but not least, we can create tests with fewer keystrokes.
The concept of POM says that when we look at a page, we should see as if it has got two components:

  • Objects
  • Business logic

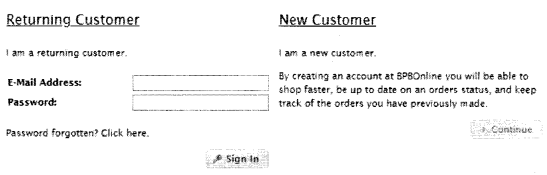
So the page has a business logic, and to achieve that business objective there are objects available on the page. We need to segregate these two entities. The reason for this is, over a period of time as an application undergoes changes the object information can get changed more frequently, making the maintenance of the code a humongous effort. Let us take an example of the My Account Page here from our application: http://practice.bpbonline.com/catalog/login.php
The business logic of the page says:

  • If there exists a new user, allow them to create a new account.
  • If there is a registered user with valid credentials allows them to log in.
  • If there is a registered user, but who has forgotten credentials, allow them to fetch the password.
  • Not allow a user with invalid credentials to log in.

To achieve these business functions, the page is designed with the following objects:

  • Username textbox
  • Password textbox
  • Sign-in button
  • Continue button

Please find the following screenshot explaining the preceding bullet points:

Selenium Python - Page Object Model chapter 11 img 1

By keeping object information separate from business logic, we are able to manage and achieve modularity and robustness at the code level. As we find during build release cycles, the object information may change over a period of time, so only the files where object information is stored need to be changed, whereas the test logic which is consuming these objects will not get affected by it.

In this chapter, we will see how we will implement POM for the login logout scenario of our application.

from selenium.webdriver.common.by import By

# for maintainbility We can seperate web objects by page name

class mainpageLocators(object):
MYACCOUT    = (By.LINK_TEXT, 'My Account')

class LoginpageLocators(object):
Email       = (By.NAME,   'email_address')
PASSWORD    = (By.NAME,   'password')
SIGNIN      = (By.ID,   'tab1')


class LogoutpageLocators(object):
LOGOFF     = (By.LINK_TEXT, 'log off')
continue   = (By.LINK_TEXT, 'continue')

So, if the object information in any of the upcoming builds changes, we can come to this file, and change the information associated with that object. In another file, called as pages. py we call the action associated with each object:

class Mainpage(page):
    def click_myaccount(self):
        self.find_element(*mainpageLocators.MYACCOUNT).click( )
        return self.driver

class Loginpage(page):
     def enter_email(self, email):
        self.find_element(*LoginpageLocators.EMAIL).send_keys(email)

def enter_password (self,pwd):
    self.find_element(*LoginpageLocators.PASSWORD).send_keys(pwd)

def click_login_button(self):
    self.find_element(*LoginpageLocators.SIGNIN).click( )

def login(self, email,pwd):
    self.enter_email(email)
    self.enter_password(pwd)
    self.click_login_button( )
    return self.driver


class Logoutpage(page):
   def click_logoff(self):
       self.find_element(*LogoutpageLocators.LOGOFF).click()

def click_continue(self):
     self.find_element(*LogoutpageLocators.CONTINUE).click( )

def logout(self):
    self.click_logoff( )
    self.click_continue( )

Now, we will create the test scenarios:

def test_sign_in_with_valid_user(self):
mainpage = mainpage(self . driver)
mainpage . Click_myaccount( )
loginpage=loginpage(self.driver)
loginpage . login("[email protected]","bpb@123")
logoutpage=logoutpage(self.driver)
logoutpage . logout ( )

As we can see, our actual test scenario looks clean, easy to read. Since object information is now hidden in the other files, the test can concentrate on actual test logic.

Conclusion

In this chapter, we learned the importance and need for POM to manage and maintain object information in the form of page objects. This is necessary as Selenium by default doesn’t come with any feature like object repository to manage and maintain object information. POM helps us create modular and robust code.
In our next chapter, we will discuss the concept of Selenium Grid, which as a component, allows us to execute scenarios in parallel.

Related Articles:

Page Object Model in Selenium Python | POM in Selenium Python Read More »

Selenium Python – Introduction to Selenium

Selenium Python Tutorial | Introduction to Selenium

Selenium Python -Introduction to Selenium

Software testing refers to a set of processes and procedures which help us identify whether the product at hand is getting built as per expectation or not. If we find any deviations we log them as defects, and in the subsequent releases we perform regression testing, retest the bugs, and eventually, we are able to release a build to the market with an acceptable bug list. These regression tests, which we have to perform with every release cycle, are mandatory as well as monotonous in nature, which makes them an ideal candidate for test automation.

There are many tools available in the market which allows us to automate our web applications, both commercial and open source. We have tools like UFT, RFT, Silk, Watir, Selenium, and others. Of these, Selenium, which is an open-source functional testing tool for web applications, is the most popular. In this chapter, we will introduce it.

Structure

  • History of Selenium
  • Benefits of Selenium
  • Components of Selenium
  • Architecture of Selenium

Objective

In this chapter, we are going to learn about Selenium as a test automation tool the reason for its popularity. We are also going to learn about the architecture of Selenium to understand how it executes tests on browsers.

History of Selenium

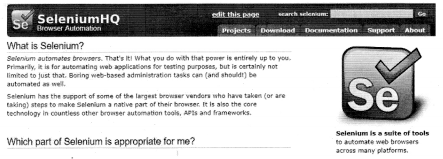
Selenium was created by Jason Huggins, while he was working at Thoughtworks in 2004. It was then called JavaScriptTestRunner. It was used to test an internal time and expense application. It was later released to the open-source community as Selenium. It was named Selenium because it overcame the shortcomings of another competitor that was made by the organization Mercury. Selenium is a chemical is used to treat Mercury poisoning. The main website of Selenium is http://seleniumhq.org/, which is shown in the following screenshot. Here, you will find all the information related to the Selenium tool:

Selenium Python - Introduction to Selenium chapter 1 img 1

There are different tabs on this web page, let’s have a look at what each represents:

• Projects: This tab basically lists the four projects, which make the Selenium tool. The Selenium IDE, Selenium RC, Selenium WebDriver, and Selenium Grid. We will talk in detail about these components in the coming chapters.

• Download: This tab, lists the various download that is required while setting up our system for using the tool.

• Documentation: It provides detailed help that may be required to learn Selenium. It also provides code examples, in different programming languages, which Selenium supports. It is very well written and should be a one-stop solution for all Selenium-related queries.

• Support: The support page provides information on chat, user groups, and the organization that is providing commercial support for the Selenium tool.

• About: The about section talks about news, events, the history of Selenium, and how one can get involved in the Selenium activities.

Benefits of Selenium

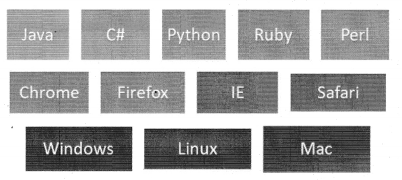
Selenium is one of the most popular open-source functional test automation tools for web applications. The reason for its popularity is due to the following:

  • It supports multiple programming languages. You can code in Java, C#, Python, Ruby, and Perl.
  • It supports the automation of multiple browsers like IE, Firefox, Chrome, and Safari.
  • It supports multiple operating systems like Windows, Mac, and Linux.
  • It is available free of cost,
  • It has a strong and active user community, which is very helpful.

Selenium Python - Introduction to Selenium chapter 1 img 2

Components of Selenium

Selenium is not a one-test automation tool, but a group of four different tools, which are listed as follows, along with their usage:
• Selenium IDE: It is a tool used for recording and playing back scripts. It currently supports both Firefox and Chrome browsers. You can procure the tool from this link: https:// www.seleniumhq.org/selenium-ide/

• Selenium RC: It was also known as Selenium 1.0. Although no longer supported, it was a combination of a selenium server and a client, which allowed automation of any browser on any operating system.

• SeleniumWebDriver: Also known as Selenium 2.0, whose 3.0 version is now available. It uses the technology of WebDriver API, where every browser has the capability through its API to automate itself. Currently, the Selenium versions are released through the WebDriver technique of browser automation.

• Selenium Grid: It uses a server component from the Selenium RC, and executes it in two different modes as hub and node. This allows the execution of multiple tests simultaneously, which saves time and cost.

Architecture of Selenium

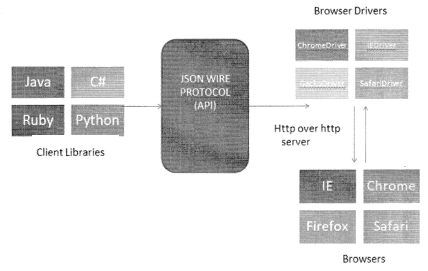
The main component of Selenium which is used in projects for automation is the Selenium WebDriver. We are going to discuss its architecture, which has four main components, as follows:

  • The client libraries available in different programming languages
  • JSON wire protocol over HTTP for communication to send commands from client to server
  • WebDriver for every browser
  • Browsers: Chrome, Firefox, IE, Opera, and more

The following diagram shows the client libraries that are available in different programming languages. We create our scripts using them. These then send commands to the WebDriver server using the JSON wire protocol over HTTP. The WebDriver for each individual browser
receives these commands and automates the browser, performing the action on them, thus achieving the task at hand:


Selenium Python - Introduction to Selenium chapter 1 img 3

Conclusion

As we conclude this chapter, we understand the background of the test automation tool Selenium, its importance, and the reason behind its popularity in the test automation world. In our next chapter, we will be discussing a component of Selenium – the Selenium IDE.

Related Articles:

Selenium Python Tutorial | Introduction to Selenium Read More »

Build A Selenium Python Test Suite From Scratch Using Unittest

Build A Selenium Python Test Suite From Scratch Using Unittest

Selenium Python – Unittest in Python

Most of the high-level programming languages have a unit test framework associated with them. Like Java has JUnit, .Net has NUnit. Similarly, Python has PyUnit or unit test associated with it. It was created by Kent Beck and Erich Gamma. The unit test framework supports test automation, with the help of text fixtures. We will learn more about it in this chapter.

Structure

  • What is a unit test?
  • Structure of unit test
  • Writing first unit test
  • Adding assertions in the test

Objective

When we are writing our test scripts, it is important that we structure them with the help of a unit test framework. The Python programming language makes the available unit tests, which is the unit test framework. In this chapter, we will understand how we use it to structure our code and write scripts.

The most unit and their structure

The unit test is the unit testing framework in Python. Its features are inspired by JUnit, which is a unit testing framework for the Java programming language. Applying a unit testing framework at the code level helps us introduce structure to our code. It also ensures
that we can add assertions in the test code, which we require as we are writing test automation scripts.

In a general unit test case, the class which we create is derived from a unit test.TestCase. We can have a set)p() andatearDown()
method there. In the setup () method, we generally write code that helps in preparing the system and test environment. And in the
tearDown () method, we write scripts to clean up the environment. In between these methods, we have our functions which are where the
code to actually test is created. These functions are written using the test_ prefix. We then execute the tests by calling unit tests.main()
the method at the end of the file.

A unit test contains the following important entities:

  • Test fixture: It expresses the process to execute the test, followed by a clean-up action.
  • Test case: It is the basic unit of testing.
  • Test suite: It is a collection of test cases.
  • Test runner: A test runner manages the execution of the test and presents the result to the user.

Let us see an example of a script for login logout, where we will be applying unit test:

from selenium import webdriver
import unittest

class login(unittest.Testcase):
      def setup(self):
      self.driver=webdriver.chrome(executable_path="D:\Eclipse\BPB\seleniumpython\seleniumpython\drivers\chromedriver.exe")
      self.base_url = "http://practice.bpbonline.com/catalog/index.php"

def test_login(self):
    driver = self.driver
    driver.get(self.base_url)
    driver.find_element_by_link_text("My Account").click( )
    driver.find_element_by_name("email_address").clear( )
    driver.find_element_by_name("email_address").send_keys("[email protected]")
    driver.find_element_by_name("password").clear( )
    driver.find_element_by_name("password").send_keys("bpb@123")
    driver.find_element_by_id("tab1").click( )
    driver.find_element_by_link_text("log off").click( )
    driver.find_element_by_link_text("continue").click( )

def tearDown(self):
    self.driver.quit( )

if_name_=="_main_":
    unittest>main( )

So in the preceding script, we see the automation test is structured in different sections.

• set up ( ): In this, we generally put statements to initialize the browser. Invoke the WebDriver object with the URL we would like to launch.

• test_login( ): In this method, we have written the steps to perform the actual test on the application. Please note that we have not added any assertion action yet. We will see that in the next section.

• tearDown( ): This is the cleanup method. In this, we generally put action to clean up the environment. So here, we have written the statement to close the browser.

Once the structure is complete, we execute the tests by calling the unit test.main( ) method.

Assertions

Assertions are ways to validate our actions. The PyUnit provides us the following set:

Assert methodExplanation
assertEqual(a, b)a == b
assertNotEqual(a, b)a != b
assertTrue(x)bool(x) is True
assertFalse(x)bool(x) is False
assertls(a,b)a is b
assertlsNot(a, b)a is not b
assertlsNone(x)x is None
assertlsNotNone(x)x is not None
assertln(a, b)a in b
assertNotln(a, b)a not in b
assertlslnstance(a, b)isinstancefa, b)
assertNotlsInstance(a, b)not isinstnacefa, b)
assertRaisesfexc, fun, args, *kwds)fun(*args, **kwds) raises exc
assertRaisesRegexpfexc, r, fun, args, *kwds)round(a-b, 7) == 0
assertAlmostEqual(a, b)round(a-b, 7) == 0
assertNotAlmostEqual(a, b)round(a-b, 7) != 0
assertGreater(a, b)a > b
assertGreaterEqual(a, b)a >= b
assertLessfa, b)a < b
assertLessEqual(a, b)a <= b
assertRegexpMatches(s, r)r.search(s)
assertNotRegexpMatchesfab)not r.search(s)
assertltemsEqual(a, b)sorted(a) == sorted(b) Works with unhashable objects
assertDictContains Subset(a, b)All the key-value pairs in a exist in b

We will now see a test automation script of login logout where we will use assertion to validate- valid user login, by checking the presence of text My Account Information.

def test_login(self):
    driver=self.driver
    driver.get(self.base_url)
    driver.find_element_by_link_text("My Account").click( )
    driver.find_element_by_name("email_address").clear( )
    driver.find_element_by_name("email_address").send_keys("[email protected]")
    driver.find_element_by_name("password").clear( )
    driver.find_element_by_name("password").send_keys("bpb123")
    driver.find_element_by_id("tab1").click( )
    pgsrc=driver.page_source
    if(pgsrc.index("My Account Information")>-1):
       print("user is valid")
       driver.find_element_by_link_text("log off").click( )
       driver.find_element_by_link_text("continue").click( )
       self.assertTrue(True,"User is valid")
else:
    print("User is Invaild")
    self.assertFalse(False, "User is invalid")

In the preceding script, we can see usage of self .assertTrue() and self .assentFalse() statement to mark the test pass or fail depending on the presence of the text My Account Information.

Conclusion

So in this chapter, we have seen how can we use the unit test framework to structure our test in setUp(), test_method(), and teardown() methods. We have also seen, how we can use assertions to mark our test as pass and fail. You can follow this link if you want to read more about it- https://docs.python.0rg/3/library/unittest.html.

In the next chapter, we will be discussing the concept of waits. We will see how we can synchronize our tests using static and dynamic waits and why is that important.

Related Articles:

Build A Selenium Python Test Suite From Scratch Using Unittest Read More »

Selenium Webdriver Tutorial with Examples | Understanding WebDriver, WebElement

Selenium Python – Understanding WebDriver, WebElement

In this chapter, we will introduce the entities WebDriver, WebElement, and By of the Selenium module. The WebDriver refers to the browser object. The WebElement refers to the HTML elements on the page. The By helps us create the locator objects on the page. So let us understand how are they used, and what all methods are associated with them.

Structure

  • WebDriver
  • WebElement
  • By

Objective

The Selenium module of Python programming language contains three crucial entities—WebDriver, WebElement, and By. The WebDriver helps us automate the browser object and has methods for it. The WebElement helps us automate the HTML element on the page, and has methods to perform an action on them. The By class helps us locate objects using different locator strategies supported by Selenium, like ID, name, XPATH, and others.

Introduction to Selenium module

The Selenium module in Python contains three important entities, WebDriver, WebElement, and By. In the following table, it shows us the relation of these entities with our objects of automation

The following table shows their relation to the web entity:

WebDriverBrowser
WebElementHTML element
ByLocator to identify the element on the page

Let us understand these entities in more detail.

WebDriver

The WebDriver object refers to the browser. It controls the browser by sending commands to the browser via the JSONWireProtocol. The details of this protocol are available here: https://github.com/Se- leniumHQ/Selenium/wiki/JsonWireProtocol. Any implementation of WebDriver for automating any browser will have to abide by this. Let us have a look at the few methods available which help in browser actions:

MethodsDescription
get(url)Opens a web page with the given URL.
findElement(By)This method takes a By object as an argument and finds the object on the web page which matches that locator. It returns the first found match.

In Python we have find_element_by_id, find_ element_by_name,                                                    find_element_by_xpath methods to locate elements.

findElements(By)This method returns a list of all elements which match the locator value provided by the By object on the web page.
Forward( )This command will take you to the next page.
back()This command will take you to the previous page.
page_sourceThis command will return the entire HTML content of the page.
TitleReturns the current title of the page.
current_urlReturns the current URL of the page.
CloseClose the current instance of the browser.
QuitClose the current instance of the browser and all the associated windows.

WebElement

The WebElement object refers to the HTML element on the web page. All methods that interact with the DOM will work through this interface. Before the implementation of any method, it does a freshness check to ensure if the element is still valid, and only then it acts. If the element reference is not valid it throws StaleElementReferenceException. Let us have a look at some of the methods available with this interface:

MethodsActions
click()It performs click operation on a web element.
clear()It performs a clear operation on a web element.
get_attribute()This method returns the data associated with the property of the HTML element at the time of execution. For example, you can fetch the href attribute with an anchor element.
is_displayed()Returns true, if the element is visible to the user.
is_enabled()Returns true, if the element is enabled.
is_selected()Returns true, if the element is selected, for example, a radio button is selected.
send_keys()It allows typing of text on an element, generally a textbox.
TextIt fetches the text associated with the HTML element.

By

The By class of Selenium allows us to locate the web element on the page. It uses the following strategies:

  • ID
  • NAME
  • XPATH
  • CSS_SELECTOR
  • TAG_NAME
  • LINK_TEXT
  • PARTIAL_LINK_TEXT
  • CLASS_NAME

To locate the element on a web page we use the find_element_by_* method, where the * replaces any of the preceding locator strategies to find the element on the web page.

Now let us try to write down the script for the scenario of login-logout using the methods we have learned above for these entities. The steps for the login-logout for our application are as follows:

  1. Open the application with URL: http://practice.bpbonline. com/catalog/index.php
  2. Click on the My Account link.
  3. Type email address and password.
  4. Click the Sign In button.
  5. Click the Log Off link.
  6. Click the Continue link.

We have learned in earlier chapters that a link is to be identified by its link text which we see on the screen. To identify the username, we can use the name property having the value email_address, the password field has the name property password, and the sign-in button has an id property table, as you can see in the HTML of its page:

<table border="0" cellspacings="0" cellpadding="2" width="1001">
 <tr>
  <td class="fieldkey"> E-mail Address:</td>
  <td class="fieldvalue"><input type="text" name="email_address"/></td>
 </tr>
 <tr>
  <td class="fieldkey">password:</td>
  <td class="fieldvalue"><input type="password" name="password" maxlenght="40" /></td>
 </tr>
</table>
<p><a href="http://practice.bpbonline.com/catalog/password_forgotten.php">password forgotten? click here.</a></p>
<p align="right"><span class="tablink"><button id="tab1" type="sbmit">sign Inc/button></span><script>

Let us now write the steps to automate the above scenario.

So in the following code, we are clicking on the MyAccount link, then typing the email address and password. Then we click on the Sign In button, and if our credentials are valid we should be able to login into the application. Then we click on the Log Off link and click on the Continue link to complete the process.

from selenium import webdriver

browser = webdriver.chrome(executble_path='D:\Ecl.ipse\BPB\seleniumpython\seleniumpython\drivers\chromedriver.exe')
browser.get('http://practice.bpbonline.com/catalog/index.php')
browser.find_element_by_link_text("My Account").click()
browser.find_element_by_name("email_address").send_keys("[email protected]")
browser.find_element_by_name("password").send_keys("bpb@123")
browser.find_element_by_id("tab1").click( )
browser.find_element_by_link_text("tab off").click( )
browser.find_element_by_link_text("continue").click( )
browser.quit( )

Conclusion

In this chapter, we learned how Selenium WebDriver helps automate the browser, identify the element on a web page and perform actions on it. The above test script can be executed on Firefox and Internet Explorer browsers by changing the executable path to their respective WebDrivers. The rest of the test script looks exactly the same. We understood the different methods associated with the WebDriver object, WebElement object, and the By locator object, which allows objects to be identified using different locator strategies.

In the next chapter, we will see how we can structure our Selenium scripts using PyUnit tests. We will study the unittest framework, which has derived its features from the JUnit and NUnit framework.

Related Articles:

Selenium Webdriver Tutorial with Examples | Understanding WebDriver, WebElement Read More »

How To Locate Different Web Elements in Selenium Using Python?

Selenium Python – Working with Different WebElements

An HTML page is made up of various HTML elements. When we automate a web page using Selenium, we first have to identify the HTML element uniquely on the web page and then perform an action on it. An HTML page can have HTML elements like a form, frame, table, dropdown, link, image, alerts, divs, spans, and many more. In this chapter, we will learn how to automate these elements through Selenium.

Structure

  • Working with form elements
  • Working with HTML table
  • Working with dropdown list

Objective

An HTML page is made up of different HTML elements, for example, we see a form element, which contains a lot of input elements. The input elements could be a textbox, radio button, or checkbox. We can then have a table element, a dropdown element. In this chapter, we will see how we can automate these HTML elements.

Working with form elements

An HTML form generally contains text boxes, buttons, links, images, radio buttons, and checkboxes type of elements. The HTML of the input elements in the form is represented as follows:
<input type= “text/checkbox/radio/password property=value../>

The following table shows the different actions we generally perform on these elements using Selenium:

Web Element

Selenium action

Description

Text boxClearClears the content of the text box.
Text boxSend_keysTypes content sent in the method in the text box.
CheckboxClickTo select a given check box.
Radio buttonClickTo select a given radio button.
AnchorclickTo click on the link element.
ButtonclickTo click on the button in the form.
ButtonsubmitIf the button provided is a submit button, then we can perform the submit action on it.
Radio buttonTo verify if the radio button is selected,
HTML elementThis method will work for any HTML element, and it checks if the element is displayed on the page or not.
HTML elementIs EnabledThis method will work for any HTML element, and it checks if the element is enabled on the page or not.

TableExarapli

An example of working on the form elements described above can be seen on the registration page of the application: http://practice. bpbonline.com/catalog/create_account.php

On this page, we can see the checkbox, radio button, text boxes, buttons, links on which we can work. The following program displays the process of user registration by performing actions on the different web elements on this page:

def text_login(self):
browser=self.driver
browser.find_element_by_link_text("My Account").click()
browser.find_element_by_link_text("continue").click( )
browser.find_element_by_name("gender").click( )
browser.find_element_by_name("firstname").send_keys("BPB")
browser.find_element_by_name("lastname").send_keys("BPB")
browser.find_element_by_id("dob").send_keys("01/01/1987")
#change	email id with each iteration
browser.find_element_by_name("email_address").send_keys("[email protected]")
browser.find_element_by_name("company").send_keys("5Elements learning")
browser.find_element_by_name("strret_address").send_keys("second Address")
browser.find_element_by_name("suburb").send_keys("second Address")
browser.find_element_by_name("postcode").send_keys("110001")
browser.find_element_by_name("city").send_keys("new delhi")
browser.find_element_by_name("state").send_keys("delhi")
sel=select(browser.find_element_by_name("country"))
sel.select_by_visible_text("India")
browser.find_element_by_name("country")
browser.find_element_by_name("telephone").send_keys("1234567890")
browser.find_element_by_name("fax").send_keys("0123456789")
browser.find_element_by_name("newsletter").click( )
browser.find_element_by_name("password").send_keys("123456")
browser.find_element_by_name("confirmation").send_keys("123456")
browser.find_element_by_xpath("//span[contains(text(),'continue')]").click( )
browser.find_element_by_link_text("log off").click( )
browser.find_element_by_link_text("continue").click( )

So in the preceding code, we are registering a new user in the application by handling actions on all the mandatory fields. So wherever there are textboxes, we have ensured they are cleared first, and then we type the text on them. For links, buttons, and radio buttons, we have used the click method for selecting them.

Working with HTML tables

The HTML tables are container elements, which mean they contain other HTML elements inside them. A general representation of HTML table is as follows:

<table>
<tbody>
<tr>
<td> text/HTML element</td>
<td> … </td>
</tr>
<tr>…</tr>
</tbody>
</table>

So we have the first node as a table, which contains a body, which contains table row[tr]. The tr node contains table data[td] which represents the table cell. The table cell can contain text or any HTML element within it. In our application, the home page displays the products listed in a web table:

 

Selenium Python - Working with Different WebElements chapter 9 img 2

Let us look at the backend HTML available:

<table border="0" width="100%" cellspacing="0" cellpadding=2">
  <tbody>
    <tr>
     <td width="33%" align="center" valign="top">
       <a href="http://practice.bpbonline.com/catalog/product info.php?
       products id=20">...</a>
        <br>
        <a href="http://practice.bpbonline.com/catalog/product info.php?
        products id=20">Beloved</a>
        <br>
       "$54.99"
      </td>
      <td width="33%" align="center" valign="top">...</td>
      <td width="33%" align="center" valign="top">...</td>
   </tr>
   <tr>...</tr>
   <tr>...</tr>


As we see in the preceding HTML snippet, the table has three tr tags, and each tr tag has three td tags. Each td tag has two anchor tags and a text, which we see on the page. One of the scenarios we pick for HTML web table automation is to find the rows and columns available in the table at run time. Here, we will be doing that, and printing the content available in every table cell as we iterate the table row by row and cell by cell.

from selenium import webdriver
import unittest

class TableExample(unittest.Testcase):
    def setup(self):
        self.driver = webdriver.chrome(executable_path='D:\Eclipse\BPB\seleniumpython\seleniumpython\drivers\chromedriver.exe')
        self.driver.implicitly_wait(30)
        self.base_url = "http://practice.bpbonline.com/catalog/index.php"
   def test_table(self):
       driver = self.driver
       driver.get(self.base_url)
       prodTable= driver.find_element_by_tag_name("table")
       #Fetch rows
       rows=prodTable.find_elements_by_xpath("//"/tbody/tr")
       i=1
       for r in rows:
           #Fetch colc for each row
           cols=r.find_elements_by_xpath("td")
           #print(for(path))
           j=1
           for cd in cols:
               print("row ", i, "col", j, ",", cd.text)
               j=j+1
          i=i+1
   def tearDown(self):
       self.driver.quit()        
if_name_=="_main_";
unittest.main()


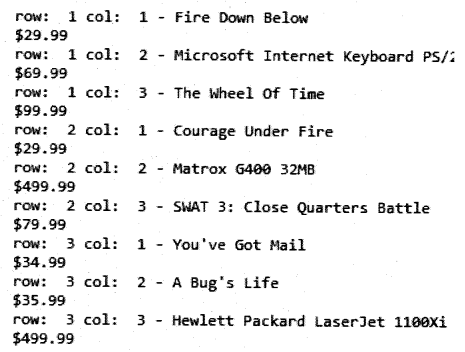
So in the preceding code, we first fetch the table object, then in that table object, we fetch all the table rows. Then we iterate each table row and fetch all table columns from each row. Then we iterate each table column, and fetch the text associated with each table cell, and print that information on the screen.

As we run the test, the output is as follows: col: 1 – Fire Down Below
 

Selenium Python - Working with Different WebElements chapter 9 img 5

Working with dropdown list

The dropdown list in HTML is known as the < select > element. It is also a container element. It contains <option> elements. The option element displays the different choices of the dropdown which can be selected from it. The HTML code of dropdown looks as follows:

<select>
(option value = data> Visible text </option>
. .
</select>

In our application, dropdowns are available on various pages. The dropdown element which we will see in the example is the country dropdown which we see on the registration page of the application:
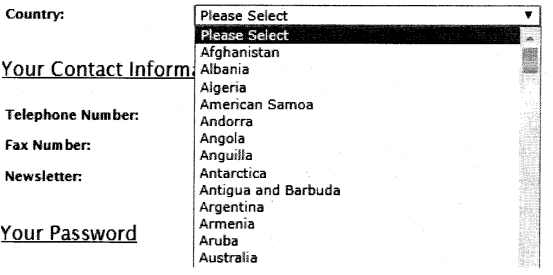
 

Selenium Python - Working with Different WebElements chapter 9 img 6

If we look at the backend HTML of this dropdown, we will see the following:

<select name="country">
  <option value selected="selected">please select</option>
  <option value="1">Afghanistan</option>
  <option value="2">Albania</option>
  <option value="3">Algeria</option>
  <option value="4">American</option>
  <option value="5">Andorra</option>
  <option value="6">Angola</option>
  <option value="7">Anguilla</option>
  <option value="8">Antarctica</option>
  <option value="9">Antigua and Barbuda</option>
  <option value="10">Argentina</option>
  <option value="11">Armenia</option>
  <option value="12">Aruba</option>


The number of options in the list will be the same as we see on the screen.

To work with a dropdown element, Selenium provides a separate class called Select. More details on this class can be found on this link:

https://seleniumhq.github.io/selenium/docs/api/py/
webdriver_support/selenium.web driver.support.select.
HTML?highlight=select#selenium.web driver.support.select

The Select class allows us to select an element from the list using the following three methods:

• select_by_value: In this method, we select an option
bypassing the data associated with the value attribute. For example in the previous list, if we say select_by_ value(” 5″), Andorra as a country will get selected.

• select^Y-Visi-ble^ext: In this method, we select an
option bypassing the data which we see on the screen. For example, if we want to select the country Angola, we can say select_by_visible_text(“Angola”).

• select_by_index: In this method, we select an option from the list, bypassing an index value. The index value associated with the options in the list ranges from 0 to the total number of options -1. So if we say select_by_index(2), Albania will get selected.

Similar to the preceding set of methods, we have select by value, visible text, and index. In the following program:

def text_dropdown(self):
    browser=self.driver
    browser.get(self.base_url)
    browser.maximize_window()
    browser.find_element_by_link_text("My Account").click( )
    browser.find_element_by_link_text("Account").click( )
    sel=select(browser.find_element_by_name("country"))
    #select by visible text
    sel.select_by_visible_text("India")
    print(sel.first_selected_option.text)
    time.sleep(1)
    #select by index
    sel.select_by_index(1)
    print(sel.first_selected_option.text)
    time.sleep(1)
    #select by value
    sel.select_by_value("5")
    print(sel.first_selected_option.text)
    time.sleep(1)

#find an option in the list
for country in sel.options:
    if(country.text=="India"):
       print("country found")


In the preceding program, we try different methods to select options from the dropdown element. We use a method called first_ selected_option, which returns the option that was selected first and foremost in the list.

Conclusion

So in this chapter, we have seen how to handle different types of form elements, web table elements, and the dropdown element. We saw the different methods that are available with these entities. We also saw the different actions which can be performed on the HTML elements during test automation runs. In the next chapter, we will discuss the switch To method, and see how we can handle frames, alerts with it. We will also see the action class which allows us to handle various keyboard, mouse actions, and also automate composite actions.

Related Articles:

How To Locate Different Web Elements in Selenium Using Python? Read More »