Prasanna

Python Data Persistence – pyodbc Module

Python Data Persistence – pyodbc Module

ODBC is a language and operating system independent API for accessing relational databases. The product module enables access to any RDBMS for which the respective ODBC driver is available on the operating system. Most of the established relational database products (Oracle, MySQL, PostgreSQL, SQL Server, etc.) have ODBC drivers developed by the vendors themselves or third-party developers.

In this section, we access ‘mydb’ database deployed on the MySQL server. First of all, verify if your OS has a corresponding ODBC driver installed. If not, download MYSQL/ODBC connector compatible with your OS, MySQL version, and hardware architecture from MySQL’s official download page: https://dev.mysql.com/downloads/connector/odbc/ and perform the installation as per instructions.

The following discussion pertains to MySQL ODBC on Windows OS. You need to open the ODBC Data Sources app in the Administrative Tools section of the control panel, add a newly installed MySQL driver, if it doesn’t have the same already, and configure it to identify by a DSN (Data Source Name) with the help of MySQL sever’s user ID and password, pointing towards ‘mydb’ database.(figure 8.1)

Python Data Presistence - pyodbc Module chapter 8 img 1

This ‘MySQLDSN’ is now available for use in any application including our Python interpreter. You need to install pyodbc module for that purpose.

Start the Python interpreter and import this module. Its connect () function takes the DSN and other login credentials as arguments.

Example

>>> con=pyodbc.connect("DSN=MYSQLDSN;UID=root")

Once we obtain the connection object, the rest of the operations are exactly similar to that described with reference to the sqlite3 module. You can try creating Customers and Invoices tables in mydb database using their earlier structure and sample data.
In conclusion, we can say that the DB-API specification has made database handling very easy and more importantly uniform. However, data in SQL tables is stored basically in primary data types only which are mapped to corresponding built-in data types of Python. Python’s user-defined objects can’t be persistently stored and retrieved to/from SQL tables. The next chapter deals with the mapping of Python classes to SQL tables.

Python Data Persistence SQLAIchemy

Python Data Persistence – Python – SQLAIchemy

The concluding paragraph of the previous chapter briefly talked about the disparity between type systems of SQL and object-oriented programming languages such as Python. Apart from Python’s Number (that too int and float only, not complex) and string types (which are generally called scalar types), SQL doesn’t have an equivalent data type for others such as diet, tuple, list, or any user-defined class.

If you have to store such an object in a relational database, it must be deconstructed into SQL data types first, before performing INSERT operation. On the other hand, a Python object of the desired type will have to be constructed by using data retrieved from a SQL table, before a Python script is able to process it.

Let’s take the case of ‘Products’ table in the SQLite database used in the previous chapter. Its structure is as follows:

Example

CREATE TABLE Products (
ProductID    INTEGER     PRIMARY KEY AUTOINCREMENT,
Name     TEXT (20),
Price       INTEGER
) ;

On the other side, Python script has a Products class and its object is populated with data as below:

Example

class Product 
def __init__(self, id, name, price):
           self.id=id
           self.name=name
           self.price=price
p1=Product(1, Laptop 1,25000)

Following sqlite3 module syntax, the following statement will insert pi object in the Products table:

Example

cur.execute("insert into products values 
(?,?,?);",(self.id, self.name, self.price))

Similarly, following statements will store retrieved data in an object of Products class.

Example

cur.execute('select * from products where name=?',
(1 Laptop',)) row=cur.fetchone()
p1=Products(row[0], row[1],row[2])

As you can see, this involves a tedious and explicit packing and unpacking of Python objects in order to be compatible with SQL data types. This is where Object Relational Mappers are useful.

WhatisORM?

An Object Relation Mapper (ORM) library provides a seamless interface between a class and a SQL table. A class is mapped to a certain table in the database, so that cumbersome to and fro conversion between object and SQL types are automated. The products class in Python code can be mapped to the Products table in the database. As a result, all CRUD operations are done with the help of objects only, not requiring hard-coded SQL queries to be used in Python script.

ORMs thus provides an abstraction layer over the raw SQL queries, thus enabling rapid application development. Such ORM libraries are available for most programming languages including Python. SQLAlchemy is a popular database toolkit widely used by Python developers. SQL ALchemy’s ORM system transparently synchronizes all changes in the state of an object of a user-defined class with its related row in the database table.

SQLAlchemy interacts with a certain type of database in association with the respective DB-API compliant module. Its dialect system is able to establish interaction with a database through the latter’s DB-API driver. That means you should have a corresponding DB-API module also installed along with SQLAlchemy to be able to use a particular type of RDBMS.

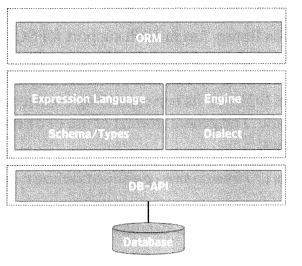
As a matter of fact, SQLALchemy library also contains, in addition to ORM API, the SQL Expression Language (SQLAlchemy Core) that executes primitive constructs of the relational database directly. While our focus in this chapter is on SQLALChemy ORM, we shall also briefly SQL Expression language in the end. (figure 9.1)

Python Data Presistence - Python - SQLAIchemy chapter 8 img 1

In most cases, SQLAlchemy is installed with the help of a pip utility. As explained in —, a virtual environment with SQLAlchemy installed will be used for this chapter. We need to activate it and start a Python interpreter.

Example

E:\SQLAlchemyEnv>scripts\activate 
(SQLAlchemyEnv) E:\SQLAlchemyEnv>python 
Python 3.7.2 (tags/v3.7.2:9a3ffc0492, Dec 23 2018, 23:09:28) 
[MSC v.1916 64 bit (AMD64)] on Win32 
Type "help", "copyright", "credits" or "license" for more information.
>>>

ORM – Session object

Now that we have created the Products table in the database, the next step is to start the transaction session. A session object is a handle used to interact with the database. We define a Session class that will serve as a factory for new Session objects with the help of the session maker () function.

from sqlalchemy.orm import sessionmaker 
Session = sessionmaker(bind=engine)

Here the engine is the Engine object that represents a connection with our database. Whenever you need to have a conversation with the database, you instantiate a Session:

session  = Session ( )

The session remains in force till changes to the database are committed and/or the close () method is called on a session object.

Python Data Persistence – SQLAlchemy ORM

Python Data Persistence – SQLAlchemy ORM

The first step is to connect to a database by using the create_engine () function in sqlalchemy module. This function should be provided with the URL of the database. The easiest way is to connect to an in-memory SQLite database.

Example

>>> from sqlalchemy import create_engine
>>> engine=create_engine('sqlite:///:memory:')

To connect to a SQLite database file use URL similar to following: engine =create_engine(‘sqlite:///mydb.sqlite’)

As you know, the Python library has in-built support for SQLite in the form of a DB-API compatible sqlite3 module. However, for other databases, its respective module needs to be installed. In order to connect to a different database (other than SQLite), its corresponding connection string includes the dialect and module. The general format of use of the create_engine () function is as follows:

dialect+driver://username:password®host:port/ database

Hence, to connect to a MySQL database using pymysql module, we need to use the following statement:

engine = create_engine('mysql+pymydsql://root@ localhost/mydb')

This assumes that the MySQL server’s username is ‘roof with no password set. The create_engine () function returns Engine object. It represents the interface to the database. The ORM doesn’t use the Engine directly once created but is used behind the scenes. This function can accept the optional ‘echo’ argument which is False by default. If set to True, it causes the generated SQL to be displayed by the Python interpreter.

>>> engine=create_
engine(1sqlite:///:memory:',echo=True)


Python Data Persistence – ORM – Table Object and Mapped Class

Python Data Persistence – ORM – Table Object and Mapped Class

The next step is to describe the database tables and define the mapping classes. An object of a metaclass, called Declarative Base class that stores a catalog of user-defined classes and mapped tables is first obtained. This Declarative Base class is defined in sqlalchemy. ext.declarative sub-module.

>>> from sqlalchemy.ext.declarative import 
declarative_base
>>> base=declarative_base( )

Use this ‘base’ class to define mapped classes in terms of it. We define the Products class and map it to the Products table in the database. Its table name property defines this mapping. Other attributes are column names in the table.

Example

#myclasses.py
from sqlalchemy.ext.declarative import declarative_ 
base
from sqlalchemy import Column, Integer, String base=declarative_base( ) 
class Product(Base):
tablename = 'Products'

ProductID = Column(Integer, primary_key=True) 
name = Column(String) 
price = Column(Integer)

The column is a SQL Alchemy schema object that represents column in the database table. Its constructor defines name, data type, and constraint parameters. The Column data type can be any of the following generic data types that specify the type in which Python data can be read, written, and stored. SQLAlchemy will choose the best database column type available on the target database when issuing a CREATE TABLE statement.

  • Biglnteger
  • Boolean
  • Date
  • DateTime
  • Float
  • Integer
  • Numeric
  • Smalllnteger
  • String
  • Text
  • Time

Even though this class defines mapping, it’s a normal Python class, in which there may be other ordinary attributes and methods as may be required by the application.

The Table object is created as per the specifications in the class and is associated with the class by constructing a Mapper object which remains behind the scene and we normally don’t need to deal with it directly.

The Table object created in the Declarative system is a member of the MetaData attribute of the declarative base class. The create_all ( ) method is called on metadata, passing in our Engine as a source of database connectivity. It will emit CREATE TABLE statements to the database for all tables that don’t yet exist.

base.metadata.create_all(engine)

Complete process explained above is stored as a script (addproducts.py) in the root folder of our virtual environment.

Example

from sqlalchemy import Column, Integer, String 
from sqlalchemy.ext.declarative import declarative_ base
from sqlalchemy import create_engine
from myclasses import Product, base
engine = create_engine('sqlite:///mydb.sqlite',echo=True)
base.metadata.create_all(engine)

We run this script from the command prompt (from within our virtual environment of course). The command window will show, apart from other logging information, the equivalent CREATE TABLE statement emitted by SQLALchemy. (figure 9.1)

(SQLAlchemyEnv) E:\SQLAlchemyEnv>python class-table-mapping . py
PRAGMA table_info("Products")
( )
CREATE TABLE "Products" (
"ProductID" INTEGER NOT NULL, 
name VARCHAR, 
price INTEGER,
PRIMARY KEY ("ProductID")
)
( )
COMMIT

Python Data Persistence – ORM – Add Data

Python Data Persistence – ORM – Add Data

To add data in the ‘Products’ table, first initialize an object of its mapped Products class, add it to the session and commit the changes.

Example

p1 = Products(name='Laptop 1, price = 25000) 
sessionobj.add(p1) 
sessionobj.commit( )

Add above code snippets to addproducts.py. It now looks like this:

from sqlalchemy import Column, Integer, String
from sqlalchemy import create_engine
from myclasses import Products,base
engine = create_engine('sqlite:///mydb.sqlite', echo=True)
base.metadata.create_all(engine) 
from sqlalchemy.orm import sessionmaker 
Session = sessionmaker(bind=engine) 
sessionobj = Session()
p1 = Product(name='Laptop', price=25000) 
sessionobj.add(p1) 
sessionobj.commit( )

Run the above script from the command prompt. SQLAlchemy will emit equivalent parameterized INSERT query that will be echoed on the terminal as shown below in figure 9.2:

(SQLAlchemyEnv) E:\SQLAlchemyEnv>addproducts.py 
PRAGMA table_info("Products")
( )
BEGIN (implicit)
INSERT INTO "Products" (name, price) VALUES (?, ?) ('Laptop', 25000)
COMMIT

If you want to confirm, open the database in SQLite console and view’ rows in Products table, (figure 9.3)

sqlite> .head on
sqlite> .mode column
sqlite> .open mydb.sqlite
sqlite> select * from products;
ProductID        name          price
———-         ——-         ——
1               Laptop         25000

To add multiple records at once, call the add_all() method on the session object. It requires a list of objects to be added.

Example

p2=Products(name='TV',price=40000) 
p3=Products(name=1 Router',price = 2 000) 
p4 = Products(name=1 Scanner 1,price = 5000) 
p5 = Products(name='Printer' ,price = 9000) 
p6=Products(name='Mobile',price=15000) 
sessionobj.add_all( [p2,p3,p4,p5,p6]) 
sessionobj.commit( )

Go ahead and add the ‘Customers’ class mapped to the ‘Customers’ table. Add data as per sample data given. (We shall add ‘Invoices’ class and ‘Invoices’ table a little later)

Example

class Customer(base):
table name ='Customers'
CustID=Column(Integer, primary_key=True) 
name=Column(String)
GSTIN=Column(String)

We have to add this table in the database schema by executing the following statement again:

base.metadata.create_all(engine)

Python Data Presistence – Row Object

Python Data Presistence – Row Object

By default, each row in the query result set is a tuple of values belonging to the column list in the SELECT statement. In the above example, the row object returns a tuple.

Example

>>> row=cur. f etchone ( )
> > > row
(2, 'TV', 40000)
>>> type(row)
<class 'tuple'>

The order of columns in the tuple cannot be ascertained from the object itself. The connection object has a useful ‘row_£actory’ property with which row in the result set can be converted into some meaningful representation. This can be done either by assigning a row factory to a user-defined function that will return a custom object or by setting it to the constructor of the Row class.

Row class has been defined in the sqlite3 module, whose primary purpose is to be used as a row factory. As a result, the row of the result set is returned as a Row object. Row class defines a keys () method that returns column names used in the SELECT statement. Values are accessible using the index as well as by name.

Example

>>> r=cur.fetchone( )
>>> type(r)
<class 'sqlite3.Row'>
>>> r.keysO
t'ProductID', 'Name', 'Price']
>>> fields=r .keys ( )
>>> r[1]
'TV'
> > > r['name']
'TV'
>>> for nm in fields:
print (nm, r[nm])
ProductID 2
Name TV
Price 40000


Python Data Presistence – while Statement

Python Data Presistence – while Statement

The while keyword constructs a conditional loop. Python interpreter evaluates the boolean expression and keeps on executing the subsequent
uniformly indented block of statements as long as it holds true. The moment it is no longer true, the repetition stops, and the program flow proceeds to the next statement in the script. A syntactical representation of usage of while loop is as follows:

Example

#using while statement
while expression==True:
#while block
. . .
end of while block
#rest of the statements

One way to control repetition is to keep its count and allow the next round of execution of block till the count exceeds the desired limit. In the following code snippet, the block executes repeatedly till the count is <= 5.

Example

#while-1.py
count=0
while count<5:
#count repetitions
count=count+1
print ("This is count number",count)
print ("end of 5 repetitions")

Output

E:\python 3 7>python whi1e- 1.py 
This is count number 1 
This is count number 2 
This is count number 3 
This is count number 4 
This is count number 5 
end of 5 repetitions 

E:\python37>

The expression in while statement is executed before each round of repetition (also called iteration). Here is another example to consolidate your understanding of the while loop.

The following code generates the list of numbers in the Fibonacci series. First, the two numbers in the list are 0 and 1. Each subsequent number is the sum of the previous two numbers. The while loop in the code adds the next 10 numbers. The iterations are counted with the help of variable ‘i’. the sum of numbers at i* and (Ml)* position is appended to the list till ‘i’ reaches 10.

Example

#fibolist . py
FiboList= [ ]
i = 0
max=1
FiboList.append(i)
FiboList.append(max)
while i<10:
#next number is sum of previous two
max=FiboList[i]+FiboList[i+1]
FiboList.append(max)
i = i + l
print ('Fibonacci series:1,FiboList)

Output

E : \py thon3 7 >py thon fibolist.py 
Fibonacci series: [ 0 , 1 , 1 , 2 , 3 , 5 , 8 , 13 , 21 , 34 , 55 , 89] 

E:\python37>

Python Data Presistence – os Module

Python Data Presistence – os Module

This is another module containing useful utilities for manipulating files and directories programmatically. The usual operating system commands for directory management have equivalents in this module. There is mkdir ( ) function that creates a new directory inside the current directory by default. To create it at any other location in the file system, its absolute path has to be given.

Example

import os
os.mkdir(1newdir’) # inside current directory
os.mkdir(‘c:\\newdir’) #in C drive

The chdir ( ) function (to set current working directory) and rmdir ( ) function (to remove a directory) also take relative path by default. A ge tcwd ( ) function is also available to know which is the current working directory. All these operations are demonstrated in following interpreter session:

Example

>> import os
>>> os.mkdir(“newdir”) #new directory in current path
>>> os.chdir(“newdir”) #set current directory
>>> os.getcwdO #displays current working directory
‘E:\\python37\\newdir’
>>> os.rmdir(“newdir”) #shouldn’t be current directory and should be empty Traceback (most recent call last):
File “<stdin>”, line 1, in <module> FileNotFoundError: [WinError 2] The system cannot
find the file specified: ‘newdir’
>>> os.chdir) #sets current directory to parent
directory
>>> os.getcwd ( )
‘ E:\\python3 7 ‘
>>> os.rmdir(“newdir”) #now it can be deleted
>>> os.listdirO #returns list of files and directories in current path
[‘abcdemo.py’, ‘aifftest.py’, ‘checkindent.py’,
‘clbr.py’, 1combinations-2.py’, ‘combinations.py’,
‘comprehensionl.py’, ‘conditionals.jpg’, ‘continue- example.py’, ‘data_class.py’, ‘DLLs’, ‘Doc’, ‘else- in-loop.py’, ‘ equitriangle .py’ , ‘fibolist.py’ ,
‘ findertest.py’, ‘for-l.py’, ‘for-2.py’, ‘for-3.
py’, ‘for-4.py’, ‘for-5.py’, ‘for-6.py’, ‘for-7.
py’, ‘gcexample.py’, ‘hello.py’, ‘include’, ‘Lib’,
‘libs’, ‘LICENSE.txt’, ‘modfinder.py’, ‘modspec. py’, ‘modulel.py’, ‘module2.py’, ‘mydb.sqlite3’,
‘myfunctions.cover’, ‘myfunctions.py’, ‘mymain.
cover’, ‘mymain.py’, ‘nestedfor.py’, ‘newdirbak’,
‘NEWS.txt’, ‘out.aiff’, ‘out.au’, ‘out.mp3’,
‘out.wma’, ‘polar.png’, ‘python.exe’, ‘python3. dll’, ‘python37.dll’, ‘pythonw.exe’, ‘report.txt’,
‘runpyexample.py’, ‘sample.wav’, ‘Scripts’, ‘secret- number.py’, ‘securepwd.py’, ‘sound.aiff’, ‘sound,
wav’, ‘sqrmodule.py’, ‘structexample.py’, ‘tabdemo.py’, ‘taxl.py’, ‘tax2.py’, ‘tax3.py'( ‘tax4. py’, ‘tel’, ‘testindent.py’, ‘Tools’, ‘triangle, py’, ‘trianglebrowser.py’, ‘vcruntimel40.dll’,
‘warningexample.py’, ‘wavetest.py’, ‘while-1.py’, ‘_threadexample.py’, ‘ pycache ‘]
>>>

The os module also has functions to create a new file and perform read/ write operations on it. We shall learn about these functions in the chapter on File Handling.

Synchronization in Selenium Python

Synchronization in Selenium Python | Synchronizing Test

Selenium Python – Synchronizing Test

In our earlier chapters, we have learned how do we automate scenarios, identify objects uniquely on a web page and perform actions on them. During the automation of scenarios, it is important that we synchronize our tests. So the time it takes for the web application to process, the automation command should match with the speed at which the command is sent by the script to the application.

Structure

  • Synchronizing test
  • Why synchronization
  • Implicit wait
  • Explicit wait

Objective

In this chapter, we will leam how we can establish synchronization in our tests so that we ensure our tests are not flaky. Reliable execution is crucial during testing cycles as they help save time, and ensure reliability in test automation exercises. We will learn how we implement that concept in our test scripts.

Synchronization

If we have not implemented synchronization in our tests, then our tests may hover between passing and failing, resulting in flaky tests. To avoid this we should synchronize our tests so that we have basic reliability in our test behavior. To achieve it we have to apply synchronization in our tests.
There are two kinds of synchronization techniques that we use in test scenarios of Selenium:

  • Implicit wait
  • Explicit wait

Implicit wait

The implicit wait is a global wait, which applies to every statement in the written test script. An implicit wait, when implemented in the script, tries to find the element on the web page. It will keep polling the web page until the element is found, or till the time is over. If the element is not found within the provided implicit wait, we get an exception NoSuchElementException.

In the following program, we will implement implicit wait:

from selenium import webdriver
import unittest

class Login(unittest.Testcase):
      def setup(self):
          self.driver = webdriver.chrome(executable_path="D:\Eclipse\BPB\seleniumpython\seleniumpyhon\drivers\chromedriver.exe")
          self.base_url = "http://practice.bpbonline.com/catalog/index.php"

def test_login(self):
    driver=self.driver
    driver.get(self.base_url)
    driver.find_element_by_link_test("My Account").click( )
    driver.find_element_by_name("email_address").clear( )
    driver.find_element_by_name("email_address").send_keys("[email protected])
    driver.find_element_by_name("password").clear( )
    driver.find_element_by_name("password").send_keys("bpb@123")
    driver.find_element_by_id("tab1").click( )
    driver.find_element_by_lik_text("log off").click( )
    driver.find_element_by_lik_text("continue").click( )

def tearDown(self):
    self.driver.quit( )

If_name_==_main_":
   unittest.main( )

The commanding self .driven.implicity_wait(30) will apply the wait on every find element command used in the program. So for every statement, it will wait for 30 seconds for the object to appear with the given By locator. It will keep polling the website until it finds the object. If the object is found, the action will be performed on the object. Else after the 30 seconds are over, we will get an exception.

Explicit wait

The explicit wait is basically a local wait which can be implemented either as:

• Static wait: It is a forced wait, which is introduced by using time.sleep(n seconds) in the code line, whenever we wish to wait in the code for n number of seconds. It is not advisable to use static wait in the code because we generally do not know if the time allocated to wait is less or more. We cannot provide a lot of time to wait in the code, because that will delay our test automation script, and if we provide very little time, it may result in a flaky test, so such waits are generally unreliable and not advisable.

• Dynamic wait: The dynamic wait is implemented in the code with the help of a class called as WebDriverWait. This class has a method called as until ( ). In this method, we pass an event which may occur and the time units for which we wish to wait for that event to occur. So in this method of WebDriverWait, we either wait for an event to occur or it times out. The exception we get in here, in case the event doesn’t occur, is TimedOutException. But in case the event has occurred, we do not wait for the entire amount of time to finish, we get out of the until loop as soon as it’s finished.

So, we will have a look at two sets of code here. In the first example, we will run a positive scenario of login logout using WebDriverWait. In the second example, we will execute a negative scenario in which we will fail forcefully by passing wrong object information in the code. So the method will wait for the timeout object to appear:

from selenium import webdriver
from selenium.webdriver.common.by import By
from selenium.webdriver.support.ui import webDriverwait
from selenium.webdriver.support import expected_conditions as EC
import unitest

class Login(unitest.TestCase):
      def setup(self):
          self.driver = webdriver.chrome(executable_path="D:\Eclipse\BPB\seleniumpython\seleniumpython\drivers\chromedriver.exe")
          self.base_url="http://practice.bpbonline.com/catalog/index.php"

dex test_login(self):
    driver=self.driver
    driver.get(self.base_url)
    driver.find_element_by_link_text("My Account").click( )
    driver.find_element_by_name("email_address").clear( )
    driver.find_element_by_name("email_address").send_keys("[email protected]")
    driver.find_element_by_name("password").clear( )
    driver.find_element_by_name("password").send_keys("bpb@123")
    driver.find_element_by_id("tab1").click( )
    webdriverwait(driver, 1e).until(
    Ec.presence_of_element_located((By.LINK_TEXT, "log off")))
    driver.find_element_by_link_text("log off").click( )
    driver.find_element_by_link_text("continue").click( )

def tearDown(self):
    self.driver.quit( )

if _name_ ==" _main_ ":
    unitest.main( )

The code lines using which we have implemented explicit wait are: WebDriverWait(driver, 10).until(
EC.presence_of_element_located((By.LINK_TEXT, “Log Off”)))

In the preceding until( ) method, we take an input argument called EC. presence_of_element_located(By.LINK_TEXT, ” Log Off”), here the EC is basically the class called as expected_ conditions exported from selenium.web driver.support import expected_conditions asEC. It has a lot of methods available with it which can help trace an event. In the preceding code, we have used a method presence_of_element_located, so this will basically look for the link with the text Log Off, for 10 seconds. If it finds the link within 10 seconds it will exit the until loop and execute the next command, which is clicking on the link, otherwise, it will timeout and throw a TimedOutException.

Let us try another code example, where we will give a bad locator for the Log Off link, causing the WebDriver wait method to timeout:

WebOriverHait(driver, 10}.until(
EC:presence_of_elenent_located((By.LIHK_TEXT, “Log ££”})) driver.find_eleinent_by_link_text(“Log Off”).click()

The exception which is thrown is an follows:
raise TiraeoutException(message, screen., stacktrace)
selenium.common,exceptions.TimeoutrExceptions Message;

Conclusion

In this chapter, we have seen how we can use the concept of waits, implicit and explicit wait, in our test automation code and ensure that the scripts are reliable during execution time. By implementing the concept of synchronization we have tried to achieve less flaky tests and introduce predictability in them during execution time. In the next chapter, we will discuss advanced types of web elements like table, dropdown, alerts, and frame. We will see how to automate these elements and what all methods are associated with them.

Related Articles:

How to Do Parameterization In Pytest With Selenium?

How To Do Parameterization In Pytest With Selenium?

Selenium Python – Concept of Parameterization

Sometimes, we come across situations where we need to execute the same test case, but with every execution, we need to use a different data set. Or sometimes, we need to create test data prior to our test suite execution. To resolve all these requirements, we should be familiar with the concept of parameterization.

Structure

  • Why do we need parameterization
  • What is parameterization
  • Creation of test data file
  • Parameterizing and login logout scenario

Objective

In this chapter, we will learn how we can use a text file to pass data to our tests and run it as many times as rows are available in our file. With this, we will understand the concept of parameterization.

Test data file

Test cases generally need test data for execution. When we write scripts to automate the test, it could be possible that we have hard-coded the test data within the test scripts. The drawback of this approach is if our test data needs to be changed for a test execution cycle, we will need to make changes at the test script level, thus making it prone to errors. So a good test script is when test data is kept outside the code.

To achieve the same, we need to parameterize our tests. In this, we replace the hard code values in the test with variables. At the time of execution, these variables are replaced by values that are picked from external data sources. These data sources could be text files, excel sheets, databases, JSON, XML, and others.

Parameterization and login logout scenario

Selenium doesn’t provide any provision to parameterize the tests. We write the code to parameterize the test using the programming language. In this chapter we will see how we can parameterize our test using a CSV file, and an excel file. The scenario we are going to pick is the login logout scenario, and we will parameterize it using two datasets—the first dataset will be for valid user and password combination. And the second dataset will be for a bad username and password combination.

The data to be picked for the test is available in a file called login. CSV, which is kept in the dataset folder in the project. Refer to the following screenshot:

Selenium Python - Concept of Parameterization chapter 8 img 1

The dataset file login. CSV has the following data:

[email protected], bpb@123
[email protected],demo123

In a CSV file, the data is separated by a comma. The test script provided below reads the data using Python file handling commands and splits it based on a comma. It then passes these values for username and password in the script. The following test iterates twice, which is equal to the number of rows in this file:

from selenium import webdriver
import unitest

class Login(unitest.TestCase):
      def setup(self):
          self.driver = webdriver.chrome(executable_path="D:\Eclipse\BPB\seleniumpython\seleniumpython\drivers\chromedriver.exe")
          self.driver.implicitly_wait(30) 
          self.base_url="http://practice.bpbonline.com/catalog/index.php"

dex test_login(self):
    driver=self.driver
    driver.get(self.base_url)
    file = open("D:\Eclipse\BPB\seleniumpython\seleniumpython\datasets\login.csv", "r")
    for line in file:
         driver.find_element_by_link_text("My Account").click( )
         data=line.spilt(",")
         print(data)
         driver.find_element_by_name("email_address").send_keys(data[0])
         driver.find_element_by_name("password").send_keys(data[1].strip())
         driver.find_element_by_id("tab1").click( )
         if(driver.page_source.find("My Account Information")l=-1):
            driver.find_element_by_link_text("log off").click( )
            driver.find_element_by_link_text("continue").click( )
            print("valid user credentail")
   else:
       print("Bad user credentail")
  file.close( )

def tearDown(self):
    self.driver.quit( )

if_name_=="_main_":
    unitest.main( )

In the preceding program, we have written the scenario of login logout, but it is wrapped around a while loop. This while loop is basically reading file contents, until the end of the file is reached. So the entire script will execute as many times as the number of rows in the file.

As we execute the test, we will see that it passes for the first data set picked from the file, as it is a combination of a valid username and password. But for the second dataset, the test reports a failure. The preceding test will execute for as many rows as available in our login.csv dataset file.

Conclusion

In this chapter we have learned how to use test data for our tests, and the importance of keeping test data separate from the actual tests. We also saw how we can read data from a CSV file or a text-based file, and pass them to our test code.

In our next chapter, we will learn how to handle different types of web elements.

Related Articles: