Author name: Prasanna

How to install Selenium in Python | Installing Selenium WebDriver Using Python and Chrome

Selenium Python – Installation and Setup

In this chapter, we will learn how to prepare our system with the required software so that we are able to write our test automation scripts and execute them. We will note to have Python, Java Runtime Engine (JRE), Eclipse IDE, PyDev. After setting up this software for creating scripts, we will need to set up Selenium in the system and download the browser drivers for execution on the individual drivers.

Structure

  • Installation and setting up
  • Installing Selenium Python module
  • Installing JRE
  • Installing Eclipse IDE
  • Setting up PyDev
  • Installing different drivers for Chrome, Firefox, and IE browser
  • Running the very first program on three browsers

Objective

This chapter will help us to understand the steps to setup Selenium and Eclipse IDE on the Windows system

Installation and setting up

Before we start to learn to write scripts to automate browsers using Selenium WebDriver, we have to prepare our system with a few software. We will require the following:

  • Python setup: https://www.python.org/downloads/
    [download the latest version] [3.7]
  • Java JRE: https://www.oracle.com/technetwork/Java/Javase/ downloads/jre8-downloads-2133155.html, and install it on the system.
  • Eclipse IDE: https://www.eclipse.org/downloads/

After we have installed and set up the above software in our system, we need to install PyDev in the Eclipse environment. To setup PyDev in the Eclipse environment, we have to perform the following actions:

  1. Open Eclipse.
  2. Click on Help | Install New Software. ;
  3. Provide in there, URL: http://pydev.org/updates

The following screenshot shows the same:

Selenium Python - Installation and Setup chapter 4 img 1

Now the Eclipse environment is ready to create Python projects and understand Python syntax as well. The next step is to install the Selenium Python module.

Installing Selenium Python module

The modules of Python are available on the website (http://www. pypi.org). From here, we will search the module for Selenium and use the pip install command.
1. Open the URL: https://pypi.org/project/selenium/
The above URL provides information about the Selenium module of Python, the command to install it, and the documentation available with it.
2. To install the module, open the Command Prompt and type pip install selenium, shown as follows:
SSI Command Prompt

Microsoft Windows [version 10.0.17134.706]
(c) 2018 Microsoft corporation. All rights reserved.

C:\users\write>pip install selenium

3. The preceding command will install the Selenium Python module, and the environment will now be ready to accept Selenium commands to automate the browser.

Creating Python project in Eclipse

We will now perform the steps to create a Python project in Eclipse and write down our first script to open the browser with the URL of our demo site application and close it. We will perform it for all three browsers: Internet Explorer, Firefox, and Chrome.
Let’s see in a step-by-step manner:
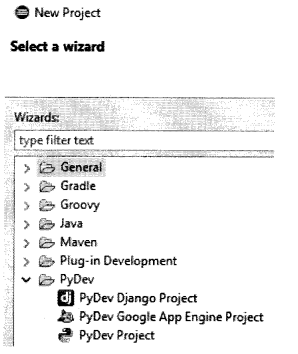
1. Go to File | Create New Project. In that window, select PyDev project. Refer to the following screenshot:

Selenium Python - Installation and Setup chapter 4 img 3

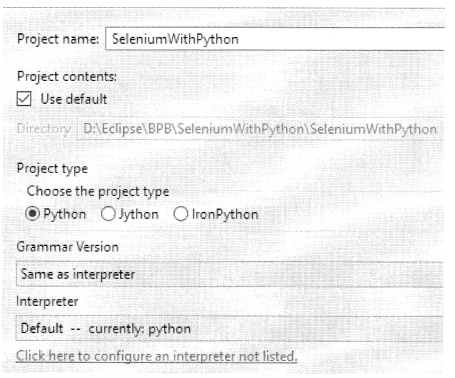
2. Provide a name to the project, select Python interpreter, it is advisable to choose Quick Auto Config. Refer to the following screenshot:

Selenium Python - Installation and Setup chapter 4 img 4

3. Click on Next, and then Finish. Eclipse may ask you to open the Python perspective, select Yes.

We are now ready to write down scripts in Python to automate the browsers.

Automating Chrome browser

To automate the Chrome browser, we first need to download the Chrome driver. Depending on the Chrome browser version we have on our system, and the operating system we are using, we need to download the suitable driver. It is advisable to ensure that you have the latest version of the browser.
1. To download Chrome driver, visit the link:
http://chromedriver.chromium.org/downloads
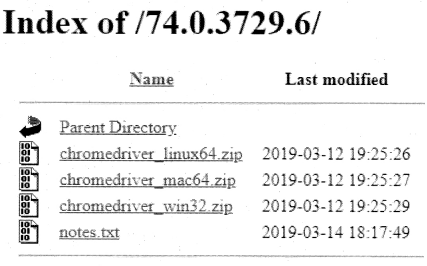
2. Drivers are available as per the operating system type for download:

Selenium Python - Installation and Setup chapter 4 img 5

3. Here, we are taking an example of the Win32 system. So we download the Win32 ChromedriverZIP folder and extract the. exe file from it.
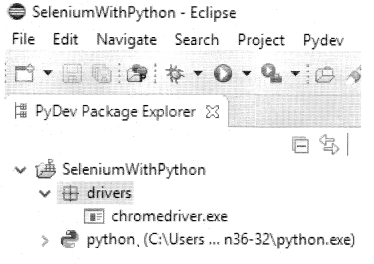
4. In Eclipse, where we create our project, we create a folder there, called drivers. We copy this chrome driver. exe file into that folder. So finally our project would look as follows:
I MG

Writing the first script

We will now write our very first script to automate the Chrome browser, where we will launch the browser, open the application, and then close the browser.

Selenium Python - Installation and Setup chapter 4 img 6

Let us understand the above script. The first statement from the Selenium import web driver will import Selenium classes in the file. This will allow usage of the Selenium commands in the script. So basically, we can create an object of WebDriver, and call different methods associated with it to handle the browser. It will fail if the Selenium module is not imported. The next statement initializes the browser object by creating an instance of the Chrome object and passing the path of the executable driver. With the Selenium WebDriver, every browser requires its own WebDriver to automate them.

The get method allows the browser to be launched with the URL that has been provided, and the quit method closes all the instances of the browser opened from this script.

Automating Firefox browser

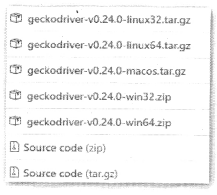
To automate the Firefox browser, we need to download the gecko driver. The geckodriver is the API which allows us to automate the Firefox browser. It acts as a bridge between Selenium and the browser. Flere as well, we need to select the driver version based on the operating system and the Firefox version. To download the driver, we need to visit the link: https://github.com/mozilla/ geckodriver/releases

Select the driver according to your system; here we select for win64 from the following list:

Refer to the following script:

from selenium import web-driver

browser =webdriver.Chrome (executable_path=r \Ectipse\BPB\seleniumpython\Selenim&thPython\drivers\chromedriver.exe}
browser.get{'http://practice. bpbonline,com/catolog/index.php'}
browser.quit()

Once we download the geckodriver for win64, we extract the geckodriver. exe file from the zip folder and put it in the driver’s folder in the Python project of Eclipse. Now we are ready to create the script which will open the application on the Firefox browser and close it:

Selenium Python - Installation and Setup chapter 4 img 8

Automating Internet Explorer

To automate the Internet Explorer browser, we have to download the IEdriverserver. exe file. This file is available on the https://www. seIeniumhq.org/download/ website.

Depending upon the operating system we are using, we will download that particular IE driver. Once the. exe file is downloaded, we will save it in the driver’s folder of our project, and write the following script to open the application in the IE browser:

The Internet Explorer Driver Server

This is required if you want to make use of the latest and greatest features of the WebDriver IntemetExplorerDriver, Please make sure that this is available on your $PATH (or %PATH% on Windows} in order for the IE Driver to work as expected.

Download version 3.14.0 for (recommended) 32 bit Windows IE or 64 bit Windows IE CHANGELOG

Conclusion

So, in this chapter, we have learned how to set up our system, create projects and automate the three browsers. The official documentation of Selenium Python bindings is available here: https://seleniumhq. github.io/selenium/docs/api/py/index.html
Now our system is ready for us to write down our Selenium tests for the multi-browser support available with Python programming languages, aiding the manual testers by automation and reducing the workload. In our next chapter, we will learn how to work with different types of WebElements, understand the concept of synchronization, and parameterization, which forms the basic building blocks for automation.

Related Articles:

How to install Selenium in Python | Installing Selenium WebDriver Using Python and Chrome Read More »

Selenium Python – Frames, Alerts, and Action Class

Selenium Python – Frames, Alerts, and Action Class

In this chapter, we will learn about the concept of the switch to( ) command associated with the driver object. Many times we come across applications that have a frame in them, if we have to handle the objects in a frame we need to first switch to the frame, and only then can we work on the objects of the page in the frame. Another usage of the switch is seen in handling alerts, JavaScript pop windows, which come up to ask for yes or no / ok and cancel decisions, to proceed. And lastly, we are going to talk about the action class, which allows us to automate various mouse and keyboard movements. It also allows us to automate composite action class.

Structure

  • Working with frame
  • Working with alerts
  • Action class

Objective

The WebDriver element has a method called switch to( ). This method allows switching the focus to a frame, an alert, or a new window. In this chapter, we will see its usage. Another entity we will see is the Action class. This is used to automate keyboard and mouse actions. Sometimes, we may come across composite actions, and in those situations, actions class is helpful.

Working with frame

A frame HTML element allows us to break an HTML window into multiple sections, where each section can contain its own HTML page. A frame tag is represented inside a frameset tag and looks like the following:

<frameset>
<frame name=”topframe” src=”topframe.htm”>
<frame name^’hot-frame” src=”botframe.htm”>
</frameset>

If we have to work with the HTML element which is available in the web page that lies inside a frame, we need to switch to the frame first, and only then we can interact with the HTML elements of the page inside the frame. To perform this task we need to use the switch_ to() command, using some attribute to identify the frame which contains the element. Let us take the following example of a page that contains nested frames: http://the-internet.herokuapp.com/ nested_frames.

If we look at the backend HTML of the page, we will find that the page contains a top frame and a bottom frame. The top frame further contains three frames: left, middle, and right. The following screenshot shows the frames HTML:

<frameset frameborder="1" rows="50%,50%">
  <frame src="/frame top" scrolling="no" name="frame-top">
   #document
    <html>
       <script src="chrome-extention://cdmedbnojkdahhdbjnemegb1hbaa1kbc/page/prompt.is">
       </script>
       <script src="chrome-extention://cdmedbnojkdahhdbjnemegb1hbaa1kbc/page/prompt.is"
       </script>
       <head>...</head>
       <frameset frameborder="1" name="frameset.middle" cols=*33%,33%,33%">
         <frame src="/frame left" scrolling="no" name = "frame=left">...</frame>
         <frame src="/frame middle" scrolling="no" name = "frame=middle">...</frame>==$o
         <frame src="/frame right" scrolling="no" name = "frame=right">...</frame>
    </frameset>
   </html>
  </frame>
<frame src="/frame bottom" scrolling="n0" name="frame-bottom">...</frame>

Now, let us suppose that in the preceding example we need to fetch the text associated with the page inside the middle frame, so how will we do that? To achieve this we will first need to switch to the top frame, and then from it, switch to the middle frame. Once we have switched to the middle frame we can fetch the text associated with it. The following program shows the working of the same.

from selenium import webdriver
import unittest

class FrameExample(unittest.TestCase):
     def setup(self):
         self.driver=webdriver.chrome(executable_path="D:\Eclipse\workspace\seleniumpython\seleniumpython\drivers\chromedriver.exe")
         self.driver.implicity_wait(30)
        self.base_url="http.ss//the.internet.herocomp.com/test_frame(self):

def test_frame(self):
    driver = self.driver
    driver.get(self.base_url)
    driver.switch_to_frame(driver.find_element_by_name("frame.top"))
    driver.switch_to_frame(driver.find_element_by_name("frame.middle"))
    print(driver.page_source)

def tearDown(self):
    self.driver.quit( )

if_name_ =="_main_":
   unittest.main( )

In the preceding program, we switch our focus to the first frame which is recognized by the name property frame-top, and then we switch our focus to another frame inside it which is recognized by the name property frame-middle. Once we have switched focus to the inner frame, we print the page source of it.

The output which we get when we run the program is as follows:

<html xmlns="http://www.w3.org/1999/xhtml"><head>
     </head>
     <body>
        <div id="content">MIDDLE</div>


</body></html>

Working with alerts

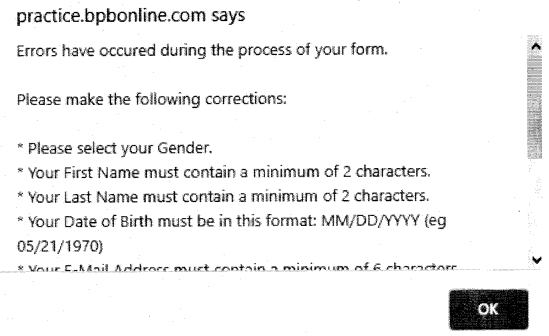
Alerts are JavaScript popup windows that prompt the user for an action or decision based on which an event is performed, or it displays some information to the user. For example, in our web i application http://practice.bpbonline.com/catalog/index.php, when we try to register the user, and while filling in the registration form, if we forget to fill in some mandatory field and we try to proceed with the process, we will see an alert prompting us to correct our entries.

Selenium Python - Frames, Alerts, and Action Class chapter 10 img 4

Now to handle the preceding alert we have to click on the OK button. To perform the action we have a class available in Selenium called the Alert class. The details of it are available here: https://seleniumhq. github.io/selenium/docs/api/py/webdriver/selenium.webdriver. common.alert.html. This Alert class has four methods:

  • accept (): It accepts the alert by clicking on the OK button.
  • dismiss( ): It cancels the alert by clicking on the cancel button.
  • Send_keys: It sends keys to the alert.
  • Text: It fetches the text associated with the alert.

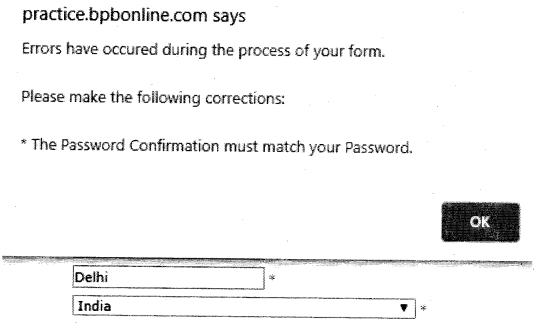
In the scenario from our application which we try to automate the user registration process. Here, we will first pass a bad combination of passwords and confirm passwords. This will cause the alert to popup:

Selenium Python - Frames, Alerts, and Action Class chapter 10 img 5

So, we use the Alert class here, and its method accepts to handle it, as can be seen in the following code snippet:

#bad password and confirm password
browser.find_element_by_name("password").send_keys("123456")
browser.find_element_by_name("confirmation").send_keys("1234")
browser.find_element_by_xpath("//span[@class='ul-button-text'][contains(	text(), 'continue')]").click( )
time.sleep(3)
alert=browser.switch_to_alert( )
print(alert.text)
alert.accept( )#press ok button
time.sleep (3)
#provide correct owd and confirm owd
browser.find_element_by_name("password").clear( )
browser.find_element_by_name("password").send_keys("123456")
browser.find_element_by_name("confirmation").clear( )

The complete code of the preceding snippet is available in the codebase.

Action class

Selenium provides us with an action class, inits Python implementation is known as action chains. This class helps us to handle low-level keyboard and mouse actions as well as complex actions like drag and drop, mouse hover, and more. Using the Action class, you can either call one action at a time, or you can queue up the actions one after another and then use a method called as perform() to call them in order. We will take an example here for a website to perform drag and drop action. This example will also showcase the usage of frames.

So the website we will be using here is: http://jqueiyui.com/ droppable/
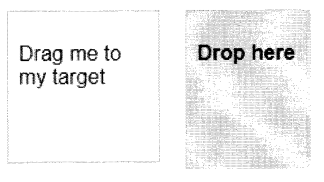
There are two objects, where the left one has to be dropped on right. Refer to the following diagram:

Selenium Python - Frames, Alerts, and Action Class chapter 10 img 7

As we inspect the element, we will find that these elements are inside the iframe tag. Let us have a look:

<iframe src="/resource/demos/droppable/default.html" class="demo-frame">
  #document
    <!doctype html>
    <html lang="en">
      <head>...</head>
      <body>
       <div id="draggable" class="ui-widget-content ui-draggable ui-draggable-handle" style="position: relative;">...</div>
       <div id="droppable" class="ui-widget-header ui-droppable">...</div>
     </body>
   </html>
 </iframe>

We want to drag the left object and drop it on the right object. The following code shows how we can do that:

driver=self.driver
driver.get(self.base_url)
actions = ActionChains(driver)
driver . switch_to_frame(driver.find_element_by_class_name("demo-frame"))
draggable=driver.find_element_by_id("draggable");
actions.drag_and_drop(draggable, droppable).perform( ):
time.sleep(3)

In the preceding program, we first switch to the iframe which contains the draggable and droppable objects. We then recognize the objects using their ID properties. Once the objects are created, we use the method available with the Action class, drag_and_drop(), which performs the required action and solves the scenario.

So to use the ActionChains class, we have to import it as well, so the following would be our import modules:

from selenium.web driver. common.action_chains import ActionChains

Conclusion

In this chapter, we saw how we will handle the frame HTML element, by using the switch command. Also, if we come across the JavaScript popups, how do we handle them using the alert interface available in Selenium. If we come across scenarios in applications that require composite actions like click and hold, drag and drop, double click, context-click, we have with us Action class, which we can use to handle mouse actions, keyboard actions, and composite actions as well.

In our next chapter, we will learn about the concept of Page Object Model (POM), where we will learn how we handle object information. The management of object information is important and is required for our test automation scripts.

Related Articles:

Selenium Python – Frames, Alerts, and Action Class Read More »

Python Interview Questions on Classes and Inheritance

We have compiled most frequently asked Python Interview Questions which will help you with different expertise levels.

Python Interview Questions on Classes and Inheritance

Modules

  • Modules are used to create a group of functions that can be used by anyone on various projects.
  • Any file that has python code in it can be thought of as a Module.
  • Whenever we have to use a module we have to import it into the code.
  • Syntax:

import module_name

Object Orientation

  • Object Orientation programming helps in maintaining the concept of reusability of code.
  • Object-Oriented Programming languages are required to create readable and reusable code for complex programs.

Classes

  • A class is a blueprint for the object.
  • To create a class we use the Keyword class.
  • The class definition is followed by the function definitions, class class_name:

def function_name(self):

Components of a class
A class would consist of the following components:

  1. class Keyword
  2. instance and class attributes
  3. self keyword
  4. __init__function

Instance and class attribute

Class attributes remain the same for all objects of the class whereas instance variables are parameters of__init__( ) method. These values are different for different objects.

The self

  • It is similar to this in Java or pointers in C++.
  • All functions in Python have one extra first parameter (the ‘self’) in the function definition, even when any function is invoked no value is passed for this parameter.
  • If there a function that takes no arguments, we will have to still mention one parameter – the “self’ in the function definition.
    The__init__( ) method:
  • Similar to the constructor in Java
  • __init__( ) is called as soon as an object is instantiated. It is used to
    initialize an object.

Question:
What will be the output of the following code?

class BirthdayWishes:
   def__init__(self, name):
        self.name = name
   def bday_wishes(self):
        print("Happy Birthday ", self.name,"!!")
bdaywishes = BirthdayWishes("Christopher")
bdaywishes.bday_wishes( )

Answer:

The output will be as follows:
Happy Birthday, Christopher !!

Question:
What are class variables and instance variables?
Answer:

Class and instance variables are defined as follows:

 class Class_name:
     class_variable_name = static_value

     def__init__(instance_variable_val):
           Instance_variable_name = instance_ variable val

Class variables have the following features:

  • They are defined within class construction
  • They are owned by the class itself
  • They are shared by all instances in class
  • Generally have the same value for every instance
  • They are defined right under the class header
  • Class variables can be accessed using the dot operator along with the class name as shown below:

Class name. class_variable_name

The instance variables on the other hand:

  • Are owned by instances.
  • Different instances will have different values for instance variables.
  • To access the instance variable it is important to create an instance of the class:

instance_name = Class_name( )
instance_name. Instance variable name

Question:
What would be the output of the following code:

class sum_total:
      def calculation(self, number1,number2 = 8,):
         return number1 + number2
st = sum_total( )
print(st.calculation(10,2))

Answer:

12

Question:
When is__init__( ) function called ?
Answer.
The__init__( ) function is called when the new object is instantiated.

Question:
What will be the output of the following code?

class Point:
   def__init__(self, x=0,y=10,z=0):
        self.x = x + 2
        self.y = y + 6
        self.z = z + 4
p = Point(10, 20,30)
print (p.x, p.y, p.z)

Answer:

12 26 34

Question:
What will be the output for the following code?

class StudentData:
    def__init__(self, name, score, subject):
         self.name = name
         self.score = score
         self.subject = subject
    def getData(self):
         print("the result is {0}, {1}, {2}".
format(self.name, self.score, self.subject))
sd = StudentData("Alice",90,"Maths")
sd.getData( )

Answer:

the result is Alice, 90, Maths

Question:
What will be the output for the following code?

class Number__Value:
    def init (self, num):
      self.num = num 
      num = 500
num = Number_Value(78.6)
print(num.num)

Answer:

78.6

Inheritance

Object-Oriented languages allow us to reuse the code. Inheritance is one such way that takes code reusability to another level altogether. In an inheritance, we have a superclass and a subclass. The subclass will have attributes that are not present in the superclass. So, imagine that we are making a software program for a Dog Kennel. For this, we can have a dog class that has features that are common in all dogs. However, when we move on to specific breeds there will be differences in each breed.

So, we can now create classes for each breed. These classes will inherit common features of the dog class and to those features, it will add its own attributes that make one breed different from the other. Now, let’s try something. Let’s go step by step. Create a class and then create a subclass to see how things work. Let’s use a simple example so that it is easy for you to understand the mechanism behind it.

Step 1:
Let’s first define a class using the “Class” Keyword as shown below:

class dog( ):

Step 2:
Now that a class has been created, we can create a method for it. For this example, we create one simple method which when invoked prints a simple message I belong to a family of Dogs.

def family(self):
      print("I belong to the family of Dogs")

The code so far looks like the following:

class dog( ):
      def family(self):
            print("I belong to the family of Dogs")

Step 3:
In this step we create an object of the class dog as shown in the following code:

c = dog( )

Step 4:
The object of the class can be used to invoke the method family( ) using the dot ‘.’ operator as shown in the following code:

c.family( )

At the end of step 4 the code would look like the following:

class dog( ):
   def family(self):
       print("I belong to the family of Dogs")

c = dog( )
c.family( )

When we execute the program we get the following output:

I belong to the family of Dogs

From here we move on to the implementation of the concept of inheritance. It is widely used in object-oriented programming. By using the concept of inheritance you can create a new class without making any modification to the existing class. The existing class is called the base and the new class that inherits it will be called the derived class. The features of the base class will be accessible to the derived class.
We can now create a class german shepherd that inherits the class dog as shown in the following code:

class germanShepherd(dog):
     def breed(self):
         print ("I am a German Shepherd")

The object of a class german shepherd can be used to invoke methods of the class dog as shown in the following code:

Final program
class dog():
     def family(self):
           print ("I belong to the family of Dogs")
class german shepherd(dog):
    def breed(self) :
           print ("I am a German Shepherd")
c = germanShepherd!)
c.family( )
c.breed( )

Output

I belong to the family of Dogs 
I am a German Shepherd

If you look at the code above, you can see that object of class germanShepherd can be used to invoke the method of the class.
Here are few things that you need to know about inheritance.
Any number of classes can be derived from a class using inheritance.
In the following code, we create another derived class Husky. Both the classes germaShepherd and husky call the family method of dog class and breed method of their own class.

class dog( ):
   def family(self):
       print("I belong to the family of Dogs")

class germanShepherd(dog):
    def breed(self):
         print("I am a German Shepherd")

class husky(dog):
   def breed(self):
       print("I am a husky")
g = germanShepherd()
g.family()
g. breed()
h = husky ()
h. family()
h .breed()

Output

I belong to family of Dogs 
I am a German Shepherd 
I belong to family of Dogs 
I am a husky

A derived class can override any method of its base class.

class dog( ):
   def family(self):
       print ("I belong to family of Dogs")

class germanShepherd(dog):
    def breed(self):
        print("I am a German Shepherd")
class husky(dog):
    def breed(self):

print("I am a husky")
def family(self):
print ("I am class apart")
g = germanShepherd()
g.family()
g. breed()
h = husky ()
h. family() h.breed()

Output

I belong to the family of Dogs 
I am a German Shepherd 
I am class apart 
I am a husky

A method can call a method of the base class with the same name.

Look at the following code, the class husky has a method family( ) which call the family( ) method of the base class and adds its own code after that.

class dog( ):
  def family(self):
        print("I belong to family of Dogs")

class germanShepherd(dog):
   def breed(self) :
      print ("I am a German Shepherd")

class husky(dog):
   def breed(self):
       print("I am a husky")
   def family(self):
        super().family()
       print("but I am class apart")

g = germanShepherd( )
g.family( )
g. breed( )
h = husky( )
h. family( ) h.breed( )


Output

I belong to the family of Dogs 
I am a German Shepherd 
I belong to the family of Dogs 
but I am class apart 
I am a husky

Question:
What are multiple inheritances?
Answer:
If a class is derived from more than one class, it is called multiple inheritances.

Question:
A is a subclass of B. How can one invoke the__init__function in B from A?
Answer:
The__init__function in B can be invoked from A by any of the two methods:

  • super( ).__init__( )
  • __init__(self)

Question:
How in Python can you define a relationship between a bird and a parrot.
Answer:
Inheritance. Parrot is a subclass of birds.

Question:
What would be the relationship between a train and a window?
Answer:
Composition

Question:
What is the relationship between a student and a subject?
Answer:
Association

Question:
What would be the relationship between a school and a teacher?
Answer:
Composition

Question:
What will be the output for the following code:

class Twice_multiply:
def __init__(self):
self.calculate (500)

def calculate(self, num):
self.num = 2 * num;
class Thrice_multiply(Twice_multiply):
def__init__(self):
super ( ) .__init__( )
print("num from Thrice_multiply is", self. num)

def calculate(self, num):
self.num = 3 * num;
tm = Thrice_multiply()

Answer:

num from Thrice_multiply is 1500
>>>

Question:
For the following code is there any method to verify whether tm is an object of Thrice_multiply class?

class Twice_multiply:
   def__init__(self) :
       self.calculate(500)
   def calculate(self, num) :
        self.num = 2 * num;
class Thrice_multiply(Twice_multiply):
    def __init__(self) :
      super () .__init__()
      print("num from Thrice_multiply is", self. num)
def calculate(self, num):
     self.num = 3 * num;
tm = Thrice_multiply( )

Answer:
Yes, one can check whether an instance belongs to a class or not using isinstance( ) function.

isinstance(tm,Thrice_multiply)

Python Interview Questions on Classes and Inheritance Read More »

Python Interview Questions on Stacks, Queues, and Deque

We have compiled most frequently asked Python Interview Questions which will help you with different expertise levels.

Python Interview Questions on Stacks, Queues, and Deque

Stack, Queues, and Deque are linear structures in Python.

Stack

Stack is an ordered collection of items where the addition and removal of items take place at the same end which is also known as the TOP. The other end of the stack is known as the BASE. The base of the stack is significant because the items that are closer to the base represent those that have been in the stack, for the longest time.

The most recently added item is the one that is in the top position so that it can bebe removed first.

This principle of order is known as LIFO-that stands for Last -in-first- out, where the newer items are near the top, while older items are near the base.

Python Interview Questions on Stacks, Queues, and Deque chapter 10 img 1

Stacks are important because they are required whenever there is a need to reverse the order of items as the order of removal is reverse of the order of insertion.

Example:

1. Pushing the back button on the browser while surfing on the internet.
2. Ctrl+Z (undo) in Microsoft applications.
3. Remove recently used objects from the cache.

Stacks are commonly used by software programmers; it may not be quite noticeable while using a program as these operations generally take place in the background. However, many times you may come across a Stack overflow error. This happens when a stack actually runs out of memory.

Stacks seem to be very simple. Yet they are one of the most important data structures as you will see very soon. Stacks serve as a very important element of several data structures and algorithms.

Question 1.
Explain, how would you implement a stack in Python.
Answer:
We will implement Stack using lists.

Step 1:

Define the Stack Class

#Define Stack Class
class Stack:

Step 2:

Create constructor

Create a constructor that takes self and size (n) of the stack. In the method, we declare that self. stack is an empty list([ ]) and self. size is equal to n i.e. the size provided.

#Define Stack Class
          def__init__(self, n):
             self.stack = [ ]
                     self.size = n


Step 3:

Define Push Function

A push function will have two arguments self and the element that we want to push in the list. In this function, we first check if the length of the stack is equal to the size provided as input (n). If yes, then it means that the stack is full and prints the message that no more elements can be appended as the stack is full. However, if that is not the case then we can call the append method to push the element to the stack.

def push(self,element):
if(len(self.stack)== self.size):
print("no more elements can be appended as the stack is full")
else:
self.stack.append(element)

Step 4:

Define POP Function

Check the stack. If it is empty, then print: Stack is empty. Nothing to POP!!. If it is not empty pop the last item from the stack.

def pop(self):
      if self.stack == [ ]:
          print("Stack is empty. Nothing to POP!!")

else:
     return self.stack.pop( )

The complete code will be as follows:

Code

#Define Stack 
Class class Stack:
     #declare constructor

def__init__(self, n):
    self.stack = [ ]
    self.size = n

#push operation

def push(self,element):
if(len(self.stack)== self.size):
print("no more elements can be appended as the stack is full")

else:

       self.stack.append(element)

#pop operation
def pop(self):
   if self.stack == [ ]:
       print("Stack is empty. Nothing to POP!!")
 
     else:
          self.stack.pop( )

Execution

s = Stack(3) 
s.push(6)
s.push(2) 
print(s.stack)
s.pop( )
print(s.stack)

Output

[6, 2]
[6]
>>>

Question 2.
Write a program to check if a given string has a balanced set of parenthesis or not.
Balanced parenthesis: ( ), { }, [ ], {[( )]}, [ ][ ], etc.
Answer:
Here we have to check if pairs of brackets exist in the right format in a string. Expressions such as “[ ]{( )}” are correct. However, if the opening bracket does not find the corresponding closing bracket then the parenthesis is a mismatch. For example: “[ }”or “{ }[ ))”• To solve this problem we will follow the following steps:

Step 1

Define class paranthesis_match

class paranthesis_match:

Step 2

Defining lists for opening and closing brackets

We now define two lists such that the index of an opening bracket matches with the index of the corresponding closing bracket:

1. List opening_brackets will have all types of opening brackets as elements -[“(“,{“,”[“]
2. List closing_brackets will have all types of closing brackets as elements – [“(“,”{“,”[“]
Here is how we define the lists:

opening_brackets = ["(",{","["]
closing_brackets = [")","}"/"]"]

Step 3

Defining Constructor, Push, and Pop functions

Constructor:

The constructor takes an expression as a parameter which is the string provided for validation of parameters.
We also initialize the list for stacking purposes. The push( ) and pop( ) functions will be applied on this list.

def__init__(self, expression):
self-expression = expression
self.stack = [ ]

Push( ) and Pop( ) Functions

Since we are implementing this using a stack it is quite obvious that we would require push( ) and pop functions.

The push( ) function when called, will add an element to the stack.

def push(self,element):
self.stack.append(element)

The pop( ) element on the other hand will pop the last element from the stack.

#pop operation
def pop(self):
if self.stack == [ ]:
print("Unbalanced Paranthesis")
else:
self.stack.pop( )

Step 4

Defining the function to do the analysis

We will now write the code to analyze the string.
In this function we will perform the following steps:

  • First, we check the length of the expression. A string of balanced parenthesis will always have even number of characters. So, if the length of the expression is divisible by two only then we would move ahead with the analysis. So, an if.. .else loop forms the outer structure of this function.
if len(self.expression)%2 == 0:
             ---- we analyse .......... .
else:
            print("Unbalanced Paranthesis")
  • Now, considering that we have received a length of even number. We can move ahead with analysis and we can write our code in the “if’ block. We will now traverse through the list element by element. If we encounter an opening bracket we will push it onto the stack, if it is not an opening bracket then we check if the element is in the closing bracket list. If yes then we pop the last element from the stack and see if the index of the elements in the opening_brackets and closing_brackets list is of the same bracket. If yes, then there is a match else the list is unbalanced.

Python Interview Questions on Stacks, Queues, and Deque chapter 10 img 2

if element in self.opening_brackets:
                          self.push(element)
elif element in self.closing_brackets:
    x = self.stack.pop( )
        if self.opening_brackets.index(x)== self. 
closing_brackets.index(element):
                print("Match Found")
       else:
               print("Match not found -check prarnthesis")
return;
  • So, the final code will be as follows, to make things easier for the end user, print commands have been added:
class paranthesis_match:
           opening_brackets = ["(","{","["]


closing_orackets = [")","}","]"}


#declare constructor
def__init__(self, expression):
    self-expression = expression
    self.stack = [ ]


#push operation
def push(self,element):
          self.stack.append(element)


#pop operation
def pop(self):
       if self.stack == [ ]:
                  print ("Unbalanced Paranthesis")
    else:
         self.stack.pop( )
def is_match(self):
       print ("expression is = ", self.expression)
       if len (self.expression)%2 == 0:
            for element in self-expression:
                       print("evaluating ", element)
                      if element in self.opening_brackets:
                     print("it is an opening bracket - ", element, "pushing to stack")

                     self.push(element)
                     print("pushed", element, " on to stack the stack is ", self.stack)
                  elif element in self. closing_brackets:
                 x = self.stack.pop( )
                print("time to pop element is ", x)
                       if self.opening_brackets.
index(x)== self.closing_brackets.index(element):
                       print("Match Found")
              else:
print("Match not found - check prarnthesis")
return;
else :
print("Unbalanced Paranthesis")

Execution

pm = paranthesis match("( [{ }])") 
pm.is_match( )

Output

expression is = ([{ }])
evaluating (
it is an opening bracket - ( pushing to stack pushed ( on evaluating to stack the [ stack is [ ' ( ' ]
evaluating [
it is an opening bracket - [ pushing to stack pushed [ on to stack the stack is [ ' ( ' , ' [ ']
evaluating {
it is an opening bracket - { pushing to stack pushed { on to stack the stack is [ ' ( ' , ' ] ' , ' { ' ]
evaluating }
time to pop element is {
Match Found
evaluating ]
time to pop element is [
Match Found
evaluating )
time to pop element is (
Match Found

Queue

A queue is a sequence of objects where elements are added from one end and removed from the other. The queues follow the principle of first in first out. The removal of items is done from one end called the Front and the items are removed from another end that’s referred to as the rear. So, just as in the case of any queue in real life, the items enter the queue from the rear and start moving towards the front as the items are removed one by one.

So, in Queue the item at the front is the one that has been in the sequence for the longest and the most recently added item must wait at the end. The insert and delete operations are also called en queue and de queue.

Basic Queue functions are as follows:

  • enqueue(i): Add element “i” to the queue.
  • dequeue( ): Removes the first element from the queue and returns its value.
  • isEmpty( ): Boolean function that returns “true” if the queue is empty else it will return false.
  • size( ): Returns length of the queue.

Python Interview Questions on Stacks, Queues, and Deque chapter 10 img 3

Question 3.
Write a code for implementation of Queue.
Answer:
The implementation of the queue is as follows: Step1
Define the class
class Queue:
Step 2
Define the constructor
Here, we initialize an empty list queue:

def__init__(self):
self.queue =[ ]

Step 3
Define isEmpty( ) function

As the name suggests, this method is called to check if the queue is empty or not. The function check the queue. If it is empty, it prints a message – Queue is Empty or else it will print a message – Queue is not Empty

def isEmpty(self):
          if self.queue ==[ ]:
               print("Queue is Empty")
       else:
           print("Queue is not Empty")

Step 4

Define enqueue( ) function

This function takes an element as parameter and inserts it at index “0”. All elements in the queue shift by one position.

def enqueue(self,element):
self.queue.insert(0, element)

Step 5

Define dequeue( ) function
This function pops the oldest element from the queue.

def dequeue(self):
self.queue.pop( )

Step 6

Define size ( ) function

This function returns the length of the queue.

def size (self) :
print ("size of queue is",len(self.queue))

Code

class Queue:
      def__init__(self):
          self.queue =[ ]
      def isEmpty(self):
          if self.queue ==[ ]:
             print ("Queue is Empty")
      else :
          print("Queue is not empty")
    def enqueue(self,element):
           self.queue.insert(0,element)
    def dequeue(self) :
           self.queue.pop( )
    def size(self):
        print("size of queue is",len(self.queue))

Code Execution

q = Queue ( )
q.isEmpty( )
print("inserting element no.1")
q.enqueue("apple")
print("inserting element no.2")
q.enqueue("banana")
print("inserting element no.3")
q.enqueue("orange")
print("The queue elements are as follows:")
print(q.queue)
print("check if queue is empty?")
q.isEmpty()
print ("remove first element")
q.dequeue()
print("what is the size of the queue?")
q.size ()
print("print contents of the queue")
print(q.queue)

Output

Queue is Empty
inserting element no.1
inserting element no.2
inserting element no.3
The queue elements are as follows:
['orange', 'banana', 'apple'] 
check if queue is empty?
Queue is not empty 
remove first element 
what is the size of the queue? 
size of queue is 2 
print contents of the queue 
['orange', 'banana']

Question 4.
Write a code to implement a stack using a single queue. What is the time complexity for pushful and pop( ) functions?
Answer:
Before implementing the code it is important to understand the logic behind it. The question demands that you make a queue work like a stack. A queue works on the principle of First-In-First-Out whereas a stack works on the principle of Last In First Out.

Python Interview Questions on Stacks, Queues, and Deque chapter 10 img 4

Code

class Stack from Queue:
     def__init__(self):
         
       self.queue =[ ]
def isEmpty(self):
       if self.queue ==[ ]:
           print("Queue is Empty")
      else :
         print("Queue is not empty")
def enqueue(self,element):
         self.queue.insert(0,element)
def dequeue(self):
      return self.queue.pop( )
def size(self):
       print("size of queue is ",len(self.queue))
def pop(self):

for i in range(len(seif.queue)-1):
     x = self.dequeue( )
     print(x)
     self.enqueue(x)
print("element removed is",self.dequeue( ))

Execution -1

sq = Stack_from_Queue( )
sq.isEmpty( )
print("inserting element apple")
sq.enqueue("apple")
print("inserting element banana")
sq.enqueue("banana")
print("inserting element orange")
sq.enqueue("orange" )
print("inserting element 0")
sq.enqueue("0")
print("The queue elements are as follows:")
print (sq. queue)
print ("check if queue is empty?")
sq.isEmpty( )
print("remove the last in element")
sq.pop( )
print(sq.queue)

Output -1

Queue is Empty 
inserting element apple 
inserting element banana 
inserting element orange 
inserting element 0 
The queue elements are as follows: 
['O', 'orange', 'banana', 'apple'] 
check if queue is empty?
Queue is not empty
remove the last in element
apple
banana
orange
element removed is 0 
['orange', 'banana', 'apple']

Execution – II

sq = Stack_from_Queue ( )
sq.isEmpty ( )
print("inserting element apple")
sq.enqueue("apple")
print("inserting element banana")
sq.enqueue("banana")
print("inserting element orange")
sq.enqueue("orange")
print("inserting element 0")
sq.enqueue("0")
for i in range(len(sq.queue)):
     print("The queue elements are as follows:") 
     print(sq.queue)
     print("check if queue is empty?")
     sq.isEmpty()
     print("remove the last in element")

print(sq.queue)

Output -II

Queue is Empty
inserting element apple
inserting element banana
inserting element orange
inserting element 0
The queue elements are as follows:
['O', 'orange', 'banana', 'apple']
check if queue is empty?
Queue is not empty
remove the last in element
apple
banana
orange
element removed is 0
['orange', 'banana', 'apple']
The queue elements are as follows:
['orange', 'banana', 'apple']
check if queue is empty?
Queue is not empty
remove the last in element
apple
banana
element removed is orange
[ 'banana', 'apple']
The queue elements are as follows:
[ 'banana', 'apple']
check if queue is empty?
Queue is not empty
remove the last in element
apple
element removed is banana
['apple']
The queue elements are as follows:
['apple']
check if queue is empty?
Queue is not empty
remove the last in element
element removed is apple
[ ]
>>>

Time complexity for push( ) and pop( ) function is O(1)
Time complexity for push is O(1).
Time complexity for pop is O(n) because we have to iterate through the
loop and rearrange elements before retrieving the element.

Question 5.
How can a queue be implemented using two stacks?
Answer:
Step 1:
Create a basic Stack( ) class with push( ), pop( ), and isEmpty( ) functions.

class Stack:
    def__init__(self) :
self.stack = [ ]

def push(self,element):
     self.stack.append(element)

def pop(self):
      return self.stack.pop( )
def isEmpty(self):
      return self.stack == [ ]

Step 2:

Define the Queue class

class Queue:

Step 3:

Define the constructor

Since the requirement here is of two stacks, we initialize two stack objects.

def__init__(self) :
self.inputStack = Stack( )
self.outputStack = Stack( )

Step 4:

Define the enqueue function

This function will push the elements into the first stack.

def enqueue(self,element):
self.inputStack.push(element)

Step 5:

Define the dequeue( ) function

This function checks if the output stack is empty or not. If it is empty then elements will be popped out from the input stack one by one and pushed into the output stack, so that the last element is the first one to be out. However, if the output stack is not empty, then the elements can be popped directly from it.

Now suppose we insert 4 values: 1,2,3,4 calling the en queue function. Then the input stack would be like this:

Python Interview Questions on Stacks, Queues, and Deque chapter 10 img 5

When we call the dequeue function, the elements from the input stack are popped and pushed one by one onto the output stack till we reach the last element and that last element is popped from the input stack and returned. If the output stack is not empty then it means that it already has elements in the right order and they can be popped in that order.

Python Interview Questions on Stacks, Queues, and Deque chapter 10 img 6

def dequeue(self):
      #if not self.inputStack.isEmpty( ):
      if self.outputStack.isEmpty( ):
              for i in range(len(self.inputStack.
stack)-1):
             x = self.inputStack.pop( )
             self.outputStack.push(x)
          print("popping out value =", self. inputStack.pop( ))
      else:
          print("popping out value =", self. 
outputStack.pop( ))

Code

class Queue:
    def__init__(self):
      self . inputStack = Stack( )
      self . outputStack = Stack( )
   def enqueue(self,element):
         self.inputStack.push(element)
   def dequeue(self):
           if self.outputStack.isEmpty( ):
                 for i in range(len(self.inputStack.stack)-1):
        x = self.inputStack.pop( )
        self.outputStack.push(x)
      print("popping out value , self. inputStack.pop( ))
   else:
          print("popping out value =", self. 
outputStack.pop( ))

#Define Stack Class
class Stack:
   def__init__(self):
       self.stack = [ ]
def push(self,element):
   
self.stack.append(element)

   def pop(self):

  return self.stack.pop( )

def isEmpty(self):
    return self.stack == [ ]

Execution

Q = Queue( )
print("insert value 1")
Q.enqueue(1)
print("insert value 2")
Q.enqueue(2)
print("insert value 3")
Q.enqueue(3)
print("insert value 4")
Q.enqueue(4)
print("dequeue operation")
Q.dequeue( )
Q.dequeue( )
print("insert value 1")
Q.enqueue(7)
Q.enqueue(8)
Q.dequeue( )
Q.dequeue( )
Q.dequeue( )
Q.dequeue( )

Output

Q = Queue( )
print("insert value 1")
Q.enqueue(1)
print ("insert value 2")
Q.enqueue(2)
print ("insert value 3")
Q.enqueue(3)
print("insert valu? 4")
Q.enqueue(4)
print("dequeue operation")
Q.dequeue()
Q.dequeue()
print("insert value 1")
Q.enqueue(7)
Q.enqueue(8)
Q.dequeue( )
Q.dequeue( )
Q.dequeue( )
Q.dequeue( )

Deques

A deque is more like a queue only that it is double-ended. It has items positioned in the ordered collection and has two ends, the front, and the rear. A deque is more flexible in nature in the sense that the elements can be added or removed from the front or rear. So you get the qualities of both stack and queue in this one linear data structure.

Python Interview Questions on Stacks, Queues, and Deque chapter 10 img 7

Question:
Write a code to implement a deque.
Answer.
Implementation of the deque is easy. If you have to add an element from the rear, you will have to add it at index 0 the same way if you have to add it from the front, call the append( ) function. Similarly, if you have to remove the front call pop( ) function and if you want to pop it from the rear call pop(o).

Code

class Deque:
   def__init__(self):
       self.deque =[ ]
   def addFront(self,element):
       self.deque.append(element)
       print("After adding from front the deque value is : ", self.deque)
   def addRear(self,element):
        self.deque.insert(0,element)

           print("After adding from end the deque value is : ", self.deque)
   def removeFront(self):
     self.deque.pop( )
print("After removing from the front the deque value is : ", self.deque)
     def removeRear(self):
self.deque.pop(0)
            print("After removing from the end the deque value is : ", self.deque)

Execution

D = Deque()
print("Adding from front")
D.addFront(1)
print("Adding from front")
D.addFront(2)
print("Adding from Rear")
D.addRear(3)
print("Adding from Rear")
D.addRear(4)
print("Removing from Front")
D.removeFront()
print("Removing from Rear")
D.removeRear( )

Output

After adding from front the deque value is : [1]
After adding from the front the deque value is : [1, 2]
After adding from the end the deque value is : [3, 1,2]
After adding from the end the deque value is : [4, 3,1, 2]
After removing from the front the deque value is : [4, 3, 1] 
After removing from the end the deque value is : [3, 1]
>>>

Python Interview Questions on Stacks, Queues, and Deque Read More »

Python Interview Questions on Linked List

We have compiled most frequently asked Python Interview Questions which will help you with different expertise levels.

Python Interview Questions on Linked List

A linked list is a linear structure that consists of elements such that each element is an individual object and contains information regarding:

  1. Data
  2. Reference to next element

In the linked list, each element is called a node.

Python Interview Questions on Linked List chapter 11 img 3

You can see in the diagram, the reference to the first node is called Head. It is the entry point of the linked list. If the list is empty then the head points to null. The last node of the linked list refers to null.

As the number of nodes can be increased or decreased as per requirement, linked lists are considered to be dynamic data structures. However, in a linked list direct access to data is not possible. Search for any item that starts from- the head and you will have to go through each reference to get that item. A linked list occupies more memory.

The linked list described above is called a singly linked list. There is one more type of linked list known as a doubly-linked list. A double-linked list has a reference to the next node and the previous node.

Python Interview Questions on Linked List chapter 11 img 4

Question 1.
Write a code to implement a Node class such that a Node contains data as well as a reference to the next node.
Answer:
To create a node object we pass data value to the constructor. The constructor assigns the data value to data and sets the node’s reference to None. Once we create all the objects we assign the memory address of the second object as the reference to the first node object, the memory address of the third object is assigned as a reference to the second object, and so on. The last object, thus have no(or none as) reference.

The code for the Node class will be as follows:

Code

class Node:
        def__init__(self,data = None):
            self . data = data
            self . reference = None
objNode1 = Node(1)
objNode2 = Node(2)
objNode3 = Node(3)
objNode4 = Node(4)
objNode1 . reference = objNode2
objNode2 . reference = objNode3
objNode3 . reference = objNode4
objNode4 . reference = None

Execution

print("DATA VALUE = ",objNodel.data,"REFERENCE = ",objNodel.reference)
print("DATA VALUE = ",objNode2.data,"REFERENCE = ",objNode2.reference)
print("DATA VALUE = ",objNode3.data,"REFERENCE = ",objNode3.reference)
print("DATA VALUE = ",objNode4.data,"REFERENCE = ”,objNode4.reference)

Output

DATA VALUE = 1 REFERENCE = <_main_. Node object
at 0x000000595E0CC6A0>
DATA VALUE = 2 REFERENCE =<_main_ .Node object
at 0x000000595E329978>
DATA VALUE = 3 REFERENCE = <_main_ .Node object
at 0x000000595E3299B0>
DATA VALUE = 4 REFERENCE = None
>>>

Question 2.
Write code to traverse through a linked list.
Answer:
Method I
We have already written the code for the Node class:

class Node:
      def _init_ (self,data = None):
          self.data = data
          self.reference = None

objNode1 = Node(1)
objNode2 = Node(2)
objNode3 = Node(3)
objNode4 = Node(4)

We will now see how to traverse through the linked list:

Step 1
We create a variable presentNode and assign the first object to it.

presentNode = objNode1

On doing this presentNode gets the data and reference values of objectNode1.
Step 2
The reference value points to objNode2.
So, we can write a while loop:

while presentNode:
print("DATA VALUE = ",presentNode.data)
presentNode = presentNode.reference

Once the presentNode is assigned, the reference value contained in objNode4 it will come out of the while loop because the value of reference is None.

Code

class Node:
       def_init_(self,data = None):
           self.data = data
           self.reference = None

Execution

objNode1 = Node(1)
objNode2 = Node(2)
objNode3 = Node(3)
objNode4 = Node(4)
objNodel.reference = objNode2
objNode2.reference = objNode3
objNode3.reference = objNode4
objNode4.reference = None
presentNode = objNode1
while presentNode:
    print("DATA VALUE = ",presentNode.data)
    presentNode = presentNode.reference

Output

DATA VALUE = 1
DATA VALUE = 2
DATA VALUE = 3
DATA VALUE = 4

Method II
Another method to do this by creating two classes: Node and Linked list
Code

class Node:
      def_init_(self,data = None):
          self.data = data
          self.reference = None
class Linked_list:
     def_init_(self):
        self.head = None 
     def traverse(self) :
           presentNode = self.head
           while presentNode:
                  print("DATA VALUE = ",presentNode.data)
                  presentNode = presentNode.reference

Execution

objNode1 = Node(1)
objNode2 = Node(2)
objNode3 = Node(3)
objNode4 = Node(4)
linkObj = Linked_list( )
#head of the linked list to first object
linkObj.head = objNodel
# reference of the first node object to second object

linkObj.head.reference = objNode2
objNode2.reference = objNode3
objNode3.reference = objNode4
linkObj.traverse ( )

Output

DATA VALUE = 1
DATA VALUE = 2
DATA VALUE = 3
DATA VALUE = 4

Question 3.
Write a code to add a node at the beginning of a linked list.
Answer:
To solve this question, we will just add a new method to insert the node in the same code that is mentioned in the last example:
In the last example, we pointed the head of the linked list object to the first node object.

linkObj.head = objNode1

When we add the node at the beginning we just have to make the linkObj.
head = new_node and new node.reference = obj_Node1.

For this, we write a code where the value of the linkObj.head is first passed on to the new node. reference and then linkObj.head is set to the new node object.

def insert_at_Beginning(self, data) :
new_data = Node(data)
new_data.reference = self.head
self.head = new_data

So, the full code would be like the following:

Code

class Node:
     def_init_(self,data = None):
          self.data = data
          self.reference = None
class Linked_list:
   def_init_(self) :
         self.head = None
  def traverse(self):
       presentNode = self.head
       while presentNode:
            print("DATA VALUE = ",presentNode.data)
            presentNode = presentNode.reference
 def insert_at_Beginning(self, data) :
       new_data = Node(data)
       new_data.reference = self.head
       self.head = new data

Execution

objNode1 = Node(l1)
objNode2 = Node(2)
objNode3 = Node(3)
objNode4 = Node(4)
linkObj = Linked_list( )
#head of the linked list to first object
linkObj.head = objNode1
# reference of the first node object to second object
linkObj.head.reference = objNode2
objNode2.reference = objNode3
objNode3.reference = objNode4
linkObj.insert_at_Beginning(5)
linkObj.traverse ( )

Output

DATA VALUE = 5
DATA VALUE = 1
DATA VALUE = 2
DATA VALUE = 3
DATA VALUE = 4

Question 4.
Write a code to add a node at the end of a linked list.
Answer.
In order to add a node at the end of the linked list, it is important that you point the reference of the last node to the new node that you create.
Step 1:

Define the function

def insert_at_end(self,data):

Step 2:

Create a new Node object

new_data = Node(data)

Step 3:

Traverse through the linked list to reach the last node
Remember that you cannot directly access the last node in the linked list. You will have to traverse through all the nodes and reach the last node in order to take the next step.

presentNode = self.head
             while presentNode.reference != None:
                   presentNode = presentNode.reference

Step 4:

Add the new node at the end

After traversing through the linked list, you know that you have reached the last node whenpresentNode.reference = None. Since this won’t remain the last node anymore, you need to:

presentNode.reference = new_data

With this, we have added a new node at the end of a linked list.

Code

class Node:
    def_init_(self,data = None):
          self.data = data
          self.reference = None
class Linked_list:
   def_init_(self):
         self.head = None
   def traverse(self):
       presentNode = self.head
       while presentNode:
             print("DATA VALUE = ",presentNode.data)
             presentNode = presentNode.reference
  def insert_at_end(self,data):
      new_data = Node(data)
      presentNode = self.head
      while presentNode.reference != None:
          presentNode = presentNode.reference
      presentNode.reference = new_data

Execution

objNode1 = Node(1)
objNode2 = Node(2)
objNode3 = Node(3)
objNode4 = Node(4)
linkObj = Linked_list( )
#head of the linked list to first object
linkObj.head = objNode1
# reference of the first node object to second object
linkObj.head.reference = objNode2
objNode2.reference = objNode3
objNode3.reference = objNode4
linkObj.insert_at_end(5)
linkObj.insert_at_end(6)
linkObj.insert_at_end(7)
linkObj.traverse( )

Output

DATA VALUE = 1
DATA VALUE = 2
DATA VALUE = 3
DATA VALUE = 4
DATA VALUE = 5
DATA VALUE = 6
DATA VALUE = 7

Question 5.
Write a code to insert a node between two nodes in a linked list.
Answer:
The solution for this problem is very similar to adding a node to the beginning. The only difference is that when we add a node at the beginning we point the head value to the new node whereas in this case, the function will take two parameters. First will be the node object after which the new object will be inserted and the second would be the data for the new object. Once the new node is created, we pass on the reference value stored in the existing node object to it and the existing node is then made to point at the new node object

Step 1:

Define the function

This function will take two parameters:

  1. The node object after which the data is to be inserted.
  2. Data for the new node object.
def insert_in_middle(self,insert_data,new_data):

Step 2:
Assign references

new_node = Node(new_data)
new_node.reference = insert_data.reference insert_data.reference = new_node

Code

class Node:
      def_init_(self,data = None):
               self.data = data
               self.reference = None
class Linked_list:
def_init_(self):
self.head = None
def traverse(self):
presentNode = self.head
while presentNode:
                    print("DATA VALUE = ",presentNode.data)
                    presentNode = presentNode.reference


def insert_in_middle(self,insert_data,new_data):
                 new_node = Node(new_data)
                new_node.reference = insert_data.reference insert_data.reference = new_node

Execution

objNode1 = Node(1)
objNode2 = Node(2)
objNode3 = Node(3)
objNode4 = Node(4)
linkObj = Linked_list()
#head of the linked list to first object
linkObj.head = objNodel
# reference of the first node object to second object
linkObj.head.reference = objNcde2

objNode2.reference = objNode3
objNode3.reference = objNode4
linkObj.insert_in_middle(objNode3,8)
linkObj.traverse ( )

Output

DATA VALUE = 1
DATA VALUE = 2
DATA VALUE = 3
DATA VALUE = 8
DATA VALUE = 4
>>>

Question 6.
Write code to remove a node from a linked list.
Answer:
Suppose we have a linked list as shown below:
A -> B -> C
A. reference = B
B. reference = C
C. reference = A.
To remove B, we traverse through the linked list. When we reach node A that has a reference pointing to B, we replace that value with the reference value stored in B(that points to C). So that will make A point to C and B is removed from the chain.
The function code will be as follows:

def remove(self,removeObj):
 presentNode = self.head
  while presentNode:
    if(presentNode.reference == removeObj):
       presentNode.reference = removeObj.reference
           presentNode = presentNode.reference

The function takes the Node object as a parameter and traverses through the linked list, till it reaches the object that needs to be removed. Once we reach the node that has reference to the node that has to be removed, we simply change the reference value to reference value stored in object removeobj. Thus, the node now points directly to the node after the removeObj.

Code

class Node:
  def_init_(self,data = None):
           self.data = data
           self.reference = None
class Linked_list:
  def_init_(self) :
         self.head = None
  def traverse(self):
          presentNode = self.head
          while presentNode:
             print("DATA VALUE = ",presentNode.data)
             presentNode = presentNode.reference


def remove(self,removeObj):
      presentNode = self.head
       while presentNode:
             if(presentNode.reference == removeObj):
             presentNode.reference = removeObj.
reference
             presentNode = presentNode.reference

Execution

objNode1 = Node(1)
objNode2 = Node(2)
objNode3 = Node(3)
objNode4 = Node(4)
linkObj = Linked_list( )
#head of the linked list to first object
linkObj.head = objNode1
# reference of the first node object to second object
linkObj.head.reference = objNode2
objNode2.reference = objNode3
objNode3.reference = objNode4
linkObj.remove(objNode2)
linkObj.traverse( )

Question 7.
Print the values of the node in the center of the linked list.
Answer:
This involves counting the number of nodes in the object. If the length is even then the data of two nodes in the middle should be printed else only the data of the node in the center should be printed.

Step 1:

Define the function

def find_middle (self, 1list) :

Step 2:

Find the length of the counter

Here, we set a variable counter = 0. As we traverse through the linked list we increment the counter. At the end of the while loop we get the count of the number of nodes in the linked list. This is also the length of the linked list.

counter = 0
          presentNode = self.head
          while presentNode:
                 presentNode = presentNode.reference
                  counter = counter + 1 .
          print("size of linked list = ", counter)

Step 3:

Reach the middle of the linked list

The reference to the node in the middle is stored in the node before that. So, in the for loop instead of iterating (counter/2) times, we iterate (counter-1)/2 times. This brings us to the node which is placed just before the centre value.

presentNode = self.head
for i in range((counter-1)112) :
presentNode = presentNode.reference

Step 4:

Display the result depending on whether the number of nodes in the linked list

If the linked list has an even number of nodes then print the value of reference stored in the present node and the next node.

if (counter%2 == 0):
                nextNode = presentNode.reference
                print ("Since the length of linked list is an even number the two midle elements are:")
                print(presentNode.data,nextNode.data)

Else, print the value of the present node.

else: 
                print("Since the length of the linked list is an odd number, the middle element is: ")
             print(presentNode.data)

Code

class Node:
     def_init_(self,data = None):
           self.data = data
           self.reference = None
class Linked_list:
    def_init_(self):
          self.head = None
def find_middle (self, Hist) :
     counter = 0
     presentNode = self.head
    while presentNode:
         presentNode = presentNode.reference
         counter = counter + 1
    print ("size of linked list = ", counter)
    presentNode = self.head
    for i in range((counter-1)112) :
        presentNode = presentNode.reference
   if (counter%2 == 0) : 
          nextNode = presentNode.reference
          print("Since the length of linked list is an even number the two midle elements are:")
         print(presentNode.data,nextNode.data)


     else:
            print("Since the length of the linked list is an odd number, the middle element is: ")
           print(presentNode.data)

Execution (Odd Number of Nodes)

objNode1 = Node(1)
objNode2 = Node(2)
objNode3 = Node(3)
objNode4 = Node(4)
objNode5 = Node(5)
linkObj = Linked_list( )
#head of the linked list to first object
linkObj.head = objNode1
# reference of the first node object to second object
linkObj.head.reference = objNode2
objNode2.reference = objNode3
objNode3.reference = objNode4
objNode4.reference = objNode5
linkObj .find_middle (linkObj )

Output

size of linked list = 5
Since the length of the linked list is an odd 
number, the middle element is:
3

Execution (Even Numbers)

objNode1 = Node(1)
objNode2 = Node(2)
objNode3 = Node(3)
objNode4 = Node(4) 
linkObj = Linked_list( )
#head of the linked list to first object
linkObj.head = objNodel
# reference of the first node object to second object
linkObj.head.reference = objNode2
objNode2.reference = objNode3
objNode3.reference = objNode4
linkObj .find_middle (linkObj )

Output

size of linked list = 4
Since the length of the linked list is an even number the two middle elements are:
2  3

Question 8.
Implement a doubly linked list.
Answer:
A doubly linked list has three parts:

  1. Pointer to the previous node
  2. Data
  3. Pointer to the next node

Implementation of a doubly linked list is easy. We just need to take care of one thing that each node is connected to the next and the previous data.

Step 1:

Create a Node Class

The node class will have a constructor that initializes three parameters: data, reference to next node – refNext and reference to previous node – refPrev.

class Node:
          def_init_(self,data = None):
              self.data = data
              self.refNext = None
              self.refPrev = None

Step 2:

Create functions to traverse through the double linked list

I. Traverse Forward

To: traverse forward with the help of refNext that points to next value of the linked list. We start with the head and move on to the next node using
refNext.

def traverse(self):
presentNode = self.head
while presentNode:
print("DATA VALUE = ",presentNode.data)
presentNode = presentNode.refNext

II. Traverse Reverse

The traverse reverse is the opposite of the traverse forward. We are able to traverse backward with the help of the value of refPrev because it points to the previous node. We start from the tail and move on to the previous node using
refPrev.

def traverseReverse(self):
presentNode = self.tail
while presentNode:
        print("DATA VALUE = ",presentNode.data)
         presentNode = presentNode.refPrev

Step 3:

Write a function to add a node at the end

Appending a node at the end of the doubly linked list is the same as appending in the linked list the only difference is that we have to ensure that the node that is appended has its refPrev pointing to the node after which it has been added.

def append(self,data):
new_data = Node(data)
presentNode = self.head
while presentNode.refNext != None:
presentNode = presentNode.refNext
presentNode.refNext = new_data
new_data.refPrev = presentNode

Step 4:

Write a function to remove a node

This function takes the node object that needs to be removed as a parameter. In order to remove a node, we iterate through the doubly linked list twice. We first start with the head and move forward using refNext and when we encounter the object that needs to be removed we change the refNext value of the present node (which is presently pointing to the object that needs to be removed) to the node that comes after the object that needs to be removed. We then traverse through the linked list backward starting from the tail and when we encounter the object to be removed again we change the refPrev value of the present node to the node that is placed before it.

def remove(self,removeObj):
presentNode = self.head
presentNodeTail = self.tail
while presentNode.refNext != None:
     if(presentNode.refNext == removeObj):
          presentNode.refNext = removeObj.refNext
     presentNode = presentNode.refNext
 while presentNodeTail.refPrev != None:
    if(presentNodeTail.refPrev == removeObj):
        presentNodeTail.refPrev = removeObj.
refPrev
      presentNodeTail = presentNodeTail.refPrev

Code

class Node:
  def_init_(self,data = None):
      self.data = data
      self.refNext = None
      self.refPrev = None
class dLinked_list:
 def_init_(self)':
      self.head = None
      self.tail = None
def append(self, data) :
    new_data = Node(data)
    presentNode = self.head
    while presentNode.refNext != None:
         presentNode = presentNode.refNext
        presentNode.refNext = new_data
        new_data.refPrev = presentNode
       self.tail = new data


def traverse(self):
     presentNode = self.head
     while presentNode:
        print("DATA VALUE = ",presentNode.data)
        presentNode = presentNode.refNext


def traverseReverse(self):
    presentNode = self.tail
    while presentNode:
          print("DATA VALUE = ",presentNode.data)
          presentNode = presentNode.refPrev
def remove(self,removeObj):
    presentNode = self.head
    presentNodeTail = self.tail
    while presentNode.refNext != None:
       if (presentNode.refNext == removeObj):
           presentNode.refNext = removeObj.
refNext
          presentNode = presentNode.refNext
   while presentNodeTail.refPrev != None:
          if (presentNodeTail.refPrev ==
removeObj):
         presentNodeTail.refPrev = removeObj.
refPrev
        presentNodeTail = presentNodeTail.
refPrev

Execution

objNode1 = Node(1)
objNode2 = Node(2)
objNode3 = Node(3)
ObjNode4 = Node(4)
dlinkObj = dLinked_list( )
#head of the linked list to first object
dlinkObj.head = objNode1
dlinkObj.tail = objNode4
# reference of the first node object to second object
dlinkObj.head.refNext = objNode2
dlinkObj.tail.refPrev = objNode3
objNode2.refNext = objNode3
objNode3.refNext = objNode4
objNode4.refPrev = objNode3
objNode3.refPrev = objNode2
objNode2.refPrev = objNode1
print("Appending Values")
dlinkObj.append(8)
dlinkObj.append(9)
print("traversing forward after Append")
dlinkObj.traverse( )
print("traversing reverse after Append")
dlinkObj.traverseReverse( )
print("Removing Values")
dlinkObj.remove(objNode2)
print("traversing forward after Remove")
dlinkObj.traverse( )
print("traversing reverse after Remove")
dlinkObj.traverseReverse( )

Output

objNode1 = Node(1)
objNode2 = Node(2)
objNode3 = Node(3)
objNode4 = Node(4)
dlinkObj = dLinked_list( )
#head of the linked list to first object
dlinkObj.head = objNode1
dlinkObj.tail = objNode4
# reference of the first node object to second object
dlinkObj.head.refNext = objNode2
dlinkObj.tail.refPrev = objNode3
objNode2.refNext = objNode3
objNode3.refNext = objNode4
objNode4.refPrev = objNode3
objNode3.refPrev = objNode2
objNode2.refPrev = objNode1
print("Appending Values")
dlinkObj.append(8)
dlinkObj.append(9)
print("traversing forward after Append")
dlinkObj.traverse( )
print("traversing reverse after Append")
dlinkObj.traverseReverse( )
print("Removing Values")
dlinkObj.remove(objNode2)
print("traversing forward after Remove")
dlinkObj.traverse( )
print("traversing reverse after Remove")
dlinkObj.traverseReverse( )

Question 9.
Write code to reverse a linked list.
Answer:
To reverse a linked list we have to reverse the pointers. Look at the figure shown below. The first table shows how information is stored in the linked list. The second table shows how the parameters are initialized in the reverse( ) function before beginning to traverse through the list and reversing the elements.

Python Interview Questions on Linked List chapter 11 img 1

We then use the following while loop:

while nextval != None:
presentNode.refNext = previous
previous = presentNode
presentNode = nextval
nextval = nextval.refNext
presentNode.refNext = previous
self.head = presentNode

This is how the while loop works:

Python Interview Questions on Linked List chapter 11 img 2

You can see as we iterate through the while loop how the values of presentnode.refNext change. Node1 that was earlier pointing to node2 changes its pointer to none. Same way node2 changes its pointer value to node1, and so on.
Code

class Node:
def_init_(self,data = None):
      self.data = data
      self.refNext = None
class Linked_list:
     def init (self) :
     self.head = None


def reverse(self):
     previous = None
     presentNode = self.head
     nextval = presentNode.refNext
     while nextval != None:
           presentNode.refNext = previous
           previous = presentNode
           presentNode = nextval
           nextval = nextval.refNext
    presentNode.refNext = previous
    self.head = presentNode
def traverse(self) :
    presentNode = self.head
   while presentNode:
     print("DATA VALUE = ",presentNode.data)
     presentNode = presentNode.refNext

Execution

objNode1 = Node(1)
objNode2 = Node(2)
objNode3 = Node(3)
objNode4 = Node(4)
linkObj = Linked_list( )
#head of the linked list to first object
linkObj.head = objNode1
# reference of the first node object to second object
linkObj.head.refNext = objNode2
obj'Node2 . refNext = objNode3
objNode3.refNext = objNode4
print("traverse before reversing")
linkObj.traverse( )
linkObj.reverse( )
print("traverse after reversing")
linkObj.traverse( )

Output

traverse before reversing
DATA VALUE = 1
DATA VALUE = 2
DATA VALUE = 3
DATA VALUE = 4
traverse after reversing
DATA VALUE = 4
DATA VALUE = 3
DATA VALUE = 2
DATA VALUE = 1

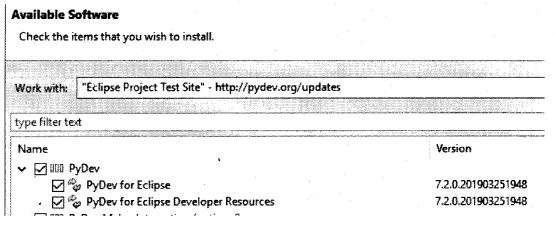


Python Interview Questions on Linked List Read More »

Python Interview Questions on User Defined Functions

We have compiled most frequently asked Python Interview Questions which will help you with different expertise levels.

Python Interview Questions on User Defined Functions

While going through the chapter on standard data types you have learned about several inbuilt defined by functions. These functions already exist in Python libraries. However, programming is all about creating your own functions that can be called at any time. A function is basically a block of code that will execute only when it is called. To define a function we use the keyword def as shown in the following code:

def function_name ( ):
    to do statements

So, let’s define a simple function:

def new_year_greetings( ) :
    print("Wish you a very happy and properous new year")
new_year_greetings( )

The new_year_greetings( ) function is a very simple function that simply displays a new year message when called.

You can also pass a parameter to a function. So, if you want the function new_year_greetings( ) to print a personalized message, we may want to consider passing a name as a parameter to the function.

def new_year_greetings(name):
print("Hi ", name.upper(),"! ! Wish you a very happy and prosperous new year")
name = input("Hello!! May I know your good name please: ")
new_year_greetings(name)

The output for the code given above would be as follows:

Hello!! May I know your good name please: Jazz
Hi JAZZ !! Wish you a very happy and prosperous new year
>>>

Indentation is very important. In order to explain, let’s add another print statement to the code.

def new_year_greetings (name) :
print("Hi ", name.upper(),"! ! Wish you a very !
happy and prosperous new year")
print("Have a great year")
name = input("Hello!! May I know your good name please: ")
new_year_greetings(name)

So, when the function is called, the output will be as follows:

Hello!! May I know your good name please: Jazz
Hi JAZZ !! Wish you a very happy and properous new year
Have a great year

Improper indentation can change the meaning of the function: ;

def new_year_greetings(name):
print("Hi ", name.upper( ),"! ! Wish you a very happy and properous new year")
print("Have a great year")

In the code given above the second print, the statement will be executed even if the function is not called because it is not indented properly and it is no more part of the function. The output will be as follows:

Have a great year

Multiple functions can also be defined and one function can call the other.

def new_year_greetings(name):
print("Hi ", name.upper( ),"!! Wish you a very happy and properous new year")
extended_greetings( )
def extended_greetings( ):
print("Have a great year ahead") name = input ("Hello! !' May I know your good name please: ")
new-_year_greetings (name)

When a new year greeting ( ) a message is printed and then it calls the extended_greetings( ) function which prints another message.

Output

Hello!! May I know your good name please: Jazz
Hi JAZZ !! Wish you a very happy and properous new year
Have a great year ahead

Multiple parameters can also be passed to a function.

def new_year_greetings(name1,name2):
print("Hi ",namel," and ",name2,"!! Wish you a very happy and properous new year")
extended_greetings( )
def extended_greetings( ):
print("Have a great year ahead") new_year_greetings("Jazz","George")

The output will be as follows:

Hi Jazz and George !! Wish you a very happy and properous new year Have a great year ahead

Question 1.
What are the different types of functions in Python?
Answer:
There are two types of functions in Python:

  1. Built-in functions: library functions in Python
  2. User-defined functions: defined by the developer

Question 2.
Why are functions required?
Answer:
Many times in a program a certain set of instructions may be called again and again. Instead of writing the same piece of code where it is required it is better to define a function and place the code in it. This function can be called whenever there is a need. This saves time and effort and the program can be developed easily. Functions help in organizing coding work and testing of code also becomes easy.

Question 3.
What is a function header?
Answer:
The first line of function definition that starts with def and ends with a colon (:) is called a function header.

Question 4.
When does a function execute?
Answer:
A function executes when a call is made to it. It can be called directly from the Python prompt or from another function.

Question 5.
What is a parameter? What is the difference between a parameter and an argument?
Answer:
A parameter is a variable that is defined in a function definition whereas an argument is an actual value that is passed on to the function. The data carried in the argument is passed on to the parameters. An argument can be passed on as a literal or as a name.

def function_name(param):

In the preceding statement, param is a parameter. Now, take a look at the statement given below, it shows how a function is called:

function_name(arg):

arg is the data that we pass on while calling a function. In this statement arg is an argument.
So, a parameter is simply a variable in method definition and an argument is the data passed on the method’s parameter when a function is called.

Question 6.
What is a default parameter?
Answer:
The default parameter is also known as the optional parameter. While defining a function if a parameter has a default value provided to it then it is called a default parameter. If while calling a function the user does not provide any value for this parameter then the function will consider the default value assigned to it in the function definition.

Question 7.
What are the types of function arguments in Python?
Answer:
There are three types of function arguments in Python:
1. Default Arguments: assumes a default value, if no value is provided by the user.

def func(name = "Angel"):
print("Happy Birthday ", name)
func ( )
Happy Birthday Angel

You can see that the default value for the name is “Angel” and since the user has not provided any argument for it, it uses the default value.

2. Keyword Arguments: We can call a function and pass on values irrespective of their positions provided we use the name of the parameter and assign them values while calling the function.

def func(name1, name2):
print("Happy Birthday", name1, " and ",name2,"!!!")

Output:

func(name2 = "Richard",namel = "Marlin")
Happy Birthday Marlin and Richard !!!

3. Variable-length Arguments: If there is uncertainty about how many arguments might be required for processing a function we can make use of variable-length arguments. In the function definition, if a single is placed before the parameter then all positional arguments from this point to the end are taken as a tuple. On the other hand, if “**” is placed before the parameter name then all positional arguments from that point to the end are collected as a dictionary.

def func(*name, **age): print(name)
print(age)
func("Lucy","Aron","Alex", Lucy = "10",Aron ="15",Alex="12")

Output:

('Lucy', 'Aron', 'Alex')
{'Lucy': '10', 'Aron': '15', 'Alex': '12'}

Question 8.
What is a fruitful and non-fruitful function?
Answer:
The fruitful function is a function that returns a value and a non-fruitful function does not return a value. Non-fruitful functions are also known as void functions.

Question 9.
Write a function to find factorial of a number using for loop
Answer:
The code for finding a factorial using for loop will be as follows:
Code

def factorial(number):
j = 1
if number==0|number==1:
print(j)
else:
for i in range (1, number+1):
print (j," * ",i," = ", j * i)
j = j*i
print(j)

Execution

factorial(5)

Output

1 * 1 = 1
1 * 2 = 2
2 * 3 = 6
6 * 4 = 24
24 * 5 = 120
120

Question 10.
Write a function for Fibonacci series using a for loop:
Answer:
Fibonacci series: 0, 1, 1, 2, 3, 5, 8….
We take three variables:
i, j, and k:

  • If i = 0, j =0, k =0
  • If i =1, j =1, k =0
  • If i> 1:

temp =j
j =j+k
k=temp
The calculations are as shown as follows:

IKJ
000
101
20Temp = j = 1

J = j + k = 1+10 = 1

K = temp = 1

31Temp = j = 1

J = j +k = 1 +1 = 2

K = temp = 1

41Temp = j = 2

J = j + k = 2+1 = 3

K = temp = 2

52Temp = j = 3

J = j + k = 3+2 = 5

K = temp = 3

63Temp = j =5

J = j + k = 5+3=8

K = temp = 1

Code

def fibonacci_seq (num) :
i = 0
j = 0
k = 0
for i in range(num):
if i==0:
print(j)

elif i==1:
j = 1
print(j)
else:
temp = j
j = j+k
k = temp
print(j)

Execution

fibonacci_seq (10)

Output

0
1
1
2
3
5
8
13
21
34

Question 11.
How would you write the following code using a while loop?
[Note: You may want to refer to recursion before attempting this question.]

def test_function(i, j) :
if i == 0:
return j;
else:
return test_function(i-1, j+1)
print(test_function(6,7) )

Answer:

def test_function (i,j) :
while i > 0:
i =i- 1
j = j + 1
return j
print(test_function(6, 7) )

Question 12.
Write code for finding the HCF of two given numbers.
Answer:
HCF stands for Highest Common Factor or Greatest Common Divisor for two numbers. This means that it is the largest number within the range of 1 to smaller of the two given numbers that divides the two numbers perfectly giving the remainder as zero.
1. Define a function hcf() that takes two numbers as input.

def hcf(x,y):

2. Find out which of the two numbers is greatest, the other one will be the smallest.

small_num = 0
if x > y:
small_nura = y
else:
small_num = x

Set a for loop for the range 1 to small_num+1. (We take the upper limit as small_num+l because the for loop operates for one number less than the upper limit of the range). In this for loop, divide both the numbers with each number in the range and if any number divides both, perfectly assign that value to have as shown in the following code:

for i in range(1,small_num+1):
if (x % i == 0) and (y % i == 0) :
hcf = i

Suppose, the two numbers are 6 and 24, first both numbers are divisible by 2. So, hcf = 2, then both numbers will be divisible by 3 so, the value of 3 will be assigned to 3. Then the loop will encounter 6, which will again divide both the numbers equally. So, 6 will be assigned to hcf. Since the upper limit of the range has reached, the function will finally have hcf value of 6.
3. Return the value of hcf: return hcf
Code

def hcf (x,y) :
small_num = 0
if x>y:
small_num = y
else:
small_num = x

for i in range (1, small_num+1):
if (x % i ==0) and (y % i ==0):
hcf = i
return hcf

Execution

print (hcf(6,24))

Output

6

Scope of a variable

The scope of a variable can be used to know which program can be used from which section of a code. The scope of a variable can be local or global.
Local variables are defined inside a function and global functions are defined outside a function. Local variables can be accessed only within
the function in which they are defined. A global variable can be accessed throughout the program by all functions.

total = 0 # Global variable
def add(a,b) :
sumtotal = a+b #Local variable
print("inside total = ", total)

Question 13.
What will be the output of the following code?

total = 0
def add(a,b):
global total
total = a+b
print("inside total = ", total)

add(6,7)
print("outside total = ", total)

Answer:
The output will be as follows:

inside total = 13
outside total = 13

Question 14.
What would be the output for the following code?

total = 0
def add(a,b):
total = a+b
print("inside total = ", total)

add(6,7)
print("outside total = ", total)

Answer:

inside total = 13
outside total = 0

Question 15.
Write the code to find HCF using Euclidean Algorithm.
Answer:
The following figure shows two ways to find HCF.
On the left-hand side, you can see the traditional way of finding the HCF.

On the right-hand side is the implementation of the Euclidean Algorithm to find HCF.
Python Interview Questions on User Defined Functions chapter 5 img 1

Code

def hcf(x,y):
small_num = 0
greater_num = 0
temp = 0
if x > y:
small_num = y
greater_num = x
else:
small_num = x
greater_num = y

while small_num > 0:
temp = small_num
small_num = greater_num % small_num
greater_num = temp
return temp

Execution

print("HCF of 6 and 2 4 = ",hcf(6,24))
print("HCF of 400 and 300 = ",hcf(400,300))

Output

HCF of 6 and 24= 6
HCF of 400 and 300 = 100

Question 16.
Write code to find all possible palindromic partitions in a string.
Answer:
The code to find all possible palindromic partitions in a string will involve the following steps:

  1. Create a list of all possible substrings.
  2. Substrings are created by slicing the strings as all possible levels using for loop.
  3. Every substring is then checked to see if it is a palindrome.
  4. The substring is converted to a list of single characters.
  5. In reverse order, the characters from the list are added to a string.
  6. If the resultant string matches the original string then it is a palindrome.

Code

def create_substrings(x):
substrings = [ ]

for i in range(len (x)) :
for j in range(1, len(x)+l):
if x[i:j] != ' ' :
substrings.append(x[i:j])
for i in substrings:
check_palin(i)

def check_palin(x):
palin_str = ' '
palin_list = list(x)
y = len(x)-1
while y>=0:
palin_str = palin_str + palin_list[y]
y = y-1
if(palin_str == x):
print("String ", x," is a palindrome")

Execution

x = ''malayalam"
create_substrings(x)

Output

String m is a palindrome
String malayalam is a palindrome
String a is a palindrome
String ala is a palindrome
String alayala is a palindrome
String 1 is a palindrome
String layal is a palindrome
String a is a palindrome
String aya is a palindrome
String y is a palindrome
String a is a palindrome
String ala is a palindrome
String 1 is a palindrome
String a is a palindrome
String m is a palindrome

Question 17.
What are anonymous functions?
Answer:
Lambda facility in Python can be used for creating a function that has no names. Such functions are also known as anonymous functions. Lambda functions are very small functions that have just one line in the function body, ft requires no return statement.

total = lambda a, b: a + b
total(10,50)
60

Question 18.
What is the use of a return statement?
Answer:
The return statement exits the function and hands back value to the function’s caller. You can see this in the code given below. The function func( ) returns the sum of two numbers. This value assigned to “total” and then the value- of the total is printed.

def func(a,b):
return a+b
total = func(5,9)
print(total)
14

Question 19.
What will be the output of the following function?

def happyBirthday( ):
print("Happy Birthday")
a = happyBirthday() print(a)

Answer:

Happy Birthday
None

Question 20.
What will be the output of the following code?

def outerWishes( ):
global wishes
wishes = "Happy New Year"
def innerWishes():
global wishes
wishes = "Have a great year ahead"
print('wishes =', wishes)
wishes = "Happiness and Prosperity Always"
router wishes( )
print('wishes =', wishes)

Answer:
The output will be as follows:

wishes = Happy New Year

Question 21.
What is the difference between passing immutable and mutable objects as an argument to a function?
Answer:
If immutable arguments like strings, integers, or tuples are passed to a function, the object reference is passed but the value of these parameters cannot be changed. It acts like a pass-by-value call. Mutable objects too are passed by object reference but their values can be changed.

Python Interview Questions on User Defined Functions Read More »

Python Interview Questions on Algorithm Analysis and Big-O

We have compiled most frequently asked Python Interview Questions which will help you with different expertise levels.

Python Interview Questions on Algorithm Analysis and Big-O

Algorithm

An algorithm is a procedure or set of instructions that are carried out in order to solve a problem. Coding demands procedural knowledge which is expressed in the form of algorithms. An algorithm provides a recipe or a roadmap or a simple sequence of instructions that are required to accomplish a particular programming task. So, for things as simple as adding two numbers or as complex as designing a banking program, everything requires a systematic approach. It is important to create a roadmap that makes sense before going ahead with the coding part. For simple programs, it is easy to create algorithms by logical thinking. There are also some famous algorithms that can be used for complex problem solving and hence frequently used for coding.

Question 1.
What are the steps involved in writing an algorithm?
Answer:
There are three main steps involved in writing an algorithm:

1. Data Input

  • Formulate the problem and decide what data types will be the input.

2. Data Processing

  • Decide what computation will be carried off to get the desired result.
  • Also identify the decision points, conditions under which various functions will operate.

3. Results Output

  • One should know the expected results so that they can be verified by the actual results.

Question 2.
What are the characteristics of the Algorithm?
Answer:
An algorithm has the following five characteristics:

  1. Precision: It clearly defines one single starting point and one or more well-defined ending points.
  2. Effectiveness: It is composed of effective primitives that are understood by the person or machine using it.
  3. Input/Output Specified: The algorithm must receive input and it must also produce an output.
  4. Finiteness: An algorithm stops after the execution of a finite number of steps.
  5. Uniqueness: In an algorithm, the result of every step is uniquely defined and its value depends only on the input provided and the output generated by the previous steps.

Question 3.
What is the meaning of Problem solving?
Answer:
Problem-solving is a logical process in which a problem is first broken down into smaller parts that can be solved step by step to get the desired solution.

Question 4.
What would you call an algorithm that puts element lists in a certain order?
Answer:
An algorithm that puts elements of a list in a certain order is called a sorting algorithm. It uncovers a structure by sorting the input. Sorting is often required for optimizing the efficiency of other algorithms. The output of a sorting algorithm is in non-decreasing order where no element is smaller than the original element of the input and the output reorders but retains all the elements of the input which is generally in array form.
Some very commonly known sorting algorithms are as follows:

1. Simple sorts:
a. Insertion sort
b. Selection sort

2. Efficient Sorts:
a. Merge sort
b. Heap sort
c. Quick sort
d. Shell sort

3. Bubble sort

4. Distribution sort
a. Counting sort
b. Bucket sort
c. Radix sort

Question 5.
What type of algorithm calls itself with smaller or simpler input values?
Answer:
A recursive algorithm calls itself with smaller input values. It is used if a problem can be solved by using its own smaller versions.

Question 6.
What is the purpose of the divide and conquer algorithm? Where is it used?
Answer:
As the name suggests the divide and conquers algorithm divides the problem into smaller parts. These smaller parts are solved and the solutions obtained are used to solve the original problem. It is used in Binary search, Merge sort, quick sort to name a few.

Question 7.
What is dynamic programming?
Answer:
In a dynamic problem, an optimization problem is broken down into much simpler sub-problems, each sub-problem is solved only once and the result is stored. For example, Fibonacci Sequence (Explained in Chapter on Recursion).

Big-O Notation

Big-0 notation helps you analyze how an algorithm would perform if the data involved in the process increases or in simple words it is a simplified analysis of how efficient an algorithm can be.

Since algorithms are an essential part of software programming it is important for us to have some idea about how long an algorithm would take to run, only then can we compare two algorithms and a good developer would always consider time complexity while planning the coding process.

It helps in identifying how long an algorithm takes to run.

Big-O

(1) Gives us the algorithm complexity in terms of input size n.
(2) It considers only the steps involved in the algorithm.
(3) Big-O analysis can be used to analyze both time and space.

An algorithm’s efficiency can be measured in terms of the best-average or worst case but Big-O notation goes with the worst case scenario.
It is possible to perform a task in different ways which means that there can be different algorithms for the same task having different complexity and scalability.
Now, suppose there are two functions:

Constant Complexity [0(1)]

A task that is constant will never experience variation during runtime, irrespective of the input value. For Example:
>>> x = 5 + 7
>>> x
12
>>>
The statement x = 5+7 does not depend on the input size of data in any way. This is known as 0(l)(big oh of 1).
Example:
Suppose, there are sequence of steps all of constant time as shown in the following code:
>>> a= (4-6) + 9
>>> b = (5 * 8) +8
>>> print (a * b)
336
>>>
Now let’s compute the Big-0 for these steps:
Total time = O(1)+O(1)+O(1)
= 3O(1)
While computing Big – O we ignore constants because once the data size increases, the value of constant does not matter.
Hence the Big-0 would be 0(1).

Linear complexity: [O(n)]

In the case of linear complexity, the time taken depends on the value of the input provided.
Suppose you want to print a table of 5. Have a look at the following code:
>>> for i in range(0,n):
print (“\n 5 x “,i,”=”,5*i)
The number of lines to be printed depends on ‘n’. For n =10, only ten lines will be printed but for n= 1000, the for loop will take more time to execute.
The print statement is O(1).
So, the block of code is n*O(l) which is 0(n).
Consider following lines of code:
>>>j = 0                               ————(1)
>>> for i in range(0,n) :        ————(2)
print(“\n 5 x “,i,”=”,5*i)
(1) is O(1)
(2) block is O(n)
Total time = O(l)+O(n)

We can drop O(1) because it is a lower order term and as the value of n becomes large (1) will not matter and the runtime actually depends on the for a loop.
Hence the Big-0 for the code mentioned above is O(n).

Quadratic Complexity: [O(n2)]

As the name indicates quadratic complexity, the time taken depends on the square of the input value. This can be the case with nested loops. Look at the following code:

>>> for i in range (0,n):
for j in range(0,n):
print(“I am in “, j,” loop of i = “, i,”.”)

In this piece of code, the print statement is executed n2 times.

Logarithmic Complexity

Logarithmic complexity indicates that in the worst case the algorithm will have to perform log(n) steps. To understand this, let’s first understand the concept of the logarithm.

Logarithms are nothing but the inverse of exponentiation.

Now let’s take term 23. Here 2 is the base and 3 is the exponent. We, therefore, say that base 2 logs of 8 (log2 8) = 3. Same way if then base 105 = 100000 then base 10 log of 100000 (log10 of 100000) = 5.

Since the computer works with binary numbers, therefore in programming and Big O we generally work with base 2 logs.

Have a look at the following observation:

1. 20 = 1, log2 1 = 0
2. 21 = 2, log2 2 = 1,
3. 22 = 4, log2 4 = 2,
4. 23 = 8, log2 8 = 3,
5. 24 = 16,log2 16 = 4,
This means that if n =1, the number of steps = 1.
If n = 4, the number of steps will be 2.
If n = 8, then the number of steps will be 3.
So, as data doubles the number of steps increases by one.
The number of steps grows slowly in comparison to the growth in data size.
The best example of logarithmic complexity in software programming is the Binary Search tree. You will learn more about it in the chapter based on Trees.

Question 8.
What is worst-case time complexity of an algorithm?
Answer.
The worst-case time complexity in computer science means worst-case in terms of time consumed while execution of a program. It is the longest-running time that an algorithm can take. The efficiency of algorithms can be compared by looking at the order of growth of the worst-case complexity.

Question 9.
What is the importance of Big-O notation?
Answer:
Big-0 notation describes how fast the runtime of an algorithm will increase with respect to the size of the input. It would give you a fair idea about how your algorithm would scale and also give you an idea about the worst-case complexity of the algorithms that you might be considering for your project. You would be able to compare two algorithms and decide which would be a better option for you.

Question 10.
What is the need for run-time analysis for an algorithm when you can find the exact runtime for a piece of code?
Answer:
The exact runtime is not. considered because the results can vary depending on the hardware of the machine, the speed of the processor, and the other processors that are running in the background. What is more important to understand is that how the performance of the algorithm gets affected with an increase in input data.

Question 11.
The big-O analysis is also known as.
Answer:
Asymptotic analysis

Question 12.
What do you understand by asymptotic notation?
Answer:
It is very important to know how fast a program would run and as mentioned earlier we do not want to consider the exact ran time because different computers have different hardware capabilities and we may not get the correct information in this manner.
In order to resolve this issue, the concept of asymptotic notation was developed. It provides a universal approach for measuring the speed and efficiency of an algorithm. For applications dealing with large inputs we are more interested in behaviour of an algorithm as the input size increases. Big O notation is one of the most important asymptotic notations.

Question 13.
Why is Big O notation expressed as O(n)?
Answer:
Big-0 notation compares the runtime for various types of input sizes. The focus is only on the impact of input size on the runtime which is why we use the n notation. As the value of n increases, our only concern is to see how it affects the runtime. If we had been measuring the runtime directly then the unit of measurement would have been time units like second, micro-second, and so on. However, in this case, ‘n’ represents the size of the input, and ‘O’ stands for ‘Order’. Hence, 0(1) stands for the order of 1, 0(n) stands for the order of n, and 0(n2) stands for the order of the square of the size of the input.
Big-0 notations and names:

  1. Constant – 0(1)
  2. Logarithmic – 0(log(n))
  3. Linear -0(n)
  4. Log Linear – 0(nlog(n))
  5. Quadratic – 0(«2)
  6. Cubic – 0(«3)
  7. Exponential – 0(2″)

Question 14.
Write a code in python that takes a list of alphabets such as [‘a’ , ‘b’ , ‘c’, ‘d’ , ‘e’ , ’f’ , ’g’] and returns a list of combination such as [‘bcdefg’, ‘acdefg’, ‘abdefg’, ‘abcefg’, ‘abcdfg’, ‘abcdeg’, ‘abcdef’]. Find the time complexity for the code.
Answer:
Code

input_value = input("enter the list of alphabets separate by comma : ")
alphabets = input_value.split(' , ')
final = [ ]
str = ' '
for element in range(0,len(alphabets)):
for index, item in alphabets:
if(item != alphabets[element]):
str = str+item
final. append (str)
str=' '

Execution

print (final)

Output

enter the list of alphabets seperate by comma : a,b,c,d,e,f,g
[‘bcdefg’, ‘acdefg’, ‘abdefg’, ‘abcefg’, ‘abcdfg’, ‘abcdeg’, ‘abcdef’]
>>>

Conclusion:

The code has a runtime of O(n<sup>2</sup>).

Question 15.
The following code finds the sum of all elements in a list. What is its time complexity?

def sum(input_list):
total = 0
for i in input_list:
total = total + i
print(total)

Answer:

def sum(input_list):
total = 0                              -----------(1)
for i in input list:                   -----------(2)
total = total + i
         print(total)                  -----------  (3)
time for block (1) = O(1)
time for block (2) = O(n)
time for block (3) = O(1)
Total time = O(1) + O(n) + O(1)
Dropping constants
Total time = O(n)

Question 16.
What are the pros and cons of time complexity?
Answer:
Pros:
It is a good way of getting an idea about the efficiency of the algorithm.
Cons:
It can be difficult to assess complexity for complicated functions.

Question 17.
What is the difference between time and space complexity?
Answer:
Time complexity gives an idea about the number of steps that would be involved in order to solve a problem. The general order of complexity in ascending order is as follows:

O(1) < O(log n) < O(n) < O(n log n) <O(n<sup>2</sup>)

Unlike time, memory can be reused and people are more interested in how fast the calculations can be done. This is one main reason why time complexity is often discussed more than space complexity. However, space complexity is never ignored. Space complexity decides how much memory will be required to run a program completely. Memory is required for:

  1. Instruction space
  2. Knowledge space for constants, variables, structured variables, dynamically altered areas, etc
  3. Execution

Question 18.
What is the difference between auxiliary space and space complexity?
Answer:
Auxiliary space is the extra space that is required while executing an algorithm and it is temporary space.
Space complexity on the other hand is the sum of auxiliary space and input space:

Space complexity = Auxiliary space + Input space

Question 19.
What is the memory usage while executing the algorithm?
Answer:
Memory is used for:

  1. Saving the compiled version of instructions.
  2. In the case of nested functions or one algorithm, calling another algorithm, the variables are pushed to a system stack and made to wait till the internal algorithm has finished executing.
  3. To store data and variables.

Space Complexity

You have learned about time complexity. Now, let’s move on to space complexity. As the name suggests space complexity describes how much memory space would be required if the size of input n increases. Here too we consider the worst-case scenario.

Now have a look at the following code:
>>> X = 23                                                                               (1)
>>> y = 34                                                                               (2)
>>> sum = x + y                                                                      (3)
>>> sum
57
>>>

In this example, we need space to store three variables: x in (1), y in (2), and sum in (3). However, this scenario will not change, and the requirement for 3 variables is constant and hence the space complexity is 0(1).

Now, have a look at the following code:

word = input(“enter a word : “)
word_list = [ ]
for element in word:
print(element)
word_list.append(element)
print(word_list)

The size of the word_list object increase with n. Hence, in this case, the space complexity is 0(n).

If there is a function 1 which has to suppose three variables and this functional calls another function named function2 that has 6 variables then the overall requirement for temporary workspace is 9 units. Even if functional calls function2 ten times the workspace requirement will remain the same.

Question 20.
What would be the space complexity for the following piece of code? Explain.

n = int(input("provide a number : "))
statement = "Happy birthday"
for i in range(0,n):
print(i+1,". ”, statement)

Answer:
The space complexity for the above code will be 0(1) because the space requirement is only for storing value of integer variable n and string statement. Even if the size of n increases the space requirement remains constant. Hence, 0(1).

Question 21.
What is the time and space complexity for the following:

a = b = 0
for i in range(n):
a = a + i
for j in range(m):
b = b + j

Answer:
Timecomplexity
Time for first loop = O(n)
Time for second loop = O(m)
Total time = O(n) + O(m) = O(n + m)
Space complexity
O(1)

Question 22.
Find the time complexity for the following code:

a = 0
for i in range(n):
a = a + i
for j in range(m):
a = a + i + j

Answer:
Time complexity: O(n2)

Question 23.
What will be the time complexity for the following code?

i = j = k =0
for i in range(n/2,n):
for j in range(2,n):
k = k+n/2
j = j*2

Answer:
The time complexity for the first for loop O(n/2).
The time complexity for second for loop: O(logn) because j is doubling itself till it is less than n.
Total time = O(n/2)*O(logn)
= O(nlogn)

Question 24.
What is the time complexity for the following code:

i = a = 0
while i>0:
a = a+i
i = i/2

Answer:
Time complexity will be O(logn).

Big O for Python Data Structures

Python language comprises mutable and immutable objects. Numbers, strings, and tuple come in the latter category whereas lists, sets, and dictionary data types are mutable objects. The reason why lists and dictionaries are called mutable is that they can be easily altered at any time. They are like arrays because the data elements can be inserted or deleted easily by providing an index value and since the values can be easily added or removed from any point, the lists are considered to be dynamic. Hence, lists are known to be dynamic arrays. You can also say that lists are called dynamic array because:

  1. Its size can be dynamically modified at run time.
  2. You need not define the size of the list when you create it.
  3. They allow you to store more than one variable.
  4. Dynamic arrays once filled allocate a bigger chunk of memory, and elements of the original array are copied to this section of the memory as a result it can continue to fill available slots.

The most important operations that are performed on a list are as follows:

  1. Indexing
  2. Assigning value to an index value

Both the methods mentioned above are designed to run at constant time 0(1). The Big-0 for common list operations are given as follows:

  1. index[ ] : O(1)
  2. index assignment: O(1)
  3. append: O(1)
    1. pop( ): O(1)
  4. pop(i): O(n)
  5. insert(i, item): O(n)
  6. delete operator: O(n)
  7. contains(in): O(n)
  8. get slice[x:y]: O(k)
  9. del slice: O(n)
  10. set slice : O(n+k)
  11. reverse: O(n)
  12. concatenate: O(k)
  13. sort: O(nlog n)
  14. multiply O(nk)

Dictionaries

Dictionaries are implementation of hashtables and can be operated with keys and values.

Big-O efficiencies for common dictionary objects are given as follows:

  1. copy : 0(n)
  2. get item : 0(1)
  3. set item: 0(1)
  4. delete item : 0(1)
  5. contains(in): 0(1)
  6. iteration: 0(n)

Python Interview Questions on Algorithm Analysis and Big-O Read More »

Python Interview Questions on File Manipulation

We have compiled most frequently asked Python Interview Questions which will help you with different expertise levels.

Python Interview Questions on File Manipulation

Till now you have learned how to implement logic in Python to write blocks of code that can help you accomplish certain tasks. In this section, we will learn about how to use Python to work with files. You can read data from files and you can also write data to the files. You can not only access the internet but also check your emails and social media accounts using the Python programming language.

Files

A file has a permanent location. It exists somewhere on the computer disk and can be referred to anytime. It is stored on the hard disk in non-volatile memory which means the information in the file remains even if the computer is switched off. In this section, we will learn how to deal with files in Python.

Open a File

If you want to work on an existing file, then you will have to first open the file. In this section, we will learn how to open a file.
In order to open a file, we will make use of the open( ) function which is an inbuilt function. When we use the open( ) function, a file object is returned which can be used to read or modify the file. If the file exists in the same directory where python is installed then you need not give the entire pathname. However, if the location is different then you will have to mention the entire path.

For this example, I have created a file by the name: learning_files.txt in the current directory of python /home/pi.

The content of the file is as follows:

I am great a learning files

See how Good I am at opening Files

Thank you Python

Look at the following piece of code:

>>> f_handle = open ("learning_files . txt")
>>> print (f_handle . read ( ) )

In case the file is not available, the error message will be displayed as follows:

>>> f_handle = open ("llllearning_files . txt")
Traceback (most recent call last):
   File "<pyshell#0>", line 1, in <module>
      f_handle = open ("llllearning_files . txt")
FileNotFoundError: [Errno 2] No such file or
directory: ' llllearning_files.txt'
>>>

Output

I am great a learning files
See how Good I am at opening Files
Thank you Python

Python File Modes

Python has defined file modes that can be implemented when a file is opened. These modes define what can be done with the file once it is opened. If you do not mention the mode then “read” is considered the default mode. The list of various modes is given as follows:

‘r’ is also the default mode, it means that the file has been opened for reading purposes. You have already seen the usage of reading mode. To explain this a file by the name “test.txt” has been created. The content of the file is as follows:

“I am excited about writing on the file using Python for the first time. Hope You feel the same. ”

We will now give the following commands.:

>>> f_handle = open("test.txt" , 'r')
>>> f_handle . read (4)

The output for the above code is :
‘I am’

f_handle.read(4) retrieves the first four characters from the file and displays it.

‘w’ stands for writing. It means that you want to open a file and write in it. In case the file that you have mentioned does not exist then a new file will be created.

>>> f_handle = open("test .txt",'w')
>>> f_handle.write("I am excited about writing on the file using Python for the first time.")
71
>>> f_handle.write("Hope you feel the same.")
22
>>> f_handle.close( )
>>>

So, if you open the file now this is how the contents would look like:

The original content of the file before passing the write instructions was:
“I am excited about writing on the file using Python for the first time. Hope you feel the same.”
If you open the file after passing “write” instructions now the contents of the file will be as follows:
“Hi I have opened this file again and I feel great again. ”

As you can see that the previous lines (/ am excited about writing on the file using Python for the first time. Hope you feel the same.) have been erased from the file.

Now, we close the file and try to write something again in it.

>>> f_handle = open (test. txt", ' w' )
>>> f_handle.write ("\n Hi I have opened this file again and I feel great again.")
58
>>> f_handle.close ( )
>>>

‘x’ stands for exclusive creation. An error will be displayed if the file already exists. Let’s see what happens when we try to use ‘x’ mode with an already existing test.txt file.

>>> f_handle = open("F:/test.txt"x')
Traceback (most recent call last):
    File "<pyshell#l>", line 1, in <module>
f_handle = open("F:/test.txt"x')
FileExistsError: [Errno 17] File exists: 'F:/test.txt'

‘a’ is used to append an existing file. If a file does not exist then a new file will be created.

So, now we try to add new text to an already existing file.

The contest of test.txt file is as follows:

“I am excited about writing on the file using Python for the first time.
Hope You feel the same. ”

We will try to add the following line to it:

“Hi I have opened this file again and I feel great again. ”

In order to append, we follow the following steps:

>>> f_handle = open("test.txt",'a')
>>> f_handle.write("Hi I have opened this file again and I feel great again.")
56
>>> f_handle.close()
>>>

Output

I am excited about writing on the file using Python for the first time.
Hope You feel the same.


Hi, I have opened this file again and I feel great again.

‘t’ is used to open a file in text mode and ‘b’ is used to open the file in binary mode.

In the above examples, you must have noticed f_handle.close( ) command. It is important to use the close( ) command after you have stopped working with a file in order to free up operating system resources. If you leave the file open, you may encounter problems.

A better way of dealing with files is to keep the code related to file reading in a try block as shown in the following code:

>>> try:
       f_handle = open ("llllearning_files . txt")
       content = f_handle.read()
       f_handle.close()
except for IOError:
       print (''Could not find the file. Please check again")
       exit( )

Output

Could not find the file. Please check again

In the above piece of code, the file name given does not exist in the given location. Hence, the remaining code of the try block is ignored and the code written in the except block is applied. In the except block, we have provided a simpler and user-friendly message which is easier for the user to understand. Without the try expect to block the following message will be displayed:

Traceback (most recent call last):
   File "<pyshell#10>", line 1, in <module>
      f_handle = open ("llllearning_files .txt")
FileNotFoundError: [Errno 2] No such file or
directory: 'llllearning_files . txt'

Which can be difficult to decipher.

File-system-type commands:

Now we will have a look at some very common file-system-type operations such as move, copy, and so on.
We now try to copy the contents of this file to another file. For this we require to import shutil as shown in the following code:

>>> import shutil
>>> shutil. copy("F:/test.txt","F:/testl.txt")
'F:/testl.txt'

Output

Content of testl.txt file:

You can move the file or change the name of the file using the move command as shown in the following code:

>>> import shutil
>>> shutil.move("test.txt","test2.txt")
'test2.txt'
>>>

The above set of instructions changes the name of the file test.txt to test2. txt.

Another important package available with Python is glob.

The glob package allows you to create a list of a particular type of files by using the star * operator.

>>> import glob
>>> glob.glob("*.txt")
['important.txt', 'learning_files.txt', ' test1. txt', 'test2.txt']
>>>

Question 1.
How is a file opened for reading? Provide an example.
Answer:
Using the open function, and the ‘r’ mode.
myFile = openCpathToFile’,’r’)

Question 2.
What is the appropriate method to call when a file is no longer being used?
Answer:
file.close( )

Question 3.
What are the modes that a file can be opened in? Answer:

  • ‘r’ – reading,
  • ‘w’ – writing,
  • ‘a’ – append,
  • ‘r+’ reading and writing, contents intact,
  • ‘w+’ reading and writing, contents deleted,
  • ‘a+’ same as ‘r+’

Question 4.
What does the ‘b’ modifier do when appended to a file mode?
Answer:
It changes the handling of the file from text to binary mode.

Question 5.
What does the ‘U’ modifier do when appended to a file mode?
Answer:
It applies the universal new-line translator to the file when it is opened.

Question 6.
How is the buffer size specified in the file opening?
Answer:
It is an optional parameter to the open function. A 0 indicates the file is unbuffered, 1 indicates that line by line buffering. Any other positive number is the actual buffer size to be allocated.

Question 7.
How is an entire file read into a buffer and returned as a string? When is it a bad practice to do so?
Answer:
With the .read( ) method. When the file may be large, because the buffer may consume excessive memory.

Question 8.
How is a file read using a limited buffer size?
Answer:
By specifying how many bytes to read in the read method. file.read(20) would read the next 20 bytes from the file.

Question 9.
How can a single line be read from a text file? Provide an illustration.
Answer:
Using the linecache module.
import linecache
myFile = “’file.txt”
print linecache.getline(myFile, 1) # prints the first line
print linecache.getline(myFile,40) # prints the 40th line, etc.

Question 10.
What are two ways to write a line of text to a file?
Answer:
Using the .write method on an open file, or >>> redirection operator to use the print statement.

Question 11.
With a list of strings, how can they all be written out to a file in a single statement?
Answer:
Using the .writelines( ) method. Example:
myFile.writelinesdistName)

Question 12.
Illustrate how to determine the number of lines in a text file, using the readlines method. When would it be inappropriate to use this technique?
Answer:
myLineCount = len(open(myFilePath, Y).readlines())
It would be inappropriate to use if the file might be large, because the readlines method will generate a list of strings that includes the entire file’s contents. It would consume too much memory.

Question 13.
What module and method is used to traverse the file system directory tree?
Answer:
The os module. Specifically os.walk.

Question 14.
How are files deleted?
Answer:
Using the os.remove method. os.remove(‘myFile’)

Question 15.
How are files renamed?
Answer:
Using the os.rename method. os.renameColdFileName’, ‘newFileName’)

Question 16.
How are entire non-empty directory trees removed?
Answer:
Each directory must be walked using the os.walk method, then the files within must be deleted. Then and only then can the directory be removed using the os.rmdir method.

Question 17.
How is a tarfile created?
Answer:
Using the tarfile module.
import tarfile
my Tar = tarfile.open(“my Tarfile”, ‘w’)

Question 18.
How are files added to a tarfile or zipfile?
Answer:
Using the .add method to an open tar or zip file.

Question 19.
How are files extracted from a tar or zip file?
Answer:
Using the .extract method on an open tar or zip file, and specifying the file name and the extraction path.

Question 20.
Illustrate extracting all of the .txt files from a zip file.
Answer:
import os
import zipfile
myZip = zipfile.open(“myZip.zip “, Y)
for myFile in myZip.getnames( ):
if myFile.endswith(“txt”):
myZip.extract(myFile, “-/temp/”)
myZip.close( )

Python Interview Questions on File Manipulation Read More »

Python Interview Questions on Decision Making and Loops

We have compiled most frequently asked Python Interview Questions which will help you with different expertise levels.

Python Interview Questions on Decision Making and Loops

Control Statements

Control statements are used to control the flow of program execution. They help in deciding the next steps under specific conditions also allow repetitions of the program a certain number of times.
Two types of control statements are as follows:

1. Conditional branching

  • If
    Syntax:
    if (condition): to do statement
    If the condition evaluates to be true only then if code under if block will be executed.
  • if. . .else Syntax:
    if (condition): to do statement else:
    to do statement
  • Nested if statements Syntax:
    if (condition1):
    to dd statement elif(condition2):
    else do this
    elif(condition3):
    else do this

2. Loops

  • while: repeat a block of statements as long as a given condition is true
    Syntax:
    while(condition): ;
    to do statement
  • for: repeat a block of statements for a certain number of times
    , Syntax: ‘
    for < iterating_variable > in sequence:
    Repeat these steps
  • nested loops

Question 1.
What would be the output for the following piece of code?

animals = [ 'cat', 'dog'] .
for pet in animals: .
pet.upper( ) 
print(animals)

Answer:
The output will be [‘cat’, ‘dog’]. The value returned by a pet. upper( ) is not assigned to anything hence it does not update the value in any way.

Question 2.
What would be the output of the following code?

for i in range(len(animals)):
animals[i] = animals[i].upper( ) 
print(animals)

Answer:

[‘CAT’, ‘DOG’]

Question 3.
What would be the output of the following code?

numbers = [1,2,3,4] 
for i in numbers:
numbers.append(i + 1) 
print(numbers)

Answer:
This piece of code will not generate any output as the ‘for’ loop will never stop executing. In every iteration, one element is added to the end of the list and the list keeps growing in size.

Question 4.
What will be the output for the following code?

i = 6
while True:
if i%4 == 0:
break
print(i)
i -= 2

Answer:
6

Question 5.
Write a code to print the following pattern:
*
**
***
****
Answer:

for i in range(1,5):
print("*"*i)

Or

count = 1 
while count < 5:
print(*count) 
count = count + 1

Question 6.
Write code to produce the following pattern:
1
22
333
4444
Answer:
The code will be as follows:

count = 1 
while count < 5:
print(str(count)*count) 
count = count + 1

Question 7.
Write a code to generate the following pattern:
1
12
123
1234
Answer:
The code will be as follows:

count = 1 
string1 =' ' 
while count < 5:
for i in range(1, count+1):
string1 = string1+str(i)
count = count + 1 
print(string1) 
string1 =' '

Question 8.
Write code to spell a word entered by the user.
Answer:
The code will be as follows:

word = input ("Please enter a word : ") 
for i in word: 
print (i)

Output
Please enter a word: Aeroplane
A
e
r
0
P
l
a
n
e

Question 9.
Write code to reverse a string.
Answer:
The code:

string1 = "AeRoPlAnE" 
temp = list (string1) 
count = len(temp)-1 
reverse_str=' ' 
while count>=0:
reverse_str = reverse_str + temp[count] 
count = count-1 
print(reverse_str)

Output

EnAlPoReA

Statements to control a loop
The following three statements can be used to control a loop:

  1. break: breaks the execution of the loop and jumps to the next statement after the loop
  2. continue: takes the control back to the top of the loop without executing the remaining statements
  3. pass: does nothing

Question 10.
What will be the output for the following code?

a = 0
for i in range(5): 
a = a+1 
continue 
print(a)

Answer:
5

Question 11.
What would be the output for the following code?
Answer:
The code:

for item in ('a','b','c','d'): 
print (item) 
if item == 'c' : 
break 
continue
print ("challenge to reach here")

Question 12.
How would you use a “if ” statement to check whether an integer is even ?
Answer:
Code

x = int(input("enter number : ")) 
if x%2 == 0:
print("You have entered an even number")

Output

enter number: 6
You have entered an even number
>>>

Question 13.
How would you use an  “if ” statement to check whether an integer is odd?
Answer:
Code

x = int(input("enter number : ")) 
if x%2 != 0:
print("You have entered an odd number")

Output
enter number: 11
You have entered an odd number

Question 14.
Use an if-else statement to check if a given number is even if yes then display that a message stating that the given number is even else print that the given number is odd.
Answer:
Please have a look at the following code:
Code

x = int(input("enter number : ")) if x%2 == 0:
print("You have entered an even number") else:
print("You have entered an odd number")

Output

enter number: 11
You have entered an odd number
>>>
enter number: 4
You have entered an even number
>>>

Question 15.
What is a ternary operator?
Answer:
The ternary operator is a conditional expression used to compress the if.. .else block in one single line.

[to do if true] if [Expression] else [to do if false]

Code

X = 27
print("You have entered an even number") if x%2
== 0 else print("You have entered an odd number")

Output

You have entered an odd number

Question 16.
What would be the output of the following code? Why?
i = j = 10 if i > j:
print(“i is greater than j”) elif i<= j:
print(“i is smaller than j”) else:
print(“both i and j are equal”)
Answer:
The output of the above code will be:
i is smaller than j
i is equal to j.
So, the second condition elif i>j evaluates to true and so, the message printed in this block is displayed.

Question 17.
How can the following piece of code be expressed in one single line?
i = j = 10 if i > j :
print(“i is greater than j”)
elif i< j:
print(“i is smaller than j”)
else:
print(“both i and j are equal”)
Answer:
print (“i is greater than j” if i > j else “i is smaller than j” if i < j else “both i and j are equal”)

Question 18.
What will be the output for the following code?
i = 2 j = 16
minimum_val = i < j and i or j minimum_val
Answer:
2

Question 19.
What is the meaning of conditional branching?
Answer:
Deciding whether certain sets of instructions must be executed or not based on the value of an expression is called conditional branching.

Question 20.
What would be the output for the following code?
a = 0
b = 9
i = [True,False] [a > b]
print(i)
Answer:
The answer would be “True”. This is another ternary syntax: [value_if_false, value_if_true][testcondition]
In the above code a < b, therefore the test condition is false. Hence, ‘i’ will be assigned the value of value_if_false which in this case is set to “True”.

Question 21.
What is the difference between the continue and pass statement?
Answer:
pass does nothing whereas continue starts the next iteration of the loop.

Python Looping

Question 22.
What are the two major loop statements?
Answer:
for and while

Question 23.
Under what circumstances would you use a while statement rather than for?
Answer:
The while statement is used for simple repetitive looping and the for statement is used when one wishes to iterate through a list of items, such as database records, characters in a string, etc.

Question 24.
What happens if you put an else statement after a block?
Answer:
The code in the else block is executed after the for loop completes, unless a break is encountered in the for loop execution, in which case the else block is not executed.

Question 25.
Explain the use of break and continue in Python looping.
Answer:
The break statement stops the execution of the current loop, and transfers control to the next block. The continue statement ends the current block’s execution and jumps to the next iteration of the loop.

Question 26.
When would you use a continue statement in a for loop?
Answer:
When processing a particular item was complete; to move on to the next, without executing further processing in the block.
The continued statement says, “I’m done processing this item, move on to the next item.”

Question 27.
When would you use a break statement in a for loop?
Answer:
When the loop has served its purpose. As an example, after finding the item in a list searched for, there is no need to keep looping. The break statement says, “I’m done in this loop; move on to the next block of code.”

Question 28.
What is the structure of a for loop?
Answer:
for <item> in <sequence>:… The ellipsis represents a code block to be executed, once for each item in the sequence. Within the block, the item is available as the current item from the entire list.

Question 29.
What is the structure of a while loop?
Answer:
while <condition>:… The ellipsis represents a code block to be executed until the condition becomes false. The condition is an expression that is considered true unless it evaluates to 0, null or false.

Question 30.
Use a for loop and illustrate how you would define and print the characters in a string out, one per line.
Answer:
my String = “I Love Python”
for my Char in my String:
print myChar

Question 31.
even the string “I LoveQPython” uses a for loop and illustrates printing each character up to, but not including the Q.
Answer:
my String = “I Love Python”
for my car in my String:
if my car = ‘Q’:
break
print myChar

Question 32.
Given the string “I Love Python” print out each character except for the spaces, using a for a loop.
Answer:
my String = “I Love Python”
for myChar in my String:
if myChar — ‘ ‘ ,
continue print myChar

Question 33.
Illustrate how to execute a loop ten times.
Answer:
i = 1
while i < 10:
i+=1

Question 34.
When using a while loop, a condition was encountered that made staying in the loop pointless, what statement is used to transfer control?
Answer:
The break statement is used to terminate the processing of the loop and move on to the next block of code.

Question 35.
How is execution in the while loop block abandoned, but the loop itself is not exited?
Answer:
The continue statement is used to terminate the processing of the block and move control to the next iteration of the loop.

Question 36.
What is a looping use of the range( ) function?
Answer:
The range function is used to generate a sequence of numbers for iteration. For example range(5) returns the list [0,1, 2, 3, 4] This list could be used in a a loop.

Question 37.
Can the else clause be used after a while loop? When is it executed? ,
Answer:
Yes. The else block is executed after the while condition becomes false, but not if the while loop is exited with a break statement.

Question 38.
Illustrate how the range( ) and len( ) functions be used to iterate over the indices of a sequence?
Answer:
myltems = [T, ‘Love’, ‘Python’]
for i in rangeden(myltems)):
print i, myltems[i]

Question 39.
How is the body of a loop defined?
Answer:
The body of the loop is defined by indentation.

Question 40.
How are loops nested?
Answer:
Ever greater levels of indentation.

Question 41.
Illustrate a nested loop that uses the following list IT, ‘Love’, ‘Python’] and outputs each character on a separate line.
Answer:
myltems = [T, ‘Love’, ‘Python’]
for myWord in myltems:
for myChar in myWord:
print myChar

Python Interview Questions on Decision Making and Loops Read More »

CBSE Class 12 Computer Science Python Syllabus

CBSE Class 12 Computer Science Python Syllabus 2021 | Check 12th CBSE Computer Science Python Exam Pattern & How to Download easily?

CBSE Class 12th Computer Science Syllabus 2021 Free Download: Central Board of Secondary Education (CBSE) released the new and revised Computer Science Python Syllabus for Class 12 students (reduced by 30%) 2021. The deleted syllabus of class 12th CBSE Computer Science python is given here in a detailed way along with the latest syllabus 2021-2022.

So, students are urged to check the Revised CBSE 12th Computer Science Syllabus 2021 & kickstart their preparation for future CBSE Class 12 board exams. Below we have also provided some useful links to access and score well in the upcoming CBSE 12th Computer Science Board Exam 2021. Also, check out the detailed steps on how to download the CBSE Class 12 Computer Science Syllabus 2021 from the official site by heading to the below modules.

Click Here To Download CBSE 12th Computer Science Python Syllabus 2021

CBSE Class 12 Computer Science Python Syllabus 2021-22 (New)

For perfect CBSE 12th Board Exam Preparation, you should have to be familiar with the latest and revised CBSE Class 12 Computer science python syllabus and then need to gather the best books and study resources. Here we have provided the unit-wise syllabus of computer science for cbse class 12 students. Access them online and offline by downloading the latest CBSE Syllabus for Class 12 computer science 2021-2022 from the above link and below topics text.

Unit I: Computational Thinking and Programming – 2 – (80 Theory + 70 Practical)

  • Revision of the basics of Python
  • Functions: scope, parameter passing, mutable/immutable properties of data objects, pass arrays to functions, return values, functions using libraries: mathematical, and string functions.
  • File handling: open and close a file, read, write, and append to a file, standard input, output, and error streams, relative and absolute paths.
  • Using Python libraries: create and import Python libraries
  • Recursion: simple algorithms with recursion: factorial, Fibonacci numbers; recursion on arrays: binary search
  • Idea of efficiency: performance defined as inversely proportional to the wall clock time, count the number of operations a piece of code is performing, and measure the time taken by a program. Example: take two different programs for the same problem, and understand how the efficient one takes less time.
  • Data visualization using Pyplot: line chart, pie chart, and bar chart.
  • Data structures: lists, stacks, queues.

Unit 2: Computer Networks (CN) – (30 Theory + 10 Practical)

  • Structure of a network: Types of networks: local area and wide area (web and internet), new technologies such as cloud and IoT, public vs. private cloud, wired and wireless networks; concept of a client and server.
  • Network devices such as a NIC, switch, hub, router, and access point.
  • Network stack: amplitude and frequency modulation, collision in wireless networks, error checking, and the notion of a MAC address, main idea of routing.
  • IP addresses: (v4 and v6), routing table, router, DNS, and web URLs, TCP: basic idea of retransmission, and rate
    modulation when there is congestion (analogy to a road network), Protocols: 2G, 3G, 4G, WiFi. What makes a protocol have a higher bandwidth?
  • Basic network tools: traceroute, ping, ipconfig, nslookup, whois, speed-test.
  • Application layer: HTTP (basic idea), working of email, secure communication: encryption and certificates (HTTPS), network applications: remote desktop, remote login, HTTP, FTP, SCP, SSH, POP/IMAP, SMTP, VoIP, NFC.

Unit 3: Data Management (DM-2) – (20 Theory + 20 Practical)

  • Write a minimal Django based web application that parses a GET and POST request, and writes the fields to a file – flat file and CSV file.
  • Interface Python with an SQL database
  • SQL commands: aggregation functions – having, group by, order by.

Unit 4: Society, Law, and Ethics (SLE-2) – (10 Theory)

  • Intellectual property rights, plagiarism, digital rights management, and licensing (Creative Commons, GPL, and Apache), open source, open data, privacy.
  • Privacy laws, fraud; cyber-crime- phishing, illegal downloads, child pornography, scams; cyber forensics, IT Act, 2000.
  • Technology and society: understanding of societal issues and cultural changes induced by technology.
  • E-waste management: proper disposal of used electronic gadgets.
  • Identity theft, unique ids, and biometrics.
  • Gender and disability issues while teaching and using computers.

Do Refer: Python Programs for Class 12

Deleted Syllabus of Class 12 Computer Science Python CBSE

Unit I: Computational Thinking and Programming – 2

● Recursion – simple algorithms with recursion: print a message forever, the sum of the first n natural numbers, factorial, Fibonacci numbers, recursion on arrays: binary search
● The idea of efficiency: performance measurement in terms of the number of operations.
● Data-structures: Lists as covered in Class XI, Stacks – Push, Pop using a list, Queues – Insert, Delete using a list. (One of the data structures Stack or Queue. Note: While setting the question paper a student will have an option between Stack and Queue.)

Unit II: Computer Networks

● Web Scripting Client-side (VB Script, JavaScript, PHP) and Server-side (ASP, JSP, PHP), Web 2.0 (for social networking)
● E-commerce payment transactions using online banking, mobile banking, payment apps, and services.

Unit III: Database Management

CREATE TABLE, DROP TABLE, ALTER TABLE, UPDATE ….SET, INSERT, DELETE

1. Suggested Practical List: Python Programming

● Recursively find the factorial of a natural number
● Write a recursive code to find the sum of all elements of a list.
● Write a recursive code to compute the nth Fibonacci number

CBSE 12th Class Computer Science Exam Pattern 2021

Marking Scheme plays a vital role in exam preparation time. It covers all required details about the question paper like how many marks each question carries and many more. From the below tabulated CBSE Class 12 Computer Science Python Exam Pattern 2021, you can easily understand which chapter contains a number of marks and the total number of marks to be gained by the students in the examination.

Chapter NameTheory marksTheory periodsPractical periods
Computational Thinking and Programming – 2407050
Computer Networks1015
Database Management202520
TOTAL7011070

12th CBSE Computer Science Practical Exam Pattern & Syllabus

Students of class 12 should aware of the practical exam pattern and provided important lab syllabus topics before they start preparing for the cbse class 12 computer science board exams.

AreaMarks Allotted
Lab Test12
Report file7
Project8
Viva voce3
Total Marks30

A few of the sample lab assignments are listed below:

Python Programming:

  • Recursively find the factorial of a natural number.
  • Write a recursive code to find the sum of all elements of a list.
  • Write a recursive code to compute the nth Fibonacci number.
  • Read a text file line by line and display each word separated by a #.
  • Read a text file and display the number of vowels/ consonants/ uppercase/ lowercase characters in the file.
  • Create a binary file with a name and roll number. Search for a given roll number and display the name, if not found display the appropriate message.
  • Create a binary file with roll numbers, names, and marks. Input a roll number and update the marks.
  • Remove all the lines that contain the character `a’ in a file and write it to another file.
  • Write a random number generator that generates random numbers between 1 and 6 (simulates a dice).
  • Write a Python program to implement a stack and queue using a list data-structure.
  • Take a sample of ten phishing e-mails (or any text file) and find the most commonly occurring word(s)

Database Management

  • Create a student table and insert data. Implement the following SQL commands on the student table:
  • ALTER table to add new attributes / modify data type / drop attribute
  • UPDATE table to modify data
  • ORDER By to display data in ascending/descending order DELETE to remove tuple(s)
  • GROUP BY and find the min, max, sum, count, and average
  • A similar exercise may be framed for other cases.
  • Integrate SQL with Python by importing the MySQL module.

Computer Science Project for CBSE Class XII

The aim of the class project is to create something that is tangible and useful. This should be done in groups of 2 to 3 students, and should be started by students at least 6 months before the submission deadline. The aim here is to find a real world problem that is worthwhile to solve. Students are encouraged to visit local businesses and ask them about the problems that they are facing. For example, if a business is finding it hard to create invoices for filing GST claims, then students can do a project that takes the raw data (list of transactions), groups the transactions by category, accounts for the GST tax rates, and creates invoices in the appropriate format. Students can be extremely creative here. They can use a wide variety of Python libraries to create user friendly applications such as games, software for their school, software for their disabled fellow students, and mobile applications, Of course to do some of this projects, some additional learning is required; this should be encouraged. Students should know how to teach themselves.

If three people work on a project for 6 months, at least 500 lines of code is expected. The committee has also been made aware about the degree of plagiarism in such projects. Teachers should take a very strict look at this situation, and take very strict disciplinary action against students who are cheating on lab assignments, or projects, or using pirated software to do the same. Everything that is proposed can be achieved using absolutely free, and legitimate open-source software.

How to download CBSE 12th Class Computer Science Syllabus 2021?

Students who want to download the revised CBSE 12th Class Computer Science Python Syllabus 2021 from the official website should follow the steps furnished below and get a pdf formatted 12th Computer Science syllabus 2021-2022.

  • Step 1 – Open the official website of CBSE ie., cbseacademic.nic.in.
  • Step 2 – After entering the home page, tap the ‘Senior secondary curriculum (XI-XII)’ menu.
  • Step 3 – Now, select ‘Academic Electives – (Group-A)’ option and then choose the ‘Computer Science New XII’
  • Step 4 – Once you choose that option, you will be available with the CBSE Class 12 Computer Science Syllabus 2021 to download for free in PDF. So, download and save it for further reference.

FAQs on CBSE Syllabus for Class 12 Computer Science Python 2021

1. How many units are there in the Class 12 CBSE Computer Science Python Syllabus?

Basically, there are four units that include sub-topics of computer science python in the CBSE Class 12 Computer Science Python Syllabus.

2. Is there any reduced syllabus in CBSE 12th Computer Science Syllabus 2021?

Yes, there is a 30% reduction of the syllabus for the academic year 2021-2022. So, you have to check the deleted syllabus of CBSE Class 12 Computer Science Python from our site before preparation.

3. How to download CBSE Syllabus for Class 12 Computer Science 2021 in PDF?

Just by clicking on the link provided in the above article, you can download CBSE Syllabus for Class 12 Computer Science 2021 in PDF format for free of cost.

4. What is the distribution of marks in the CBSE 12th Computer Science 2020-21 Syllabus?

The marks distribution for CBSE 12th Computer Science 2020-21 Syllabus is as follows:

I. Computational Thinking and Programming 2 – 40 Marks,
II. Computer Networks- 10 Marks and
III. Database Management -20 Marks

CBSE Class 12 Computer Science Python Syllabus 2021 | Check 12th CBSE Computer Science Python Exam Pattern & How to Download easily? Read More »