Author name: Vikram Chiluka

Split a Given List and Insert in Excel File in Python

In this article, let us see how to split a given list and insert it into an excel file using Python.

In Python, how do you split a list?

We can split the given list of elements using slicing.

Pandas Module in Python:

Pandas is an open-source library designed to make it simple and natural to work with relational or labeled data. It includes a number of data structures and methods for working with numerical data and time series. This library is based on the NumPy Python library. Pandas is quick and has a high level of performance and productivity for its users.

Pandas is widely used for data science, data analysis, and machine learning activities. It is built on top of Numpy, a library that supports multi-dimensional arrays. Pandas, as one of the most popular data-wrangling programs, is normally included in every Python distribution, from those that come with your operating system to commercial vendor versions like ActiveState’s ActivePython.

Splitting a Given List and Insert in Excel File in Python

Using pandas, we can easily edit the columns and use the dataframe.to excel() function to quickly insert the filtered elements into an excel file.

The list is converted into data, rows, and columns by using a data frame. We can use the splitter list in an Excel sheet this way.

Approach:

  • Import pandas module using the import keyword
  • Give the list as static input and store it in a variable.
  • Create a dataframe object using the DataFrame() function of the pandas module
  • Creating 4 columns on the dataframe(Employ_id, Employee_Name, Designation, Salary) by applying slicing on the given list
  • Save all the above 4 columns of the dataframe into an Excel file using the to_excel() function
  • Here, the to_excel() fucntion is used to insert an object into an Excel file.
  • The Exit of the Program.

Below is the implementation:

# Import pandas module using the import keyword 
import pandas  
# Give the list as static input and store it in a variable.
gvn_lst = [1, 'John','Software developer', 80000,
         2,'Virat', 'Project associate', 50000,
         3, 'Nick','Testing Engineer', 40000,
         4, 'Rosy','Networking department', 35000] 

# Create a dataframe object using the DataFrame() function of the pandas module
datafrme = pandas.DataFrame() 
# Creating 4 columns on the dataframe(Employ_id, Employee_Name, Designation, Salary) 
# by applying slicing on the given list
datafrme['Employ_id'] = gvn_lst[0::4] 
datafrme['Employee_Name'] = gvn_lst[1::4] 
datafrme['Designation'] = gvn_lst[2::4]
datafrme['Salary'] = gvn_lst[3::4]

# Save all the above 4 columns of the dataframe into an Excel file using the to_excel()
# function
# Here, the to_excel() function is used to insert an object into an Excel file.
datafrme.to_excel('OutputExcelFile.xlsx', index = False)

Output:

Output Excel File after Splitting the Given List

Split a Given List and Insert in Excel File in Python Read More »

Python Program to Pluralize a Given Word

We have an interesting topic in English grammar called “singular and plurals.” Let us examine how they can be implemented using Python

We all are aware that, singular refers to an object that has a single number or quantity. For instance, “a book” or “a pen.” Plurals denote objects in groups or a large number of objects. For example, “pens” or “books” etc.

Here, we’ll see how to implement this concept in Python.

In English, there are a few rules for converting singular to plural:

  • A singular noun can be made plural by adding “s” at the end.
  • Words that end in “sh, s, x, z” can be made plural by adding “es” at the end.
  • A singular word that ends in a consonant and then y can be made plural by removing the “y” and adding “ies.”

There may be some exceptions to the above rules. However, we will stick to the rules that were given above.

To perform this task we use the re module

re module:

A regular expression is a name given to the re-package.

In Python, this package is used to manipulate strings. Moreover, it can be used to determine whether we are searching for a specific search pattern in a string. In other words, suppose we need to identify the occurrence of “p” in “pythonprograms”, we can utilize the re-package for such searches.

Program to Pluralize a Given Word in Python

Approach:

  • Import regex(re) module using the import keyword
  • Create a function say pluralize_word which accepts a word(noun) as an argument and returns the pluralized word
  • Check if the given word matches with the rules using the search() function in the regex module and if the conditional statement
  • If it is true then substitute ‘es’ to the word passed to make it a plural using the sub() function of the regex module
  • If it is true then substitute ‘es’ to the end of the word passed.
  • If it is true then substitute ‘ies’ with ‘y’ to the word passed to make it a plural using the sub() function of the regex module
  • Else just add ‘s’ to the word passed.
  • Give the list as static input and store it in a variable.
  • Iterate in the list of words using the For loop
  • pass the iterator word as an argument to the pluralize_word function(It returns the pluralized word) and print it
  • The Exit of the Program.

Below is the implementation:

# Import regex(re) module using the import keyword
import re
# Create a function say pluralize_word which accepts a word(noun) as an argument and returns the pluralized word 
def pluralize_word(word):
    # Check if the given word matches with the rules using the search() function in regex module and if conditional statement 
    if re.search('[sxz]$', word):
         # If it is true then substitute 'es' to the word passed to make it a plural using sub() function of regex module
         return re.sub('$', 'es', word)
    elif re.search('[^aeioudgkprt]h$', word):
        # If it is true then substitue 'es' to the end of the word passed.
        return re.sub('$', 'es', word)
    elif re.search('[aeiou]y$', word):
        # If it is true then substitute 'ies' with 'y' to the word passed to make it a plural using sub() function of regex module
        return re.sub('y$', 'ies', word)
    else:
        # Else just add 's' to the word passed.
        return word + 's'
# Give the list as static input and store it in a variable.
gvn_lst = ["cat", "fox", "flower", "cap"]
#Iterate in the list of words using the For loop
for word in gvn_lst:
     #pass the iterator word as an argument to the pluralize_word function(It returns the pluralized word) and print it
     print(word, '-->', pluralize_word(word))

Output:

cat --> cats
fox --> foxes
flower --> flowers
cap --> caps

Python Program to Pluralize a Given Word Read More »

How to Find the Duration of a Wav File in Python?

What is a .wav File?

Wav is an audio file format that is similar to mp3. Wav audio files can also be played.

There are numerous methods accessible on the internet for determining the duration of wav audio files, but here we use a very simple and straightforward technique. For this task, we will employ Pydub, a Python library.

Pydub module:

To work with audio files, the Pydub library is used. It is useful for a wide range of operations. We can use pydub to play, trim, combine, split, or modify audio files.

Before we work with pydub module we should first install it.

Installation

pip install pydub

Finding the Duration of a WAV File in Python

Method #1:Using Pydub module

Approach:

  • Import AudioSegment from pydub module using the import keyword
  • Pass the .wav file to the from_file() function to load the audio file and store it in a variable
  • Calculate the duration(len of the file) of given .wav audio file using the len() function and apply duration_seconds() function on it to convert it into seconds.
  • Here the len() function gives a value in milliseconds hence we convert the duration into seconds
  • Converting the above duration from seconds to minutes
  • Here we are converting seconds to a certain time duration. We get minutes by dividing it by 60, and the remaining seconds by using the % (Modulo) operator.
  • Round off the values using the round() function
  • Print the given audio file(.wav) duration in {minutes:seconds} format.
  • The Exit of the Program.

Below is the implementation:

# Import AudioSegment from pydub module using the import keyword
from pydub import AudioSegment
# Pass the .wav file to the from_file() function to load the audio file
# and store it in a variable
audio = AudioSegment.from_file("samplewavfile.wav")

# Calculate the duration(len of the file) of given .wav audio file using the len()
# function and apply duration_seconds() function on it to convert it into seconds.
# Here the len() function gives a value in milliseconds hence we convert 
# the duration into seconds
audio.duration_seconds == (len(audio) / 1000.0)

# Converting the above duration from seconds to minutes
# Here we are converting seconds to a certain time duration. We get minutes by dividing it by 60,
# and the remaining seconds by using the % (Modulo) operator.
minutes_duartion = int(audio.duration_seconds // 60)
# Round off the values using the round() function
seconds_duration = round((audio.duration_seconds % 60),3)
# Print the given audio file(.wav) duration in minutes:seconds format 
print("The given audio file(.wav) duration in {minutes:seconds} format:")
print(minutes_duartion,':',seconds_duration)

Output:

The given audio file(.wav) duration in {minutes:seconds} format:
0 : 5.042

Method #2:Using contextlib module

Get the duration by dividing the totalframes with rateof frames.

import wave
import contextlib
gvn_wavfile = "samplewavfile.wav"
print("The duration of given wav file is:")
with contextlib.closing(wave.open(gvn_wavfile,'r')) as wavfile:
    frames = wavfile.getnframes()
    rate = wavfile.getframerate()
    duration = frames / float(rate)
    print(duration)

Output:

The duration of given wav file is:
5.0416326530612245

How to Find the Duration of a Wav File in Python? Read More »

How to Find Bank Branch Name from IFSC Code in Python?

What is an IFSC Code?

The IFSC is an abbreviation for Indian Financial System Code is an 11-digit alpha-numeric code that is used to uniquely classify bank branches within the National Electronic Fund Transfer (NEFT) network by the Central Bank.

Let us now see how to retrieve bank information from an IFSC code.

Python, as you are aware, has a variety of modules and libraries that may be used to execute a variety of tasks. Here, we use Python’s requests module. The details are asked from Razorpay.

In Python, we may send HTTP requests by utilizing the requests module. The HTTP request returns data according to it.

Before we work with this module we use should first install it on our system as shown below.

Installation:

pip install requests

The IFSC codes for some of the states

State                           District                         Branch                                                   IFSC Code

KARNATAKA             BANGALORE                URBAN BANGALORE CITY                   SIBL0000008

TAMIL NADU            VELLORE                       ARKONAM                                                 SIBL0000004

KERALA                      ERNAKULAM                MATTANCHERRY                                   SIBL0000018

MAHARASHTRA      GREATER BOMBAY     MUMBAI BANDRA                                 SIBL0000157

TELANGANA            ADILABAD                       MANCHERIAL                                         SIBL0000867

Finding Bank Branch Name from IFSC Code in Python

Approach:

  • Import requests module using the import keyword
  • Give the URL of Razorpay to send HTTP request and store it in a variable.
  • Give the IFSC code as user input using the input() function and store it in a variable.
  • Add both the above-given Razorpay Url and IFSC code to request HTTP and store it in another variable.
  • Pass the above result URL to the get() function and apply json() function for the result of the get() function
  • Here, the.json() function is used to transmit data in webpages to json format allowing for well-structured output.
  • Print the bank, branch names using the above JSON data by passing the keys as BANK and BRANCH.
  • Here, all the details are stored as key-value pairs.
  • The Exit of the Program.

Below is the implementation:

# Import requests module using the import keyword
import requests 

# Give the URL of razorpay to send HTTP request and store it in a variable.
gvn_url = "https://ifsc.razorpay.com/"

# Give the IFSC code as user input using the input() function and
# store it in a variable.
gvn_IFSCcocde = input("Enter some random IFSC code: ")

# Add both the above given razorpay Url and IFSC code to request HTTP and 
# store it in another variable
rslt_url = gvn_url + gvn_IFSCcocde

# Pass the above result url to the get() function and apply json() function
# for the result of the get() function
# Here, the.json() function is used to transmit data in webpages to json format
# allowing for well-structured output.
retrivedata = requests.get(rslt_url).json()

# Print the bank, branch names using the above json data by passing the keys as BANK and BRANCH.
# Here, all the details are stored as key-value pairs.
bank_name = retrivedata['BANK']
branch_name = retrivedata['BRANCH']
print(bank_name, branch_name)

Output:

Enter some random IFSC code: SIBL0000008
South Indian Bank BANGALORE CITY

How to Find Bank Branch Name from IFSC Code in Python? Read More »

How to Pass an Array to a Function in Python?

Here, in this article let us look at how to pass an array to a function in Python.

In Python, any type of data, such as a text, list, array, dictionary, and so on, can be given as an argument to a function. When we send a numeric array as an argument to a Python method or function, it is passed by reference.

Function in Python:

A function is a block of code that only executes when it is invoked. Data, known as parameters, can be passed into a function. As a result, a function can return data.

A function is a set of related statements that accomplishes a certain task.

Functions help in the division of our program into smaller, modular parts. As our program increases in size, functions help to keep it organized and manageable.

It also avoids repetition and makes the code reusable.

Passing an Array to a Function in Python

Method #1: Using Built-in Functions (Static Input)

Approach:

  • Import all from array module using the import keyword
  • Create a function say printing_array() which accepts the given aray as an argument
  • Inside the function, loop in the above passed array using the for loop.
  • Print each element of the given array.
  • Pass ‘i’, some random list as arguments to the array() function to create an array.
  • Store it in a variable.
  • Here ‘i’ indicates the datatype of the given array elements is integer
  • Pass the given array as an argument to the above-created printing_array() function to print an array.
  • The Exit of the Program.

Below is the implementation:

# Import all from array module using the import keyword
from array import *
# Create a function say printing_array() which accepts the given aray as an argument
def printing_array(arry): 
    # Inside the function, loop in the above passed array using the for loop
    for k in arry:
        # Print each element of the given array. 
        print(k)

# Pass 'i', some random list as arguments to the array() function to create an array.
# Store it in a variable.
# Here 'i' indicates the datatype of the given array elements is integer
gvn_arry = array('i', [1, 5, 3, 8, 2])
# Pass the given array as an argument to the above created printing_array() function
# to print an array
printing_array(gvn_arry)

Output:

1
5
3
8
2

Method #2: Using Built-in Functions (User Input)

Approach:

  • Import all from array module using the import keyword
  • Create a function say printing_array() which accepts the given aray as an argument
  • Inside the function, loop in the above passed array using the for loop.
  • Print each element of the given array.
  • Give the list as user input using the list(),map(),split(),int functions and store it in a variable.
  • Pass ‘i’, above given list as arguments to the array() function to create an array.
  • Store it in another variable.
  • Here ‘i’ indicates the datatype of the given array elements is integer
  • Pass the given array as an argument to the above-created printing_array() function to print an array.
  • The Exit of the Program.

Below is the implementation:

# Import all from array module using the import keyword
from array import *
# Create a function say printing_array() which accepts the given aray as an argument
def printing_array(arry): 
    # Inside the function, loop in the above passed array using the for loop
    for k in arry:
        # Print each element of the given array. 
        print(k)
        
# Give the list as user input using the list(),map(),split(),int 
# functions and store it in a variable.
gvn_lst = list(map(int, input(
   'Enter some random List Elements separated by spaces = ').split()))
# Pass 'i', above given list as arguments to the array() function to create an array.
# Store it in another variable.
# Here 'i' indicates the datatype of the given array elements is integer
gvn_arry = array('i', gvn_lst)
# Pass the given array as an argument to the above created printing_array() function
# to print an array
printing_array(gvn_arry)

Output:

Enter some random List Elements separated by spaces = 11 3 6 2 4
11
3
6
2
4


How to Pass an Array to a Function in Python? Read More »

How to Take Screenshots of Particular Size in Python?

In this article, let us see how to use Python to capture a specific portion of a screen. In many circumstances, we need to take a screenshot of a specific portion of the application.

Taking Screenshots of Particular Size in Python

Below are the ways to Take Screenshots of Particular Size in Python:

Method #1: Using pyscreenshot Module

Before we work with this pyscreenshot module we use should first install pillow (PIL) on our system as shown below.

Installation:

pip install pillow
pip install pyscreenshot

Output:

Collecting pyscreenshot
Downloading pyscreenshot-3.0-py3-none-any.whl (27 kB)
Collecting jeepney
Downloading jeepney-0.7.1-py3-none-any.whl (54 kB)
|████████████████████████████████| 54 kB 1.9 MB/s 
Collecting EasyProcess
Downloading EasyProcess-1.1-py3-none-any.whl (8.7 kB)
Collecting mss
Downloading mss-6.1.0-py3-none-any.whl (76 kB)
|████████████████████████████████| 76 kB 4.0 MB/s 
Collecting entrypoint2
Downloading entrypoint2-1.0-py3-none-any.whl (9.8 kB)
Installing collected packages: mss, jeepney, entrypoint2, EasyProcess, pyscreenshot
Successfully installed EasyProcess-1.1 entrypoint2-1.0 jeepney-0.7.1 mss-6.1.0 
pyscreenshot-3.0

Approach:

  • Import pyscreenshot module using the import keyword
  • Pass the dimensions of the screen in pixels to the bbox() function and pass it as an argument to the grab()
    function to capture the screenshot of the given size.
  • Store it in a variable.
  • Display the screenshot using the show() function
  • Save the screenshot with some random name in .png format using the save() function.
  • The Exit of the Program.

Below is the implementation:

# Import pyscreenshot module using the import keyword
import pyscreenshot
# Pass the dimensions of the screen in pixels to the bbox() function and 
# pass it as an argument to the grab() to capture the screenshot of the given size.
# Store it in a variable.
screenshot = pyscreenshot.grab(bbox=(100, 200, 450, 350))
# Display the screenshot using the show() function
screenshot.show()
# Save the screenshot with some random name in .png format using the save() function
screenshot.save("sample_screenshot.png")

Output:

Output Screenshot

Method #2: Using pillow Module

Approach:

  • Import ImageGrab from PIL(pillow) module using the import keyword
  • Pass the dimensions of the screen in pixels to the bbox() function and pass it as an argument to the grab() function of the ImageGrab to capture the screenshot of the given size.
  • Store it in a variable.
  • Display the screenshot using the show() function
  • Save the screenshot with some random name in .png format using the save() function.
  • The Exit of the Program.

Below is the implementation:

# Import ImageGrab from PIL(pillow) module using the import keyword
from PIL import ImageGrab
# Pass the dimensions of the screen in pixels to the bbox() function and 
# pass it as an argument to the grab() function of the ImageGrab to capture the 
# screenshot of the given size.
# Store it in a variable.
screenshot = ImageGrab.grab(bbox=(90, 120, 450, 350))
# Display the screenshot using the show() function
screenshot.show()
# Save the screenshot with some random name in .png format using the save() function
screenshot.save("output_screenshot.png")

Output:

Output screenshot using pillow module


How to Take Screenshots of Particular Size in Python? Read More »

Linked List Data Structure

Linked List Data Structure:

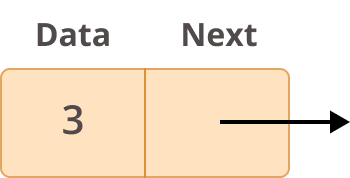
A linked list is a type of data structure that consists of a chain of nodes, each of which contains a value and a pointer to the next node in the chain.

The list’s head pointer points to the first node, and the list’s last element points to null. The head pointer points to null when the list is empty.

Linked lists can grow in size dynamically, and inserting and deleting elements from them is simple because, unlike arrays, we only need to change the pointers to the previous and next elements to insert or delete an element.

Linked lists are commonly used in the construction of file systems, adjacency lists, and hash tables.

Why Linked List?

Arrays can be used to store similar types of linear data, but they have the following limitations.
1) Because the array size is fixed, we must know the maximum number of elements in advance. Furthermore, regardless of usage, the allocated memory is always equal to the upper limit.
2) Inserting a new element in an array of elements is expensive because room must be made for the new elements, and existing elements must be shifted to make room, whereas in a linked list if we have the head node, we can traverse to any node through it and insert a new node at the required position.

Advantages of Linked Lists over arrays

1)Dynamic Data Structure:

  • Because the linked list is a dynamic data structure that can shrink and grow at runtime by deallocating or allocating memory, there is no need for initial size.
  • In contrast, in an array, an initial size must be declared, and the number of elements cannot exceed that size.

2) No Memory Wastage:

  • There is no memory waste because the size of a linked list can grow or shrink at runtime. Only the necessary memory is allocated.
  • In arrays, we must first initialize it with a size that we may or may not fully utilize. Thus, memory waste may occur.

3)Implementation:

A Linked List can be used to easily implement some very useful data structures such as queues and stacks.

4)Insertion and Deletion Operation:

Insertion and deletion operations in a Linked List are simple because there is no need to shift every element after insertion or deletion. Only the address in the pointers needs to be changed.

Disadvantages of Linked Lists over arrays

1)Memory Usage:

A linked list requires more memory than an array because it includes a pointer field in addition to the data field. The pointer field, like all other fields, requires memory to store the address of the next node.

2)Random Access:

To get to node an at index x in a linked list, we must first go through all the nodes before it. In the case of an array, however, we can use arr[x] to directly access an element at index x.

3)Reverse Traversal:

  • Reverse traversal is not possible in a singly linked list because each node stores only the address of the next node. Reverse traversal is possible in the case of a doubly-linked list, but it consumes more memory because we must allocate extra memory to store the previous pointer.
  • With the help of a for loop, we can perform a simple reverse traversal in arrays.

Representation:

A pointer to the first node of a linked list is used to represent it. The first node is referred to as the head. When the linked list is empty, the value of the head is NULL.
A list node is made up of at least two parts:
1) data (we can store integers, strings, or any type of data).
2) A pointer to the next node (or a reference to it) (connects one node to another)

Example Node of a Linked List

Linked List Data Structure Read More »

Filtering Text using Enchant in Python

Enchant Module in Python:

Enchant is a Python module that checks a word’s spelling and provides suggestions for correcting it. The antonyms and synonyms of the words are also provided. It determines whether or not a word is in the dictionary.

To tokenize text, Enchant provides the enchant.tokenize module. Tokenizing is the way of splitting words from the body of the text. However, not all words must be tokenized all of the time. If we’re spell-checking, it’s common practice to ignore email addresses and URLs. This can be accomplished by using filters to alter/modify the tokenization process.

Filtering Text using Enchant in Python

The following filters are currently in use:

1)EmailFilter

Approach:

  • Import get_tokenizer from tokenize of enchant module using the import keyword
  • Import EmailFilter from tokenize of enchant module using the import keyword
  • Give the text to be tokenized as static input and store it in a variable.
  • Get the tokenizer class by the argument language to the get_tokenizer() function
  • Printing the tokens without filtering it.
  • Take a new empty list that stores the tokens
  • Loop in each words of the token text by passing text as argument to tokenizer using the for loop
  • Add/append the token words to the newly created list using the append() function
  • Print the token list(It prints the tokens without filtering)
  • Pass the language and Type of Filter(say EmailFilter) to get_tokenizer() function to get the tokenizer of the corresponding filter
  • Printing the tokens after applying filtering to the given tokens
  • Take a new empty list that stores the tokens after filtering
  • Loop in each word of the filtered token text bypassing text as an argument to tokenizerfilter using the for loop
  • Add/append the token words to the newly created filteredtokenslist using the append() function
  • Print the token list after filtering(It prints the tokens with filtering).
  • The Exit of the Program.

Below is the implementation:

# Import get_tokenizer from tokenize of enchant module using the import keyword
from enchant.tokenize import get_tokenizer
# Import EmailFilter from tokenize of enchant module using the import keyword
from enchant.tokenize import EmailFilter

# Give the text to be tokenized as static input and store it in a variable.
gvn_text = "My email Id is [email protected]"

# Get the tokenizer class by the argument language to the get_tokenizer() function
tokenizer = get_tokenizer("en_US")

# Printing the tokens without filtering it.
print("Printing the tokens without filtering it:")
# Take a new empty list which stores the tokens 
tokenslist = []
# Loop in each words of the token text by passing text as argument to tokenizer using the for loop
for wrds in tokenizer(gvn_text):
  # Add/apppend the token words to the newly created list using the append() function
    tokenslist.append(wrds)
# Print the token list(It prints the tokens without filtering)    
print(tokenslist)
# Pass the language and Type of Filter(say EmailFilter) to get_tokenizer() function
# to get the tokenizer of corresponding filter
tokenizerfilter = get_tokenizer("en_US", [EmailFilter])
# Printing the tokens after applying filtering to the given tokens 
print("\nPrinting the tokens after applying filtering to the given tokens:")
# Take a new empty list which stores the tokens after filtering
filteredtokenslist = []
# Loop in each words of the filtered token text by passing text as argument to tokenizerfilter using the for loop
for wrds in tokenizerfilter(gvn_text):
    # Add/apppend the token words to the newly created filteredtokenslist using the append() function
    filteredtokenslist.append(wrds)
# Print the token list after filtering(It prints the tokens withfiltering)     
print(filteredtokenslist)

Output:

Printing the tokens without filtering it:
[('My', 0), ('email', 3), ('Id', 9), ('is', 12), ('pythonprograms', 15), ('gmail', 30), ('com', 36)]

Printing the tokens after applying filtering to the given tokens:
[('My', 0), ('email', 3), ('Id', 9), ('is', 12)]

2)URLFilter

Approach:

  • Import get_tokenizer from tokenize of enchant module using the import keyword
  • Import URLFilter from tokenize of enchant module using the import keyword
  • Give the text(URL) to be tokenized as static input and store it in a variable.
  • Get the tokenizer class by the argument language to the get_tokenizer() function
  • Printing the tokens without filtering it.
  • Take a new empty list that stores the tokens
  • Loop in each word of the token text by passing text as an argument to tokenizer using the for loop
  • Add/append the token words to the newly created list using the append() function
  • Print the token list(It prints the tokens without filtering)
  • Pass the language and Type of Filter(say URLFilter) to get_tokenizer() function to get the tokenizer of the corresponding filter
  • Printing the tokens after applying filtering to the given tokens
  • Take a new empty list that stores the tokens after filtering
  • Loop in each words of the filtered token text by passing text as an argument to tokenizerfilter using the for loop
  • Add/append the token words to the newly created filteredtokenslist using the append() function
  • Print the token list after filtering(It prints the tokens with filtering).
  • The Exit of the Program.

Below is the implementation:

# Import get_tokenizer from tokenize of enchant module using the import keyword
from enchant.tokenize import get_tokenizer
# Import URLFilter from tokenize of enchant module using the import keyword
from enchant.tokenize import URLFilter

# Give the text(URL) to be tokenized as static input and store it in a variable.
gvn_text = "The given URL is = https://python-programs.com/"

# Get the tokenizer class by the argument language to the get_tokenizer() function
tokenizer = get_tokenizer("en_US")

# Printing the tokens without filtering it.
print("Printing the tokens without filtering it.")
# Take a new empty list which stores the tokens 
tokenslist = []
# Loop in each words of the token text by passing text as argument to tokenizer using the for loop
for wrds in tokenizer(gvn_text):
  # Add/append the token words to the newly created list using the append() function
    tokenslist.append(wrds)
# Print the token list(It prints the tokens without filtering)    
print(tokenslist)
# Pass the language and Type of Filter(say URLFilter) to get_tokenizer() function
# to get the tokenizer of corresponding filter
tokenizerfilter = get_tokenizer("en_US", [URLFilter])
# Printing the tokens after applying filtering to the given tokens 
print("\nPrinting the tokens after applying filtering to the given tokens:")
# Take a new empty list which stores the tokens after filtering
filteredtokenslist = []
# Loop in each words of the filtered token text by passing text as argument to tokenizerfilter using the for loop
for wrds in tokenizerfilter(gvn_text):
    # Add/append the token words to the newly created filteredtokenslist using the append() function
    filteredtokenslist.append(wrds)
# Print the token list after filtering(It prints the tokens with filtering)     
print(filteredtokenslist)

Output:

Printing the tokens without filtering it.
[('The', 0), ('given', 4), ('URL', 10), ('is', 14), ('https', 19), ('python', 27), ('programs', 34), ('com', 43)]

Printing the tokens after applying filtering to the given tokens:
[('The', 0), ('given', 4), ('URL', 10), ('is', 14)]

3)WikiWordFilter

A WikiWord is a word made up of two or more words that start with capital letters and are run together.

Approach:

  • Import get_tokenizer from tokenize of enchant module using the import keyword
  • Import WikiWordFilter from tokenize of enchant module using the import keyword
  • Give the text(two or more words with initial capital letters) to be tokenized as static input and store it in a variable.
  • Get the tokenizer class by the argument language to the get_tokenizer() function
  • Printing the tokens without filtering it.
  • Take a new empty list that stores the tokens
  • Loop in each word of the token text by passing text as an argument to tokenizer using the for loop
  • Add/append the token words to the newly created list using the append() function
  • Print the token list(It prints the tokens without filtering)
  • Pass the language and Type of Filter(say WikiWordFilter) to get_tokenizer() function to get the tokenizer of the corresponding filter
  • Printing the tokens after applying filtering to the given tokens
  • Take a new empty list that stores the tokens after filtering
  • Loop in each word of the filtered token text by passing text as an argument to tokenizerfilter using the for loop
  • Add/append the token words to the newly created filteredtokenslist using the append() function
  • Print the token list after filtering(It prints the tokens with filtering).
  • The Exit of the Program.

Below is the implementation:

# Import get_tokenizer from tokenize of enchant module using the import keyword
from enchant.tokenize import get_tokenizer
# Import WikiWordFilter from tokenize of enchant module using the import keyword
from enchant.tokenize import WikiWordFilter

# Give the text(two or more words with initial capital letters) to be tokenized as static input and store it in a variable.
gvn_text = "PythonProgramsCoding....Hello all"

# Get the tokenizer class by the argument language to the get_tokenizer() function
tokenizer = get_tokenizer("en_US")

# Printing the tokens without filtering it.
print("Printing the tokens without filtering it.")
# Take a new empty list which stores the tokens 
tokenslist = []
# Loop in each words of the token text by passing text as argument to tokenizer using the for loop
for wrds in tokenizer(gvn_text):
  # Add/apppend the token words to the newly created list using the append() function
    tokenslist.append(wrds)
# Print the token list(It prints the tokens without filtering)    
print(tokenslist)
# Pass the language and Type of Filter(say WikiWordFilter) to get_tokenizer() function
# to get the tokenizer of corresponding filter
tokenizerfilter = get_tokenizer("en_US", [WikiWordFilter])
# Printing the tokens after applying filtering to the given tokens 
print("\nPrinting the tokens after applying filtering to the given tokens:")
# Take a new empty list which stores the tokens after filtering
filteredtokenslist = []
# Loop in each words of the filtered token text by passing text as argument to tokenizerfilter using the for loop
for wrds in tokenizerfilter(gvn_text):
    # Add/apppend the token words to the newly created filteredtokenslist using the append() function
    filteredtokenslist.append(wrds)
# Print the token list after filtering(It prints the tokens withfiltering)     
print(filteredtokenslist)

Output:

Printing the tokens without filtering it.
[('PythonProgramsCoding', 0), ('Hello', 24), ('all', 30)]

Printing the tokens after applying filtering to the given tokens:
[('all', 30)]
Filtering Text using Enchant in Python Read More »

Python enchant.DictWithPWL() Function

Enchant Module in Python:

Enchant is a Python module that checks a word’s spelling and provides suggestions for correcting it. The antonyms and synonyms of the words are also provided. It determines whether or not a word is in the dictionary.

The Enchant module is also used to check the spelling of words.

Python enchant.DictWithPWL() Function:

enchant. DictWithPWL() is a built-in method of the enchant module. It is used to combine a language dictionary and a custom dictionary, also known as a Personal Word List (PSL).

Syntax:

enchant.DictWithPWL(tag, textFile)

Parameters

tag: It is the code of the language dictionary

textFile: It is the path to the text file given as input containing the words to be included, one word per line.

Return Value:

A Dictionary(Dict) object is returned by the DictWithPWL() function of the enchant module

Let us take the “sampletextfile.txt” as an example that has the following content:

NOTE: The text file should contain one word per line

sampletextfile.txt:

welcome
Hello 
all

enchant.DictWithPWL() Function in Python

Approach:

  • Import enchant module using the import keyword
  • Pass some random language code to the Dict() function of the enchant module to create a dictionary for the language given.
  • Here we create a dictionary for en_US language
  • Give some random word to be searched as static input and store it in a variable.
  • Check if the above-given word present(exists) in the dictionary using the check() function and the if conditional statement
  • If it is true, then print the “The given word is present in the dictionary”
  • Else print “The given word is NOT present in the dictionary”
  • Give the text file path as static input and store it in another variable.
  • Pass the language code, above text file as arguments to the DictWithPWL() function to instantiate the enchant dictionary
  • Check if the above given word present(exists) in the new(enchant)dictionary using the check() function and if conditional statement
  • If it is true, then print the “The given word is present in the Enchant dictionary”
  • Else print “The given word is NOT present in the Enchant dictionary”.
  • The Exit of the Program.

Below is the implementation:

# Import enchant module using the import keyword
import enchant

# Pass some random language code to the Dict() function of the enchant module
# to create dictionary for the language given.
# Here we create dictionary for en_US language
dictionry  = enchant.Dict("en_US")

# Give some random word to be searched as static input and store it in a variable.
gvn_word = "welcome"

# Check if the above given word present(exists) in the dictionary using the check() function 
# and if conditional statement
if dictionry.check(gvn_word):
    # If it is true, then print the "The given word is present in the dictionary"
    print("The given word{", gvn_word, "} is present the dictionary")
else:
    # Else print "The given word is NOT present in the dictionary"
    print("The given word{", gvn_word, "} is NOT present the dictionary")

# Give the text file path as static input and store it in another variable.
Textfilepath = r"C:\Users\cirus\Desktop\sampletextfile.txt"

# Pass the language code, above text file as arguments to the DictWithPWL() function to 
# instantiate the enchant dictionary
dictionry = enchant.DictWithPWL("en_US", Textfilepath)

# Check if the above given word present(exists) in the new(enchant)dictionary using the check() function 
# and if conditional statement
if dictionry.check(gvn_word):
    # If it is true, then print the "The given word is present in the Enchant dictionary"
    print("The given word{", gvn_word, "} is present in the Enchant dictionary")
else:
    # Else print "The given word is NOT present in the Enchant dictionary"
    print("The given word{", gvn_word, "} is NOT present in the Enchant dictionary")

Output:

The given word{ welcome } is present in the dictionary
The given word{ welcome } is present in the Enchant dictionary


Python enchant.DictWithPWL() Function Read More »

Python enchant.dict_exists() Function

Enchant Module in Python:

Enchant is a Python module that checks a word’s spelling and provides suggestions for correcting it. The antonyms and synonyms of the words are also provided. It determines whether or not a word is in the dictionary.

Python enchant.dict_exists() Function:

enchant.dict_exists() is an enchant module built-in method. It is used to check if a dictionary for a specific language is available or NOT.

Syntax:

enchant.dict_exists(tag)

Parameters

tag: It is the code of the language dictionary given as input.

Return Value:

This function returns a boolean value. True if the dictionary exists, False otherwise.

enchant.dict_exists() Function in Python

Method #1: Using Built-in Functions (Static Input)

Approach:

  • Import enchant module using the import keyword
  • Give the tag(language code) to be checked as static input and store it in a variable
  • Pass the given tag as an argument to the dict_exists() function of the enchant module to check whether the dictionary exists or NOT for the given tag
  • Check if the above result is True using the if conditional statement
  • If it is true, then print “The dictionary exists for the given tag”
  • Else print “The dictionary does NOT exist for the given tag”.
  • The Exit of the Program.

Below is the implementation:

# Import enchant module using the import keyword
import enchant

# Give the tag(language code) to be checked as static input and store it in a variable
gvn_tag = "en_US"

# Pass the given tag as an argument to the dict_exists() function 
# of the enchant module to check whether the dictionary exists or NOT for the given tag
dict_exists = enchant.dict_exists(gvn_tag)

# Check if the above result is True using the if conditional statement
if dict_exists == True:
    # If it is true, then print "The dictionary exists for the given tag"
    print("The dictionary exists for the given tag{", gvn_tag, "}")
else:
    # Else print "The dictionary does NOT exist for the given tag"
    print("The dictionary does NOT exist for the given tag{", gvn_tag, "}")

Output:

The dictionary exists for the given tag{ en_US }

Method #2: Using Built-in Functions (User Input)

Approach:

  • Import enchant module using the import keyword
  • Give the tag(language code) to be checked as user input using the input() function and store it in a variable
  • Pass the given tag as an argument to the dict_exists() function of the enchant module to check whether the dictionary exists or NOT for the given tag
  • Check if the above result is True using the if conditional statement
  • If it is true, then print “The dictionary exists for the given tag”
  • Else print “The dictionary does NOT exist for the given tag”.
  • The Exit of the Program.

Below is the implementation:

# Import enchant module using the import keyword
import enchant

# Give the tag(language code) to be checked as user input using the input() function 
# and store it in a variable
gvn_tag = input("Enter some random tag(language code) = ")

# Pass the given tag as an argument to the dict_exists() function 
# of the enchant module to check whether the dictionary exists or NOT for the given tag
dict_exists = enchant.dict_exists(gvn_tag)

# Check if the above result is True using the if conditional statement
if dict_exists == True:
    # If it is true, then print "The dictionary exists for the given tag"
    print("The dictionary exists for the given tag{", gvn_tag, "}")
else:
    # Else print "The dictionary does NOT exist for the given tag"
    print("The dictionary does NOT exist for the given tag{", gvn_tag, "}")

Output:

Enter some random tag(language code) = hi_IN
The dictionary does NOT exist for the given tag{ hi_IN }


Python enchant.dict_exists() Function Read More »