Python

Python Data Persistence – pyodbc Module

Python Data Persistence – pyodbc Module

ODBC is a language and operating system independent API for accessing relational databases. The product module enables access to any RDBMS for which the respective ODBC driver is available on the operating system. Most of the established relational database products (Oracle, MySQL, PostgreSQL, SQL Server, etc.) have ODBC drivers developed by the vendors themselves or third-party developers.

In this section, we access ‘mydb’ database deployed on the MySQL server. First of all, verify if your OS has a corresponding ODBC driver installed. If not, download MYSQL/ODBC connector compatible with your OS, MySQL version, and hardware architecture from MySQL’s official download page: https://dev.mysql.com/downloads/connector/odbc/ and perform the installation as per instructions.

The following discussion pertains to MySQL ODBC on Windows OS. You need to open the ODBC Data Sources app in the Administrative Tools section of the control panel, add a newly installed MySQL driver, if it doesn’t have the same already, and configure it to identify by a DSN (Data Source Name) with the help of MySQL sever’s user ID and password, pointing towards ‘mydb’ database.(figure 8.1)

Python Data Presistence - pyodbc Module chapter 8 img 1

This ‘MySQLDSN’ is now available for use in any application including our Python interpreter. You need to install pyodbc module for that purpose.

Start the Python interpreter and import this module. Its connect () function takes the DSN and other login credentials as arguments.

Example

>>> con=pyodbc.connect("DSN=MYSQLDSN;UID=root")

Once we obtain the connection object, the rest of the operations are exactly similar to that described with reference to the sqlite3 module. You can try creating Customers and Invoices tables in mydb database using their earlier structure and sample data.
In conclusion, we can say that the DB-API specification has made database handling very easy and more importantly uniform. However, data in SQL tables is stored basically in primary data types only which are mapped to corresponding built-in data types of Python. Python’s user-defined objects can’t be persistently stored and retrieved to/from SQL tables. The next chapter deals with the mapping of Python classes to SQL tables.

Python Data Persistence SQLAIchemy

Python Data Persistence – Python – SQLAIchemy

The concluding paragraph of the previous chapter briefly talked about the disparity between type systems of SQL and object-oriented programming languages such as Python. Apart from Python’s Number (that too int and float only, not complex) and string types (which are generally called scalar types), SQL doesn’t have an equivalent data type for others such as diet, tuple, list, or any user-defined class.

If you have to store such an object in a relational database, it must be deconstructed into SQL data types first, before performing INSERT operation. On the other hand, a Python object of the desired type will have to be constructed by using data retrieved from a SQL table, before a Python script is able to process it.

Let’s take the case of ‘Products’ table in the SQLite database used in the previous chapter. Its structure is as follows:

Example

CREATE TABLE Products (
ProductID    INTEGER     PRIMARY KEY AUTOINCREMENT,
Name     TEXT (20),
Price       INTEGER
) ;

On the other side, Python script has a Products class and its object is populated with data as below:

Example

class Product 
def __init__(self, id, name, price):
           self.id=id
           self.name=name
           self.price=price
p1=Product(1, Laptop 1,25000)

Following sqlite3 module syntax, the following statement will insert pi object in the Products table:

Example

cur.execute("insert into products values 
(?,?,?);",(self.id, self.name, self.price))

Similarly, following statements will store retrieved data in an object of Products class.

Example

cur.execute('select * from products where name=?',
(1 Laptop',)) row=cur.fetchone()
p1=Products(row[0], row[1],row[2])

As you can see, this involves a tedious and explicit packing and unpacking of Python objects in order to be compatible with SQL data types. This is where Object Relational Mappers are useful.

WhatisORM?

An Object Relation Mapper (ORM) library provides a seamless interface between a class and a SQL table. A class is mapped to a certain table in the database, so that cumbersome to and fro conversion between object and SQL types are automated. The products class in Python code can be mapped to the Products table in the database. As a result, all CRUD operations are done with the help of objects only, not requiring hard-coded SQL queries to be used in Python script.

ORMs thus provides an abstraction layer over the raw SQL queries, thus enabling rapid application development. Such ORM libraries are available for most programming languages including Python. SQLAlchemy is a popular database toolkit widely used by Python developers. SQL ALchemy’s ORM system transparently synchronizes all changes in the state of an object of a user-defined class with its related row in the database table.

SQLAlchemy interacts with a certain type of database in association with the respective DB-API compliant module. Its dialect system is able to establish interaction with a database through the latter’s DB-API driver. That means you should have a corresponding DB-API module also installed along with SQLAlchemy to be able to use a particular type of RDBMS.

As a matter of fact, SQLALchemy library also contains, in addition to ORM API, the SQL Expression Language (SQLAlchemy Core) that executes primitive constructs of the relational database directly. While our focus in this chapter is on SQLALChemy ORM, we shall also briefly SQL Expression language in the end. (figure 9.1)
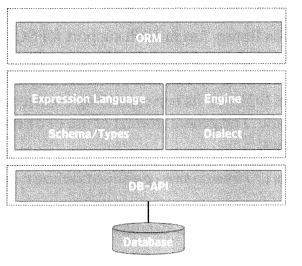
Python Data Presistence - Python - SQLAIchemy chapter 8 img 1

In most cases, SQLAlchemy is installed with the help of a pip utility. As explained in —, a virtual environment with SQLAlchemy installed will be used for this chapter. We need to activate it and start a Python interpreter.

Example

E:\SQLAlchemyEnv>scripts\activate 
(SQLAlchemyEnv) E:\SQLAlchemyEnv>python 
Python 3.7.2 (tags/v3.7.2:9a3ffc0492, Dec 23 2018, 23:09:28) 
[MSC v.1916 64 bit (AMD64)] on Win32 
Type "help", "copyright", "credits" or "license" for more information.
>>>

ORM – Session object

Now that we have created the Products table in the database, the next step is to start the transaction session. A session object is a handle used to interact with the database. We define a Session class that will serve as a factory for new Session objects with the help of the session maker () function.

from sqlalchemy.orm import sessionmaker 
Session = sessionmaker(bind=engine)

Here the engine is the Engine object that represents a connection with our database. Whenever you need to have a conversation with the database, you instantiate a Session:

session  = Session ( )

The session remains in force till changes to the database are committed and/or the close () method is called on a session object.

Python Data Persistence – SQLAlchemy ORM

Python Data Persistence – SQLAlchemy ORM

The first step is to connect to a database by using the create_engine () function in sqlalchemy module. This function should be provided with the URL of the database. The easiest way is to connect to an in-memory SQLite database.

Example

>>> from sqlalchemy import create_engine
>>> engine=create_engine('sqlite:///:memory:')

To connect to a SQLite database file use URL similar to following: engine =create_engine(‘sqlite:///mydb.sqlite’)

As you know, the Python library has in-built support for SQLite in the form of a DB-API compatible sqlite3 module. However, for other databases, its respective module needs to be installed. In order to connect to a different database (other than SQLite), its corresponding connection string includes the dialect and module. The general format of use of the create_engine () function is as follows:

dialect+driver://username:password®host:port/ database

Hence, to connect to a MySQL database using pymysql module, we need to use the following statement:

engine = create_engine('mysql+pymydsql://root@ localhost/mydb')

This assumes that the MySQL server’s username is ‘roof with no password set. The create_engine () function returns Engine object. It represents the interface to the database. The ORM doesn’t use the Engine directly once created but is used behind the scenes. This function can accept the optional ‘echo’ argument which is False by default. If set to True, it causes the generated SQL to be displayed by the Python interpreter.

>>> engine=create_
engine(1sqlite:///:memory:',echo=True)


Python Data Persistence – ORM – Table Object and Mapped Class

Python Data Persistence – ORM – Table Object and Mapped Class

The next step is to describe the database tables and define the mapping classes. An object of a metaclass, called Declarative Base class that stores a catalog of user-defined classes and mapped tables is first obtained. This Declarative Base class is defined in sqlalchemy. ext.declarative sub-module.

>>> from sqlalchemy.ext.declarative import 
declarative_base
>>> base=declarative_base( )

Use this ‘base’ class to define mapped classes in terms of it. We define the Products class and map it to the Products table in the database. Its table name property defines this mapping. Other attributes are column names in the table.

Example

#myclasses.py
from sqlalchemy.ext.declarative import declarative_ 
base
from sqlalchemy import Column, Integer, String base=declarative_base( ) 
class Product(Base):
tablename = 'Products'

ProductID = Column(Integer, primary_key=True) 
name = Column(String) 
price = Column(Integer)

The column is a SQL Alchemy schema object that represents column in the database table. Its constructor defines name, data type, and constraint parameters. The Column data type can be any of the following generic data types that specify the type in which Python data can be read, written, and stored. SQLAlchemy will choose the best database column type available on the target database when issuing a CREATE TABLE statement.

  • Biglnteger
  • Boolean
  • Date
  • DateTime
  • Float
  • Integer
  • Numeric
  • Smalllnteger
  • String
  • Text
  • Time

Even though this class defines mapping, it’s a normal Python class, in which there may be other ordinary attributes and methods as may be required by the application.

The Table object is created as per the specifications in the class and is associated with the class by constructing a Mapper object which remains behind the scene and we normally don’t need to deal with it directly.

The Table object created in the Declarative system is a member of the MetaData attribute of the declarative base class. The create_all ( ) method is called on metadata, passing in our Engine as a source of database connectivity. It will emit CREATE TABLE statements to the database for all tables that don’t yet exist.

base.metadata.create_all(engine)

Complete process explained above is stored as a script (addproducts.py) in the root folder of our virtual environment.

Example

from sqlalchemy import Column, Integer, String 
from sqlalchemy.ext.declarative import declarative_ base
from sqlalchemy import create_engine
from myclasses import Product, base
engine = create_engine('sqlite:///mydb.sqlite',echo=True)
base.metadata.create_all(engine)

We run this script from the command prompt (from within our virtual environment of course). The command window will show, apart from other logging information, the equivalent CREATE TABLE statement emitted by SQLALchemy. (figure 9.1)

(SQLAlchemyEnv) E:\SQLAlchemyEnv>python class-table-mapping . py
PRAGMA table_info("Products")
( )
CREATE TABLE "Products" (
"ProductID" INTEGER NOT NULL, 
name VARCHAR, 
price INTEGER,
PRIMARY KEY ("ProductID")
)
( )
COMMIT

Python Data Persistence – ORM – Add Data

Python Data Persistence – ORM – Add Data

To add data in the ‘Products’ table, first initialize an object of its mapped Products class, add it to the session and commit the changes.

Example

p1 = Products(name='Laptop 1, price = 25000) 
sessionobj.add(p1) 
sessionobj.commit( )

Add above code snippets to addproducts.py. It now looks like this:

from sqlalchemy import Column, Integer, String
from sqlalchemy import create_engine
from myclasses import Products,base
engine = create_engine('sqlite:///mydb.sqlite', echo=True)
base.metadata.create_all(engine) 
from sqlalchemy.orm import sessionmaker 
Session = sessionmaker(bind=engine) 
sessionobj = Session()
p1 = Product(name='Laptop', price=25000) 
sessionobj.add(p1) 
sessionobj.commit( )

Run the above script from the command prompt. SQLAlchemy will emit equivalent parameterized INSERT query that will be echoed on the terminal as shown below in figure 9.2:

(SQLAlchemyEnv) E:\SQLAlchemyEnv>addproducts.py 
PRAGMA table_info("Products")
( )
BEGIN (implicit)
INSERT INTO "Products" (name, price) VALUES (?, ?) ('Laptop', 25000)
COMMIT

If you want to confirm, open the database in SQLite console and view’ rows in Products table, (figure 9.3)

sqlite> .head on
sqlite> .mode column
sqlite> .open mydb.sqlite
sqlite> select * from products;
ProductID        name          price
———-         ——-         ——
1               Laptop         25000

To add multiple records at once, call the add_all() method on the session object. It requires a list of objects to be added.

Example

p2=Products(name='TV',price=40000) 
p3=Products(name=1 Router',price = 2 000) 
p4 = Products(name=1 Scanner 1,price = 5000) 
p5 = Products(name='Printer' ,price = 9000) 
p6=Products(name='Mobile',price=15000) 
sessionobj.add_all( [p2,p3,p4,p5,p6]) 
sessionobj.commit( )

Go ahead and add the ‘Customers’ class mapped to the ‘Customers’ table. Add data as per sample data given. (We shall add ‘Invoices’ class and ‘Invoices’ table a little later)

Example

class Customer(base):
table name ='Customers'
CustID=Column(Integer, primary_key=True) 
name=Column(String)
GSTIN=Column(String)

We have to add this table in the database schema by executing the following statement again:

base.metadata.create_all(engine)

Python: Add a Column to an Existing CSV File

Methods to add a column to an existing CSV File

In this article, we will discuss how to add a column to an existing CSV file using csv.reader and csv.DictWriter  classes. Apart from appending the columns, we will also discuss how to insert columns in between other columns of the existing CSV file.

Original CSV file content

total_bill tip sex smoker day time size
0 16.99 1.01 Female No Sun Dinner 2
1 10.34 1.66 Male No Sun Dinner 3
2 21.01 3.50 Male No Sun Dinner 3
3 23.68 3.31 Male No Sun Dinner 2
4 24.59 3.61 Female No Sun Dinner 4
  • Method 1-Add a column with the same values to an existing CSV file

In this, we see how we make one column and add it to our CSV file but all the values in this column are the same.

Steps will be to append a column in CSV file are,

  1. Open ‘input.csv’ file in read mode and create csv.reader object for this CSV file
  2. Open ‘output.csv’ file in write mode and create csv.writer object for this CSV file
  3. Using reader object, read the ‘input.csv’ file line by line
  4. For each row (read like a list ), append default text in the list.
  5. Write this updated list / row in the ‘output.csv’ using csv.writer object for this file.
  6. Close both input.csv and output.csv file.

Let see this with the help of an example

from csv import writer
from csv import reader
default_text = 'New column'
# Open the input_file in read mode and output_file in write mode
with open('example1.csv', 'r') as read_obj, \
        open('output_1.csv', 'w', newline='') as write_obj:
    # Create a csv.reader object from the input file object
    csv_reader = reader(read_obj)
    # Create a csv.writer object from the output file object
    csv_writer = writer(write_obj)
    # Read each row of the input csv file as list
    for row in csv_reader:
        # Append the default text in the row / list
        row.append(default_text)
        # Add the updated row / list to the output file
        csv_writer.writerow(row)
output_data=pd.read_csv('output_1.csv')
output_data.head()

Output

total_bill tip sex smoker day time size New column
0 16.99 1.01 Female No Sun Dinner 2 New column
1 10.34 1.66 Male No Sun Dinner 3 New column
2 21.01 3.50 Male No Sun Dinner 3 New column
3 23.68 3.31 Male No Sun Dinner 2 New column
4 24.59 3.61 Female No Sun Dinner 4 New column

Here we see that new column is added but all value in this column is same.

Now we see how we can add different values in the column.

  •  Method 2-Add a column to an existing CSV file, based on values from other columns

In this method how we can make a new column but in this column the value we add will be a combination of two or more columns. As we know there is no direct function to achieve so we have to write our own function to achieve this task. Let see the code for this.

from csv import writer
from csv import reader
def add_column_in_csv(input_file, output_file, transform_row):
    """ Append a column in existing csv using csv.reader / csv.writer classes"""
    # Open the input_file in read mode and output_file in write mode
    with open(input_file, 'r') as read_obj, \
            open(output_file, 'w', newline='') as write_obj:
        # Create a csv.reader object from the input file object
        csv_reader = reader(read_obj)
        # Create a csv.writer object from the output file object
        csv_writer = writer(write_obj)
        # Read each row of the input csv file as list
        for row in csv_reader:
            # Pass the list / row in the transform function to add column text for this row
            transform_row(row, csv_reader.line_num)
            # Write the updated row / list to the output file
            csv_writer.writerow(row)
add_column_in_csv('example1.csv', 'output_2.csv', lambda row, line_num: row.append(row[0] + '__' + row[1]))
output_data=pd.read_csv('output_2.csv')
output_data.head()

Output

total_bill tip sex smoker day time size total_bill__tip
0 16.99 1.01 Female No Sun Dinner 2 16.99__1.01
1 10.34 1.66 Male No Sun Dinner 3 10.34__1.66
2 21.01 3.50 Male No Sun Dinner 3 21.01__3.5
3 23.68 3.31 Male No Sun Dinner 2 23.68__3.31
4 24.59 3.61 Female No Sun Dinner 4 24.59__3.61

Here we see the new column is formed as the combination of the values of the 1st and 2nd column.

Explanation:

In the Lambda function, we received each row as a list and the line number. It then added a value in the list and the value is a merger of the first and second value of the list. It appended the column in the contents of example1.csv by merging values of the first and second columns and then saved the changes as output_2.csv files.

  • Method 3-Add a list as a column to an existing csv file

In this method, we will add our own value in the column by making a list of our values and pass this into the function that we will make. Let see the code for this.

from csv import writer
from csv import reader
def add_column_in_csv(input_file, output_file, transform_row):
    """ Append a column in existing csv using csv.reader / csv.writer classes"""
    # Open the input_file in read mode and output_file in write mode
    with open(input_file, 'r') as read_obj, \
            open(output_file, 'w', newline='') as write_obj:
        # Create a csv.reader object from the input file object
        csv_reader = reader(read_obj)
        # Create a csv.writer object from the output file object
        csv_writer = writer(write_obj)
        # Read each row of the input csv file as list
        for row in csv_reader:
            # Pass the list / row in the transform function to add column text for this row
            transform_row(row, csv_reader.line_num)
            # Write the updated row / list to the output file
            csv_writer.writerow(row)
l=[]
l.append("New Column")
rows = len(data.axes[0])
for i in range(rows):
    val=i+1
    l.append(val)
add_column_in_csv('example1.csv', 'output_3.csv', lambda row, line_num: row.append(l[line_num - 1]))
output_data=pd.read_csv('output_3.csv')
output_data.head()

Output

total_bill tip sex smoker day time size New Column
0 16.99 1.01 Female No Sun Dinner 2 1
1 10.34 1.66 Male No Sun Dinner 3 2
2 21.01 3.50 Male No Sun Dinner 3 3
3 23.68 3.31 Male No Sun Dinner 2 4
4 24.59 3.61 Female No Sun Dinner 4 5

Explanation

In the Lambda function, we received each row as a list and the line number. It then added a value in the list and the value is an entry from our list l at index  line_num – 1.Thus all the entries in the list l are added as a column in the CSV.

So these are some of the methods to add new column in csv.

Python: How to create a zip archive from multiple files or Directory

Method to create zip archive from multiple files or directory in python

In this article, we discuss how we can create a zip archive of multiple files or directories in python. To understand this let us understand about ZipFile class.

ZipFile class

To execute this program we have to import ZipFile class of zipfile module.ZipFile is a class of zipfile modules for reading and writing zip files.

syntax: zipfile.ZipFile(file, mode='r', compression=ZIP_STORED, allowZip64=True, compresslevel=None, *, strict_timestamps=True)

Create a zip archives of multiples file

    • Method 1:Without using with statement

Let us first write the program and then see how code works.

from zipfile import ZipFile
# create a ZipFile object
zipObj = ZipFile('sample.zip', 'w')
# Add multiple files to the zip
zipObj.write('file1.txt')
zipObj.write('file2.txt')
# close the Zip File
zipObj.close()

Output

Directory structure before the execution of the program

Mode LastWriteTime Length Name
---- ------------- ------ ----
-a---- 10-06-2021 18:41 14 file1.txt
-a---- 10-06-2021 18:41 15 file2.txt
-a---- 10-06-2021 19:06 216 zip.py

Directory structure after the execution of the program

Mode LastWriteTime Length Name
---- ------------- ------ ----
-a---- 10-06-2021 18:41 14 file1.txt
-a---- 10-06-2021 18:41 15 file2.txt
-a---- 10-06-2021 19:09 239 sample.zip
-a---- 10-06-2021 19:09 216 zip.py

Here we clearly see that a zip file is created.

Let see how the program works. First, we create a ZipFile object bypassing the new file name and mode as ‘w’ (write mode). It will create a new zip file and open it within the ZipFile object. Then we use Call write() function on ZipFile object to add the files in it and then call close() on ZipFile object to Close the zip file.

  • Method 2:Using with statement

The difference between this and the previous method is that when we didn’t use with the statement then we have to close the zip file when the ZipFile object goes out of scope but when we use with statement the zip file automatically close when the ZipFile object goes out of scope. Let see the code for this.

from zipfile import ZipFile
# Create a ZipFile Object
with ZipFile('sample2.zip', 'w') as zipObj:
   # Add multiple files to the zip
   zipObj.write('file1.txt')
   zipObj.write('file2.txt')

Output

Directory structure before the execution of the program

Mode LastWriteTime Length Name
---- ------------- ------ ----
-a---- 10-06-2021 18:41 14 file1.txt
-a---- 10-06-2021 18:41 15 file2.txt
-a---- 10-06-2021 19:09 239 sample.zip
-a---- 10-06-2021 19:21 429 zip.py

Directory structure after the execution of the program

Mode LastWriteTime Length Name
---- ------------- ------ ----
-a---- 10-06-2021 18:41 14 file1.txt
-a---- 10-06-2021 18:41 15 file2.txt
-a---- 10-06-2021 19:09 239 sample.zip
-a---- 10-06-2021 19:24 239 sample2.zip
-a---- 10-06-2021 19:24 429 zip.py

Here we see that another zip file is created.

Create a zip archive of the directory

To zip selected files from a directory we need to check the condition on each file path while iteration before adding it to the zip file. As here we work on directory and file so we also have to import os module. Let see the code for this.

from zipfile import ZipFile
import os
from os.path import basename
# create a ZipFile object
dirName="../zip"
with ZipFile('sampleDir.zip', 'w') as zipObj:
   # Iterate over all the files in directory
   for folderName, subfolders, filenames in os.walk(dirName):
       for filename in filenames:
           #create complete filepath of file in directory
           filePath = os.path.join(folderName, filename)
           # Add file to zip
           zipObj.write(filePath, basename(filePath))

Output

Mode LastWriteTime Length Name
---- ------------- ------ ----
-a---- 10-06-2021 18:41 14 file1.txt
-a---- 10-06-2021 18:41 15 file2.txt
-a---- 10-06-2021 19:09 239 sample.zip
-a---- 10-06-2021 19:24 239 sample2.zip
-a---- 10-06-2021 21:44 2796 sampleDir.zip
-a---- 10-06-2021 19:24 429 zip.py
-a---- 10-06-2021 21:44 506 zipdir.py

Here we see that the sampleDir.zip file is created.

Python Data Presistence – Row Object

Python Data Presistence – Row Object

By default, each row in the query result set is a tuple of values belonging to the column list in the SELECT statement. In the above example, the row object returns a tuple.

Example

>>> row=cur. f etchone ( )
> > > row
(2, 'TV', 40000)
>>> type(row)
<class 'tuple'>

The order of columns in the tuple cannot be ascertained from the object itself. The connection object has a useful ‘row_£actory’ property with which row in the result set can be converted into some meaningful representation. This can be done either by assigning a row factory to a user-defined function that will return a custom object or by setting it to the constructor of the Row class.

Row class has been defined in the sqlite3 module, whose primary purpose is to be used as a row factory. As a result, the row of the result set is returned as a Row object. Row class defines a keys () method that returns column names used in the SELECT statement. Values are accessible using the index as well as by name.

Example

>>> r=cur.fetchone( )
>>> type(r)
<class 'sqlite3.Row'>
>>> r.keysO
t'ProductID', 'Name', 'Price']
>>> fields=r .keys ( )
>>> r[1]
'TV'
> > > r['name']
'TV'
>>> for nm in fields:
print (nm, r[nm])
ProductID 2
Name TV
Price 40000


Python Data Presistence – while Statement

Python Data Presistence – while Statement

The while keyword constructs a conditional loop. Python interpreter evaluates the boolean expression and keeps on executing the subsequent
uniformly indented block of statements as long as it holds true. The moment it is no longer true, the repetition stops, and the program flow proceeds to the next statement in the script. A syntactical representation of usage of while loop is as follows:

Example

#using while statement
while expression==True:
#while block
. . .
end of while block
#rest of the statements

One way to control repetition is to keep its count and allow the next round of execution of block till the count exceeds the desired limit. In the following code snippet, the block executes repeatedly till the count is <= 5.

Example

#while-1.py
count=0
while count<5:
#count repetitions
count=count+1
print ("This is count number",count)
print ("end of 5 repetitions")

Output

E:\python 3 7>python whi1e- 1.py 
This is count number 1 
This is count number 2 
This is count number 3 
This is count number 4 
This is count number 5 
end of 5 repetitions 

E:\python37>

The expression in while statement is executed before each round of repetition (also called iteration). Here is another example to consolidate your understanding of the while loop.

The following code generates the list of numbers in the Fibonacci series. First, the two numbers in the list are 0 and 1. Each subsequent number is the sum of the previous two numbers. The while loop in the code adds the next 10 numbers. The iterations are counted with the help of variable ‘i’. the sum of numbers at i* and (Ml)* position is appended to the list till ‘i’ reaches 10.

Example

#fibolist . py
FiboList= [ ]
i = 0
max=1
FiboList.append(i)
FiboList.append(max)
while i<10:
#next number is sum of previous two
max=FiboList[i]+FiboList[i+1]
FiboList.append(max)
i = i + l
print ('Fibonacci series:1,FiboList)

Output

E : \py thon3 7 >py thon fibolist.py 
Fibonacci series: [ 0 , 1 , 1 , 2 , 3 , 5 , 8 , 13 , 21 , 34 , 55 , 89] 

E:\python37>

Python Data Presistence – os Module

Python Data Presistence – os Module

This is another module containing useful utilities for manipulating files and directories programmatically. The usual operating system commands for directory management have equivalents in this module. There is mkdir ( ) function that creates a new directory inside the current directory by default. To create it at any other location in the file system, its absolute path has to be given.

Example

import os
os.mkdir(1newdir’) # inside current directory
os.mkdir(‘c:\\newdir’) #in C drive

The chdir ( ) function (to set current working directory) and rmdir ( ) function (to remove a directory) also take relative path by default. A ge tcwd ( ) function is also available to know which is the current working directory. All these operations are demonstrated in following interpreter session:

Example

>> import os
>>> os.mkdir(“newdir”) #new directory in current path
>>> os.chdir(“newdir”) #set current directory
>>> os.getcwdO #displays current working directory
‘E:\\python37\\newdir’
>>> os.rmdir(“newdir”) #shouldn’t be current directory and should be empty Traceback (most recent call last):
File “<stdin>”, line 1, in <module> FileNotFoundError: [WinError 2] The system cannot
find the file specified: ‘newdir’
>>> os.chdir) #sets current directory to parent
directory
>>> os.getcwd ( )
‘ E:\\python3 7 ‘
>>> os.rmdir(“newdir”) #now it can be deleted
>>> os.listdirO #returns list of files and directories in current path
[‘abcdemo.py’, ‘aifftest.py’, ‘checkindent.py’,
‘clbr.py’, 1combinations-2.py’, ‘combinations.py’,
‘comprehensionl.py’, ‘conditionals.jpg’, ‘continue- example.py’, ‘data_class.py’, ‘DLLs’, ‘Doc’, ‘else- in-loop.py’, ‘ equitriangle .py’ , ‘fibolist.py’ ,
‘ findertest.py’, ‘for-l.py’, ‘for-2.py’, ‘for-3.
py’, ‘for-4.py’, ‘for-5.py’, ‘for-6.py’, ‘for-7.
py’, ‘gcexample.py’, ‘hello.py’, ‘include’, ‘Lib’,
‘libs’, ‘LICENSE.txt’, ‘modfinder.py’, ‘modspec. py’, ‘modulel.py’, ‘module2.py’, ‘mydb.sqlite3’,
‘myfunctions.cover’, ‘myfunctions.py’, ‘mymain.
cover’, ‘mymain.py’, ‘nestedfor.py’, ‘newdirbak’,
‘NEWS.txt’, ‘out.aiff’, ‘out.au’, ‘out.mp3’,
‘out.wma’, ‘polar.png’, ‘python.exe’, ‘python3. dll’, ‘python37.dll’, ‘pythonw.exe’, ‘report.txt’,
‘runpyexample.py’, ‘sample.wav’, ‘Scripts’, ‘secret- number.py’, ‘securepwd.py’, ‘sound.aiff’, ‘sound,
wav’, ‘sqrmodule.py’, ‘structexample.py’, ‘tabdemo.py’, ‘taxl.py’, ‘tax2.py’, ‘tax3.py'( ‘tax4. py’, ‘tel’, ‘testindent.py’, ‘Tools’, ‘triangle, py’, ‘trianglebrowser.py’, ‘vcruntimel40.dll’,
‘warningexample.py’, ‘wavetest.py’, ‘while-1.py’, ‘_threadexample.py’, ‘ pycache ‘]
>>>

The os module also has functions to create a new file and perform read/ write operations on it. We shall learn about these functions in the chapter on File Handling.