Count occurrences of a value in NumPy array in Python | numpy.count() in Python
Count Occurences of a Value in Numpy Array in Python: In this article, we have seen different methods to count the number of occurrences of a value in a NumPy array in Python. Check out the below given direct links and gain the information about Count occurrences of a value in a NumPy array in Python.
- numpy.count() Function in Python
- Example Code for Python numpy.count() Function
- How to count the occurrences of a value in a NumPy array in Python?
- Use count_nonzero()
- Use sum()
- Use bincount()
- Convert numpy array to list and count occurrences of a value in an array
- Select elements from the array that matches the value and count them
- Count occurrences of a value in 2D NumPy Array
- Count occurrences of a value in each row of 2D NumPy Array
- Count occurrences of a value in each column of 2D NumPy Array
Python numpy.count() Function
The function of numpy.count()in python aid in the counts for the non-overlapping occurrence of sub-string in the specified range. The syntax for phyton numpy.count() function is as follows:
Syntax:
numpy.core.defchararray.count(arr, substring, start=0, end=None)
Parameters:
- arr: array-like or string to be searched.
- substring: substring to search for.
- start, end: [int, optional] Range to search in.
Returns:
An integer array with the number of non-overlapping occurrences of the substring.
Example Code for numpy.count() Function in Python
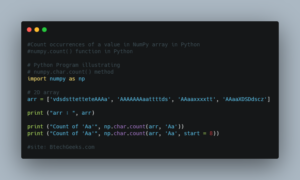
# Python Program illustrating
# numpy.char.count() method
import numpy as np

# 2D array
arr = ['vdsdsttetteteAAAa', 'AAAAAAAaattttds', 'AAaaxxxxtt', 'AAaaXDSDdscz']

print ("arr : ", arr)

print ("Count of 'Aa'", np.char.count(arr, 'Aa'))
print ("Count of 'Aa'", np.char.count(arr, 'Aa', start = 8))
Output:
arr : ['vdsdsttetteteAAAa', 'AAAAAAAaattttds', 'AAaaxxxxtt', 'AAaaXDSDdscz']

Count of 'Aa' [1 1 1 1]
Count of 'Aa' [1 0 0 0]
Also Check:
How to count the occurrences of a value in a NumPy array in Python
Counting the occurrences of a value in a NumPy array means returns the frequency of the value in the array. Here are the various methods used to count the occurrences of a value in a python numpy array.
Use count_nonzero()
We use the count_nonzero()function to count occurrences of a value in a NumPy array, which returns the count of values in a given numpy array. If the value of the axis argument is None, then it returns the count.
Let’s take an example, count all occurrences of value ‘6’ in an array,
import numpy as np
arr = np.array([9, 6, 7, 5, 6, 4, 5, 6, 5, 4, 7, 8, 6, 6, 7])
print('Numpy Array:')
print(arr)
# Count occurrence of element '3' in numpy array
count = np.count_nonzero(arr == 6)
print('Total occurences of "6" in array: ', count)
Output:
RESTART: C:/Users/HP/Desktop/article3.py
Numpy Array:
[9 6 7 5 6 4 5 6 5 4 7 8 6 6 7]
Total occurences of "6" in array: 5
In the above example, you have seen that we applied a condition to the numpy array ie., arr==6, then it applies the condition on each element of the array and stores the result as a bool value in a new array.
Use sum()
In this, we are using thesum()function to count occurrences of a value in an array.
import numpy as np
arr = np.array([9, 6, 7, 5, 6, 4, 5, 6, 5, 4, 7, 8, 6, 6, 7])
print('Numpy Array:')
print(arr)
# Count occurrence of element '6' in numpy array
count = (arr == 6).sum()

print('Total occurences of "6" in array: ', count)
Output:
RESTART: C:/Users/HP/Desktop/article3.py
Numpy Array: [9 6 7 5 6 4 5 6 5 4 7 8 6 6 7]
Total occurences of "6" in array: 5
In the above example, we have seen if the given condition is true then it is equivalent to one in python so we can add the True values in the array to get the sum of values in the array.
Use bincount()
We usebincount()function to count occurrences of a value in an array.
import numpy as np
arr = np.array([9, 6, 7, 5, 6, 4, 5, 6, 5, 4, 7, 8, 6, 6, 7])
count_arr = np.bincount(arr)
# Count occurrence of element '6' in numpy array
print('Total occurences of "6" in array: ', count_arr[6])
# Count occurrence of element '5' in numpy array
print('Total occurences of "5" in array: ', count_arr[5])
Output:
RESTART: C:/Users/HP/Desktop/article3.py
Total occurences of "6" in array: 5
Total occurences of "5" in array: 3
Convert numpy array to list and count occurrences of a value in an array
In this method, first we convert the array to a list and then we applycount()function on the list to get the count of occurrences of an element.
import numpy as np
arr = np.array([9, 6, 7, 5, 6, 4, 5, 6, 5, 4, 7, 8, 6, 6, 7])
# Count occurrence of element '6' in numpy array
count = arr.tolist().count(6)
print('Total occurences of "6" in array: ', count)
Output:
RESTART: C:/Users/HP/Desktop/article3.py
Total occurences of "6" in array:
Select elements from the array that matches the value and count them
We can choose only those elements from the numpy array that is similar to a presented value and then we can attain the length of this new array. It will furnish the count of occurrences of the value in the original array. For instance,
import numpy as np
# Create a 2D Numpy Array from list of lists
matrix = np.array( [[2, 3, 4],
                    [5, 3, 4],
                    [5, 3, 5],
                    [4, 7, 8],
                    [3, 6, 2]] )
# Count occurrence of element '3' in each column
count = np.count_nonzero(matrix == 3, axis=0)
print('Total occurrences  of "3" in each column of 2D array: ', count)
Output:
Total occurrences of "3" in each column of 2D array: [1 3 0]
Count occurrences of a value in 2D NumPy Array
We can use the count_nonzero() function to count the occurrences of a value in a 2D array or matrix.
import numpy as np
# Create a 2D Numpy Array from list of lists
matrix = np.array( [[2, 3, 4],
                    [5, 3, 4],
                    [5, 6, 5],
                    [6, 7, 6],
                    [3, 6, 2]] )
# Count occurrence of element '6' in complete 2D Numpy Array
count = np.count_nonzero(matrix == 6)
print('Total occurrences of "6" in 2D array:')
print(count)
Output:
Total occurrences of "6" in 2D array: 4
Count occurrences of a value in each row of 2D NumPy Array
To count the occurrences of a value in each row of the 2D array we will pass the axis value as 1 in the count_nonzero() function.
It will return an array containing the count of occurrences of a value in each row.
import numpy as np
# Create a 2D Numpy Array from list of lists
matrix = np.array( [[2, 3, 4],
                    [5, 3, 4],
                    [6, 6, 5],
                    [4, 7, 6],
                    [3, 6, 2]] )
# Count occurrence of element '6' in each row
count = np.count_nonzero(matrix == 6, axis=1)
print('Total occurrences  of "6" in each row of 2D array: ', count)
Output:
Total occurrences of "6" in each row of 2D array: [0 0 2 1 1]
Count occurrences of a value in each column of 2D NumPy Array
In order to count the occurrences of a value in each column of the 2D NumPy array transfer the axis value as 0 in thecount_nonzero()function. After that, it will result in an array including the count of occurrences of a value in each column. For instance,
import numpy as np
# Create a 2D Numpy Array from list of lists
matrix = np.array( [[2, 3, 4],
                    [5, 3, 4],
                    [5, 3, 5],
                    [4, 7, 8],
                    [3, 6, 2]] )
# Count occurrence of element '3' in each column
count = np.count_nonzero(matrix == 3, axis=0)
print('Total occurrences  of "3" in each column of 2D array: ', count)
Output:
Total occurrences of "3" in each column of 2D array: [1 3 0]
Count occurrences of a value in NumPy array in Python | numpy.count() in Python Read More »