Author name: Shikha Mishra

How to Make a Discord Bot Python

In a world where video games are so important to so many people, communication and community around games are vital. Discord offers both of those and more in one well-designed package. In this tutorial, you’ll learn how to make a Discord bot in Python so that you can make the most of this fantastic platform.

What Is Discord?

Discord is a voice and text communication platform for gamers.

Players, streamers, and developers use Discord to discuss games, answer questions, chat while they play, and much more. It even has a game store, complete with critical reviews and a subscription service. It is nearly a one-stop shop for gaming communities.

While there are many things you can build using Discord’s APIs this tutorial will focus on a particular learning outcome: how to make a Discord bot in Python.

What Is a Bot?

Discord is growing in popularity. As such, automated processes, such as banning inappropriate users and reacting to user requests are vital for a community to thrive and grow.

Automated programs that look and act like users and automatically respond to events and commands on Discord are called bot users. Discord bot users (or just bots) have nearly unlimited application.

How to Make a Discord Bot in the Developer Portal:

Before you can dive into any Python code to handle events and create exciting automations, you need to first create a few Discord components:

  1. An account
  2. An application
  3. A bot
  4. A guild

You’ll learn more about each piece in the following sections.

Once you’ve created all of these components, you’ll tie them together by registering your bot with your guild.

Creating a Discord Account

The first thing you’ll see is a landing page where you’ll need to either login, if you have an existing account, or create a new account:

Creating-a-Discord-Account

If you need to create a new account, then click on the Register button below Login and enter your account information.

Once you’re finished, you’ll be redirected to the Developer Portal home page, where you’ll create your application.

Creating-a-Discord-Account-login

Creating an Application:

An application allows you to interact with Discord’s APIs by providing authentication tokens, designating permissions, and so on.

To create a new application, select New Application:
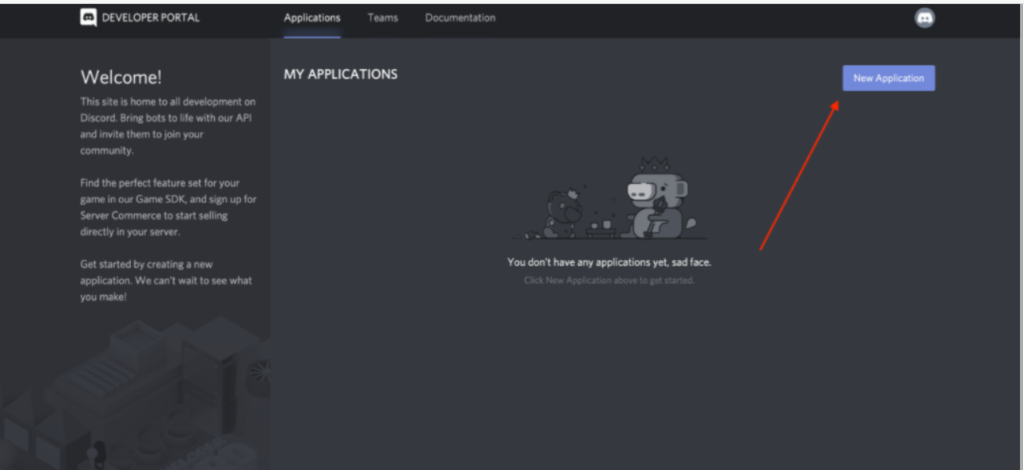
Creating-a-Discord-Account-application

Next, you’ll be prompted to name your application. Select a name and click Create:
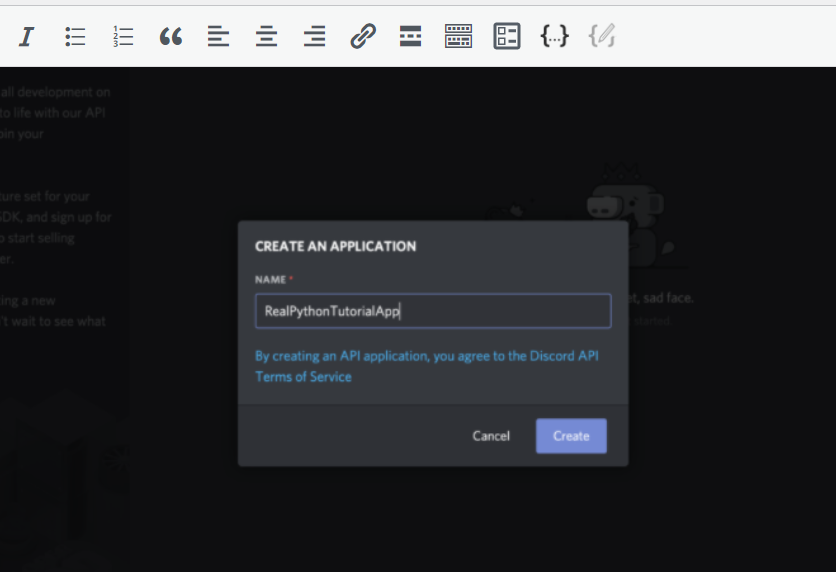
Creating-a-Discord-Account-login-creating

Congratulations! You made a Discord application. On the resulting screen, you can see information about your application:
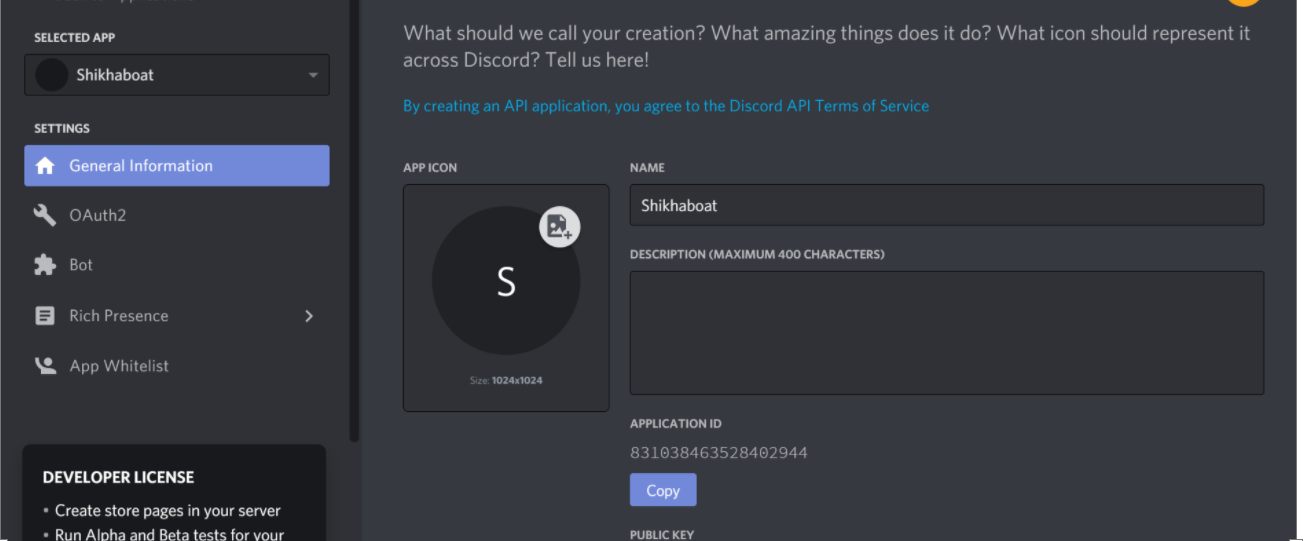
Creating-a-Discord-Account-login-done.png

Keep in mind that any program that interacts with Discord APIs requires a Discord application, not just bots. Bot-related APIs are only a subset of Discord’s total interface.

However, since this tutorial is about how to make a Discord bot, navigate to the Bot tab on the left-hand navigation list.

Creating a Bot

As you learned in the previous sections, a bot user is one that listens to and automatically reacts to certain events and commands on Discord.

For your code to actually be manifested on Discord, you’ll need to create a bot user. To do so, select Add Bot:
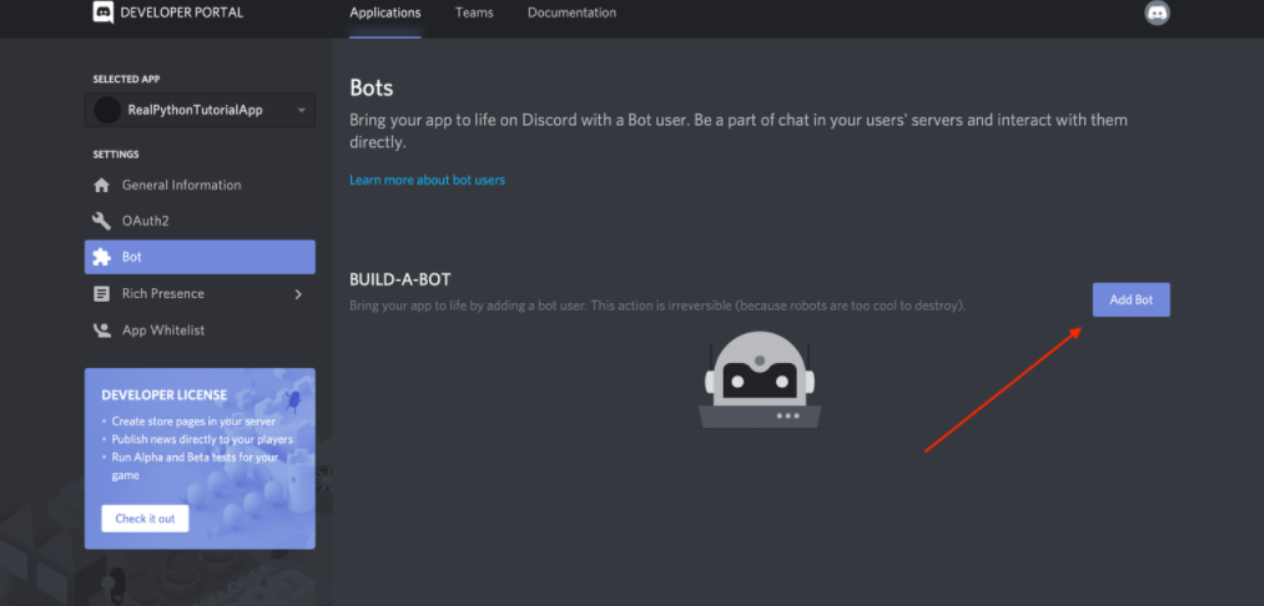
Creating-a-Discord-boat

Once you confirm that you want to add the bot to your application, you’ll see the new bot user in the portal:

Creating-a-Discord-account-new-boat-user

Now, the bot’s all set and ready to go, but to where?

A bot user is not useful if it’s not interacting with other users. Next, you’ll create a guild so that your bot can interact with other users.

Creating a Guild

A guild (or a server, as it is often called in Discord’s user interface) is a specific group of channels where users congregate to chat.

You’d start by creating a guild. Then, in your guild, you could have multiple channels, such as:

  • General Discussion: A channel for users to talk about whatever they want
  • Spoilers, Beware: A channel for users who have finished your game to talk about all the end game reveals
  • Announcements: A channel for you to announce game updates and for users to discuss them

Once you’ve created your guild, you’d invite other users to populate it.

So, to create a guild, head to your Discord home page:

Creating-a-Discord-home-page

From this home page, you can view and add friends, direct messages, and guilds. From here, select the + icon on the left-hand side of the web page to Add a Server:
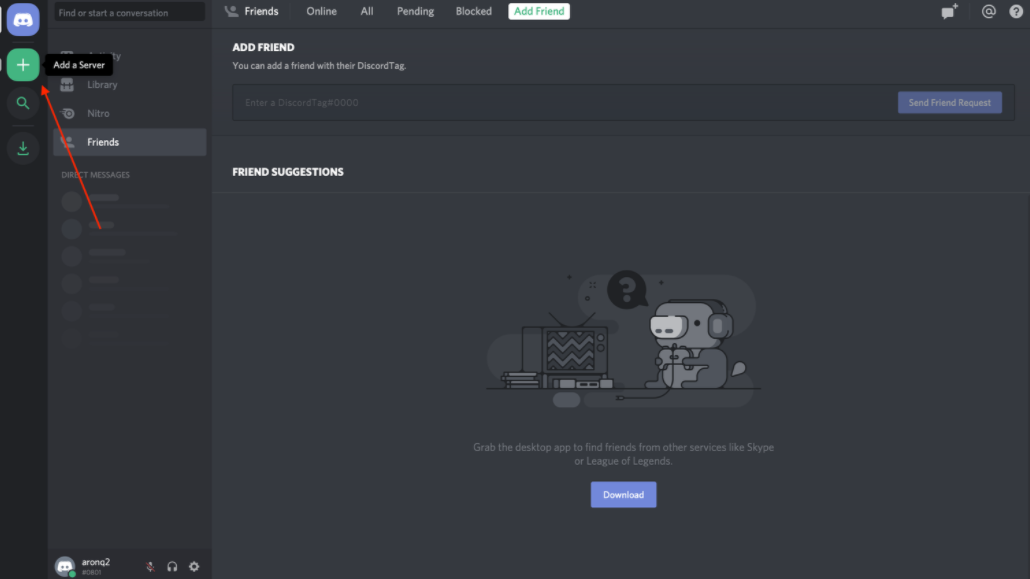
This will present two options, Create a server and Join a Server. In this case, select Create a server and enter a name for your guild.

Creating-a-Discord-creating-a-server

Once you’ve finished creating your guild, you’ll be able to see the users on the right-hand side and the channels on the left.

The final step on Discord is to register your bot with your new guild.

Adding a Bot to a Guild

A bot can’t accept invites like a normal user can. Instead, you’ll add your bot using the OAuth2 protocol.

To do so, head back to the Developer Portal and select the OAuth2 page from the left-hand navigation:
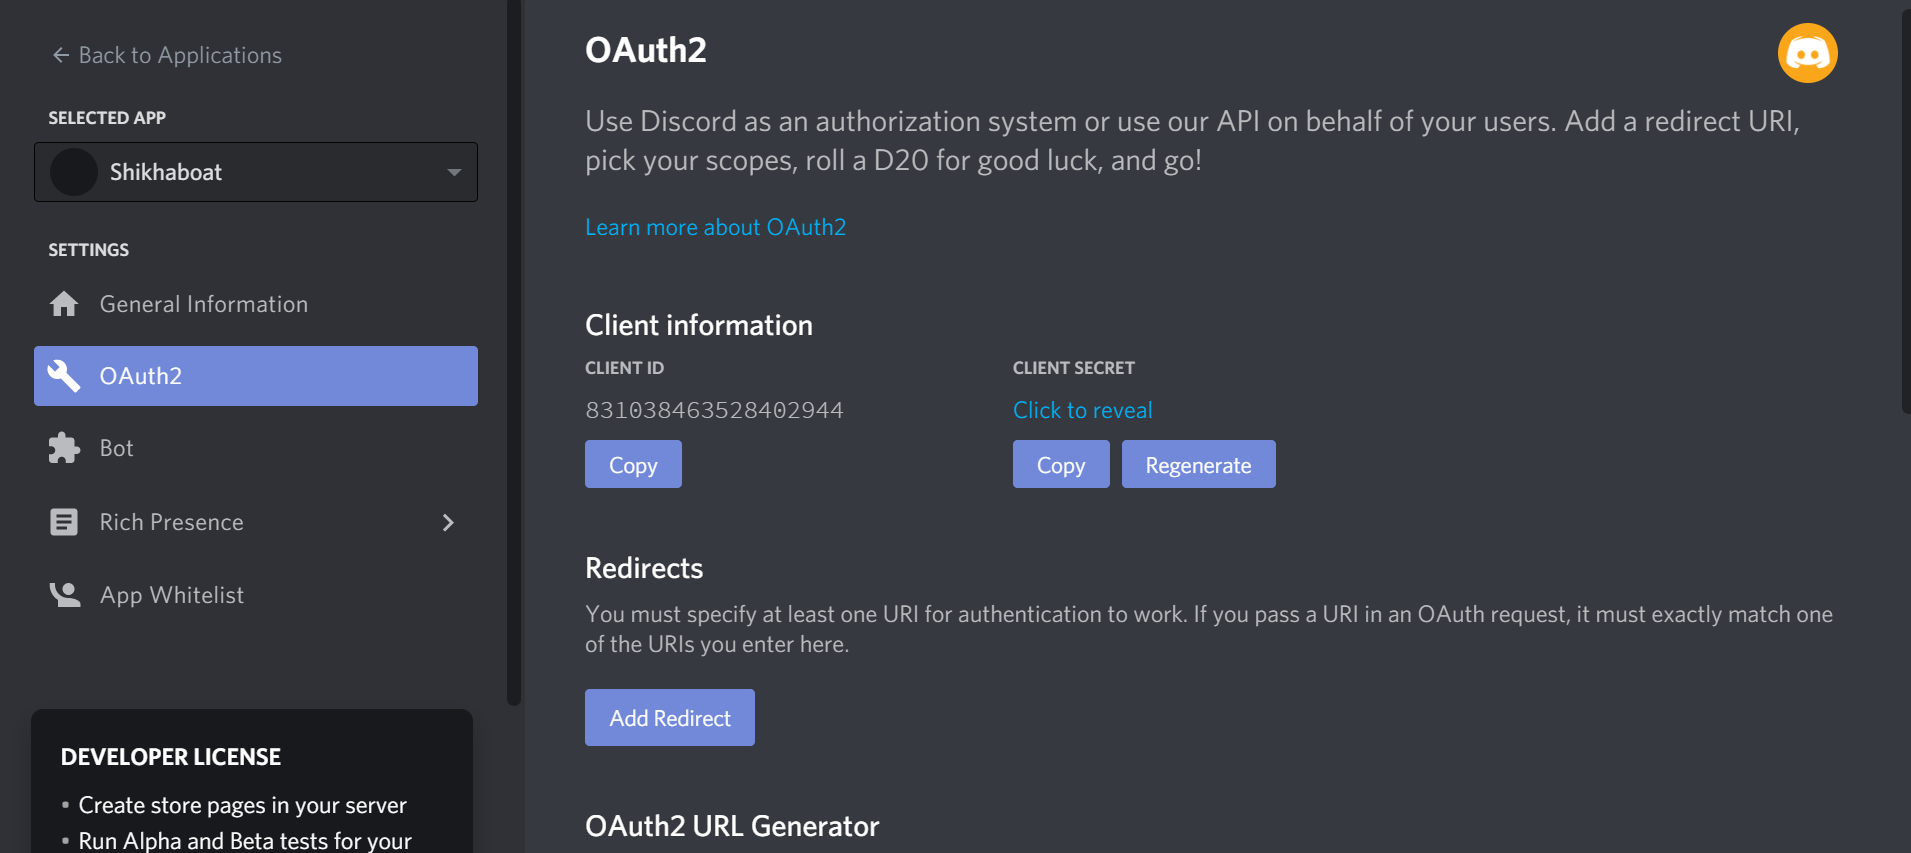
Add your bot using the OAuth2 protocol.

From this window, you’ll see the OAuth2 URL Generator.

This tool generates an authorization URL that hits Discord’s OAuth2 API and authorizes API access using your application’s credentials.

In this case, you’ll want to grant your application’s bot user access to Discord APIs using your application’s OAuth2 credentials.

To do this, scroll down and select bot from the SCOPES options and Administrator from BOT PERMISSIONS:
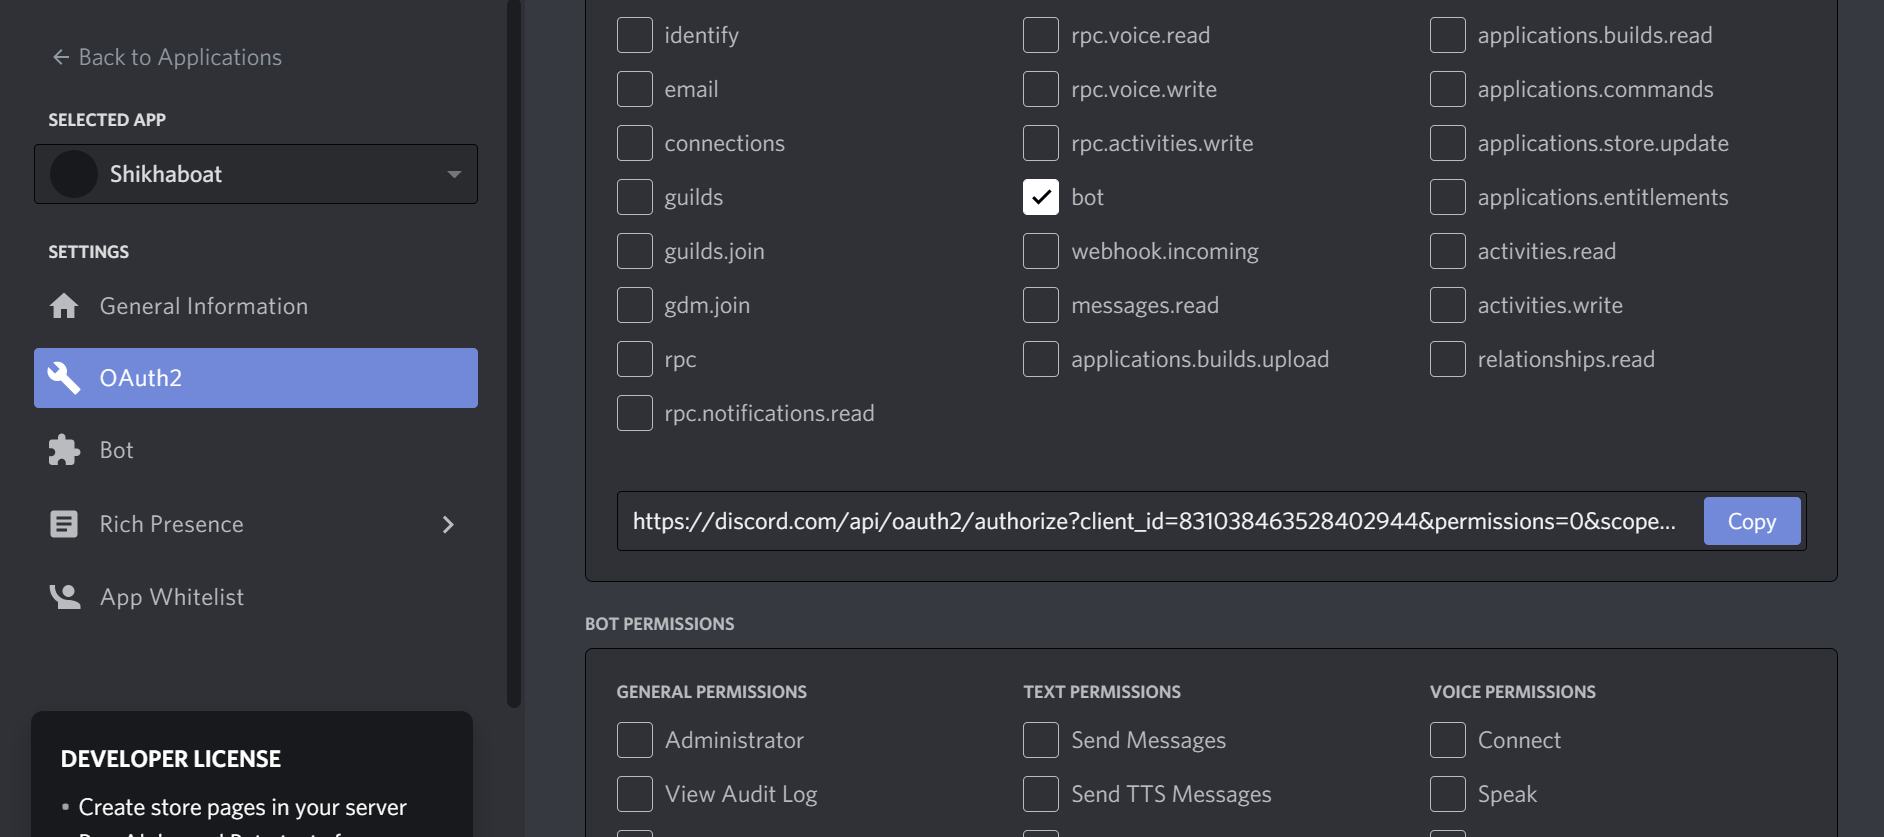
BOT PERMISSIONS

Now, Discord has generated your application’s authorization URL with the selected scope and permissions.

Select Copy beside the URL that was generated for you, paste it into your browser, and select your guild from the dropdown options:

Creating-a-Discord-select-your-grid

Click Authorize, and you’re done!


Authorized
If you go back to your guild, then you’ll see that the bot has been added:
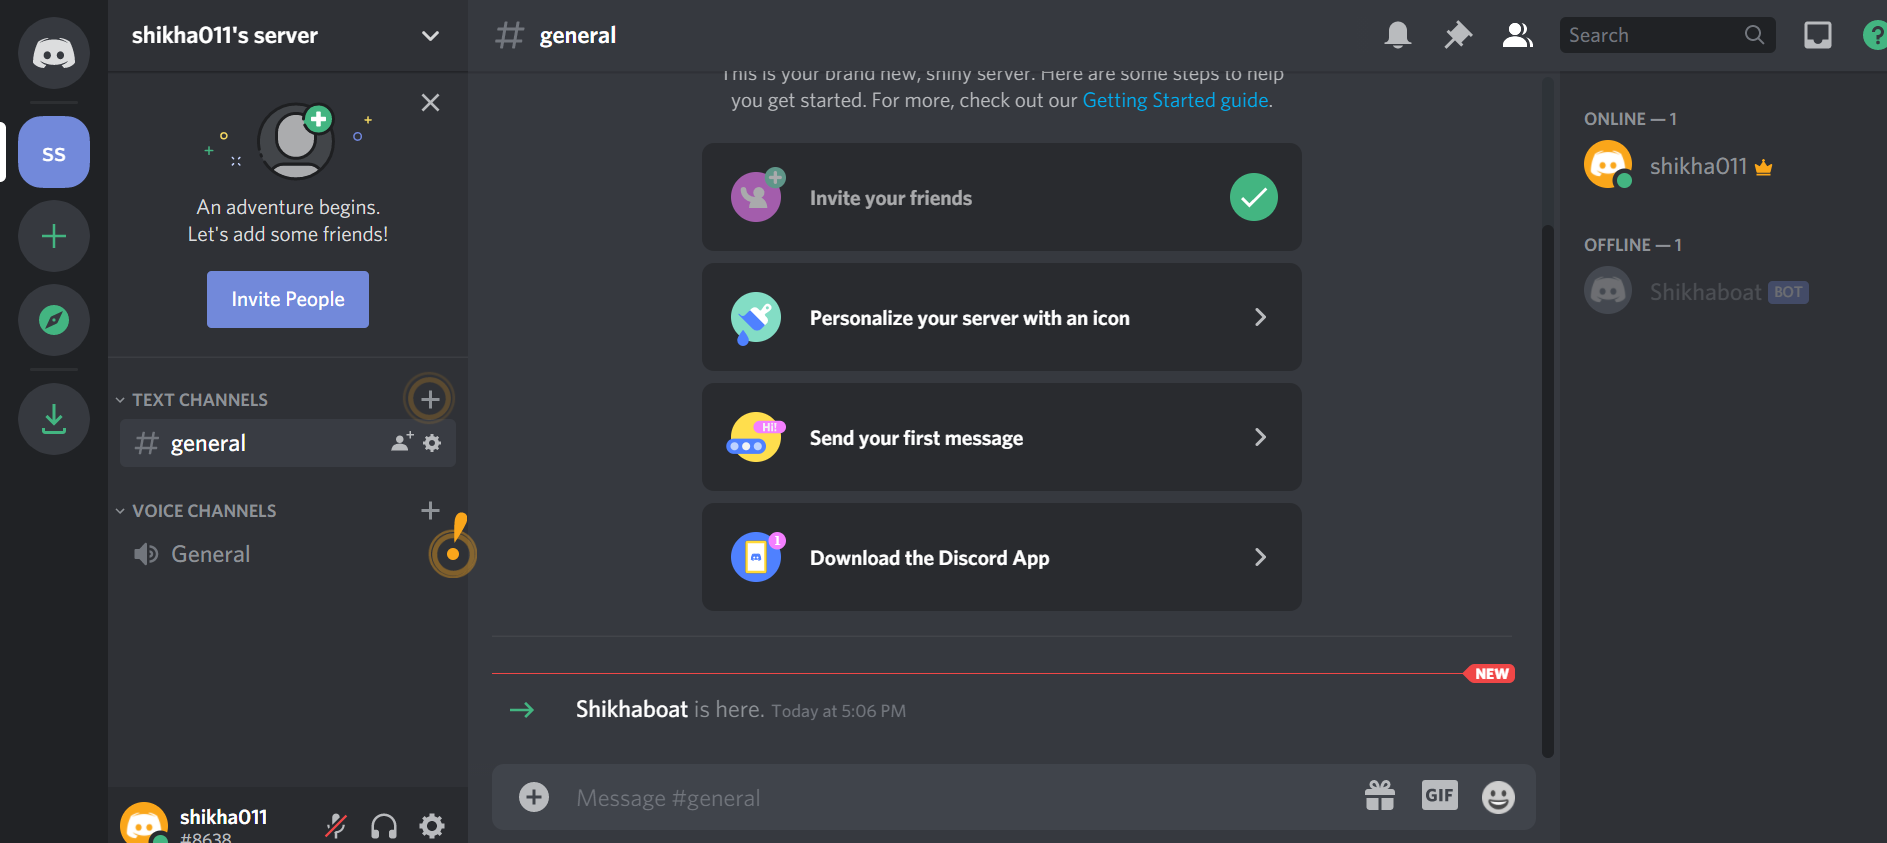
Bot added

In summary, you’ve created:

  • An application that your bot will use to authenticate with Discord’s APIs
  • A bot user that you’ll use to interact with other users and events in your guild
  • A guild in which your user account and your bot user will be active
  • ADiscordaccount with which you created everything else and that you’ll use to interact with your bot

Now, you know how to make a Discord bot using the Developer Portal. Next comes the fun stuff: implementing your bot in Python!

How to Make a Discord Bot in Python

Since you’re learning how to make a Discord bot with Python, you’ll be using discord.py.

discord.py is a Python library that exhaustively implements Discord’s APIs in an efficient and Pythonic way. This includes utilizing Python’s implementation of Async IO

Begin by installing discord.py with pip:

$ pip install -U discord.py

Now that you’ve installed discord.py, you’ll use it to create your first connection to Discord!

Creating a Discord Connection

The first step in implementing your bot user is to create a connection to Discord. With discord.py, you do this by creating an instance of Client:

# bot.py
import os

import discord
from dotenv import load_dotenv

load_dotenv()
TOKEN = os.getenv('DISCORD_TOKEN')

client = discord.Client()

@client.event
async def on_ready():
    print(f'{client.user} has connected to Discord!')

client.run(TOKEN)

A Client is an object that represents a connection to Discord. A Client handles events, tracks state, and generally interacts with Discord APIs.

Here, you’ve created a Client and implemented its on_ready() event handler, which handles the event when the Client has established a connection to Discord and it has finished preparing the data that Discord has sent, such as login state, guild and channel data, and more.

In other words, on_ready() will be called (and your message will be printed) once client is ready for further action. You’ll learn more about event handlers later in this article.

When you’re working with secrets such as your Discord token, it’s good practice to read it into your program from an environment variable. Using environment variables helps you:

  • Avoid putting the secrets into source control
  • Use different variables for development and production environments without changing your code

While you could export DISCORD_TOKEN={your-bot-token}, an easier solution is to save a .env file on all machines that will be running this code. This is not only easier, since you won’t have to export your token every time you clear your shell, but it also protects you from storing your secrets in your shell’s history.

Create a file named .env in the same directory as bot.py:

You’ll need to replace {your-bot-token} with your bot’s token, which you can get by going back to the Bot page on the Developer portal and clicking Copy under the TOKEN section:

 Creating-a-Discord-adding-bot-token

Looking back at the bot.py code, you’ll notice a library called dotnev. This library is handy for working with .env files. load_dotenv()loads environment variables from a .env file into your shell’s environment variables so that you can use them in your code.

Install dotenv with pip:

pip install -U python-dotenv

Finally, client.run() runs your Client using your bot’s token.

Now that you’ve set up both bot.py and .env, you can run your code:

python bot.py
Shikhaboat#5531 has connected to Discord!

Great! Your Client has connected to Discord using your bot’s token. In the next section, you’ll build on this Client by interacting with more Discord APIs.

Interacting With Discord APIs

Using a Client, you have access to a wide range of Discord APIs.

For example, let’s say you wanted to write the name and identifier of the guild that you registered your bot user with to the console.

First, you’ll need to add a new environment variable:

# .env
DISCORD_TOKEN={your-bot-token}
DISCORD_GUILD={your-guild-name}

Don’t forget that you’ll need to replace the two placeholders with actual values:

  1. {your-bot-token}
  2. {your-guild-name}

Remember that Discord calls on_ready(), which you used before, once the Client has made the connection and prepared the data. So, you can rely on the guild data being available inside on_ready():

# bot.py
import os

import discord
from dotenv import load_dotenv

load_dotenv()
TOKEN = os.getenv('DISCORD_TOKEN')
GUILD = os.getenv('DISCORD_GUILD')

client = discord.Client()

@client.event
async def on_ready():
    for guild in client.guilds:
        if guild.name == GUILD:
            break

    print(
        f'{client.user} is connected to the following guild:\n'
        f'{guild.name}(id: {guild.id})'
    )

client.run(TOKEN)

Here, you looped through the guild data that Discord has sent client, namely client.guilds. Then, you found the guild with the matching name and printed a formatted string to stdout.

Run the program to see the results:

 python bot.py
Shikhaboat#5531 is connected to the following guild:
Shikhaboat#5531(id: 571759877328732195)

Great! You can see the name of your bot, the name of your server, and the server’s identification number.

Another interesting bit of data you can pull from a guild is the list of users who are members of the guild:

# bot.py
import os

import discord
from dotenv import load_dotenv

load_dotenv()
TOKEN = os.getenv('DISCORD_TOKEN')
GUILD = os.getenv('DISCORD_GUILD')

client = discord.Client()

@client.event
async def on_ready():
    for guild in client.guilds:
        if guild.name == GUILD:
            break

    print(
        f'{client.user} is connected to the following guild:\n'
        f'{guild.name}(id: {guild.id})\n'
    )

    members = '\n - '.join([member.name for member in guild.members])
    print(f'Guild Members:\n - {members}')

client.run(TOKEN)

By looping through guild.members, you pulled the names of all of the members of the guild and printed them with a formatted string.

When you run the program, you should see at least the name of the account you created the guild with and the name of the bot user itself:

$ python bot.py
Shikhaboat#5531 is connected to the following guild:
Shikhaboat#5531(id: 571759877328732195)
Guild Members:
 - aronq2
 - RealPythonTutorialBot

These examples barely scratch the surface of the APIs available on Discord, be sure to check out their documentation to see all that they have to offer.

Next, you’ll learn about some utility functions and how they can simplify these examples.

Using Utility Functions

Let’s take another look at the example from the last section where you printed the name and identifier of the bot’s guild:

# bot.py
import os

import discord
from dotenv import load_dotenv

load_dotenv()
TOKEN = os.getenv('DISCORD_TOKEN')
GUILD = os.getenv('DISCORD_GUILD')

client = discord.Client()

@client.event
async def on_ready():
    for guild in client.guilds:
        if guild.name == GUILD:
            break

    print(
        f'{client.user} is connected to the following guild:\n'
        f'{guild.name}(id: {guild.id})'
    )

client.run(TOKEN)

You could clean up this code by using some of the utility functions available in discord.py.

discord.utils.find is one utility that can improve the simplicity and readability of this code by replacing the for loop with an intuitive, abstracted function:

# bot.py
import os

import discord
from dotenv import load_dotenv

load_dotenv()
TOKEN = os.getenv('DISCORD_TOKEN')
GUILD = os.getenv('DISCORD_GUILD')

client = discord.Client()

@client.event
async def on_ready():
    guild = discord.utils.find(lambda g: g.name == GUILD, client.guilds)
    print(
        f'{client.user} is connected to the following guild:\n'
        f'{guild.name}(id: {guild.id})'
    )

client.run(TOKEN)

<find() takes a function, called a predicate, which identifies some characteristic of the element in the iterable that you’re looking for. Here, you used a particular type of anonymous function, called a lambda, as the predicate.

In this case, you’re trying to find the guild with the same name as the one you stored in the DISCORD_GUILD environment variable. Once find() locates an element in the iterable that satisfies the predicate, it will return the element. This is essentially equivalent to the break statement in the previous example, but cleaner.

discord.py has even abstracted this concept one step further with the get.utility():

# bot.py
import os

import discord
from dotenv import load_dotenv

load_dotenv()
TOKEN = os.getenv('DISCORD_TOKEN')
GUILD = os.getenv('DISCORD_GUILD')

client = discord.Client()

@client.event
async def on_ready():
    guild = discord.utils.get(client.guilds, name=GUILD)
    print(
        f'{client.user} is connected to the following guild:\n'
        f'{guild.name}(id: {guild.id})'
    )

client.run(TOKEN)

get() takes the iterable and some keyword arguments. The keyword arguments represent attributes of the elements in the iterable that must all be satisfied for get() to return the element.

In this example, you’ve identified name=GUILD as the attribute that must be satisfied.

Now that you’ve learned the basics of interacting with APIs, you’ll dive a little deeper into the function that you’ve been using to access them: on_ready().

Responding to Events

You already learned that on_ready() is an event. In fact, you might have noticed that it is identified as such in the code by the client.event decorator.

But what is an event?

An event is something that happens on Discord that you can use to trigger a reaction in your code. Your code will listen for and then respond to events.

Using the example you’ve seen already, the on_ready() event handler handles the event that the Client has made a connection to Discord and prepared its response data.

So, when Discord fires an event, discord.py will route the event data to the corresponding event handler on your connected Client.

There are two ways in discord.py to implement an event handler:

  1. Using the client.event decorator
  2. Creating a subclass of Client and overriding its handler methods

You already saw the implementation using the decorator. Next, take a look at how to subclass Client:

# bot.py
import os

import discord
from dotenv import load_dotenv

load_dotenv()
TOKEN = os.getenv('DISCORD_TOKEN')

class CustomClient(discord.Client):
    async def on_ready(self):
        print(f'{self.user} has connected to Discord!')

client = CustomClient()
client.run(TOKEN)

Here, just like before, you’ve created a client variable and called <.run() with your Discord token. The actual Client is different, however. Instead of using the normal base class, client is an instance of CustomClient, which has an overridden on_ready() function.

There is no difference between the two implementation styles of events, but this tutorial will primarily use the decorator version because it looks similar to how you implement Bot commands, which is a topic you’ll cover in a bit.

Welcoming New Members

Previously, you saw the example of responding to the event where a member joins a guild. In that example, your bot user could send them a message, welcoming them to your Discord community.

Now, you’ll implement that behavior in your Client, using event handlers, and verify its behavior in Discord:

# bot.py
import os

import discord
from dotenv import load_dotenv

load_dotenv()
TOKEN = os.getenv('DISCORD_TOKEN')

client = discord.Client()

@client.event
async def on_ready():
    print(f'{client.user.name} has connected to Discord!')

@client.event
async def on_member_join(member):
    await member.create_dm()
    await member.dm_channel.send(
        f'Hi {member.name}, welcome to my Discord server!'
    )

client.run(TOKEN)

Like before, you handled the on_ready() event by printing the bot user’s name in a formatted string. New, however, is the implementation of the on_member_join() event handler.

on_member_join(), as its name suggests, handles the event of a new member joining a guild.

In this example, you used member.create_dm()to create a direct message channel. Then, you used that channel to send() a direct message to that new member.

Now, let’s test out your bot’s new behavior.

First, run your new version of bot.py and wait for the on_ready() event to fire, logging your message to stdout:

$ python bot.py
ShikhaBot has connected to Discord!

Now, head over to Discord, log in, and navigate to your guild by selecting it from the left-hand side of the screen:

Creating-a-Discord-navigate-to-server

Select Invite People just beside the guild list where you selected your guild. Check the box that says Set this link to never expire and copy the link:
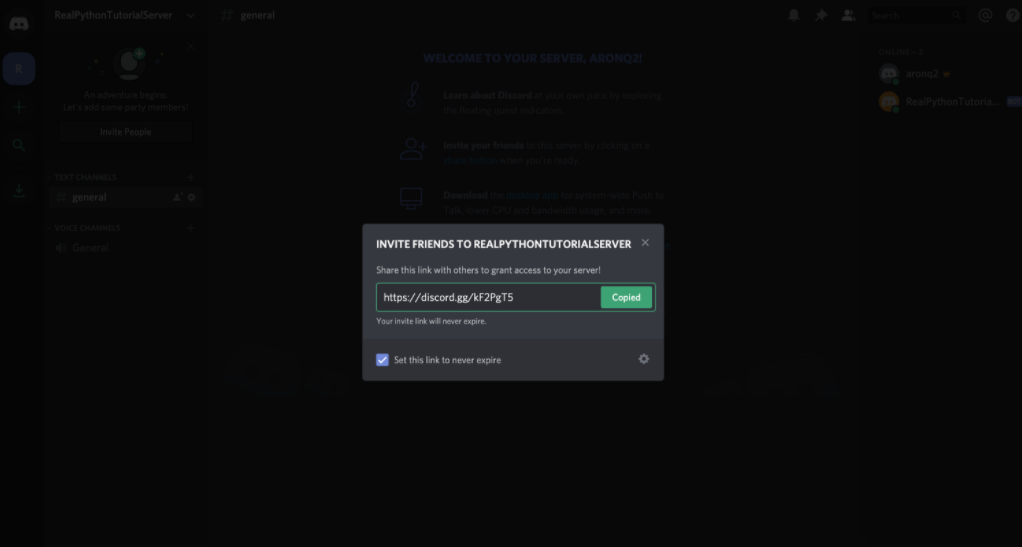
InvitePepole

Now, with the invite link copied, create a new account and join the guild using your invite link.

First, you’ll see that Discord introduced you to the guild by default with an automated message. More importantly though, notice the badge on the left-hand side of the screen that notifies you of a new message:
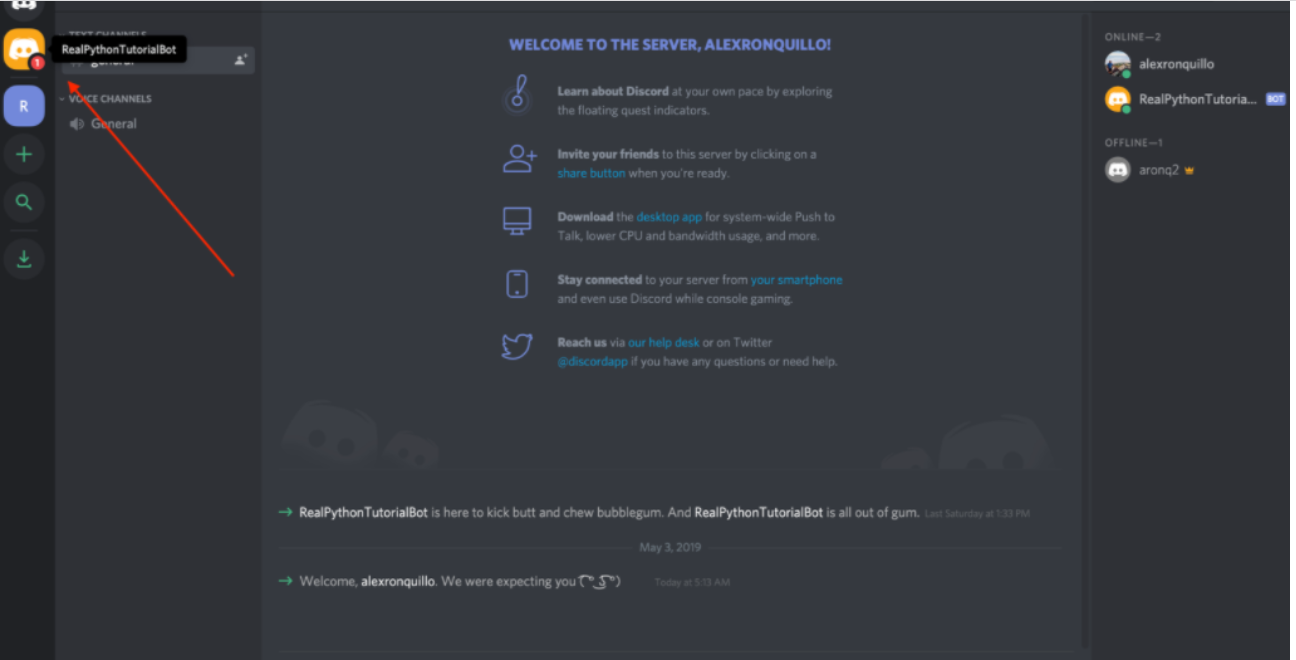
 Creating-a-Discord-account-new-message.
When you select it, you’ll see a private message from your bot user:
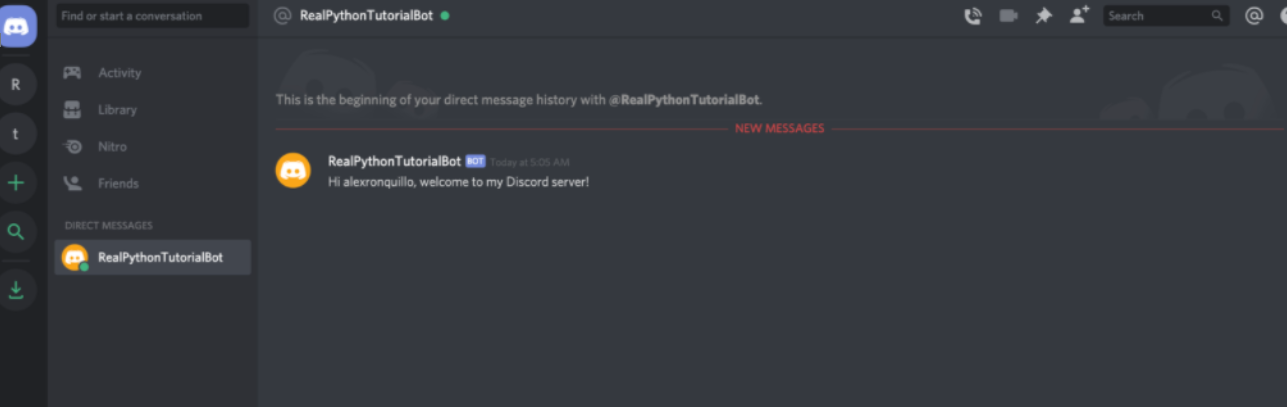
 Boat-is-created

Perfect! Your bot user is now interacting with other users with minimal code.

Conclusion

Congratulations! Now, you’ve learned how to make a Discord bot in Python. You’re able to build bots for interacting with users in guilds that you create or even bots that other users can invite to interact with their communities.
 

How to Make a Discord Bot Python Read More »

Understanding the Two Sum Problem

The two sum problem is a  very common interview question, asked in companies.For the two sum problem we will write two algorithm that runs in O(n2) & O(n) time.

Two Sum Problem

Given an array of integer return indices of the two numbers such that they add up to the specific target.

You may assume that each input would have exactly one solution and you are not going to use same element twice.

Example:

Given numbers=[ 3 , 4 , 6 ,7 ] , target = 7,

Because num[0]+num[1] = 3 + 4 = 7,

return[0,1]

Example has given above we have to execute two sum problem for any two number in list and give us targeted value.

There are mainly two way to execute two sum problem.

  1. Using Naive Method
  2. Using hash table

Implementing Naive Method:

In this method  we would be loop through each number and then loop again through the list looking for a pair that sums and give us final value. The running time for the below solution would be O(n2).

So for this we will write an algorithm which mentioned below-

def twoSum(nums, target):
    for i in range(len(nums)):
        for j in range(i+1,len(nums)):
            if target - nums[i] == nums[j]:
                return[i,j]

    return None            

test = [2,7,11,15]
target = 9
print(twoSum(test,target))

Output:

C:\New folder\Python project(APT)>py twosum.py
[0, 1]

C:\New folder\Python project(APT)>

So you can see that it has return us those indices which has given target value.If we change the target then value and indices both will change.This is what we want to do but it increases the complexity because we run two loop.

So for increasing complexity we will use second method which is hash table.

Implementing hash table:

Below we will show use of hash table. We can write an another faster algorithm that will find pairs that sum to numbers in same time. As we pass through each element in the array, we check to see if M minus the current element exists in the hash table.

Example:

If the array is: [6, 7, 1, 8] and the sum is 8.
class Solution:
    def twoSum(nums,target):
        prevMap = {}

        for i,n in enumerate(nums):
            diff = target - n
            if diff in prevMap:
               return[prevMap[diff],i]
            prevMap[n] = i
        return    
    nums=[6, 7, 1, 8]
    target= 8
    print(twoSum(nums,target))

Output:

C:\New folder\Python project(APT)>py twosum.py [1, 2] 
C:\New folder\Python project(APT)>

So you can see that above program gives us index value of the two number which gives us our target value.

Conclusion:

Great!So in this article we have seen two methods for two sum problem in python.Naive method has complexity O(n2)and Hash metod has complexity O(n),So best approach is Hash method and worst is Naive method.

Understanding the Two Sum Problem Read More »

Building an RSS feed Scraper with Python

What is RSS?

RSS stands for Really Simple Syndication or Rich Site Summary. It is a type of web feed that allows users and applications to receive regular updates from a website or blog of their choice. Various website use their RSS feed to publish the frequently updated information like blog entries, news headlines etc, So this is where RSS feeds are mainly used.

So we can use that RSS feed to extract some important information from a particular website. In this article I will be showing how you will extract RSS feeds of any website.

Installing packages

You can install all packages using pip like the example below.

 pip install requests
 pip install bs4

Importing  libraries:

Now our project setup is ready, we can start writing the code.

Within our rssScrapy.py we’ll import the packages we’ve installed using pip.

import requests

from bs4 import BeautifulSoup

The above package will allow us to use the functions given to us by the Requests and BeautifulSoup libraries.

I am going to use the RSS feeds of a news website called Times of India.

Link-"https://timesofindia.indiatimes.com/rssfeeds/1221656.cms"

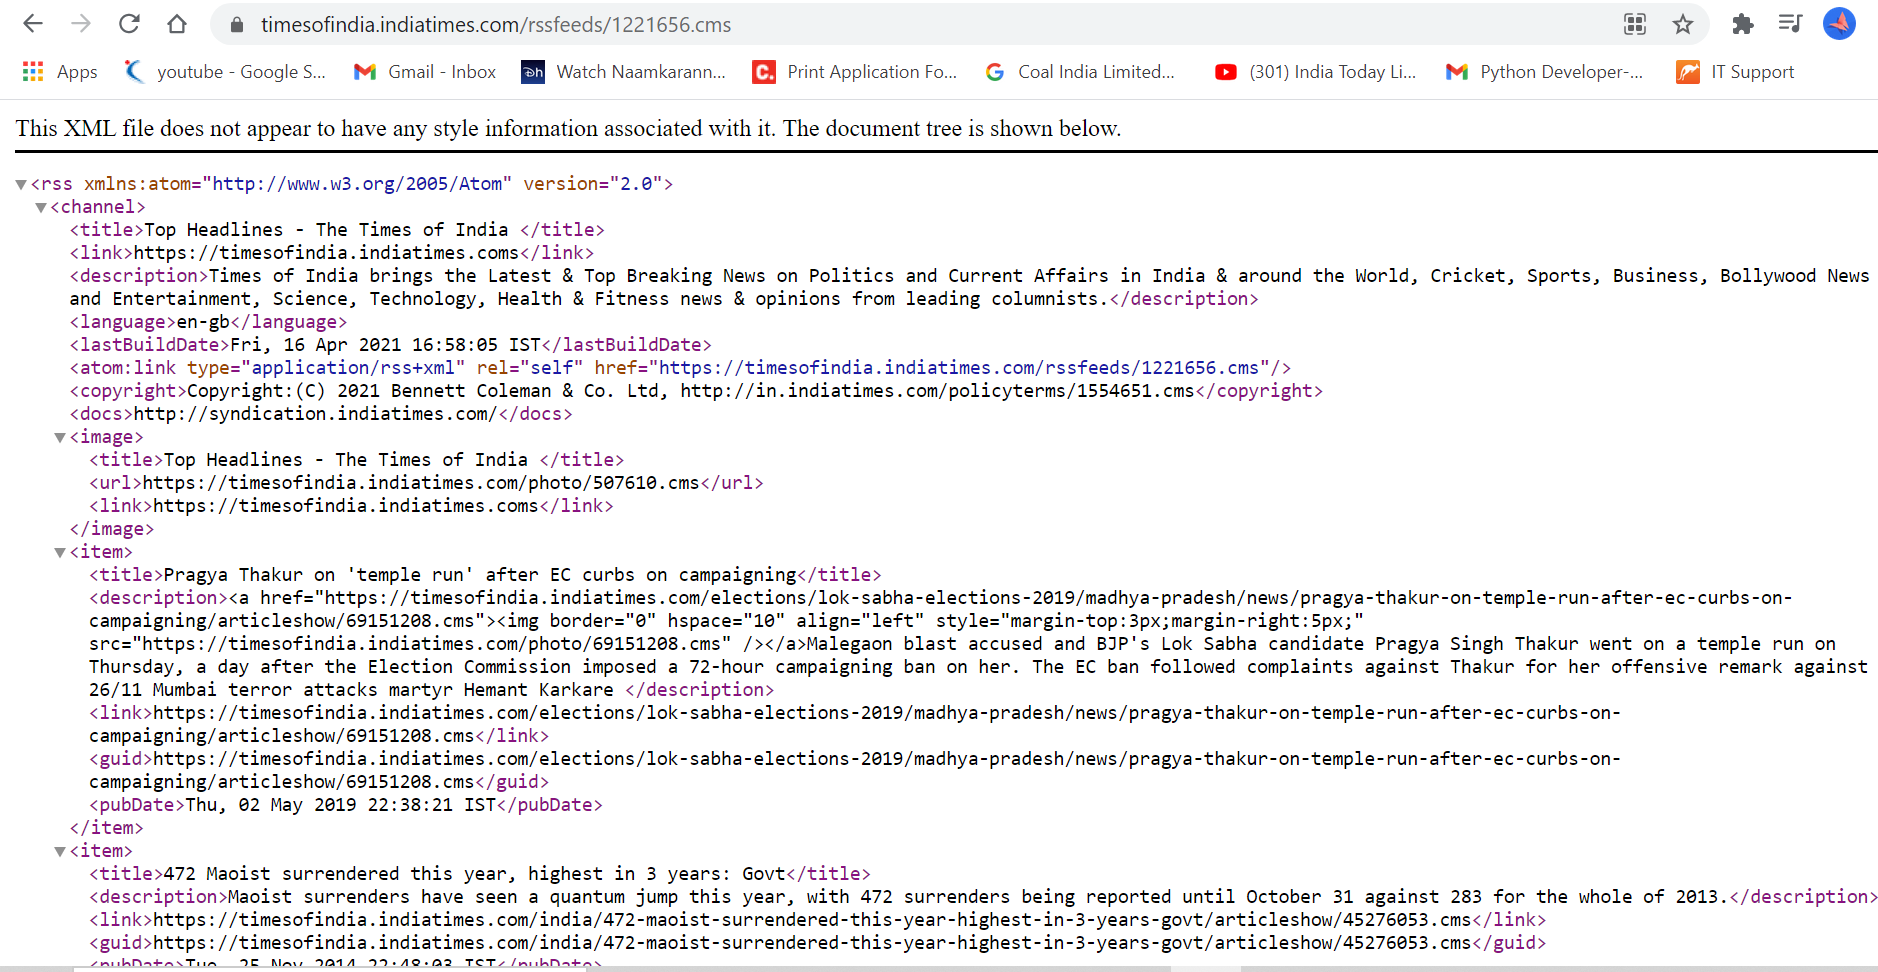
This is basically an XML file.

Building-an-RSS-feed-scraper-with-Python_xml-file

So now I am going to show you how this particular xml file will scrape.

import requests
from bs4 import BeautifulSoup
url="https://timesofindia.indiatimes.com/rssfeeds/1221656.cms"
resp=requests.get(url)
soup=BeautifulSoup(resp.content,features="xml")
print(soup.prettify())

I have imported all necessary libraries.I have also defined url which give me link for news website RSS feed after that for get request I made resp object where I have pass that url.

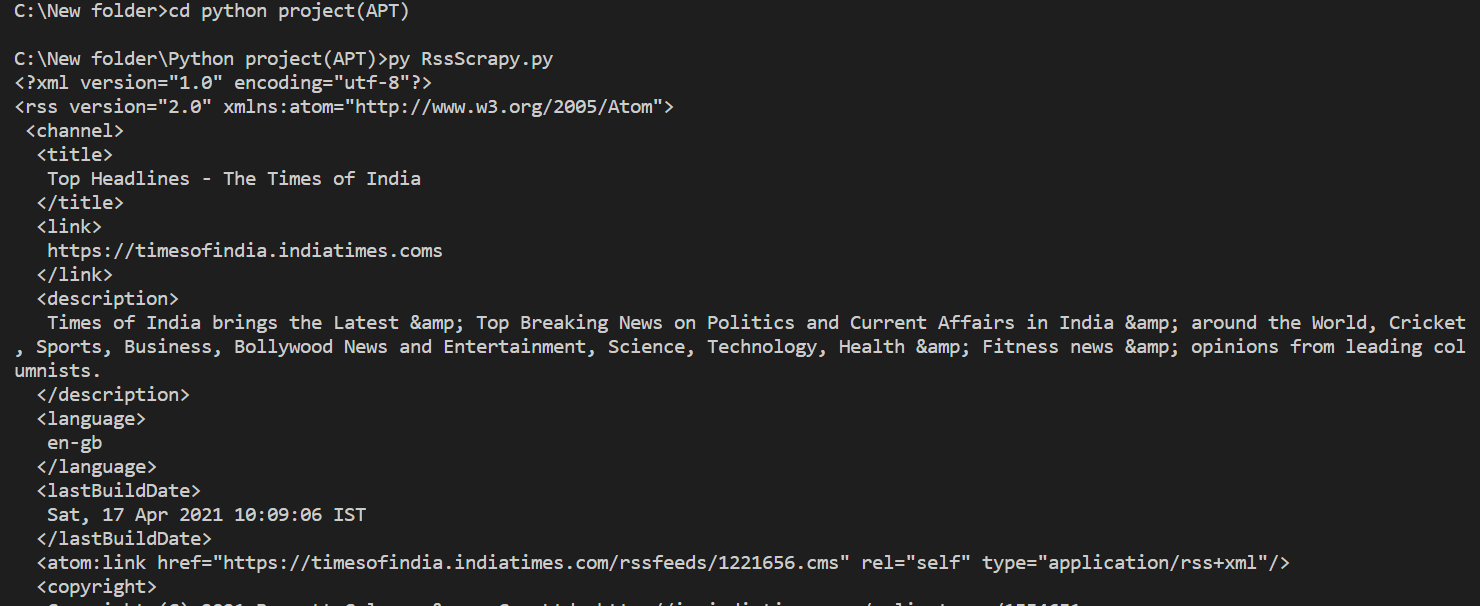
Now we have response object and we have also a beautiful soup object with me.Bydefault beautiful soup parse html file but we want xml file so we used features=”xml”.So now let me just show you the xml file we have parsed.

Building-an-RSS-feed-scraper-with-Python_output

We dont nedd all the data having in it.We want news description,title,publish date right.So for this we are going to create a list which contains all the content inside item tags.For this we have used   items=soup.findAll('item') 

You can also check the length of items using this len(items)

So now I am writing whole code for scrapping the news RSS feed-

import requests
from bs4 import BeautifulSoup
url="https://timesofindia.indiatimes.com/rssfeeds/1221656.cms"
resp=requests.get(url)
soup=BeautifulSoup(resp.content,features="xml")
items=soup.findAll('item')
item=items[0]
news_items=[]
for item in items:
    news_item={}
    news_item['title']=item.title.text
    news_item['description']=item.description.text
    news_item['link']=item.link.text
    news_item['guid']=item.guid.text
    news_item['pubDate']=item.pubDate.text
    news_items.append(news_item)
print(news_items[2])

So we can see that I have used item.title.textfor scrapping title because item is parent class and title is child class similarly we do for rest.

Each of the articles available on the RSS feed  containing all information within item tags <item>...</item>.
and follows the below structure-

<item>
    <title>...</title>
    <link>...</link>
    <pubDate>...</pubDate>
    <comments>...</comments>
    <description>...</description>
</item>

We’ll be taking advantage of the consistent item tags to parse our information.

I have also make an empty list news_items which append all in it.

So this is how we can parse particularly news item.

Building-an-RSS-feed-scraper-with-Python_final-output

Conclusion:

We have successfully created an RSS feed scraping tool using Python, Requests, and BeautifulSoup. This allows us to parse XML information into a suitable format for us to work with in the future.

Building an RSS feed Scraper with Python Read More »

Python Word Count (Filter out Punctuation, Dictionary Manipulation, and Sorting Lists)

Python Word Count (Filter out Punctuation, Dictionary Manipulation, and Sorting Lists)

In this tutorial, we will discuss python word count (Filter out Punctuation, Dictionary Manipulation, and Sorting Lists). Also, you guys can see some of the approaches on Output a List of Word Count Pairs. Let’s use the below links and have a quick reference on this python concept.

How to count the number of words in a sentence, ignoring numbers, punctuation, and whitespace?

First, we will take a paragraph after that we will clean punctuation and transform all words to lowercase. Then we will count how many times each word occurs in that paragraph.

Text="Python can be easy to pick up whether you're a first time programmer or you're experienced with other languages. The following pages are a useful first step to get on your way writing programs with Python!The community hosts conferences and meetups, collaborates on code, and much more. Python's documentation will help you along the way, and the mailing lists will keep you in touch.Python is developed under an OSI-approved open source license, making it freely usable and distributable, even for commercial use. Python's license is administered.Python is a general-purpose coding language—which means that, unlike HTML, CSS, and JavaScript, it can be used for other types of programming and software development besides web development. That includes back end development, software development, data science and writing system scripts among other things."
for char in '-.,\n':
Text=Text.replace(char,' ')
Text = Text.lower()
# split returns a list of words delimited by sequences of whitespace (including tabs, newlines, etc, like re's \s) 
word_list = Text.split()
print(word_list)

Output:

['python', 'can', 'be', 'easy', 'to', 'pick', 'up', 'whether', 
"you're", 'a', 'first', 'time', 'programmer', 'or', "you're",
 'experienced', 'with', 'other', 'languages', 'the', 'following', 
'pages', 'are', 'a', 'useful', 'first', 'step', 'to', 'get', 'on', 'your', 
'way', 'writing', 'programs', 'with', 'python!the', 'community',
 'hosts', 'conferences', 'and', 'meetups', 'collaborates', 'on', 'code', 
'and', 'much', 'more', "python's", 'documentation', 'will', 'help', 'you',
 'along', 'the', 'way', 'and', 'the', 'mailing', 'lists', 'will', 'keep', 'you', 'in',
 'touch', 'python', 'is', 'developed', 'under', 'an', 'osi', 'approved', 'open',
 'source', 'license', 'making', 'it', 'freely', 'usable', 'and', 'distributable', 
'even', 'for', 'commercial', 'use', "python's", 'license', 'is', 'administered', 
'python', 'is', 'a', 'general', 'purpose', 'coding', 'language—which', 'means', 
'that', 'unlike', 'html', 'css', 'and', 'javascript', 'it', 'can', 'be', 'used', 'for', 'other', 
'types', 'of', 'programming', 'and', 'software', 'development', 'besides', 'web', 
'development', 'that', 'includes', 'back', 'end', 'development', 'software', 
'development', 'data', 'science', 'and', 'writing', 'system', 'scripts', 'among', 'other', 'things']

So in the above output, you can see a list of word count pairs which is sorted from highest to lowest.

Thus, now we are going to discuss some approaches.

Also Check:

Output a List of Word Count Pairs (Sorted from Highest to Lowest)

1. Collections Module:

The collections module approach is the easiest one but for using this we have to know which library we are going to use.

from collections import Counter

Counter(word_list).most_common()

In this, collections module, we will import the counter then implement this in our programme.

from collections import Counter
Text="Python can be easy to pick up whether you're a first time programmer or you're experienced with other languages. The following pages are a useful first step to get on your way writing programs with Python!The community hosts conferences and meetups, collaborates on code, and much more. Python's documentation will help you along the way, and the mailing lists will keep you in touch.Python is developed under an OSI-approved open source license, making it freely usable and distributable, even for commercial use. Python's license is administered.Python is a general-purpose coding language—which means that, unlike HTML, CSS, and JavaScript, it can be used for other types of programming and software development besides web development. That includes back end development, software development, data science and writing system scripts among other things."
word_list = Text.split()
count=Counter(word_list).most_common()
print(count)

Output:

[('and', 7), ('a', 3), ('other', 3), ('is', 3), ('can', 2), ('be', 2), ('to', 2), 
("you're", 2), ('first', 2), ('with', 2), ('on', 2), ('writing', 2), ("Python's", 2),
 ('will', 2), ('you', 2), ('the', 2), ('it', 2), ('for', 2), ('software', 2), ('development,', 2), 
('Python', 1), ('easy', 1), ('pick', 1), ('up', 1), ('whether', 1), ('time', 1), ('programmer', 1),
 ('or', 1), ('experienced', 1), ('languages.', 1), ('The', 1), ('following', 1), ('pages', 1), ('are', 1), 
('useful', 1), ('step', 1), ('get', 1), ('your', 1), ('way', 1), ('programs', 1), ('Python!The', 1), 
('community', 1), ('hosts', 1), ('conferences', 1), ('meetups,', 1), ('collaborates', 1), ('code,', 1), 
('much', 1), ('more.', 1), ('documentation', 1), ('help', 1), ('along', 1), ('way,', 1), ('mailing', 1),
 ('lists', 1), ('keep', 1), ('in', 1), ('touch.Python', 1), ('developed', 1), ('under', 1), ('an', 1),
 ('OSI-approved', 1), ('open', 1), ('source', 1), ('license,', 1), ('making', 1), ('freely', 1),
 ('usable', 1), ('distributable,', 1), ('even', 1), ('commercial', 1), ('use.', 1), ('license', 1), 
('administered.Python', 1), ('general-purpose', 1), ('coding', 1), ('language—which', 1), ('means', 1),
 ('that,', 1), ('unlike', 1), ('HTML,', 1), ('CSS,', 1), ('JavaScript,', 1), ('used', 1), ('types', 1), ('of', 1), 
('programming', 1), ('development', 1), ('besides', 1), ('web', 1), ('development.', 1), ('That', 1), 
('includes', 1), ('back', 1), ('end', 1), ('data', 1), ('science', 1), ('system', 1), ('scripts', 1), ('among', 1), ('things.', 1)]

2. Using For Loops:

This is the second approach and in this, we will use for loop and dictionary get method.

from collections import Counter
Text="Python can be easy to pick up whether you're a first time programmer or you're experienced with other languages. The following pages are a useful first step to get on your way writing programs with Python!The community hosts conferences and meetups, collaborates on code, and much more. Python's documentation will help you along the way, and the mailing lists will keep you in touch.Python is developed under an OSI-approved open source license, making it freely usable and distributable, even for commercial use. Python's license is administered.Python is a general-purpose coding language—which means that, unlike HTML, CSS, and JavaScript, it can be used for other types of programming and software development besides web development. That includes back end development, software development, data science and writing system scripts among other things."
word_list = Text.split()
# Initializing Dictionary
d = {}
# counting number of times each word comes up in list of words (in dictionary)
for word in word_list: 
    d[word] = d.get(word, 0) + 1
word_freq = []
for key, value in d.items():
    word_freq.append((value, key))
word_freq.sort(reverse=True) 
print(word_freq)

Output:

[(7, 'and'), (3, 'other'), (3, 'is'), (3, 'a'), (2, "you're"), (2, 'you'), (2, 'writing'),
 (2, 'with'), (2, 'will'), (2, 'to'), (2, 'the'), (2, 'software'), (2, 'on'), (2, 'it'), (2, 'for'), (
2, 'first'), (2, 'development,'), (2, 'can'), (2, 'be'), (2, "Python's"), (1, 'your'), (1, 'whether'),
 (1, 'web'), (1, 'way,'), (1, 'way'), (1, 'useful'), (1, 'used'), (1, 'use.'), (1, 'usable'), (1, 'up'), 
(1, 'unlike'), (1, 'under'), (1, 'types'), (1, 'touch.Python'), (1, 'time'), (1, 'things.'), (1, 'that,'), 
(1, 'system'), (1, 'step'), (1, 'source'), (1, 'scripts'), (1, 'science'), (1, 'programs'),
 (1, 'programming'), (1, 'programmer'), (1, 'pick'), (1, 'pages'), (1, 'or'), (1, 'open'), 
(1, 'of'), (1, 'much'), (1, 'more.'), (1, 'meetups,'), (1, 'means'), (1, 'making'), (1, 'mailing'),
 (1, 'lists'), (1, 'license,'), (1, 'license'), (1, 'language—which'), (1, 'languages.'), (1, 'keep'),
 (1, 'includes'), (1, 'in'), (1, 'hosts'), (1, 'help'), (1, 'get'), (1, 'general-purpose'), (1, 'freely'), 
(1, 'following'), (1, 'experienced'), (1, 'even'), (1, 'end'), (1, 'easy'), (1, 'documentation'),
 (1, 'distributable,'), (1, 'development.'), (1, 'development'), (1, 'developed'), (1, 'data'), 
(1, 'conferences'), (1, 'community'), (1, 'commercial'), (1, 'collaborates'), (1, 'coding'), 
(1, 'code,'), (1, 'besides'), (1, 'back'), (1, 'are'), (1, 'an'), (1, 'among'), (1, 'along'), (1, 'administered.Python'),
 (1, 'The'), (1, 'That'), (1, 'Python!The'), (1, 'Python'), (1, 'OSI-approved'), (1, 'JavaScript,'), (1, 'HTML,'), (1, 'CSS,')]

So in the above approach, we have used for loop after that we reverse the key and values so they can be sorted using tuples. Now we sorted from lowest to highest.

3. Not using Dictionary Get Method:

So in this approach, we will not use the get method dictionary.

from collections import Counter
Text="Python can be easy to pick up whether you're a first time programmer or you're experienced with other languages. The following pages are a useful first step to get on your way writing programs with Python!The community hosts conferences and meetups, collaborates on code, and much more. Python's documentation will help you along the way, and the mailing lists will keep you in touch.Python is developed under an OSI-approved open source license, making it freely usable and distributable, even for commercial use. Python's license is administered.Python is a general-purpose coding language—which means that, unlike HTML, CSS, and JavaScript, it can be used for other types of programming and software development besides web development. That includes back end development, software development, data science and writing system scripts among other things."
word_list = Text.split()
# Initializing Dictionary
d = {}

# Count number of times each word comes up in list of words (in dictionary)
for word in word_list:
    if word not in d:
        d[word] = 0
    d[word] += 1
word_freq = []
for key, value in d.items():
    word_freq.append((value, key))
word_freq.sort(reverse=True)
print(word_freq)

Output:

[(7, 'and'), (3, 'other'), (3, 'is'), (3, 'a'), (2, "you're"), (2, 'you'), (2, 'writing'),
 (2, 'with'), (2, 'will'), (2, 'to'), (2, 'the'), (2, 'software'), (2, 'on'), (2, 'it'), (2, 'for'), (2, 'first'), 
(2, 'development,'), (2, 'can'), (2, 'be'), (2, "Python's"), (1, 'your'), (1, 'whether'), (1, 'web'),
 (1, 'way,'), (1, 'way'), (1, 'useful'), (1, 'used'), (1, 'use.'), (1, 'usable'), (1, 'up'), (1, 'unlike'),
 (1, 'under'), (1, 'types'), (1, 'touch.Python'), (1, 'time'), (1, 'things.'), (1, 'that,'), (1, 'system'), 
(1, 'step'), (1, 'source'), (1, 'scripts'), (1, 'science'), (1, 'programs'), (1, 'programming'), 
(1, 'programmer'), (1, 'pick'), (1, 'pages'), (1, 'or'), (1, 'open'), (1, 'of'), (1, 'much'),
 (1, 'more.'), (1, 'meetups,'), (1, 'means'), (1, 'making'), (1, 'mailing'), (1, 'lists'), (1, 'license,'), 
(1, 'license'), (1, 'language—which'), (1, 'languages.'), (1, 'keep'), (1, 'includes'), (1, 'in'), (1, 'hosts'),
 (1, 'help'), (1, 'get'), (1, 'general-purpose'), (1, 'freely'), (1, 'following'), (1, 'experienced'), 
(1, 'even'), (1, 'end'), (1, 'easy'), (1, 'documentation'), (1, 'distributable,'), (1, 'development.'),
 (1, 'development'), (1, 'developed'), (1, 'data'), (1, 'conferences'), (1, 'community'), (1, 'commercial'),
 (1, 'collaborates'), (1, 'coding'), (1, 'code,'), (1, 'besides'), (1, 'back'), (1, 'are'), (1, 'an'), (1, 'among'),
 (1, 'along'), (1, 'administered.Python'), (1, 'The'), (1, 'That'), (1, 'Python!The'), (1, 'Python'), 
(1, 'OSI-approved'), (1, 'JavaScript,'), (1, 'HTML,'), (1, 'CSS,')]

4. Using Sorted:

# initializing a dictionary
d = {};

# counting number of times each word comes up in list of words
for key in word_list: 
    d[key] = d.get(key, 0) + 1

sorted(d.items(), key = lambda x: x[1], reverse = True)

Conclusion:

In this article, you have seen different approaches on how to count the number of words in a sentence, ignoring numbers, punctuation, and whitespace. Thank you!

Python Word Count (Filter out Punctuation, Dictionary Manipulation, and Sorting Lists) Read More »

Python- How to convert a timestamp string to a datetime object using datetime.strptime()

Python: How to convert a timestamp string to a datetime object using datetime.strptime()

In this tutorial, we will learn how to convert a timestamp string to a datetime object using datetime.strptime(). Also, you can understand how to to create a datetime object from a string in Python with examples below.

String to a DateTime object using datetime.strptime()

Thestrptime()method generates a datetime object from the given string.

Datetime module provides a datetime class that has a method to convert string to a datetime object.

Syntax:

datetime.strptime(date_string, format)

So in the above syntax, you can see that it accepts a string containing a timestamp. It parses the string according to format codes and returns a datetime object created from it.

First import datetime class from datetime module to use this,

from datetime import datetime

Also Read:

Complete Format Code List

Format CodesDescriptionExample
%dDay of the month as a zero-padded decimal number01, 02, 03, 04 …, 31
%aWeekday as the abbreviated nameSun, Mon, …, Sat
%AWeekday as full nameSunday, Monday, …, Saturday
%mMonth as a zero-padded decimal number01, 02, 03, 04 …, 12
%bMonth as an abbreviated nameJan, Feb, …, Dec
%BMonth as full nameJanuary, February, …, December
%yA Year without century as a zero-padded decimal number00, 01, …, 99
%YA Year with a century as a decimal number0001, …, 2018, …, 9999
%HHour (24-hour clock) as a zero-padded decimal number01, 02, 03, 04 …, 23
%MMinute as a zero-padded decimal number01, 02, 03, 04 …, 59
%SSecond as a zero-padded decimal number01, 02, 03, 04 …, 59
%fMicrosecond as a decimal number, zero-padded on the left000000, 000001, …, 999999
%IHour (12-hour clock) as a zero-padded decimal number01, 02, 03, 04 …, 12
%pLocale’s equivalent of either AM or PMAM, PM
%jDay of the year as a zero-padded decimal number01, 02, 03, 04 …, 366

How strptime() works?

In thestrptime()class method, it takes two arguments:

  • string (that be converted to datetime)
  • format code

In the accordance with the string and format code used, the method returns its equivalent datetime object.

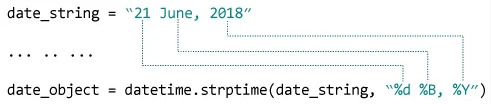
Let’s see the following example, to understand how it works:

python strptime method example

where,

%d – Represents the day of the month. Example: 01, 02, …, 31
%B – Month’s name in full. Example: January, February etc.
%Y – Year in four digits. Example: 2018, 2019 etc.

Examples of converting a Time String in the format codes using strptime() method

Just have a look at the few examples on how to convert timestamp string to a datetime object using datetime.strptime() in Python and gain enough knowledge on it.

Example 1:

Let’s take an example,

from datetime import datetime
datetimeObj = datetime.strptime('2021-05-17T15::11::45.456777', '%Y-%m-%dT%H::%M::%S.%f')
print(datetimeObj)
print(type(datetimeObj))

Output:

2021-05-17 15:11:45.456777
<class 'datetime.datetime'>

So in the above example, you can see that we have converted a time string in the format “YYYY-MM-DDTHH::MM::SS.MICROS” to a DateTime object.

Let’s take another example,

Example 2:

from datetime import datetime
datetimeObj = datetime.strptime('17/May/2021 14:12:22', '%d/%b/%Y %H:%M:%S')
print(datetimeObj)
print(type(datetimeObj))

Output:

2021-05-17 14:12:22
<class 'datetime.datetime'>

So this is the other way to show timestamp here we have converted a time string in the format “DD/MM/YYYY HH::MM::SS” to a datetime object.

Example 3:

If we want to show the only date in this format “DD MMM YYYY”. We do like this,

from datetime import datetime
datetimeObj = datetime.strptime('17 May 2021', '%d %b %Y')
# Get the date object from datetime object
dateObj = datetimeObj.date()
print(dateObj)
print(type(dateObj))

Output:

2021-05-17
<class 'datetime.date'>

Example 4:

So if we want to show only time “‘HH:MM:SS AP‘” in this format. We will do like that,

from datetime import datetime
datetimeObj = datetime.strptime('08:12:22 PM', '%I:%M:%S %p') 
# Get the time object from datetime object 
timeObj = datetimeObj.time()
print(timeObj) 
print(type(timeObj))

Output:

20:12:22
<class 'datetime.time'>

Example 5:

If we want to show our timestamp in text format. We will execute like that,

from datetime import datetime
textStr = "On January the 17th of 2021 meet me at 8 PM"
datetimeObj = datetime.strptime(textStr, "On %B the %dth of %Y meet me at %I %p")
print(datetimeObj)

Output:

2021-01-17 20:00:00

Conclusion:

So in the above tutorial, you can see that we have shown different methods of how to convert a timestamp string to a datetime object using datetime.strptime(). Thank you!

Python: How to convert a timestamp string to a datetime object using datetime.strptime() Read More »

Pandas- Select first or last N rows in a Dataframe using head() & tail()

Pandas: Select first or last N rows in a Dataframe using head() & tail()

In this tutorial, we are going to discuss how to select the first or last N rows in a Dataframe using head() & tail() functions. This guide describes the following contents.

Select first N Rows from a Dataframe using head() function

pandas.DataFrame.head()

In Python’s Pandas module, the Dataframe class gives the head() function to fetch top rows from it.

Syntax:

DataFrame.head(self, n=5)

If we give some value to n it will return n number of rows otherwise default is 5.

Let’s create a dataframe first,

import pandas as pd
# List of Tuples
empoyees = [('Ram', 34, 'Sunderpur', 5) ,
           ('Riti', 31, 'Delhi' , 7) ,
           ('Aman', 16, 'Thane', 9) ,
           ('Shishir', 41,'Delhi' , 12) ,
           ('Veeru', 33, 'Delhi' , 4) ,
           ('Shan',35,'Mumbai', 5 ),
           ('Shikha', 35, 'kolkata', 11)
            ]
# Create a DataFrame object
empDfObj = pd.DataFrame(empoyees, columns=['Name', 'Age', 'City', 'Experience'], index=['a', 'b', 'c', 'd', 'e', 'f', 'g'])
print("Contents of the Dataframe : ")
print(empDfObj)

Output:

Contents of the Dataframe :
     Name  Age  City           Experience
a   Ram     34   Sunderpur 5
b   Riti       31  Delhi          7
c   Aman   16  Thane         9
d  Shishir   41 Delhi          12
e  Veeru     33 Delhi          4
f   Shan      35 Mumbai     5
g  Shikha   35 kolkata      11

So if we want to select the top 4 rows from the dataframe,

import pandas as pd
# List of Tuples
empoyees = [('Ram', 34, 'Sunderpur', 5) ,
           ('Riti', 31, 'Delhi' , 7) ,
           ('Aman', 16, 'Thane', 9) ,
           ('Shishir', 41,'Delhi' , 12) ,
           ('Veeru', 33, 'Delhi' , 4) ,
           ('Shan',35,'Mumbai', 5 ),
           ('Shikha', 35, 'kolkata', 11)
            ]
# Create a DataFrame object
empDfObj = pd.DataFrame(empoyees, columns=['Name', 'Age', 'City', 'Experience'], index=['a', 'b', 'c', 'd', 'e', 'f', 'g'])

dfObj1 = empDfObj.head(4)
print("First 4 rows of the Dataframe : ")
print(dfObj1)

Output:

First 4 rows of the Dataframe :
  Name    Age   City         Experience
a Ram      34     Sunderpur 5
b Riti        31    Delhi          7
c Aman    16    Thane        9
d Shishir   41   Delhi         12

So in the above example, you can see that we have given n value 4 so it returned the top 4 rows from the dataframe.

Do Check:

Select first N rows from the dataframe with specific columns

In this, while selecting the first 3 rows, we can select specific columns too,

import pandas as pd
# List of Tuples
empoyees = [('Ram', 34, 'Sunderpur', 5) ,
           ('Riti', 31, 'Delhi' , 7) ,
           ('Aman', 16, 'Thane', 9) ,
           ('Shishir', 41,'Delhi' , 12) ,
           ('Veeru', 33, 'Delhi' , 4) ,
           ('Shan',35,'Mumbai', 5 ),
           ('Shikha', 35, 'kolkata', 11)
            ]
# Create a DataFrame object
empDfObj = pd.DataFrame(empoyees, columns=['Name', 'Age', 'City', 'Experience'], index=['a', 'b', 'c', 'd', 'e', 'f', 'g'])

# Select the top 3 rows of the Dataframe for 2 columns only
dfObj1 = empDfObj[['Name', 'City']].head(3)
print("First 3 rows of the Dataframe for 2 columns : ")
print(dfObj1)

Output:

First 3 rows of the Dataframe for 2 columns :
   Name  City
a Ram    Sunderpur
b Riti      Delhi
c Aman  Thane

Select last N Rows from a Dataframe using tail() function

In the Pandas module, the Dataframe class provides a tail() function to select bottom rows from a Dataframe.

Syntax:

DataFrame.tail(self, n=5)

It will return the last n rows from a dataframe. If n is not provided then the default value is 5. So for this, we are going to use the above dataframe as an example,

import pandas as pd
# List of Tuples
empoyees = [('Ram', 34, 'Sunderpur', 5) ,
           ('Riti', 31, 'Delhi' , 7) ,
           ('Aman', 16, 'Thane', 9) ,
           ('Shishir', 41,'Delhi' , 12) ,
           ('Veeru', 33, 'Delhi' , 4) ,
           ('Shan',35,'Mumbai', 5 ),
           ('Shikha', 35, 'kolkata', 11)
            ]
# Create a DataFrame object
empDfObj = pd.DataFrame(empoyees, columns=['Name', 'Age', 'City', 'Experience'], index=['a', 'b', 'c', 'd', 'e', 'f', 'g'])

# Select the last 4 rows of the Dataframe
dfObj1 = empDfObj.tail(4)
print("Last 4 rows of the Dataframe : ")
print(dfObj1)

Output:

Last 5 rows of the Dataframe :
  Name     Age City    Experience
d Shishir   41   Delhi      12
e Veeru    33   Delhi       4
f Shan      35   Mumbai  5
g Shikha  35   kolkata    11

So in above example, you can see that we are given n value 4 so tail() function return last 4 data value.

Select bottom N rows from the dataframe with specific columns

In this, while selecting the last 4 rows, we can select specific columns too,

import pandas as pd
# List of Tuples
empoyees = [('Ram', 34, 'Sunderpur', 5) ,
           ('Riti', 31, 'Delhi' , 7) ,
           ('Aman', 16, 'Thane', 9) ,
           ('Shishir', 41,'Delhi' , 12) ,
           ('Veeru', 33, 'Delhi' , 4) ,
           ('Shan',35,'Mumbai', 5 ),
           ('Shikha', 35, 'kolkata', 11)
            ]
# Create a DataFrame object
empDfObj = pd.DataFrame(empoyees, columns=['Name', 'Age', 'City', 'Experience'], index=['a', 'b', 'c', 'd', 'e', 'f', 'g'])

# Select the bottom 4 rows of the Dataframe for 2 columns only
dfObj1 = empDfObj[['Name', 'City']].tail(4)
print("Last 4 rows of the Dataframe for 2 columns : ")
print(dfObj1)

Output:

Last 4 rows of the Dataframe for 2 columns :
     Name   City
d  Shishir  Delhi
e  Veeru    Delhi
f   Shan     Mumbai
g  Shikha   kolkata

Conclusion:

In this article, you have seen how to select first or last N  rows in a Dataframe using head() & tail() functions. Thank you!

Want to expert in the python programming language? Exploring Python Data Analysis using Pandas tutorial changes your knowledge from basic to advance level in python concepts.

Read more Articles on Python Data Analysis Using Padas – Select items from a Dataframe

Pandas: Select first or last N rows in a Dataframe using head() & tail() Read More »

Pandas- Find maximum values & position in columns or rows of a Dataframe

Pandas: Find maximum values & position in columns or rows of a Dataframe | How to find the max value of a pandas DataFrame column in Python?

In this article, we will discuss how to find maximum value & position in rows or columns of a Dataframe and its index position.

DataFrame.max()

Python pandas provide a member function in the dataframe to find the maximum value.

Syntax:

DataFrame.max(axis=None, skipna=None, level=None, numeric_only=None, **kwargs)

Dataframe.max() accepts these arguments:

axis: Where max element will be searched

skipna: Default is True means if not provided it will be skipped.

Let’s create a dataframe,

import pandas as pd
import numpy as np
# List of Tuples
matrix = [(17, 15, 12),
          (53, np.NaN, 10),
          (46, 34, 11),
          (35, 45, np.NaN),
          (76, 26, 13)
          ]
# Create a DataFrame object
dfObj = pd.DataFrame(matrix, index=list('abcde'), columns=list('xyz'))
print(dfObj)

Output:

   x             y      z
a 17     15.0   12.0
b 53     NaN   10.0
c 46      34.0   11.0
d 35      45.0   NaN
e 76      26.0   13.0

Get maximum values in every row & column of the Dataframe

Here, you will find two ways to get the maximum values in dataframe

Also Check: 

Get maximum values of every column

In this, we will call the max() function to find the maximum value of every column in DataFrame.

import pandas as pd
import numpy as np
# List of Tuples
matrix = [(17, 15, 12),
          (53, np.NaN, 10),
          (46, 34, 11),
          (35, 45, np.NaN),
          (76, 26, 13)
          ]
# Create a DataFrame object
dfObj = pd.DataFrame(matrix, index=list('abcde'), columns=list('xyz'))
# Get a series containing maximum value of each column
maxValuesObj = dfObj.max()
print('Maximum value in each column : ')
print(maxValuesObj)

Output:

Maximum value in each column :
x 76.0
y 45.0
z 13.0

Get maximum values of every row

In this also we will call the max() function to find the maximum value of every row in DataFrame.

import pandas as pd
import numpy as np
# List of Tuples
matrix = [(17, 15, 12),
          (53, np.NaN, 10),
          (46, 34, 11),
          (35, 45, np.NaN),
          (76, 26, 13)
          ]
# Create a DataFrame object
dfObj = pd.DataFrame(matrix, index=list('abcde'), columns=list('xyz'))
# Get a series containing maximum value of each row
maxValuesObj = dfObj.max(axis=1)
print('Maximum value in each row : ')
print(maxValuesObj)

Output:

Maximum value in each row :
a   17.0
b   53.0
c   46.0
d   45.0
e   76.0

So in the above example, you can see that it returned a series with a row index label and maximum value of each row.

Get maximum values of every column without skipping NaN

import pandas as pd
import numpy as np
# List of Tuples
matrix = [(17, 15, 12),
          (53, np.NaN, 10),
          (46, 34, 11),
          (35, 45, np.NaN),
          (76, 26, 13)
          ]
# Create a DataFrame object
dfObj = pd.DataFrame(matrix, index=list('abcde'), columns=list('xyz'))
# Get a series containing maximum value of each column without skipping NaN
maxValuesObj = dfObj.max(skipna=False)
print('Maximum value in each column including NaN: ')
print(maxValuesObj)

Output:

Maximum value in each column including NaN:
x 76.0
y NaN
z NaN

So in the above example, you can see that we have passed the ‘skipna=False’ in the max() function, So it included the NaN while searching for NaN.

If there is any NaN in the column then it will be considered as the maximum value of that column.

Get maximum values of a single column or selected columns

So for getting a single column maximum value we have to select that column and apply the max() function in it,

import pandas as pd
import numpy as np
# List of Tuples
matrix = [(17, 15, 12),
          (53, np.NaN, 10),
          (46, 34, 11),
          (35, 45, np.NaN),
          (76, 26, 13)
          ]
# Create a DataFrame object
dfObj = pd.DataFrame(matrix, index=list('abcde'), columns=list('xyz'))
# Get maximum value of a single column 'y'
maxValue = dfObj['y'].max()
print("Maximum value in column 'y': " , maxValue)

Here you can see that we have passed y  maxValue = dfObj['y'].max()for getting max value in that column.

Output:

Maximum value in column 'y': 45.0

We can also pass the list of column names instead of passing single column like.,

import pandas as pd
import numpy as np
# List of Tuples
matrix = [(17, 15, 12),
          (53, np.NaN, 10),
          (46, 34, 11),
          (35, 45, np.NaN),
          (76, 26, 13)
          ]
# Create a DataFrame object
dfObj = pd.DataFrame(matrix, index=list('abcde'), columns=list('xyz'))
# Get maximum value of a single column 'y'
maxValue = dfObj[['y', 'z']].max()
print("Maximum value in column 'y' & 'z': ")
print(maxValue)

Output:

Maximum value in column 'y' & 'z':
y 45.0
z 13.0

Get row index label or position of maximum values of every column

DataFrame.idxmax()

So in the above examples, you have seen how to get the max value of rows and columns but what if we want to know the index position of that row and column whereas the value is maximum, by using dataframe.idxmax() we get the index position.

Syntax-

DataFrame.idxmax(axis=0, skipna=True)

Get row index label of Maximum value in every column

import pandas as pd
import numpy as np
# List of Tuples
matrix = [(17, 15, 12),
          (53, np.NaN, 10),
          (46, 34, 11),
          (35, 45, np.NaN),
          (76, 26, 13)
          ]
# Create a DataFrame object
dfObj = pd.DataFrame(matrix, index=list('abcde'), columns=list('xyz'))
# get the index position of max values in every column
maxValueIndexObj = dfObj.idxmax()
print("Max values of columns are at row index position :")
print(maxValueIndexObj)

Output:

Max values of columns are at row index position :
x e
y d
z e
dtype: object

So here you have seen it showed the index position of the column where max value exists.

Get Column names of Maximum value in every row

import pandas as pd
import numpy as np
# List of Tuples
matrix = [(17, 15, 12),
          (53, np.NaN, 10),
          (46, 34, 11),
          (35, 45, np.NaN),
          (76, 26, 13)
          ]
# Create a DataFrame object
dfObj = pd.DataFrame(matrix, index=list('abcde'), columns=list('xyz'))
# get the column name of max values in every row
maxValueIndexObj = dfObj.idxmax(axis=1)
print("Max values of row are at following columns :")
print(maxValueIndexObj)

Output:

Max values of row are at following columns :
a x
b x
c x
d y
e x
dtype: object

So here you have seen it showed the index position of a row where max value exists.

Conclusion:

So in this article, we have seen how to find maximum value & position in rows or columns of a Dataframe and its index position. Thank you!

Want to expert in the python programming language? Exploring Python Data Analysis using Pandas tutorial changes your knowledge from basic to advance level in python concepts.

Read more Articles on Python Data Analysis Using Padas – Find Elements in a Dataframe

Pandas: Find maximum values & position in columns or rows of a Dataframe | How to find the max value of a pandas DataFrame column in Python? Read More »

Python-Add column to dataframe in Pandas

Python: Add column to dataframe in Pandas ( based on other column or list or default value)

In this tutorial, we are going to discuss different ways to add columns to the dataframe in pandas. Moreover, you can have an idea about the Pandas Add Column, Adding a new column to the existing DataFrame in Pandas and many more from the below explained various methods.

Pandas Add Column

Pandas is one such data analytics library created explicitly for Python to implement data manipulation and data analysis. The Pandas library made of specific data structures and operations to deal with numerical tables, analyzing data, and work with time series.

Basically, there are three ways to add columns to pandas i.e., Using [] operator, using assign() function & using insert().

We will discuss it all one by one.

First, let’s create a dataframe object,

import pandas as pd
# List of Tuples
students = [('Rakesh', 34, 'Agra', 'India'),
            ('Rekha', 30, 'Pune', 'India'),
            ('Suhail', 31, 'Mumbai', 'India'),
            ('Neelam', 32, 'Bangalore', 'India'),
            ('Jay', 16, 'Bengal', 'India'),
            ('Mahak', 17, 'Varanasi', 'India')]
# Create a DataFrame object
df_obj = pd.DataFrame(students,
                      columns=['Name', 'Age', 'City', 'Country'],
                      index=['a', 'b', 'c', 'd', 'e', 'f'])
print(df_obj )

Output:

    Name    Age  City        Country
a  Rakesh  34     Agra        India
b  Rekha   30     Pune        India
c  Suhail    31    Mumbai   India
d  Neelam 32   Bangalore India
e  Jay         16   Bengal      India
f  Mahak    17  Varanasi     India

Do Check:

Add column to dataframe in pandas using [] operator

import pandas as pd
# List of Tuples
students = [('Rakesh', 34, 'Agra', 'India'),
            ('Rekha', 30, 'Pune', 'India'),
            ('Suhail', 31, 'Mumbai', 'India'),
            ('Neelam', 32, 'Bangalore', 'India'),
            ('Jay', 16, 'Bengal', 'India'),
            ('Mahak', 17, 'Varanasi', 'India')]
# Create a DataFrame object
df_obj = pd.DataFrame(students,
                      columns=['Name', 'Age', 'City', 'Country'],
                      index=['a', 'b', 'c', 'd', 'e', 'f'])

# Add column with Name Score
df_obj['Score'] = [10, 20, 45, 33, 22, 11]
print(df_obj )

Output:

      Name     Age   City        Country   Score
a    Rakesh    34    Agra          India      10
b    Rekha     30    Pune          India      20
c    Suhail     31     Mumbai    India      45
d    Neelam  32    Bangalore  India      33
e    Jay         16     Bengal       India      22
f    Mahak    17    Varanasi     India       11

So in the above example, you have seen we have added one extra column ‘score’ in our dataframe. So in this, we add a new column to Dataframe with Values in the list. In the above dataframe, there is no column name ‘score’ that’s why it added if there is any column with the same name that already exists then it will replace all its values.

Add new column to DataFrame with same default value

import pandas as pd
# List of Tuples
students = [('Rakesh', 34, 'Agra', 'India'),
            ('Rekha', 30, 'Pune', 'India'),
            ('Suhail', 31, 'Mumbai', 'India'),
            ('Neelam', 32, 'Bangalore', 'India'),
            ('Jay', 16, 'Bengal', 'India'),
            ('Mahak', 17, 'Varanasi', 'India')]
# Create a DataFrame object
df_obj = pd.DataFrame(students,
                      columns=['Name', 'Age', 'City', 'Country'],
                      index=['a', 'b', 'c', 'd', 'e', 'f'])

df_obj['Total'] = 100
print(df_obj)

Output:

         Name    Age    City     Country      Total
a       Rakesh   34    Agra       India          100
b       Rekha    30    Pune       India          100
c       Suhail     31   Mumbai  India          100
d       Neelam  32  Bangalore India        100
e       Jay          16  Bengal       India        100
f       Mahak     17 Varanasi     India        100

So in the above example, we have added a new column ‘Total’ with the same value of 100 in each index.

Add column based on another column

Let’s add a new column ‘Percentage‘ where entrance at each index will be added by the values in other columns at that index i.e.,

df_obj['Percentage'] = (df_obj['Marks'] / df_obj['Total']) * 100
df_obj

Output:

    Name  Age       City    Country  Marks  Total  Percentage
a   jack   34     Sydeny  Australia     10     50        20.0
b   Riti   30      Delhi      India     20     50        40.0
c  Vikas   31     Mumbai      India     45     50        90.0
d  Neelu   32  Bangalore      India     33     50        66.0
e   John   16   New York         US     22     50        44.0
f   Mike   17  las vegas         US     11     50        22.0

Append column to dataFrame using assign() function

So for this, we are going to use the same dataframe which we have created in starting.

Syntax:

DataFrame.assign(**kwargs)

Let’s add columns in DataFrame using assign().

import pandas as pd
# List of Tuples
students = [('Rakesh', 34, 'Agra', 'India'),
            ('Rekha', 30, 'Pune', 'India'),
            ('Suhail', 31, 'Mumbai', 'India'),
            ('Neelam', 32, 'Bangalore', 'India'),
            ('Jay', 16, 'Bengal', 'India'),
            ('Mahak', 17, 'Varanasi', 'India')]
# Create a DataFrame object
df_obj = pd.DataFrame(students,
                      columns=['Name', 'Age', 'City', 'Country'],
                      index=['a', 'b', 'c', 'd', 'e', 'f'])
mod_fd = df_obj.assign(Marks=[10, 20, 45, 33, 22, 11])
print(mod_fd)

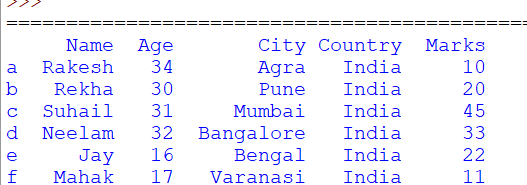
Output:

Add-a-column-using-assign

It will return a new dataframe with a new column ‘Marks’ in that Dataframe. Values provided in the list will be used as column values.

Add column in DataFrame based on other column using lambda function

In this method using two existing columns i.e, score and total value we are going to create a new column i.e..’ percentage’.

import pandas as pd
# List of Tuples
students = [('Rakesh', 34, 'Agra', 'India'),
            ('Rekha', 30, 'Pune', 'India'),
            ('Suhail', 31, 'Mumbai', 'India'),
            ('Neelam', 32, 'Bangalore', 'India'),
            ('Jay', 16, 'Bengal', 'India'),
            ('Mahak', 17, 'Varanasi', 'India')]
# Create a DataFrame object
df_obj = pd.DataFrame(students, columns=['Name', 'Age', 'City', 'Country'],
                      index=['a', 'b', 'c', 'd', 'e', 'f'])
df_obj['Score'] = [10, 20, 45, 33, 22, 11]
df_obj['Total'] = 100
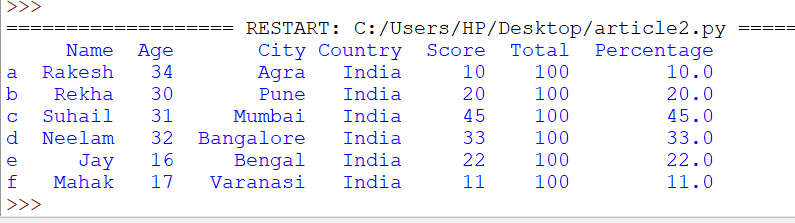
df_obj = df_obj.assign(Percentage=lambda x: (x['Score'] / x['Total']) * 100)
print(df_obj)

Output:

Add-column-based-on-another-column

Add new column to Dataframe using insert()

import pandas as pd
# List of Tuples
students = [('Rakesh', 34, 'Agra', 'India'),
            ('Rekha', 30, 'Pune', 'India'),
            ('Suhail', 31, 'Mumbai', 'India'),
            ('Neelam', 32, 'Bangalore', 'India'),
            ('Jay', 16, 'Bengal', 'India'),
            ('Mahak', 17, 'Varanasi', 'India')]
# Create a DataFrame object
df_obj = pd.DataFrame(students, columns=['Name', 'Age', 'City', 'Country'],
                      index=['a', 'b', 'c', 'd', 'e', 'f'])
# Insert column at the 2nd position of Dataframe
df_obj.insert(2, "Marks", [10, 20, 45, 33, 22, 11], True)
print(df_obj)

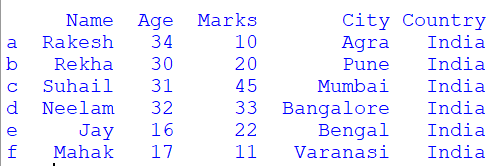
Output:

add-a-column-using-insert


In other examples, we have added a new column at the end of the dataframe, but in the above example, we insert a new column in between the other columns of the dataframe, then we can use the insert() function.

Add a column to Dataframe by dictionary

import pandas as pd
# List of Tuples
students = [('Rakesh', 34, 'Agra', 'India'),
            ('Rekha', 30, 'Pune', 'India'),
            ('Suhail', 31, 'Mumbai', 'India'),
            ('Neelam', 32, 'Bangalore', 'India'),
            ('Jay', 16, 'Bengal', 'India'),
            ('Mahak', 17, 'Varanasi', 'India')]
# Create a DataFrame object
df_obj = pd.DataFrame(students, columns=['Name', 'Age', 'City', 'Country'],
                      index=['a', 'b', 'c', 'd', 'e', 'f'])
ids = [11, 12, 13, 14, 15, 16]
# Provide 'ID' as the column name and for values provide dictionary
df_obj['ID'] = dict(zip(ids, df_obj['Name']))
print(df_obj)

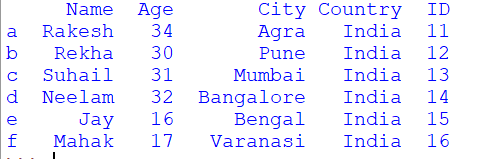
Output:

Add-a-column-using-dictionary

Want to expert in the python programming language? Exploring Python Data Analysis using Pandas tutorial changes your knowledge from basic to advance level in python concepts.

Read more Articles on Python Data Analysis Using Padas – Add Contents to a Dataframe

Python: Add column to dataframe in Pandas ( based on other column or list or default value) Read More »

Pandas- Loop or Iterate over all or certain columns of a dataframe

Pandas : Loop or Iterate over all or certain columns of a dataframe

In this article, we will discuss how to loop or Iterate overall or certain columns of a DataFrame. Also, you may learn and understand what is dataframe and how pandas dataframe iterate over columns with the help of great explanations and example codes.

About DataFrame

A Pandas DataFrame is a 2-dimensional data structure, like a 2-dimensional array, or a table with rows and columns.

First, we are going to create a dataframe that will use in our article.

import pandas as pd

employees = [('Abhishek', 34, 'Sydney') ,
           ('Sumit', 31, 'Delhi') ,
           ('Sampad', 16, 'New York') ,
           ('Shikha', 32,'Delhi') ,
            ]

#load data into a DataFrame object:
df = pd.DataFrame(employees, columns=['Name', 'Age', 'City'], index=['a', 'b', 'c', 'd'])

print(df)

Output:

    Name       Age    City
a  Abhishek  34    Sydney
b  Sumit       31    Delhi
c  Sampad   16     New York
d  Shikha     32     Delhi

Also Check:

Using DataFrame.iteritems()

We are going to iterate columns of a dataframe using DataFrame.iteritems().

Dataframe class provides a member function iteritems().

import pandas as pd
employees = [('Abhishek', 34, 'Sydney') ,
             ('Sumit', 31, 'Delhi') ,
             ('Sampad', 16, 'New York') ,
             ('Shikha', 32,'Delhi') , ]
#load data into a DataFrame object:
df = pd.DataFrame(employees, columns=['Name', 'Age', 'City'], index=['a', 'b', 'c', 'd'])
# Yields a tuple of column name and series for each column in the dataframe
for (columnName, columnData) in df.iteritems():
   print('Colunm Name : ', columnName)
   print('Column Contents : ', columnData.values)

Output:

Colunm Name : Name
Column Contents : ['Abhishek' 'Sumit' 'Sampad' 'Shikha']
Colunm Name : Age
Column Contents : [34 31 16 32]
Colunm Name : City
Column Contents : ['Sydney' 'Delhi' 'New York' 'Delhi']

In the above example, we have to return an iterator that can be used to iterate over all the columns. For each column, it returns a tuple containing the column name and column contents.

Iterate over columns in dataframe using Column Names

import pandas as pd
employees = [('Abhishek', 34, 'Sydney') ,
             ('Sumit', 31, 'Delhi') ,
             ('Sampad', 16, 'New York') ,
             ('Shikha', 32,'Delhi') , ]
#load data into a DataFrame object:
df = pd.DataFrame(employees, columns=['Name', 'Age', 'City'], index=['a', 'b', 'c', 'd'])
# Yields a tuple of column name and series for each column in the dataframe
for column in df:
   # Select column contents by column name using [] operator
   columnSeriesObj = df[column]
   print('Colunm Name : ', column)
   print('Column Contents : ', columnSeriesObj.values)

Output:

Colunm Name : Name
Column Contents : ['Abhishek' 'Sumit' 'Sampad' 'Shikha']
Colunm Name : Age
Column Contents : [34 31 16 32]
Colunm Name : City
Column Contents : ['Sydney' 'Delhi' 'New York' 'Delhi']

ln the above example, we can see that Dataframe.columns returns a sequence of column names on which we put iteration and return column name and content.

Iterate Over columns in dataframe in reverse order

import pandas as pd
employees = [('Abhishek', 34, 'Sydney') ,
             ('Sumit', 31, 'Delhi') ,
             ('Sampad', 16, 'New York') ,
             ('Shikha', 32,'Delhi') , ]
#load data into a DataFrame object:
df = pd.DataFrame(employees, columns=['Name', 'Age', 'City'], index=['a', 'b', 'c', 'd'])
# Yields a tuple of column name and series for each column in the dataframe
for column in reversed(df.columns):
   # Select column contents by column name using [] operator
   columnSeriesObj = df[column]
   print('Colunm Name : ', column)
   print('Column Contents : ', columnSeriesObj.values)

Output:

Colunm Name : City
Column Contents : ['Sydney' 'Delhi' 'New York' 'Delhi']
Colunm Name : Age
Column Contents : [34 31 16 32]
Colunm Name : Name
Column Contents : ['Abhishek' 'Sumit' 'Sampad' 'Shikha']

We have used reversed(df.columns)which given us the reverse column name and its content.

Iterate Over columns in dataframe by index using iloc[]

import pandas as pd
employees = [('Abhishek', 34, 'Sydney') ,
             ('Sumit', 31, 'Delhi') ,
             ('Sampad', 16, 'New York') ,
             ('Shikha', 32,'Delhi') , ]
#load data into a DataFrame object:
df = pd.DataFrame(employees, columns=['Name', 'Age', 'City'], index=['a', 'b', 'c', 'd'])
# Yields a tuple of column name and series for each column in the dataframe
for index in range(df.shape[1]):
   print('Column Number : ', index)
   # Select column by index position using iloc[]
   columnSeriesObj = df.iloc[: , index]
   print('Column Contents : ', columnSeriesObj.values)

Output:

Column Number : 0
Column Contents : ['Abhishek' 'Sumit' 'Sampad' 'Shikha']
Column Number : 1
Column Contents : [34 31 16 32]
Column Number : 2
Column Contents : ['Sydney' 'Delhi' 'New York' 'Delhi']

So in the above example, you can see that we have iterate over all columns of the dataframe from the 0th index to the last index column. We have selected the contents of the columns using iloc[].

Want to expert in the python programming language? Exploring Python Data Analysis using Pandas tutorial changes your knowledge from basic to advance level in python concepts.

Read more Articles on Python Data Analysis Using Padas

Conclusion:

At last, I can say that the above-explained different methods to iterate over all or certain columns of a dataframe. aids you a lot in understanding the Pandas: Loop or Iterate over all or certain columns of a dataframe. Thank you!

Pandas : Loop or Iterate over all or certain columns of a dataframe Read More »

Sorting 2D Numpy Array by column or row in Python

Sorting 2D Numpy Array by column or row in Python | How to sort the NumPy array by column or row in Python?

In this tutorial, we are going to discuss how to sort the NumPy array by column or row in Python. Just click on the direct links available here and directly jump into the example codes on sorting 2D Numpy Array by Column or Row in Python.

How to Sort the NumPy Array by Column in Python?

In this section, you will be learning the concept of Sorting 2D Numpy Array by a column

Firstly, we have to import a numpy module ie.,

import numpy as np

After that, create a 2D Numpy array i.e.,

# Create a 2D Numpy array list of list
arr2D = np.array([[21, 22, 23, 20], [21, 17, 13, 14], [13, 10, 33, 19]])
print('2D Numpy Array')
print(arr2D)

Output:

2D Numpy Array
[[21 22 23 20]
[21 17 13 14]
[13 10 33 19]]

Suppose if we want to sort this 2D array by 2nd column like this,

[[21 7 23 14]
[31 10 33 7]
[11 12 13 22]]

To do that, first, we have to change the positioning of all rows in the 2D numpy array on the basis of sorted values of the 2nd column i.e. column at index 1.

Do Check:

Let’s see how to sort it,

Sorting 2D Numpy Array by column at index 1

In this, we will use arr2D[:,columnIndex].argsort()which will give the array of indices that sort this column.

import numpy as np

# Create a 2D Numpy array list of list
arr2D = np.array([[21, 22, 23, 20], [21, 17, 13, 14], [13, 10, 33, 19]])
print('2D Numpy Array')
print(arr2D)
columnIndex = 1
# Sort 2D numpy array by 2nd Column
sortedArr = arr2D[arr2D[:,columnIndex].argsort()]
print('Sorted 2D Numpy Array')
print(sortedArr)

Output:

2D Numpy Array
[[21 22 23 20]
[21 17 13 14]
[13 10 33 19]]

Sorted 2D Numpy Array
[[13 10 33 19]
[21 17 13 14]
[21 22 23 20]]

So in the above example, you have seen we changed the position of all rows in an array on sorted values of the 2nd column means column at index 1.

Sorting 2D Numpy Array by column at index 0

Let’s see how it will work when we give index 0.

import numpy as np

# Create a 2D Numpy array list of list
arr2D = np.array([[21, 22, 23, 20], [21, 17, 13, 14], [13, 10, 33, 19]])
print('2D Numpy Array')
print(arr2D)
# Sort 2D numpy array by first column
sortedArr = arr2D[arr2D[:,0].argsort()]
print('Sorted 2D Numpy Array')
print(sortedArr)

Output:

2D Numpy Array
[[21 22 23 20]
[21 17 13 14]
[13 10 33 19]]

Sorted 2D Numpy Array
[[13 10 33 19]
[21 22 23 20]
[21 17 13 14]]

Sorting 2D Numpy Array by the Last Column

import numpy as np

# Create a 2D Numpy array list of list
arr2D = np.array([[21, 22, 23, 20], [21, 17, 13, 14], [13, 10, 33, 19]])
print('2D Numpy Array')
print(arr2D)
# Sort 2D numpy array by last column
sortedArr = arr2D[arr2D[:, -1].argsort()]
print('Sorted 2D Numpy Array')
print(sortedArr)

Output:

2D Numpy Array
[[21 22 23 20]
[21 17 13 14]
[13 10 33 19]]

Sorted 2D Numpy Array
[[21 17 13 14]
[13 10 33 19]
[21 22 23 20]]

How to Sort the NumPy array by Row in Python?

By using similar logic, we can also sort a 2D Numpy array by a single row i.e. mix-up the columns of the 2D numpy array to get the furnished row sorted.

Look at the below examples and learn how it works easily,

Let’s assume, we have a 2D Numpy array i.e.

# Create a 2D Numpy array list of list
arr2D = np.array([[11, 12, 13, 22], [21, 7, 23, 14], [31, 10, 33, 7]])
print('2D Numpy Array')
print(arr2D)

Output:

2D Numpy Array
[[11 12 13 22]
[21 7 23 14]
[31 10 33 7]]

Sorting 2D Numpy Array by row at index position 1

So we are going to use the above example to show how we sort an array by row.

import numpy as np

# Create a 2D Numpy array list of list
arr2D = np.array([[21, 22, 23, 20], [21, 17, 13, 14], [13, 10, 33, 19]])
print('2D Numpy Array')
print(arr2D)
# Sort 2D numpy array by 2nd row
sortedArr = arr2D [ :, arr2D[1].argsort()]
print('Sorted 2D Numpy Array')
print(sortedArr)

Output:

2D Numpy Array
[[21 22 23 20]
[21 17 13 14]
[13 10 33 19]]

Sorted 2D Numpy Array
[[23 20 22 21]
[13 14 17 21]
[33 19 10 13]]

So you can see that it changed column value, as we selected row at given index position using [] operator and using argsort()we got sorted indices after that we have changed the position of the column to sort our row.

Sorting 2D Numpy Array by the Last Row

import numpy as np

# Create a 2D Numpy array list of list
arr2D = np.array([[21, 22, 23, 20], [21, 17, 13, 14], [13, 10, 33, 19]])
print('2D Numpy Array')
print(arr2D)
# Sort 2D numpy array by last row
sortedArr = arr2D[:, arr2D[-1].argsort()]
print('Sorted 2D Numpy Array')
print(sortedArr)

Output:

2D Numpy Array
[[21 22 23 20]
[21 17 13 14]
[13 10 33 19]]

Sorted 2D Numpy Array
[[22 21 20 23]
[17 21 14 13]
[10 13 19 33]]

Conclusion:

So in this article, I have shown you different ways to sorting 2D Numpy Array by column or row in Python.

Happy learning guys!

Sorting 2D Numpy Array by column or row in Python | How to sort the NumPy array by column or row in Python? Read More »