Python

How to Iterate over a List

Python : How to Iterate over a List ?

Lists are similar to dynamically sized arrays, which are declared in other languages(e.g., vector in C++ and ArrayList in Java). Lists do not have to be homogeneous all of the time, which makes it a very useful tool in Python. DataTypes such as Integers, Strings, and Objects can all be included in a single list. Lists are mutable, which means they can be changed after they’ve been created.

We’ll look at a few different ways to iterate through a list in this article.

Examples:

Input:

givenlist=['hello' , 'world' , 'this', 'is' ,'python']

Output:

hello 
world
this 
is 
python

Print the list by iterating through it

There are several ways to iterate through a list some of them are:

Method #1 : Using For loop

We can use for loop to iterate over the list.

Below is the implementation:

# Given list
givenlist=['hello' , 'world' , 'this', 'is' ,'python']

#Using for loop to iterate over the list
for element in givenlist:
    print(element)

Output:

hello 
world
this 
is 
python

Method #2 :Using while loop

In Python, the while loop is used to iterate through a block of code as long as the test expression (condition) is true. This loop is typically used when we don’t know how many times to iterate ahead of time.

Here the condition is loop till length of list

Below is the implementation:

# Given list
givenlist = ['hello', 'world', 'this', 'is', 'python']

# Getting length of list
length = len(givenlist)

# Initializing position to index 0
position = 0

# Iterating using while loop
while position < length:
    print(givenlist[position])
    position = position + 1

Output:

hello 
world
this 
is 
python

Method #3: Using For loop and range() function

If we want to use the standard for loop, which iterates from x to y, we can do so.

Below is the implementation:

# Given list
givenlist = ['hello', 'world', 'this', 'is', 'python']

# Getting length of list
length = len(givenlist)

# Iterating till length of list
for index in range(length):
    print(givenlist[index])

Output:

hello 
world
this 
is 
python

Method #4 : Using list comprehension

We can iterate over the list in one line using list comprehension

Below is the implementation:

# Given list
givenlist = ['hello', 'world', 'this', 'is', 'python']

# Using list comprehension
[print(i) for i in givenlist]

Output:

hello 
world
this 
is 
python

Method #5 :Using enumerate()

The enumerate() function can be used to transform a list into an iterable list of tuples or to get the index based on a condition check.

Below is the implementation:

# Given list
givenlist = ['hello', 'world', 'this', 'is', 'python']

# Using enumerate()
for index, value in enumerate(givenlist):
    print(value)

Output:

hello 
world
this 
is 
python

 
Related Programs:

Python : How to Iterate over a List ? Read More »

Different ways to Iterate over a List in Reverse Order

Python : Different ways to Iterate over a List in Reverse Order

Lists are similar to dynamically sized arrays, which are declared in other languages(e.g., vector in C++ and ArrayList in Java). Lists do not have to be homogeneous all of the time, which makes it a very useful tool in Python. DataTypes such as Integers, Strings, and Objects can all be included in a single list. Lists are mutable, which means they can be changed after they’ve been created.

We’ll look at a few different ways to iterate over a List in Reverse Order in this article.

Example:

Input:

givenlist=['hello' , 'world' , 'this', 'is' ,'python']

Output:

python
is 
this
world
hello

Print list in reverse order

There are several ways to iterate through a list in reverse order some of them are:

Method #1 : Using for loop and range()

When it comes to iterating through something, the loop is always helpful. To iterate in Python, we use the range() function. This approach is known as range ([start], stop[, step]).

start: This is the sequence’s first index.
stop: The range will continue until it reaches this index, but it will not include it.
step: The difference between each sequence element.

range(len(givenlist)-1, -1, -1)

this will return numbers from n to 1 i.e reverse indexes.

In the for loop, use the range() function and the random access operator [] to access elements in reverse.

Below is the implementation:

# Given list
givenlist = ['hello', 'world', 'this', 'is', 'python']

# Iterate over the list in reverse order using for loop and range()

for index in range(len(givenlist) - 1, -1, -1):
    print(givenlist[index])

Output:

python
is 
this
world
hello

Method #2: Using while loop

In Python, the while loop is used to iterate through a block of code as long as the test expression (condition) is true. This loop is typically used when we don’t know how many times to iterate ahead of time.

  • First, we used the len() method to determine the length of the list.
  • The index variable is set to the length of the list -1.
  • It’s used to display the list’s current index when iterating.This loop will continue until the index value reaches 0.
  • The index value is decremented by one each time.
  • The print line will print the list’s current iteration value.

Below is the implementation:

# Given list
givenlist = ['hello', 'world', 'this', 'is', 'python']

# Point position to the last element in list
position = len(givenlist) - 1

# Iterate till 1st element and keep on decrementing position
while position >= 0:
    print(givenlist[position])
    position = position - 1

Output:

python
is 
this
world
hello

Method #3: Using list Comprehension and slicing

givenlist[::-1]

It will generate a temporary reversed list.

Let’s apply this to iterating over the list in reverse in List comprehension.

Below is the implementation:

# Given list
givenlist = ['hello', 'world', 'this', 'is', 'python']

# Using list comprehension and slicing
[print(element) for element in givenlist[::-1]]

Output:

python
is 
this
world
hello

Method #4: Using for loop and reversed()

reversed(givenlist)

The reversed() function returns an iterator that iterates through the given list in reverse order.

Let’s use for loop  to iterate over that reversed sequence.

Below is the implementation:

# Given list
givenlist = ['hello', 'world', 'this', 'is', 'python']

# Using for loop and reversed function
for element in reversed(givenlist):
    print(element)

Output:

python
is 
this
world
hello

Method #5 : Using List Comprehension and reversed() function

reversed(givenlist)

The reversed() function returns an iterator that iterates through the given list in reverse order.

let us use list comprehension to print list in reverse order.

Below is the implementation:

# Given list
givenlist = ['hello', 'world', 'this', 'is', 'python']

# Iterate over the list using List Comprehension and [::-1]
[print(element) for element in reversed(givenlist)]

Output:

python
is 
this
world
hello

Related Programs:

Python : Different ways to Iterate over a List in Reverse Order Read More »

How to Find all Indexes of an Item in a List

Python How to Find all Indexes of an Item in a List

Lists are similar to dynamically sized arrays, which are declared in other languages(e.g., vector in C++ and ArrayList in Java). Lists do not have to be homogeneous all of the time, which makes it a very useful tool in Python. DataTypes such as Integers, Strings, and Objects can all be included in a single list. Lists are mutable, which means they can be changed after they’ve been created.

An index refers to a position within an list.

Given a list and item, the task is to print all indexes of occurrences of that item in the list

Examples:

Input :

givenlist = ["this", "is", "the", "new", "way", "to" , "learn" , "python", "which" , "is" ,"easy" ,"is" ]

item = is

Output:

Indexes are : 1 9 11

Explanation:

Here "is" is present at the indices 1,9 and 11

Print the indices of occurrences of the item

There are several ways to find indices of item in list some of them are:

Method #1: Using For loop and list

Create an empty list. Iterate through each element in the original list using a for-loop.

Append the index of each occurrence of the given item to the empty list.

Below is the implementation:

# Given list
givenlist = ["this", "is", "the", "new", "way", "to", "learn", "python",
             "which", "is", "easy", "is"]

# Given item
item = "is"

# Taking empty list
indexes = []

# Loop over indices of elements in givenlist
for index in range(len(givenlist)):
  # if element is equal to given item then append to empty list
    if givenlist[index] == item:
        indexes.append(index)

# printing the result indexes
print("Indexes are : ", *indexes)

Note : Here * is used to print list with spaces

Output:

Indexes are :  1 9 11

Method #2 : Using enumerate() function

The built-in function enumerate can be used to get the index of all occurrences of an element in a list ().

It was created to solve the loop counter issue and can be used in these type of problems.

Below is the implementation:

# Given list
givenlist = ["this", "is", "the", "new", "way", "to", "learn", "python",
             "which", "is", "easy", "is"]

# Given item
item = "is"

print("Indexes are :", end=" ")

for index, element in enumerate(givenlist):
    # If the element is equal to item then print its index
    if element == item:
        print(index, end=" ")

Output:

Indexes are :  1 9 11

Method #3: Using list comprehension and range

You can get a list of all valid indices with the range() function and then compare the corresponding value

at each index with the given object.

Below is the implementation:

# Given list
givenlist = ["this", "is", "the", "new", "way", "to", "learn", "python",
             "which", "is", "easy", "is"]

# Given item
item = "is"

print("Indexes are :", end=" ")
# Using list comprehension to store indexes in indexes list
indexes = [index for index in range(
    len(givenlist)) if givenlist[index] == item]

# print the list
print(*indexes)

Output:

Indexes are :  1 9 11

Method #4 : Using count() function in itertools

We can use itertools count() function to build an iterator for efficient looping that returns evenly

spaced values beginning with the given amount.

You may use it in conjunction with the zip() function to add sequence numbers as shown below.

from itertools import count
# Given list
givenlist = ["this", "is", "the", "new", "way", "to", "learn", "python",
             "which", "is", "easy", "is"]

# Given item
item = "is"

print("Indexes are :", end=" ")
indexes = [(i, j) for i, j in zip(count(), givenlist) if j == item]


# Traverse the indexes list and print only index
for i in indexes:
    print(i[0], end=" ")

Note: Here we need only index so we print only index element in indexes list

Output:

Indexes are :  1 9 11

Method #5 : Using Numpy

We use numpy.where() function to get indexes of the occurrences of item in given list.

Below is the implementation

import numpy as np
# Given list
givenlist = ["this", "is", "the", "new", "way", "to", "learn", "python",
             "which", "is", "easy", "is"]

# Given item
item = "is"

indexes = np.where(np.array(givenlist) == item)[0]

print("Indexes are :",*indexes)

Output:

Indexes are :  1 9 11

Related Programs:

Python How to Find all Indexes of an Item in a List Read More »

Introduction to Python – Object

In this Page, We are Providing Introduction to Python – Object. Students can visit for more Detail and Explanation of Python Handwritten Notes Pdf.

Introduction to Python – Object

Introduction to Python Object

“Object” (also called “name”) is Python’s abstraction for data. All data in a Python program is represented by objects or by relations between objects. Every object has an identity, a type, and a value. An object’s identity never changes once it has been created; it can be thought of it as the object’s address in memory. The id () function returns an integer representing its identity (currently implemented as its address). An object’s type determines the operations that the object supports and also defines the possible values for objects of that type.

An object’s type is also unchangeable and the type () function returns an object’s type. The value of some objects can change. Objects whose value can change are said to be “mutable”; objects whose value is unchangeable once they are created are called “immutable”. In the example below, object a has identity 31082544, type int, and value 5.

>>> a=5
>>> id (a)
31082544 
>>> type (a) 
<type 'int'>

Some objects contain references to other objects; these are called “containers”. Examples of containers are tuples, lists, and dictionaries. The value of an immutable container object that contains a reference to a mutable object can change when the latter’s value is changed; however, the container is still considered immutable because the collection of objects it contains cannot be changed. So, immutability is not strictly the same as having an unchangeable value.

An object has an attribute(s), which are referenced using dotted expressions. For example, if an object ABC has an attribute PQ, then it would be referenced as ABC. PQ. In the following example, upper () is an attribute of var object.

>>> var= 'hello'
>>> var.upper()
'HELLO'

In the above example, upper () is a function on some object var, and this function is called “method”. More information on “method” is given in chapter 6.

Introduction to Python – Object Read More »

How to Append Text or Lines to a File in Python

In this article, we will discuss the topic of how to append in a python file.

Before we fully understand this topic we have to be clear about some basic abbreviations that we use during file handling in python whether we have to write something to the file or append to the file.

There are some modes in python that we need when we work with python files.

These modes are:-

  1. Read Mode (‘r’)-This is the default mode. This mode opens a file for reading and gives an error if the file doesn’t exist.
  2. Append mode (‘a’)- This mode is used to append to a file in python. If no file exists it creates a new file.
  3. Write mode (‘w’)- This mode is used to write to a file in python. If no file exists it creates a new file.
  4. “r+”: This mode is used for both reading and writing.
  5. “a+”: This mode is used for both reading and appending.

Difference between writing and appending in a file

So some may have a sort of confusion about what is the difference between appending and writing to a file. The basic difference between both of them is that when we open a file in write mode then as many as the time we perform write operation our original data will be overwritten with new data but when we access the file in append mode it means we append new data with original data.

open() function and its working

 As we know to perform any operation in a file first we have to access it.Here open() function comes into use.the open() function is used to open a file in reading or write or append mode. As our main concern in this topic is to discuss append data so we use append mode with the open() function.

the open() function takes two arguments first is the file name and another is the mode in which we want to access the file. If we do not pass any mode it will by default take ‘r’ mode.

So the syntax is open(fileName,mode).

To open files in append mode we use either ‘a’ mode or ‘a+’ mode. With file access mode ‘a’ open() function first checks if a file exists or not. If a file doesn’t exist it creates a file and then opens it otherwise it directly opens the file. In both cases, a file object is returned.

Syntax: file_object=open(fileName,’a’). Or file_object=open(fileName,’a+’).

Here we can use any variable name. “file_object” is not a compulsion. In file_object a file object is returned which is helpful to perform append operation in the file.

File Object

Here we see a word file object multiple times so let’s understand what file object actually means. The file object is the connector between us and the file. It allows us to read and write in the file. It takes a reference of the file and opens it in the different mode we want.

Example:

Input

f=open("append_file.txt", "a")
f.write("First Line\n")
f.write("Second Line")
f.close()

Output

First Line

Second Line

Note: \n is used to append data to a new line otherwise our content will look like this…

Output without using “\n” is given below

First LineSecond Line

Code Explanation

We opened the file ‘append_file.txt’ in append mode i.e. using access mode ‘a’. As the cursor was pointing to the end of the file in the file object, therefore when we passed the string in the write() function, it appended it at the end of the file. So, our text ‘Second  Line’ gets added at the end of the file ‘append_file.txt’.

 Append Data to a new line in python files

In the previous example, we see that we use escape sequence ‘\n’ to append data in a new line. This method is good but it will fail in one scenario. When a file does not exist or is empty then this approach will create a problem. Hence we should change this approach and work on a new approach that will work on all the cases.

Before understanding the new approach we must need to know about some abbreviations and functions.

  • Read() function: The read() method returns the specified number of bytes from the file. Default is -1 which means the whole file.

For Example, if we write f.read(30) so it will read() first 30 characters from the file.

  • seek() method: The seek() method sets the file’s current position at the offset. The whence argument is optional and defaults to 0, which means absolute file positioning, other values are 1 which means seek relative to the current position and 2 means seek relative to the file’s end.

Note: If the file is only opened for writing in append mode using ‘a’, this method is essentially a no-op, but it remains useful for files opened in append mode with reading enabled (mode ‘a+’).

As we understand two important concepts now we will be comfortable in implementing the new approach to append data in a new line in the file.

Approach

  • Open the file in append & read mode (‘a+’). Both read & write cursor points to the end of the file.
  • Move the red cursor to the start of the file.
  • Read some text from the file and check if the file is empty or not.
  • If the file is not empty, then append ‘\n’ at the end of the file using the write() function.
  • Append a given line to the file using the write() function.
  • Close the file

As we check whether our file is empty or not so it will work on all the scenarios.

Examples
Input

f=open("append_file.txt", "a+")
f.seek(0)
data = f.read(100)
if len(data) > 0 :
    f.write("\n")
f.write("second line")

Output

Hello Nice meeting you
second line

Before appending the string “second line” in the file my file has the content “Hello Nice meeting you” so it will append the second line” in the new line.

Use of with open statement to append text in the python file

With open() do similar functions as open() do but one difference is that we do not need to close files. with open() statement handles it.

Example

With open(file,a) as f is similar as f=open(file,a)

Input

with open("append_file.txt","a") as f:
    f.write("First Line\n")
    f.write("Second Line")

Output

First Line

Second Line

We clearly see that the output is the same as the previous one.

Appending List of items in the python file

Till now we see that we can append text in a file with help of the write() function. But consider a scenario where we have a list of items instead of string then what we can do. One of the traditional ways is that we can run a loop and append data. But there is also another way in which we can append a list of items in a single line without using a loop. We can do this by using writelines() method.

Example

Input

l=['I ','use ','writelines()','function']
f=open("append_file.txt", "a")
f.write("First Line\n")
f.write("second line\n")
f.writelines(l)

Output

First Line
second line
I use writelines()function

Here we see that we have a list l and we easily append items of the list in the file without using any loop.

How to Append Text or Lines to a File in Python Read More »

Python: Check if a Value Exists in the Dictionary

In this article, we will be discussing how to check if a value exists in the python dictionary or not.

Before going to the different method to check let take a quick view of python dictionary and some of its basic function that we will be used in different methods.

Dictionary in python is an unordered collection of elements. Each element consists of key-value pair.It must be noted that keys in dictionary must be unique because if keys will not unique we might get different values in the same keys which is wrong. There is no such restriction in the case of values.

For example: {“a”:1, “b”:2, “c”:3, “d”,4}

Here a,b,c, and d are keys, and 1,2,3, and 4 are values.

Now let take a quick look at some basic method that we are going to use.

  1. keys():  The keys() method in Python Dictionary, return a list of keys that are present in a particular dictionary.
  2. values(): The values() method in Python Dictionary, return a list of values that are present in a particular dictionary.
  3. items(): The items() method in python dictionary return a list of key-value pair.

syntax for using keys() method: dictionary_name.keys()

syntax for using values() method: dictionary_name.values()

syntax for using items() method: dictionary_name.items()

Let us understand this with basic code

d={"a":1,
    "b":2,
    "c":3,
    "d":4
    }
print(type(d))
print(d.keys())
print(d.values())
print(d.items())

Output

<class 'dict'>
dict_keys(['a', 'b', 'c', 'd'])
dict_values([1, 2, 3, 4])
dict_items([('a', 1), ('b', 2), ('c', 3), ('d', 4)])

Here we see that d is our dictionary and has a,b,c, and d as keys and 1,2,3,4 as values and items() return a tuple of key-value pair.

Different methods to check if a value exists in the dictionary

  • Using in operator and values()

    As we see values() method gives us a list of values in the python dictionary and in keyword is used to check if a value is present in a sequence (list, range, string, etc.).So by using the combination of both in operator and values() method we can easily check if a value exists in the dictionary or not. This method will return boolean values i.e. True or False. True if we get the value otherwise False.

d={"a":1,
    "b":2,
    "c":3,
    "d":4
    }
print(3 in d.values())
if(3 in d.values()):
    print("3 is present in dictionary")
else:
    print("3 is not present in dictionary")

Output

True
3 is present in dictionary
  • Using for loop

Here we can use for loop in different ways to check if a value exists in the dictionary or not. One of the methods is to iterate over the dictionary and check for each key if our value is matching or not using a conditional statement(if-else). And another method is that we can iterate over all the key-value pairs of dictionary using a for loop and while iteration we can check if our value matches any value in the key-value pairs.

Let us see both the method one by one.

First method

d={"a":1,
    "b":2,
    "c":3,
    "d":4
    }
res = False
for key in d:
    if(d[key] == 3):
        res = True 
        break
if(res):
     print("3 is present in dictionary")
else:
     print("3 is not present in dictionary")

Output

3 is present in dictionary

Here we iterate over the dictionary and check for each key if our value is matching or not using a conditional statement(if-else).

Second Method

d={"a":1,
    "b":2,
    "c":3,
    "d":4
    }
res = False
value=3
for key, val in d.items():
    if val == value:
        res = True
        break
if(res):
    print(f"{value} is present in dictionary")
else:
    print(f"{value} is not present in dictionary")

Output

3 is present in dictionary

Here we can iterate over all the key-value pairs of dictionary using a for loop and while iteration we can check if our value matches any value in the key-value pairs.

  • Using any() and List comprehension

Using list comprehension, iterate over a sequence of all the key-value pairs in the dictionary and create a bool list. The list will contain a True for each occurrence of our value in the dictionary. Then call any() function on the list of bools to check if it contains any True. any() function accept list, tuples, or dictionary as an argument. If yes then it means that our value exists in any key-value pair of the dictionary otherwise not.

d={"a":1,
    "b":2,
    "c":3,
    "d":4
    }
value=3
if any([True for k,v in d.items() if v == value]):
    print(f"Yes, Value: '{value}' exists in dictionary")
else:
    print(f"No, Value: '{value}' does not exists in dictionary")

Output

Yes, Value: '3' exists in dictionary

So these are the different methods to check if a value exists in the dictionary or not.

Python: Check if a Value Exists in the Dictionary Read More »

How to Convert a List to Dictionary in Python?

In this article, we will discuss the topic of how to convert a list to the dictionary in python. Before going to the actual topic let us take a quick brief of lists and dictionaries in python.

List: In python, a list is used to store the item of various data types like integer, float, string, etc. Python list is mutable i.e we can update the python list or simply say we can modify its element after its creation.

l=[1,"a","b",2,3,3.1]
print(type(l))

Output

<class 'list'>

Dictionary: Dictionary is an unordered collection of data values that are used to store data in the form of key-value pairs.

d={"a":1,
    "b":2,
    "c":3,
    "d":4
    }

print(type(d))

Output

<class 'dict'>

Important Point:

A list is an ordered collection of data while a dictionary is an unordered collection of data so when we convert the list into dictionary output, may differ in order.

Ways to convert list to the dictionary in python

  • Method1-Using dictionary comprehension

This is one of the ways to convert a list to a dictionary in python. Let us understand what dictionary comprehension is. Dictionary comprehension is one of the easiest ways to create a dictionary. Using Dictionary comprehension we can make our dictionary by writing only a single line of code.

syntax: d = {key: value for variables in iterable}

Example :- d={ i: i*2 for i in range(1,6)}

d={i : i*2 for i in range(1,6)}
print(d)

Output

{1: 2, 2: 4, 3: 6, 4: 8, 5: 10}

Let us understand with an example how we can convert a list to a dictionary using this method. We clearly see in a dictionary comprehension syntax we iterate iterables and we know the list is also iterable so we simply iterate our list and form a dictionary with the list. Let us clear this concept with an example:-

l=[1,2,3,4,5]
d={i : i*2 for i in l}
print(d)

Output

{1: 2, 2: 4, 3: 6, 4: 8, 5: 10}

Explanation: We simply pass a list in the dictionary comprehension and iterate through each element of the list. The element we get is store in i and we successfully executed the condition “i : i*2” to get the key-value pair.

  • Method-2 Using zip() function

The zip() function is used to aggregate or zip or combine the two values together. zip() function returns a zip object so we can easily convert this zip object to the tuple, list, or dictionary.

syntax:  zip(iterator1,iterator2,…….)

As we convert the list to the dictionary so we need only two iterators and these are lists. That means we pass a list as an argument in the zip() function we get a zip object and then we can typecast this zip object to the dictionary. But here 2 cases will arise the first case when both lists have the same length second case when both lists have different lengths. Let us see both cases one by one.

First case: When both the list are of the same length

l1=['a','b','c','d']
l2=[1,2,3,4]
zip_val=zip(l1,l2)
print(zip_val)
print(dict(zip_val))

Output

<zip object at 0x00000142497361C8>
{'a': 1, 'b': 2, 'c': 3, 'd': 4}

Explanation: Here we see that both the list are of the same length. We can see that the first zip() function returns a zip object that we print in the above example and then we typecast this object into the dictionary to get the desired result.

Second case: When both the list are of the different length

l1=['a','b','c','d','e']
l2=[1,2,3,4]
zip_val=zip(l1,l2)
print(zip_val)
print(dict(zip_val))

Output

<zip object at 0x000001C331F160C8>
{'a': 1, 'b': 2, 'c': 3, 'd': 4}

Explanation: Here we see that our first list is of length 5 while the second list is of length 4 and in the final result, we get only 4 key-value pairs. So it can be concluded that the list with the smallest length will decide the number of key-value pairs in output. While another part is the same i.e. first we get a zip object and we typecast this zip object into the dictionary to get our desired result.

  • Method-3 Using dict() constructor

dict() constructor is also used to create a dictionary in python.This method comes into use when we have list of tuples. List of tuples means tuples inside the list.

Example: listofTuples = [(“student1” , 1), (“student2” , 2), (“Student3” , 3)] is a list of tuples.

listofTuples = [("student1" , 1), ("student2" , 2), ("Student3" , 3)]
print(dict(listofTuples))

Output

{'student1': 1, 'student2': 2, 'Student3': 3}

so these are the three methods to convert a list to the dictionary in python.


How to Convert a List to Dictionary in Python? Read More »

Convert integer to string in Python

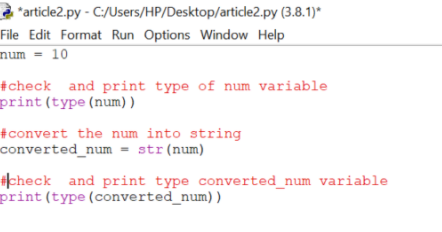
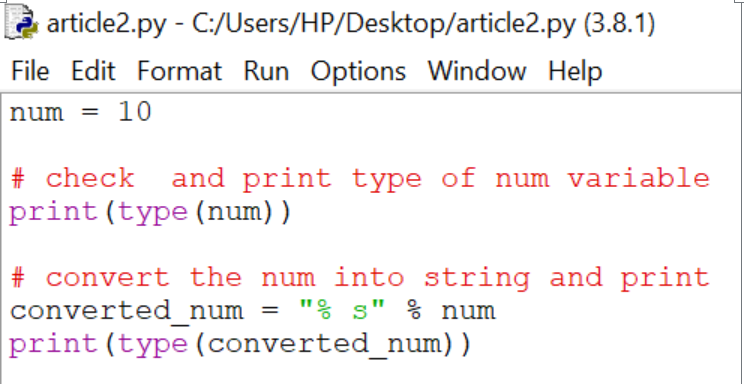
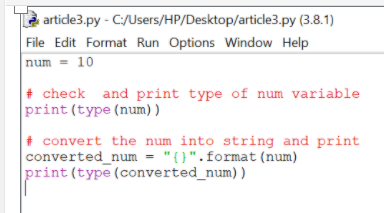
We can convert an integer data type using the python built-in str() function. This function takes any data type as an argument and converts it into a string. But we can also do it using the “%s” literal and using the .format() function.

How to convert an integer to a string in Python

Below is the list of possible ways to convert an integer to string in python:

1. Using str() function :

Syntax: str(integer_value)

Convert Integer to String in Python Using str() function
Output:
Convert Integer to String in Python Using str() function Output

2. Using “%s” keyword:

Syntax: “%s” % integer

Convert Integer to String in Python Using s keyword

Output:

Convert Integer to String in Python Using str() function Output
3. Using .format() function:

Syntax: ‘{}’.format(integer)

Convert Integer to String in Python Using format function
Output:

Using .format() function op

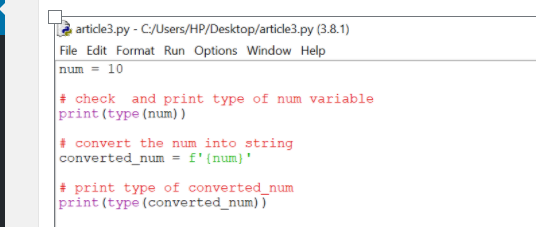
4. Using f-string:

Syntax: f'{integer}’

Convert-Integer-to-String-in-Python-Using-f-string
Output:

Convert Integer to String in Python Using f string output

Conclusion:

We have defined all methods of converting the integer data type to the string type. You can use one of them according to your requirement.

Convert integer to string in Python Read More »

Simple Whatsapp Automation Using Python3 and Selenium

In this article, we will be using python and selenium to automate some messages on WhatsApp.

I hope the reader is well aware of python beforehand.

The first and the foremost step is to install python3 which you can download from https://www.python.org/  and follow up the install instruction. After the installation will be complete, install selenium for the automation of all the tasks we want to perform.

python3 -m pip install Selenium

Selenium Hello World:

After installing selenium, to check whether it is installed correctly or not, run the python code mentioned below and check if there are any errors.

from selenium import webdriver

import time

driver = webdriver.Chrome()

driver.get("http://google.com")

time.sleep(2)

driver.quit()

Save this code in a python file and name it according to your preference. If the program runs correctly without showing any errors, then the Google Chrome window will be opened automatically.

Automate Whatsapp:

Import the modules selenium and time like below.

from selenium import webdriver

import time

After the importing of the modules, the below code will open the WhatsApp web interface which will automatically ask you to scan the QR code and will be logged into your account.

driver = webdriver.Chrome()

driver.get("https://web.whatsapp.com")

print("Scan QR Code, And then Enter")

time.sleep(5)

The next step is entering the username to whom you want to send the message. In my case, I made a group named “WhatsApp bot” and then located an XPath using the inspect method and put it in.

As soon as the WhatsApp bot will be opened, it will automatically locate the WhatsApp bot and will enter that window.

user_name = 'Whatsapp Bot'

user = driver.find_element_by_xpath('//span[@title="{}"]'.format(user_name))

user.click()

After this, the message box will be opened and now you have to inspect the message box and enter the message you want to send. Later, you have to inspect the send button and click on it using the click() method. 

message_box = driver.find_element_by_xpath('//div[@class="_2A8P4"]')

message_box.send_keys('Hey, I am your whatsapp bot')

message_box = driver.find_element_by_xpath('//button[@class="_1E0Oz"]')

message_box.click()

As soon as you execute this code, the message will be sent and your work is done.

I am attaching the whole code for your reference.

from selenium import webdriver

import time


driver = webdriver.Chrome(executable_path=””)

time.sleep(5)

user_name = 'Whatsapp Bot'

user = driver.find_element_by_xpath('//span[@title="{}"]'.format(user_name))

user.click()


message_box = driver.find_element_by_xpath('//div[@class="_2A8P4"]')

message_box.send_keys('Hey, I am your whatsapp bot')

message_box = driver.find_element_by_xpath('//button[@class="_1E0Oz"]')

message_box.click()

driver.quit()

At the end we put driver.quit() method to end the execution of the task.

You did a great job making this bot!!


Simple Whatsapp Automation Using Python3 and Selenium Read More »

How to web scrape with Python in 4 minutes

Web Scraping:

Web scraping is used to extract the data from the website and it can save time as well as effort. In this article, we will be extracting hundreds of file from the New York MTA. Some people find web scraping tough, but it is not the case as this article will break the steps into easier ones to get you comfortable with web scraping.

New York MTA Data:

We will download the data from the below website:

http://web.mta.info/developers/turnstile.html

Turnstile data is compiled every week from May 2010 till now, so there are many files that exist on this site. For instance, below is an example of what data looks like.

You can right-click on the link and can save it to your desktop. That is web scraping!

Important Notes about Web scraping:

  1. Read through the website’s Terms and Conditions to understand how you can legally use the data. Most sites prohibit you from using the data for commercial purposes.
  2. Make sure you are not downloading data at too rapid a rate because this may break the website. You may potentially be blocked from the site as well.

Inspecting the website:

The first thing that we should find out is the information contained in the HTML tag from where we want to scrape it. As we know, there is a lot of code on the entire page and it contains multiple HTML tags, so we have to find out the one which we want to scrape and write it down in our code so that all the data related to it will be visible.

When you are on the website, right-click and then when you will scroll down you will get an option of “inspect”. Click on it and see the hidden code behind the page.
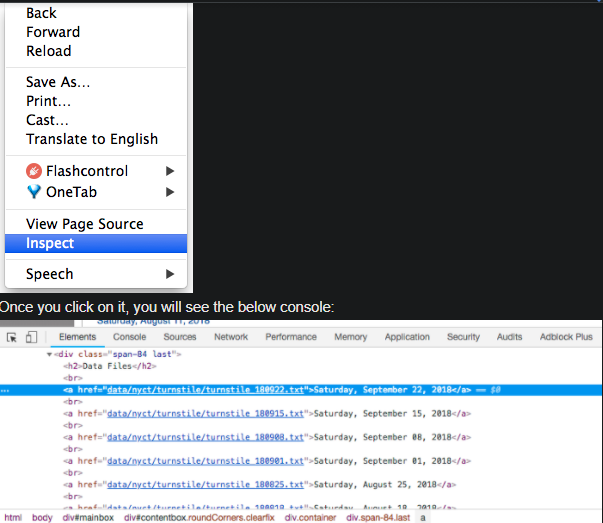
You can see the arrow symbol at the top of the console. 

If you will click on the arrow and then click any text or item on the website then the highlighted tag will appear related to the website on which you clicked.

I clicked on Saturday, September 2018 file and the console came in the blue highlighted part.

<a href=”data/nyct/turnstile/turnstile_180922.txt”>Saturday, September 22, 2018</a>

You will see that all the .txt files come in <a> tags. <a> tags are used for hyperlinks.

Now that we got the location, we will process the coding!

Python Code:

The first and foremost step is importing the libraries:

import requests

import urllib.request

import time

from bs4 import BeautifulSoup

Now we have to set the url and access the website:

url = 'http://web.mta.info/developers/turnstile.html'

response = requests.get(url)

Now, we can use the features of beautiful soup for scraping.

soup = BeautifulSoup(response.text, “html.parser”)

We will use the method findAll to get all the <a> tags.

soup.findAll('a')

This function will give us all the <a> tags.

Now, we will extract the actual link that we want.

one_a_tag = soup.findAll(‘a’)[38]

link = one_a_tag[‘href’]

This code will save the first .txt file to our variable link.

download_url = 'http://web.mta.info/developers/'+ link

urllib.request.urlretrieve(download_url,'./'+link[link.find('/turnstile_')+1:])

For pausing our code we will use the sleep function.

time.sleep(1)

To download the entire data we have to apply them for a loop. I am attaching the entire code so that you won’t face any problem.
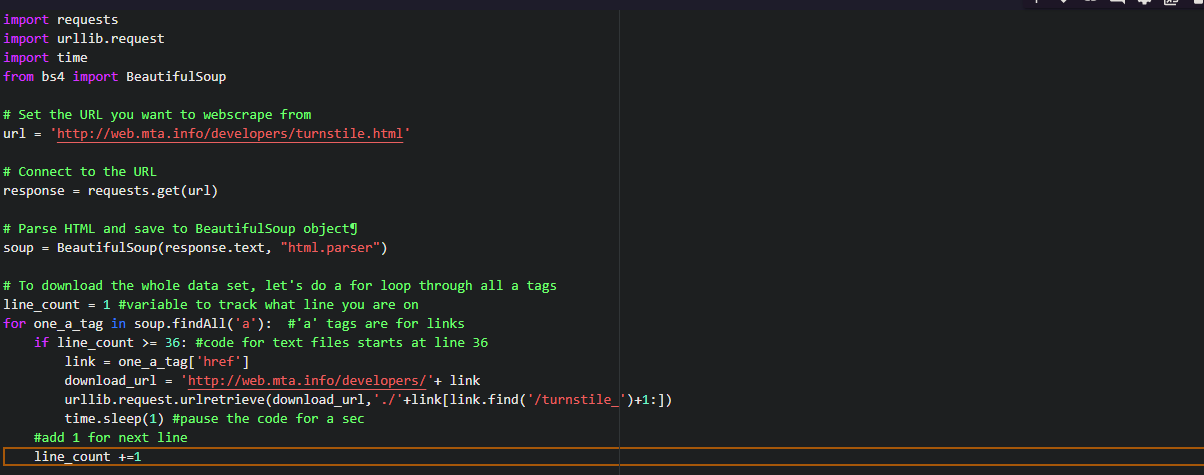
I hope you understood the concept of web scraping.

Enjoy reading and have fun while scraping!

An Intro to Web Scraping with lxml and Python:

Sometimes we want that data from the API which cannot be accessed using it. Then, in the absence of API, the only choice left is to make a web scraper. The task of the scraper is to scrape all the information which we want in easily and in very little time.

The example of a typical API response in JSON. This is the response from Reddit.
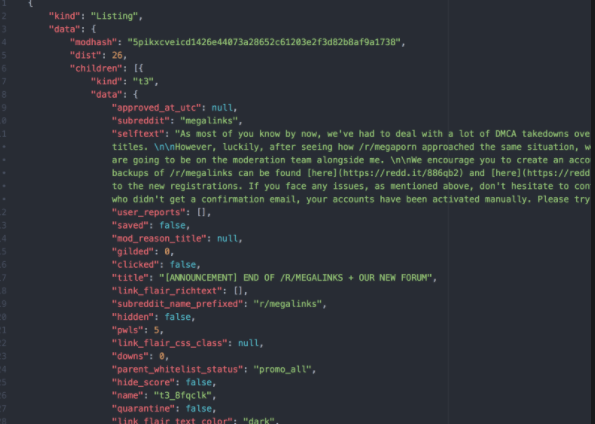
 There are various kinds of python libraries that help in web scraping namely scrapy, lxml, and beautiful soup.

Many articles explain how to use beautiful soup and scrapy but I will be focusing on lxml. I will teach you how to use XPaths and how to use them to extract data from HTML documents.

Getting the data:

If you are into gaming, then you must be familiar with this website steam.

We will be extracting the data from the “popular new release” information.

Now, right-click on the website and you will see the inspect option. Click on it and select the HTML tag.

We want an anchor tag because every list is encapsulated in the <a> tag.
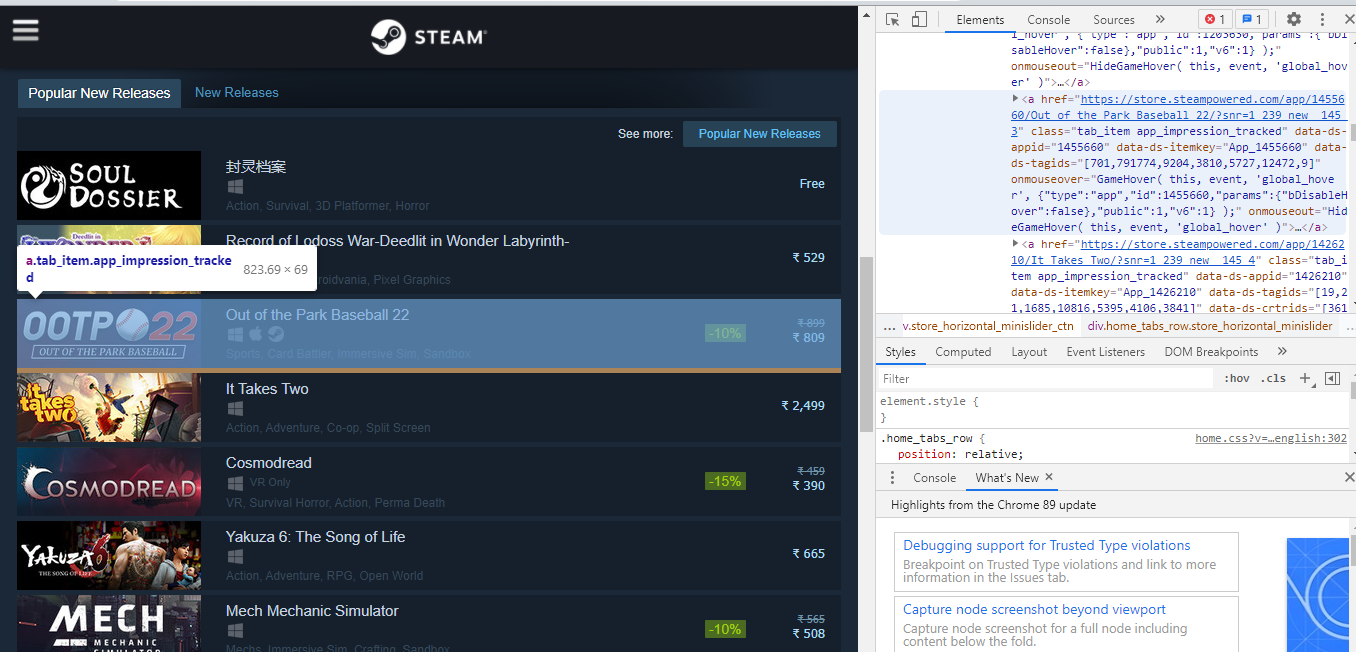
The anchor tag lies in the div tag with an id of tag_newreleasecontent. We are mentioning the id because there are two tabs on this page and we only want the information of popular release data.

Now, create your python file and start coding. You can name the file according to your preference. Start importing the below libraries:

import requests 

import lxml.html

If you don’t have requests to install then type the below code on your terminal:

$ pip install requests

Requests module helps us open the webpage in python.

Extracting and processing the information:

Now, let’s open the web page using the requests and pass that response to lxml.html.fromstring.

html = requests.get('https://store.steampowered.com/explore/new/') 

doc = lxml.html.fromstring(html.content)

This provides us with a structured way to extract information from an HTML document. Now we will be writing an XPath for extracting the div which contains the” popular release’ tab.

new_releases = doc.xpath('//div[@id="tab_newreleases_content"]')[0]

We are taking only one element ([0]) and that would be our required div. Let us break down the path and understand it.

  • // these tell lxml that we want to search for all tags in the HTML document which match our requirements.
  • Div tells lxml that we want to find div tags.
  • @id=”tab_newreleases_content tells the div tag that we are only interested in the id which contains tab_newrelease_content.

Awesome! Now we understand what it means so let’s go back to inspect and check under which tag the title lies.
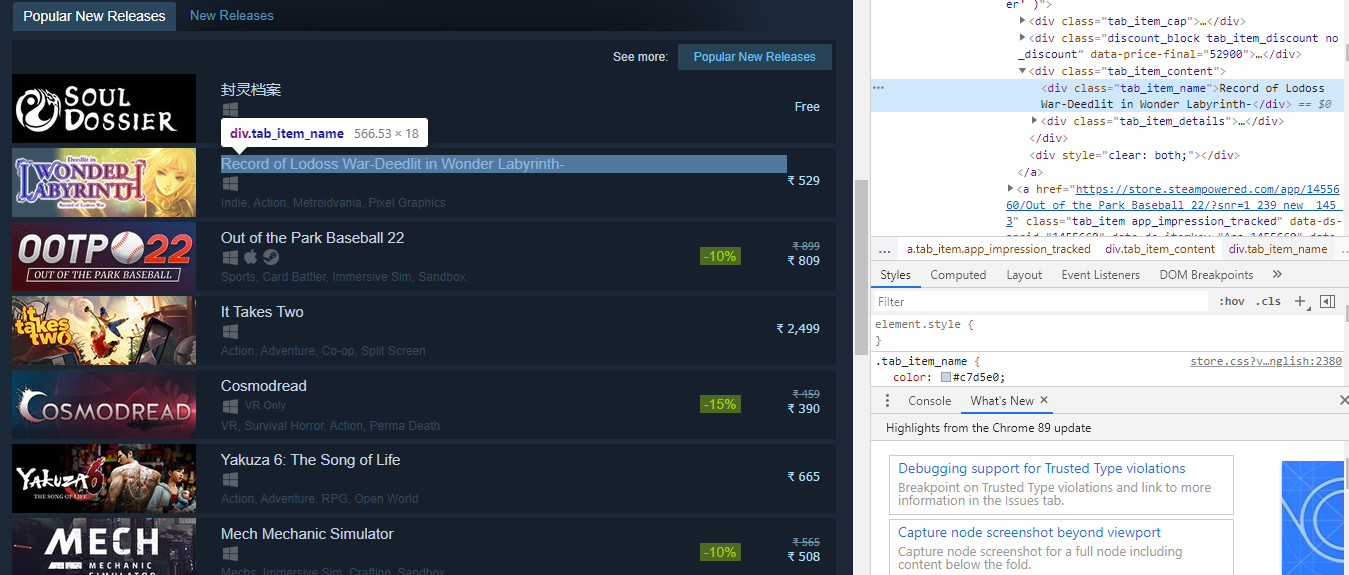
The title name lies in the div tag inside the class tag_item_name. Now we will run the XPath queries to get the title name.

titles = new_releases.xpath('.//div[@class="tab_item_name"]/text()')



We can see that the names of the popular releases came. Now, we will extract the price by writing the following code:

prices = new_releases.xpath('.//div[@class="discount_final_price"]/text()')

Now, we can see that the prices are also scraped. We will extract the tags by writing the following command:

tags = new_releases.xpath('.//div[@class="tab_item_top_tags"]')

total_tags = []

for tag in tags:

total_tags.append(tag.text_content())

We are extracting the div containing the tags for the game. Then we loop over the list of extracted tags using the tag.text_content method.

Now, the only thing remaining is to extract the platforms associated with each title. Here is the the HTML markup:
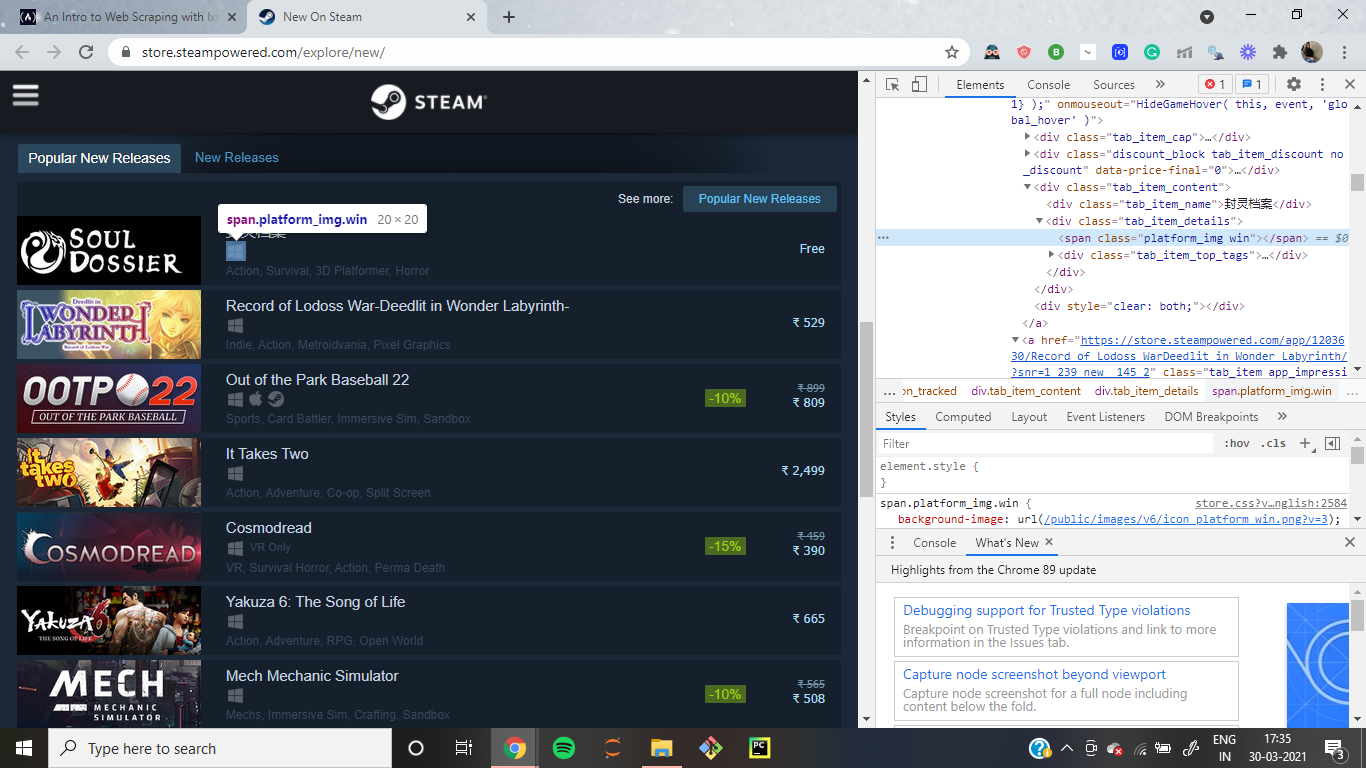
The major difference here is that platforms are not contained as texts within a specific tag. They are listed as class name so some titles only have one platform associated with them:


<span class="platform_img win">&lt;/span>


While others have 5 platforms like this:


<span class="platform_img win"></span><span class="platform_img mac"></span><span class="platform_img linux"></span><span class="platform_img hmd_separator"></span> <span title="HTC Vive" class="platform_img htcvive"></span> <span title="Oculus Rift" class="platform_img oculusrift"></span>

The span tag contains platform types as the class name. The only thing common between them is they all contain platform_img class.

First of all, we have to extract the div tags containing the tab_item_details class. Then we will extract the span containing the platform_img class. Lastly, we will extract the second class name from those spans. Refer to the below code:

platforms_div = new_releases.xpath('.//div[@class="tab_item_details"]')

total_platforms = []

for game in platforms_div:    

temp = game.xpath('.//span[contains(@class, "platform_img")]')    

platforms = [t.get('class').split(' ')[-1] for t in temp]    

if 'hmd_separator' in platforms:        

platforms.remove('hmd_separator')   

 total_platforms.append(platforms)

Now we just need this to return a JSON response so that we can easily turn this into Flask based API.

output = []for info in zip(titles,prices, tags, total_platforms):    resp = {}    

resp['title'] = info[0]

resp['price'] = info[1]    

resp['tags'] = info[2]    

resp['platforms'] = info[3]    

output.append(resp)

We are using the zip function to loop over all of the lists in parallel. Then we create a dictionary for each game to assign the game name, price, and platforms as keys in the dictionary.

Wrapping up:

I hope this article is understandable and you find the coding easy.

Enjoy reading!

 

How to web scrape with Python in 4 minutes Read More »