Shikha Mishra

Pandas- 6 Different ways to iterate over rows in a Dataframe & Update while iterating row by row

Pandas: 6 Different ways to iterate over rows in a Dataframe & Update while iterating row by row

In this tutorial, we will review & make you understand six different techniques to iterate over rows. Later we will also explain how to update the contents of a Dataframe while iterating over it row by row.

Let’s first create a dataframe which we will use in our example,

import pandas as pd
empoyees = [('Shikha', 34, 'Mumbai', 5) ,
           ('Rekha', 31, 'Delhi' , 7) ,
           ('Shishir', 16, 'Punjab', 11)
            ]
# Create a DataFrame object
empDfObj = pd.DataFrame(empoyees, columns=['Name', 'Age', 'City', 'Experience'], index=['a', 'b', 'c'])
print(empDfObj)

Output:

Name  Age    City        Experience
a  Shikha 34     Mumbai  5
b Rekha   31     Delhi      7
c Shishir  16     Punjab   11

Iterate over rows of a dataframe using DataFrame.iterrows()

Dataframe class implements a member function iterrows() i.e. DataFrame.iterrows(). Now, we will use this function to iterate over rows of a dataframe.

DataFrame.iterrows()

DataFrame.iterrows() returns an iterator that iterator iterate over all the rows of a dataframe.

For each row, it returns a tuple containing the index label and row contents as series.

Let’s use it in an example,

import pandas as pd
empoyees = [('Shikha', 34, 'Mumbai', 5) ,
           ('Rekha', 31, 'Delhi' , 7) ,
           ('Shishir', 16, 'Punjab', 11)
            ]
# Create a DataFrame object
empDfObj = pd.DataFrame(empoyees, columns=['Name', 'Age', 'City', 'Experience'], index=['a', 'b', 'c'])

for (index_label, row_series) in empDfObj.iterrows():
   print('Row Index label : ', index_label)
   print('Row Content as Series : ', row_series.values)

Output:

Row Index label : a
Row Content as Series : ['Shikha' 34 'Mumbai' 5]
Row Index label : b
Row Content as Series : ['Rekha' 31 'Delhi' 7]
Row Index label : c
Row Content as Series : ['Shishir' 16 'Punjab' 11]

Note:

  • Do Not Preserve the data types as iterrows() returns each row contents as series however it doesn’t preserve datatypes of values in the rows.
  • We can not able to do any modification while iterating over the rows by iterrows(). If we do some changes to it then our original dataframe would not be affected.

Iterate over rows of a dataframe using DataFrame.itertuples()

DataFrame.itertuples()

DataFrame.itertuples() yields a named tuple for each row containing all the column names and their value for that row.

Let’s use it,

import pandas as pd
empoyees = [('Shikha', 34, 'Mumbai', 5) ,
           ('Rekha', 31, 'Delhi' , 7) ,
           ('Shishir', 16, 'Punjab', 11)
            ]
# Create a DataFrame object
empDfObj = pd.DataFrame(empoyees, columns=['Name', 'Age', 'City', 'Experience'], index=['a', 'b', 'c'])

# Iterate over the Dataframe rows as named tuples
for namedTuple in empDfObj.itertuples():
   #Print row contents inside the named tuple
   print(namedTuple)

Output:

Pandas(Index='a', Name='Shikha', Age=34, City='Mumbai', Experience=5)
Pandas(Index='b', Name='Rekha', Age=31, City='Delhi', Experience=7)
Pandas(Index='c', Name='Shishir', Age=16, City='Punjab', Experience=11)

So we can see that for every row it returned a named tuple. we can access the individual value by indexing..like,

For the first value,

namedTuple[0]

For the second value,

namedTuple[1]

Do Read:

Named Tuples without index

If we pass argument ‘index=False’ then it only shows the named tuple not the index column.

import pandas as pd
empoyees = [('Shikha', 34, 'Mumbai', 5) ,
           ('Rekha', 31, 'Delhi' , 7) ,
           ('Shishir', 16, 'Punjab', 11)
            ]
# Create a DataFrame object
empDfObj = pd.DataFrame(empoyees, columns=['Name', 'Age', 'City', 'Experience'], index=['a', 'b', 'c'])

# Iterate over the Dataframe rows as named tuples without index
for namedTuple in empDfObj.itertuples(index=False):
   # Print row contents inside the named tuple
   print(namedTuple)

Output:

Pandas(Name='Shikha', Age=34, City='Mumbai', Experience=5)
Pandas(Name='Rekha', Age=31, City='Delhi', Experience=7)
Pandas(Name='Shishir', Age=16, City='Punjab', Experience=11)

Named Tuples with custom names

If we don’t want to show Pandas name every time, we can pass custom names too:

import pandas as pd
empoyees = [('Shikha', 34, 'Mumbai', 5) ,
           ('Rekha', 31, 'Delhi' , 7) ,
           ('Shishir', 16, 'Punjab', 11)
            ]
# Create a DataFrame object
empDfObj = pd.DataFrame(empoyees, columns=['Name', 'Age', 'City', 'Experience'], index=['a', 'b', 'c'])

# Give Custom Name to the tuple while Iterating over the Dataframe rows
for row in empDfObj.itertuples(name='Employee'):
   # Print row contents inside the named tuple
   print(row)

Output:

Employee(Index='a', Name='Shikha', Age=34, City='Mumbai', Experience=5)
Employee(Index='b', Name='Rekha', Age=31, City='Delhi', Experience=7)
Employee(Index='c', Name='Shishir', Age=16, City='Punjab', Experience=11)

Iterate over rows in dataframe as Dictionary

Using this method we can iterate over the rows of the dataframe and convert them to the dictionary for accessing by column label using the same itertuples().

import pandas as pd
employees = [('Shikha', 34, 'Mumbai', 5) ,
           ('Rekha', 31, 'Delhi' , 7) ,
           ('Shishir', 16, 'Punjab', 11)
            ]
# Create a DataFrame object
empDfObj = pd.DataFrame(employees, columns=['Name', 'Age', 'City', 'Experience'], index=['a', 'b', 'c'])

# itertuples() yields an iterate to named tuple
for row in empDfObj.itertuples(name='Employee'):
   # Convert named tuple to dictionary
   dictRow = row._asdict()
   # Print dictionary
   print(dictRow)
   # Access elements from dict i.e. row contents
   print(dictRow['Name'] , ' is from ' , dictRow['City'])

Output:

{'Index': 'a', 'Name': 'Shikha', 'Age': 34, 'City': 'Mumbai', 'Experience': 5}
Shikha is from Mumbai
{'Index': 'b', 'Name': 'Rekha', 'Age': 31, 'City': 'Delhi', 'Experience': 7}
Rekha is from Delhi
{'Index': 'c', 'Name': 'Shishir', 'Age': 16, 'City': 'Punjab', 'Experience': 11}
Shishir is from Punjab

Iterate over rows in dataframe using index position and iloc

We will loop through the 0th index to the last row and access each row by index position using iloc[].

import pandas as pd
employees = [('Shikha', 34, 'Mumbai', 5) ,
           ('Rekha', 31, 'Delhi' , 7) ,
           ('Shishir', 16, 'Punjab', 11)
            ]
# Create a DataFrame object
empDfObj = pd.DataFrame(employees, columns=['Name', 'Age', 'City', 'Experience'], index=['a', 'b', 'c'])

# Loop through rows of dataframe by index i.e. from 0 to number of rows
for i in range(0, empDfObj.shape[0]):
   # get row contents as series using iloc{] and index position of row
   rowSeries = empDfObj.iloc[i]
   # print row contents
   print(rowSeries.values)

Output:

['Shikha' 34 'Mumbai' 5]
['Rekha' 31 'Delhi' 7]
['Shishir' 16 'Punjab' 11]

Iterate over rows in dataframe in reverse using index position and iloc

Using this we will loop through the last index to the 0th index and access each row by index position using iloc[].

import pandas as pd
employees = [('Shikha', 34, 'Mumbai', 5) ,
           ('Rekha', 31, 'Delhi' , 7) ,
           ('Shishir', 16, 'Punjab', 11)
            ]
# Create a DataFrame object
empDfObj = pd.DataFrame(employees, columns=['Name', 'Age', 'City', 'Experience'], index=['a', 'b', 'c'])

# Loop through rows of dataframe by index in reverse i.e. from last row to row at 0th index.
for i in range(empDfObj.shape[0] - 1, -1, -1):
   # get row contents as series using iloc{] and index position of row
   rowSeries = empDfObj.iloc[i]
   # print row contents
   print(rowSeries.values)

Output:

['Shishir' 16 'Punjab' 11]
['Rekha' 31 'Delhi' 7]
['Shikha' 34 'Mumbai' 5]

Iterate over rows in dataframe using index labels and loc[]

import pandas as pd
employees = [('Shikha', 34, 'Mumbai', 5) ,
           ('Rekha', 31, 'Delhi' , 7) ,
           ('Shishir', 16, 'Punjab', 11)
            ]
# Create a DataFrame object
empDfObj = pd.DataFrame(employees, columns=['Name', 'Age', 'City', 'Experience'], index=['a', 'b', 'c'])

# loop through all the names in index label sequence of dataframe
for index in empDfObj.index:
   # For each index label, access the row contents as series
   rowSeries = empDfObj.loc[index]
   # print row contents
   print(rowSeries.values)

Output:

['Shikha' 34 'Mumbai' 5]
['Rekha' 31 'Delhi' 7]
['Shishir' 16 'Punjab' 11]

Update contents a dataframe While iterating row by row

As Dataframe.iterrows() returns a copy of the dataframe contents in a tuple, so updating it will have no effect on the actual dataframe. So, to update the contents of the dataframe we need to iterate over the rows of the dataframe using iterrows() and then access each row using at() to update its contents.

Let’s see an example,

Suppose we have a dataframe i.e

import pandas as pd


# List of Tuples
salaries = [(11, 5, 70000, 1000) ,
           (12, 7, 72200, 1100) ,
           (13, 11, 84999, 1000)
           ]
# Create a DataFrame object
salaryDfObj = pd.DataFrame(salaries, columns=['ID', 'Experience' , 'Salary', 'Bonus'])

Output:

   ID Experience Salary Bonus
0 11    5             70000 1000
1 12    7             72200 1100
2 13   11            84999 1000

Now we will update each value in column ‘Bonus’ by multiplying it with 2 while iterating over the dataframe row by row.

import pandas as pd


# List of Tuples
salaries = [(11, 5, 70000, 1000) ,
           (12, 7, 72200, 1100) ,
           (13, 11, 84999, 1000)
           ]
# iterate over the dataframe row by row
salaryDfObj = pd.DataFrame(salaries, columns=['ID', 'Experience' , 'Salary', 'Bonus'])
for index_label, row_series in salaryDfObj.iterrows():
   # For each row update the 'Bonus' value to it's double
   salaryDfObj.at[index_label , 'Bonus'] = row_series['Bonus'] * 2
print(salaryDfObj)

Output:

    ID    Experience Salary Bonus
0 11          5           70000 2000
1 12          7           72200 2200
2 13        11           84999 2000

Want to expert in the python programming language? Exploring Python Data Analysis using Pandas tutorial changes your knowledge from basic to advance level in python concepts.

Read more Articles on Python Data Analysis Using Padas

Conclusion:

So in this article, you have seen different ways to iterate over rows in a dataframe & update while iterating row by row. Keep following our BtechGeeks for more concepts of python and various programming languages too.

Python numpy.flatten() Function Tutorial with Examples

Python numpy.flatten() Function Tutorial with Examples | How to Use Function Numpy Flatten in Python?

In this tutorial, Beginners and Experience python developers will learn about function numpy.flatten(), how to use it, and how it works. Kindly, hit on the available links and understand how numpy.ndarray.flatten() function in Python gonna help you while programming.

numpy.ndarray.flatten() in Python

A numpy array has a member function to flatten its contents or convert an array of any shape to a 1D numpy array,

Syntax:

ndarray.flatten(order='C')

Parameters:

Here we can pass the following parameters-

Order: In this, we give an order in which items from the numpy array will be used,

C: Read items from array row-wise

F: Read items from array column-wise

A: Read items from array-based on memory order

Returns:

It returns a copy of the input array but in a 1D array.

Also Check:

Let’s learn the concept by viewing the below practical examples,

Flatten a matrix or a 2D array to a 1D array using ndarray.flatten()

First of all, import the numpy module,

import numpy as np

Let’s suppose, we have a 2D Numpy array,

import numpy as np

# Create a 2D Numpy array from list of list
arr_2d = np.array([[7, 4, 2],
                  [5, 4, 3],
                  [9, 7, 1]])
print(arr_2d)

Output:

[7 4 2]
[5 4 3]
[9 7 1]]

Now we are going to use the above 2D Numpy array to convert the 1D Numpy array.

import numpy as np

# Create a 2D Numpy array from list of list
arr_2d = np.array([[7, 4, 2],
                  [5, 4, 3],
                  [9, 7, 1]])
print(arr_2d)
# Convert the 2D array to 1D array
flat_array = arr_2d.flatten()
print('Flattened 1D Numpy Array:')
print(flat_array)

Output:

[[7 4 2]
[5 4 3]
[9 7 1]]

Flattened 1D Numpy Array:
[7 4 2 5 4 3 9 7 1]

So in the above example, you have seen how we converted the 2D array into a 1D array.

ndarray.flatten() returns a copy of the input array

flatten() function always returns a copy of the given array means if we make any changes in the returned array will not edit anything in the original one.

import numpy as np

# Create a 2D Numpy array from list of list
arr_2d = np.array([[7, 4, 2],
                  [5, 4, 3],
                  [9, 7, 1]])
print(arr_2d)
flat_array = arr_2d.flatten()
flat_array[2] = 50
print('Flattened 1D Numpy Array:')
print(flat_array)
print('Original 2D Numpy Array')
print(arr_2d)

output:

[[7 4 2]
[5 4 3]
[9 7 1]]

Flattened 1D Numpy Array:
[ 7 4 50 5 4 3 9 7 1]

Original 2D Numpy Array
[[7 4 2]
[5 4 3]
[9 7 1]]

Thus in the above example, you can see that it has not affected the original array.

Flatten a 2D Numpy Array along Different Axis using flatten()

It accepts different parameter orders. It can be ‘C’ or ‘F’ or ‘A’, but the default value is ‘C’.
It tells the order.

  • C’: Read items from array row-wise i.e. using C-like index order.
  • ‘F’: Read items from array column-wise i.e. using Fortran-like index order.
  • ‘A’: Read items from an array on the basis of memory order of items.

In the below example, we are going to use the same 2D array which we used in the above example-

Flatten 2D array row-wise

In this, if we will not pass any parameter in function then it will take ‘C’ as a default value

import numpy as np

# Create a 2D Numpy array from list of list
arr_2d = np.array([[7, 4, 2],
                  [5, 4, 3],
                  [9, 7, 1]])
flat_array = arr_2d.flatten(order='C')
print('Flattened 1D Numpy Array:')
print(flat_array)

Output:

Flattened 1D Numpy Array:
[7 4 2 5 4 3 9 7 1]

Flatten 2D array column-wise

If we pass ‘F’ as the order parameter in  function then it means elements from a 2D array will be read column wise

import numpy as np

# Create a 2D Numpy array from list of list
arr_2d = np.array([[7, 4, 2],
                  [5, 4, 3],
                  [9, 7, 1]])
flat_array = arr_2d.flatten(order='F')
print('Flattened 1D Numpy Array:')
print(flat_array)

Output:

Flattened 1D Numpy Array:
[7 5 9 4 4 7 2 3 1]

Flatten 2D array based on memory layout

Let’s create a transparent view of the given 2D array

import numpy as np

# Create a 2D Numpy array from list of list
arr_2d = np.array([[7, 4, 2],
                  [5, 4, 3],
                  [9, 7, 1]])
# Create a transpose view of array
trans_arr = arr_2d.T
print('Transpose view of array:')
print(trans_arr)

Output:

Transpose view of array:
[[7 5 9]
[4 4 7]
[2 3 1]]

Now flatten this view was Row Wise,

import numpy as np

# Create a 2D Numpy array from list of list
arr_2d = np.array([[7, 4, 2],
                  [5, 4, 3],
                  [9, 7, 1]])
# Create a transpose view of array
trans_arr = arr_2d.T
flat_array = trans_arr.flatten(order='C')
print(flat_array )

Output:

[7 5 9 4 4 7 2 3 1]

Flatten a 3D array to a 1D numpy array using ndarray.flatten()

Let’s create a 3D numpy array,

import numpy as np

# Create a 3D Numpy array
arr = np.arange(12).reshape((2,3,2))
print('3D Numpy array:')
print(arr)

Output:

3D Numpy array:
[[[ 0 1]
[ 2 3]
[ 4 5]]

[[ 6 7]
[ 8 9]
[10 11]]]

Now we are going to flatten this 3D numpy array,

import numpy as np

# Create a 3D Numpy array
arr = np.arange(12).reshape((2,3,2))
# Convert 3D array to 1D
flat_array = arr.flatten()
print('Flattened 1D Numpy Array:')
print(flat_array)

Output:

Flattened 1D Numpy Array:
[ 0 1 2 3 4 5 6 7 8 9 10 11]

Flatten a list of arrays using numpy.ndarray.flatten()

Now, we have to create a list of arrays,

# Create a list of numpy arrays
arr = np.arange(5)
list_of_arr = [arr] * 5
print('Iterate over the list of a numpy array')
for elem in list_of_arr:
    print(elem)

Output:

Iterate over the list of a numpy array
[0 1 2 3 4]
[0 1 2 3 4]
[0 1 2 3 4]
[0 1 2 3 4]
[0 1 2 3 4]

Now, its time to convert the above list of numpy arrays to a flat 1D numpy array,

# Convert a list of numpy arrays to a flat array
flat_array = np.array(list_of_arr).flatten()
print('Flattened 1D Numpy Array:')
print(flat_array)

Output:

Flattened 1D Numpy Array:
[0 1 2 3 4 0 1 2 3 4 0 1 2 3 4 0 1 2 3 4 0 1 2 3 4]

Flatten a list of lists using ndarray.flatten()

To perform this process, first, we have to create a 2D numpy array from a list of list and then convert that to a flat 1D Numpy array,

# Create a list of list
list_of_lists = [[1, 2, 3, 4, 5],
                 [1, 2, 3, 4, 5],
                 [1, 2, 3, 4, 5],
                 [1, 2, 3, 4, 5]]
# Create a 2D numpy array from a list of list and flatten that array
flat_array = np.array(list_of_lists).flatten()
print('Flattened 1D Numpy Array:')
print(flat_array)
# Convert the array to list
print('Flat List:')
print(list(flat_array))

Output:

Flattened 1D Numpy Array:
[1 2 3 4 5 1 2 3 4 5 1 2 3 4 5 1 2 3 4 5]
Flat List:
[1, 2, 3, 4, 5, 1, 2, 3, 4, 5, 1, 2, 3, 4, 5, 1, 2, 3, 4, 5]

Hence, this is how we can use flatten() function in numpy.

Conclusion:

We hope this python tutorial, you have seen how to use function numpy.flatten() assist you all in needy times. Thank you! keep visiting our site frequently for updated concepts of python.

Python- How to unzip a file and Extract Single, multiple or all files from a ZIP archive

Python: How to unzip a file | Extract Single, multiple or all files from a ZIP archive | Syntax for ZipFile

In this tutorial, we will discuss different ways to unzip or extract single, multiple, or all files from the zip archive to a current or different directory. Also, you can learn what is a zip file and python unzip file along with the syntax. Moreover, let’s check the reasons to use the Zip Files in python. Click on the direct links available below and happily understand what you required regarding How to unzip files in Python?

What is Zip File?

A ZIP file is a single file containing one or more compressed files, it is an easy way to make large files smaller and keep related files together.

Why do we need zip files?

  • To lessen storage requirements.
  • To develop transfer speed over standard connections.

Python Unzip File

ZipFile class provides a member function to extract all the data from a ZIP archive. ZIP is the archive file format that supports lossless data compression.

In order to unzip a file in Python, make use of this ZipFile.extractall() method. The extractall() method takes a path, members, pwd as an argument, and extracts all the contents.

Also Check:

Syntax for ZipFile

ZipFile.extractall(path=None, members=None, pwd=None)

It accepts three arguments-

1. path: It shows the location where we want to extract our file

2. members:  It shows the list of files to be extracted

3. pwd: If the zip file is encrypted then pass the password in this argument default it will be None

Example of Python unzip

Let’s assume, in my current working directory, I have a zip file called Mail3.zip, and I wanted to unzip it with the help of the ZipFile.extractall() method. So, check out the following example program code:

# app.py

from zipfile import ZipFile

with ZipFile('Mail3.zip', 'r') as zipObj:
   # Extract all the contents of zip file in current directory
   zipObj.extractall()

Output:

python3 app.py

Lets’ first, import the zipfile module in our program,

from zipfile import ZipFile

Extract all files from a zip file to the current directory

So if want to zip file ‘program.zip’. in our current directory, let’s see how to extract all files from it.
To unzip it first create a ZipFile object by opening the zip file in read mode and then call extractall() on that object.

# app.py

from zipfile import ZipFile

with ZipFile('program.zip', 'r') as zipObj:
   # Extract all the contents of zip file in current directory
   zipObj.extractall()

In the output, it will extract the files in the same directory as your programming app.py file.

Extract all files from a zip file to Different Directory

To extract all the files from a zip file to another directory we can pass the destination location as an argument in extractall().

# app.py 
from zipfile import ZipFile
# Create a ZipFile Object and load program.zip in it
with ZipFile('program.zip', 'r') as zipObj:
   # Extract all the contents of zip file in different directory
   zipObj.extractall('temp')

It will extract all the files in ‘program.zip’ in the temp folder.

Extract few files from a large zip file based on condition

If we have a very large zip file and we need a few files from thousand of files in the archive. Unzipping all files from large zip can take minutes. But if we want only a few of the archived files, then instead of unzipping the whole file we can extract a few files too from the zip file.

For this, we are going to use the below syntax-

ZipFile.extract(member, path=None, pwd=None)

It accepts three arguments-

1. path: It shows the location where we want to extract our file

2. members:  Full name of the file to be extracted. It should one from the list of archived files names returned by ZipFile.namelist()

3. pwd: If the zip file is encrypted then pass the password in this argument default it will be None

# app.py 
from zipfile import ZipFile
# Create a ZipFile Object and load program.zip in it
with ZipFile('programDir.zip', 'r') as zipObj:
   # Get a list of all archived file names from the zip
   listOfFileNames = zipObj.namelist()
   # Iterate over the file names
   for fileName in listOfFileNames:
       # Check filename endswith csv
       if fileName.endswith('.csv'):
           # Extract a single file from zip
           zipObj.extract(fileName, 'temp_csv')

It will extract only csv files from the given zip archive.

Conclusion:

So in this article, you have seen how to unzip a file | Extract Single, multiple, or all files from a ZIP archive.

Thank you!

Python : How to remove characters from a string by Index ?

Ways to remove i’th character from string in Python

Here we are going to discuss how to remove characters from a string in a given range of indices or at specific index position.

So we will discuss different different methods for this.

Naive Method

In this method, we have to first run the loop and append the characters .After that  build a new string from the existing one .

test_str = "WelcomeBtechGeeks"
  
# Printing original string 
print ("The original string is : " + test_str)
  
# Removing char at pos 3
# using loop
new_str = ""
  
for i in range(len(test_str)):
    if i != 2:
        new_str = new_str + test_str[i]
  
# Printing string after removal  
print ("The string after removal of i'th character : " + new_str)

Output:

RESTART: C:/Users/HP/Desktop/article3.py
The original string is : WelcomeBtechGeeks
The string after removal of i'th character : WecomeBtechGeeks

So in above eoutput you have seen that we have remove character of position three that is ‘l’.

This method is very slow if we compare with other methods.

Using str.replace()

str.replace() can replace the particular index with empty char, and hence solve the issue.

test_str = "WelcomeBtechGeeks"
  
# Printing original string 
print ("The original string is : " + test_str)
  
# Removing char at pos 3
# using replace
new_str = test_str.replace('e', '1')
  
# Printing string after removal  
# removes all occurrences of 'e'
print ("The string after removal of i'th character( doesn't work) : " + new_str)
  
# Removing 1st occurrence of e, i.e 2nd pos.
# if we wish to remove it.
new_str = test_str.replace('e', '', 1)
  
# Printing string after removal  
# removes first occurrences of e
print ("The string after removal of i'th character(works) : " + new_str)

Output:

RESTART: C:/Users/HP/Desktop/article3.py
The original string is : WelcomeBtechGeeks
The string after removal of i'th character( doesn't work) : W1lcom1Bt1chG11ks
The string after removal of i'th character(works) : WlcomeBtechGeeks

So in above output you can see that first we have replace all ‘e’ present in original word.After that we replace only first occurrence of e.This method is also not very useful but sometime we are using this.

Using slice + concatenation

In this method we will use string slicing.Then using string concatenation of both, i’th character can appear to be deleted from the string.

test_str = "WelcomeBtechGeeks"
  
# Printing original string 
print ("The original string is : " + test_str)
  
#Removing char at pos 3
# using slice + concatenation
new_str = test_str[:2] +  test_str[3:]
  
# Printing string after removal  
# removes ele. at 3rd index
print ("The string after removal of i'th character : " + new_str)

Output:

RESTART: C:/Users/HP/Desktop/article3.py
The original string is : WelcomeBtechGeeks
The string after removal of i'th character : WecomeBtechGeeks

Using str.join() and list comprehension

In this method each string is converted in list then each of them is joined to make a string.

test_str = "WelcomeBtechGeeks"
  
# Printing original string 
print ("The original string is : " + test_str)
  
# Removing char at pos 3
# using join() + list comprehension
new_str = ''.join([test_str[i] for i in range(len(test_str)) if i != 2])
  
# Printing string after removal  
# removes ele. at 3rd index
print ("The string after removal of i'th character : " + new_str)

Output:

RESTART: C:/Users/HP/Desktop/article3.py
The original string is : WelcomeBtechGeeks
The string after removal of i'th character : WecomeBtechGeeks

Conclusion:

So in this article we have seen different method to remove characters from a string in a given range of indices or at specific index position.Enjoy learning guys.

Pandas: Convert a dataframe column into a list using Series.to_list() or numpy.ndarray.tolist() in python

Get a list of a specified column of a Pandas DataFrame

This article is all about how to get a list of a specified column of a Pandas DataFrame using different methods.

Lets create a dataframe which we will use in this article.

import pandas as pd 
students = [('juli', 34, 'Sydney', 155),
           ('Ravi', 31, 'Delhi', 177.5),
           ('Aaman', 16, 'Mumbai', 81),
           ('Mohit', 31, 'Delhi', 167),
           ('Veena', 12, 'Delhi', 144),
           ('Shan', 35, 'Mumbai', 135),
           ('Sradha', 35, 'Colombo', 111)
           ]

student_df = pd.DataFrame(students, columns=['Name', 'Age', 'City', 'Score'])
print(student_df)

Output:

        Name    Age   City             Score
0      Julie      34     Sydney         155.0
1     Ravi       31      Delhi            177.5
2     Aman    16     Mumbai         81.0
3     Mohit    31     Delhi             167.0
4     Veena    12     Delhi             144.0
5      Shan     35    Mumbai         135.0
6     Sradha   35   Colombo        111.0

Now we are going to fetch a single column .

There are different ways to do that.

using Series.to_list()

We will use the same example we use above in this article.We select the column ‘Name’ .We will use [] that gives a series object.Series.to_list()  this function we use provided by the Series class to convert the series object and return a list.

import pandas as pd 
students = [('juli', 34, 'Sydney', 155),
           ('Ravi', 31, 'Delhi', 177.5),
           ('Aaman', 16, 'Mumbai', 81),
           ('Mohit', 31, 'Delhi', 167),
           ('Veena', 12, 'Delhi', 144),
           ('Shan', 35, 'Mumbai', 135),
           ('Sradha', 35, 'Colombo', 111)
           ]

student_df = pd.DataFrame(students, columns=['Name', 'Age', 'City', 'Score'])
list_of_names = student_df['Name'].to_list()
print('List of Names: ', list_of_names)
print('Type of listOfNames: ', type(list_of_names))

Output:

RESTART: C:/Users/HP/Desktop/article2.py
List of Names: ['juli', 'Ravi', 'Aaman', 'Mohit', 'Veena', 'Shan', 'Sradha']
Type of listOfNames: <class 'list'>

So in above example you have seen its working…let me explain in brief..

We have first select the column ‘Name’ from the dataframe using [] operator,it returns a series object names, and we have confirmed that by printing its type.

We used [] operator that gives a series object.Series.to_list()  this function we use provided by the series class to convert the series object and return a list.

This is how we converted a dataframe column into a list.

using numpy.ndarray.tolist()

From the give dataframe we will select the column “Name” using a [] operator that returns a Series object and uses

Series.Values to get a NumPy array from the series object. Next, we will use the function tolist() provided by NumPy array to convert it to a list.

import pandas as pd 
students = [('juli', 34, 'Sydney', 155),
           ('Ravi', 31, 'Delhi', 177.5),
           ('Aaman', 16, 'Mumbai', 81),
           ('Mohit', 31, 'Delhi', 167),
           ('Veena', 12, 'Delhi', 144),
           ('Shan', 35, 'Mumbai', 135),
           ('Sradha', 35, 'Colombo', 111)
           ]

student_df = pd.DataFrame(students, columns=['Name', 'Age', 'City', 'Score'])
list_of_names = student_df['Name'].values.tolist()
print('List of Names: ', list_of_names)
print('Type of listOfNames: ', type(list_of_names))

Output:

RESTART: C:/Users/HP/Desktop/article2.py
List of Names: ['juli', 'Ravi', 'Aaman', 'Mohit', 'Veena', 'Shan', 'Sradha']
Type of listOfNames: <class 'list'>
>>>

So now we are going to show you its working,

We converted the column ‘Name’ into a list in a single line.Select the column ‘Name’ from the dataframe using [] operator,

From Series.Values get a Numpy array

import pandas as pd 
students = [('juli', 34, 'Sydney', 155),
           ('Ravi', 31, 'Delhi', 177.5),
           ('Aaman', 16, 'Mumbai', 81),
           ('Mohit', 31, 'Delhi', 167),
           ('Veena', 12, 'Delhi', 144),
           ('Shan', 35, 'Mumbai', 135),
           ('Sradha', 35, 'Colombo', 111)
           ]

student_df = pd.DataFrame(students, columns=['Name', 'Age', 'City', 'Score'])
names = student_df['Name'].values
print('Numpy array: ', names)
print('Type of namesAsNumpy: ', type(names))

Output:

Numpy array: ['juli' 'Ravi' 'Aaman' 'Mohit' 'Veena' 'Shan' 'Sradha']
Type of namesAsNumpy: <class 'numpy.ndarray'>

Numpy array provides a function tolist() to convert its contents to a list.

This is how we selected our column ‘Name’ from Dataframe as a Numpy array and then turned it to a list.

Conclusion:

In this article i have shown you that how to get a list of a specified column of a Pandas DataFrame using different methods.Enjoy learning guys.Thank you!

Python Pandas : Select Rows in DataFrame by conditions on multiple columns

About Pandas DataFrame

It  is a 2 dimensional data structure, like a 2 dimensional array, or a table with rows and columns.

This article is all about showing different ways to select rows in DataFrame based on condition on single or multiple columns.

import pandas as pd
students = [ ('Shyam', 'books' , 24) ,
             ('ankur', 'pencil' , 28) ,
             ('Rekha', 'pen' , 30) ,
             ('Sarika', 'books', 62) ,
             ('Lata', 'file' , 33) ,
             ('Mayank', 'pencil' , 30) ] 
dataframeobj = pd.DataFrame(students, columns = ['Name' , 'Product', 'Sale'])
print(dataframeobj)

Output will be:

RESTART: C:/Users/HP/Desktop/dataframe.py
Name    Product    Sale
0   Shyam   books       24
1   Ankur    pencil       28
2   Rekha    pen          30
3   Sarika    books      62
4   Lata       file           33
5   Mayank  pencil     30

Select Rows based on value in column

Let’s see how to Select rows based on some conditions in  DataFrame.

Select rows in above example for which ‘Product’ column contains the value ‘books’,

import pandas as pd
students = [ ('Shyam', 'books' , 24) ,
             ('ankur', 'pencil' , 28) ,
             ('Rekha', 'pen' , 30) ,
             ('Sarika', 'books', 62) ,
             ('Lata', 'file' , 33) ,
             ('Mayank', 'pencil' , 30) ] 
dataframeobj = pd.DataFrame(students, columns = ['Name' , 'Product', 'Sale'])
subsetDataFrame = dataframeobj[dataframeobj['Product'] == 'books']
print(subsetDataFrame)

Output:

RESTART: C:/Users/HP/Desktop/dataframe.py
Name     Product   Sale
0     Shyam    books      24
3     Sarika     books      62

In above example we have seen that subsetDataFrame = dataframeobj[dataframeobj['Product'] == 'books']

using this it will return column which have ‘Product’ contains ‘Books’ only.

So,if we want to see whole functionality?See below.

When we apply [dataframeobj['Product'] == 'books']this condition,it will give output in true & false form.

0 True
1 False
2 False
3 True
4 False
5 False
Name: Product, dtype: bool

It will give true when the condition matches otherwise false.

If we pass this series object to [] operator of DataFrame, then it will be return a new DataFrame with only those rows that has True in the passed Series object i.e.

RESTART: C:/Users/HP/Desktop/dataframe.py

Name     Product   Sale

0     Shyam    books      24

3     Sarika     books      62

If we select any other product name it will return value accordingly.

Select Rows based on any of the multiple values in column

Select rows from above example for which ‘Product‘ column contains either ‘Pen‘ or ‘Pencil‘ i.e

import pandas as pd
students = [ ('Shyam', 'books' , 24) ,
             ('ankur', 'pencil' , 28) ,
             ('Rekha', 'pen' , 30) ,
             ('Sarika', 'books', 62) ,
             ('Lata', 'file' , 33) ,
             ('Mayank', 'pencil' , 30) ] 
dataframeobj = pd.DataFrame(students, columns = ['Name' , 'Product', 'Sale'])
subsetDataFrame = dataframeobj[dataframeobj['Product'].isin(['pen', 'pencil']) ]
print(subsetDataFrame)

We have given product name list by isin() function and it will return true if condition will match otherwise false.

Therefore, it will return a DataFrame in which Column ‘Product‘ contains either ‘Pen‘ or ‘Pencil‘ only i.e.

Output:

RESTART: C:/Users/HP/Desktop/dataframe.py
Name Product Sale
1 ankur     pencil  28
2 Rekha    pen      30
5 Mayank pencil   30

Select DataFrame Rows Based on multiple conditions on columns

In this method we are going to select rows in above example for which ‘Sale’ column contains value greater than 20 & less than 33.So for this we are going to give some condition.

import pandas as pd
students = [ ('Shyam', 'books' , 24) ,
             ('ankur', 'pencil' , 28) ,
             ('Rekha', 'pen' , 30) ,
             ('Sarika', 'books', 62) ,
             ('Lata', 'file' , 33) ,
             ('Mayank', 'pencil' , 30) ] 
dataframeobj = pd.DataFrame(students, columns = ['Name' , 'Product', 'Sale'])
filterinfDataframe = dataframeobj[(dataframeobj['Sale'] > 20) & (dataframeobj['Sale'] < 33) ]
print(filterinfDataframe)

It will return following DataFrame object in which Sales column  contains value between 20 to 33,

RESTART: C:/Users/HP/Desktop/dataframe.py
    Name      Product Sale
0 Shyam      books    24
1 ankur        pencil    28
2 Rekha       pen       30
5 Mayank    pencil    30

Conclusion:

In this article we have seen diferent methods to select rows in dataframe by giving some condition.Hope you find this informative.

5 Different ways to read a file line by line in Python

Python gives us functions for writing ,creating and reading files.Ok llike we have some file in our directory so in python we can read that file and also make some modification on it. Normal text files and binary files there are two types of files that can be handled in python.There are different ways to read a file line by line in Python.

We have one  file intro1.txt in our directory and we want to read it line by line.Lets see how will we do that.

Using readlines()

readlines() we can use for small file. It reads all files details from memory, then  separate into lines and returns all in a list.  All the List returned by readlines or readline will store the newline character at the end.

Lets take an example,

fileHandler = open ('c:\\new folder\intro1.txt', "r")
# Get list of all lines in file
listOfLines = fileHandler.readlines()
for line in listOfLines:
    print(line.strip()) 
fileHandler.close()

Output:

RESTART: C:/Users/HP/Desktop/filehandling.py
Python is an interpreted, object-oriented, high-level programming language with dynamic semantics.
Python's simple, easy to learn syntax emphasizes readability and therefore reduces the cost of program maintenance.
Python supports modules and packages, which encourages program modularity and code reuse.

So in above example we have seen that listOfLines = fileHandler.readlines() this will return a list of lines in file. We can iterate over that list and strip() the new line character then print the line .

Above case is only use for small file for large file we have to look up some other methods because it use lots of memory.

Using readline()

For working with large file we have readline().It will read file line by line instead of storing all at one time.Also, if the end of the file is reached, it will return an empty string.

fileHandler = open ("c:\\new folder\intro1.txt", "r")
while True:
    
    line = fileHandler.readline()
    # If line is empty then end of file reached
    if not line :
        break;
    print(line.strip())
   
fileHandler.close()

Output:

RESTART: C:/Users/HP/Desktop/filehandling.py

Python is an interpreted, object-oriented, high-level programming language with dynamic semantics. 
Python's simple, easy to learn syntax emphasizes readability and therefore reduces the cost of program maintenance.
 Python supports modules and packages, which encourages program modularity and code reuse.

Using context manager (with block)

If we open any file it is very important to close that file,if we did not close then it will automatically close but sometime when there is  large function which not going to end soon.In that case we take help of context manager to cleanup and closeup.

fileHandler = open("c:\\new folder\intro1.txt", "r")
line = fileHandler.readline()
for line in fileHandler:
    print("Line{}: {}".format(count, line.strip()))
   
fileHandler.close()

Output:

RESTART: C:/Users/HP/Desktop/filehandling.py 
Python is an interpreted, object-oriented, high-level programming language with dynamic semantics.
Python's simple, easy to learn syntax emphasizes readability and therefore reduces the cost of program maintenance.
Python supports modules and packages, which encourages program modularity and code reuse.

After termination of loop file will automatically close,even if there is any exception it will also terminates.

 Using context manager (with block)get List of lines in file

listOfLines = list()        
with open("c:\\new folder\intro1.txt", "r") as file:
    for line in file:
        listOfLines.append(line.strip()) 
    print(listOfLines)

Output:

['Python is an interpreted, object-oriented, high-level programming language with dynamic semantics.', 
"Python's simple, easy to learn syntax emphasizes readability and therefore reduces the cost of program maintenance.", 
'Python supports modules and packages, which encourages program modularity and code reuse.']

So in above example we have iterate all the lines in file and create a list.

Using context manager and while loop read contents of file line by line

So in this method we are going to use while loop and context manager for reading of any file.So in while loop we can give any condition according to this it iterate over lines in file.

with open("c:\\new folder\intro1.txt", "r") as fileHandler:  
    # Read next line
    line = fileHandler.readline()
    # check line is not empty
    while line:
        print(line.strip())
        line = fileHandler.readline()

Output:

RESTART: C:/Users/HP/Desktop/filehandling.py
 Python is an interpreted, object-oriented, high-level programming language with dynamic semantics. 
Python's simple, easy to learn syntax emphasizes readability and therefore reduces the cost of program maintenance. 
Python supports modules and packages, which encourages program modularity and code reuse.

Conclusion:

So in this article we have shown you different methods to read any file.Hope you enjoyed the session.

More Complex File Manipulation with Python

Python is a very convenient language that’s  frequently used for  data science, scripting and web development.

In this article, we will see  how to get different kinds of file information.

Using the os module you can get more information about it.

Getting the different kinds of file information

OS module introduced with large number of tools to deal with various filenames, directories and paths.

To find out a list of all  files and subdirectories in a particular directory , we are using os.listdir().

import os
entries = os.listdir("C:\\New folder\\Python project(APT)\\")

os.listdir() returns a list hold the names of the files and subdirectories in the given folder .

Output:

['articles', 'django folder', 'FilePath.py', 'hello.py', 'imagedownload', 'images', 'lcm', 'lcm2', 'newtons-second-law', 'RssScrapy.py', 'Scrapy1', 'scrapy2', 'scrapy3', 'speedofsound', 'studyrank', 'twosum.py']

A directory listing like that have some difficulty while reading. So we use loop to make it little clear-

import os
entries  = os.listdir("C:\\New folder\\Python project(APT)\\")
for entry in entries:
    print(entry)

Output:

articles
django folder
FilePath.py
hello.py
imagedownload
images
lcm
lcm2
newtons-second-law
RssScrapy.py
Scrapy1
scrapy2
scrapy3
speedofsound
studyrank
twosum.py

So you can see that with the help of loop we can make reading all subfolder little clear.

Listing of directory in Modern Python Versions:

In Python modern versions , an alternative to os.listdir() is to use os.scandir() and pathlib.path().

os.scandir() was introduced in Python 3.5. os.scandir() returns an iterator as opposed to a list when called.

import os

entries = os.scandir("C:\\New folder\\Python project(APT)\\")

print(entries)

Output:

RESTART: C:/Users/HP/Desktop/article3.py
<nt.ScandirIterator object at 0x0371F9F8>

The scandir points out to all the entries in the current directory. You can loop over the entries of the iterator and print out the filenames.While above it will show you object name.

Another method to get a directory listing is to use the pathlib module:

from pathlib import Path

entries = Path("C:\\New folder\\Python project(APT)\\")
for entry in entries.iterdir():
    print(entry.name)

Output:

RESTART: C:/Users/HP/Desktop/article3.py
articles
django folder
FilePath.py
hello.py
imagedownload
images
lcm
lcm2
newtons-second-law
RssScrapy.py
Scrapy1
scrapy2
scrapy3
speedofsound
studyrank
twosum.py

So you have seen three method to list all filenames of any directory which is os.listdir(),os.scandir() and pathlib.path().

List out All Files in a Directory:

To separate out folders and only list files from a directory listing produced by os.listdir(), use os.path():

import os
# List all files in a directory using os.listdir
basepath = ("C:\\New folder\\Python project(APT)\\")
for entry in os.listdir(basepath):
    if os.path.isfile(os.path.join(basepath, entry)):
        print(entry)

Output:

RESTART: C:/Users/HP/Desktop/article3.py
FilePath.py
hello.py
RssScrapy.py
twosum.py

Here we can see that,os.listdir() returns a list of everything in the specified path and then that list is filtered with the help of os.path.itself() to  print out only  files and not directories.

So now we will see other easier way to list files in a directory is by using os.scandir() or pathlib.path() :

import os

# List all files in a directory using scandir()
basepath = "C:\\New folder\\Python project(APT)\\"
with os.scandir(basepath) as entries:
    for entry in entries:
        if entry.is_file():
            print(entry.name)

Using os.scandir() has more clear than os.listdir(), even though it is one line of code long. In this we are calling entry.is_file() on each item in the Scandir() returns True if the object is a file.

Output:

RESTART: C:/Users/HP/Desktop/article3.py 
FilePath.py 
hello.py 
RssScrapy.py 
twosum.py

Here’s we will show to list out files in a directory using pathlib.path():

from pathlib import Path

basepath = Path("C:\\New folder\\Python project(APT)\\")
files_in_basepath = basepath.iterdir()
for item in files_in_basepath:
    if item.is_file():
        print(item.name)

Output:

RESTART: C:/Users/HP/Desktop/article3.py

FilePath.py
hello.py
RssScrapy.py
twosum.py

List out Subdirectories:

To list out subdirectories other than files, use one of the methods below.

import os

# List all subdirectories using os.listdir
basepath = "C:\\New folder\\Python project(APT)\\"
for entry in os.listdir(basepath):
    if os.path.isdir(os.path.join(basepath, entry)):
        print(entry)

Here’s we have shown how to use os.listdir() and os.path():

Output:

articles
django folder
imagedownload
images
lcm
lcm2
newtons-second-law
Scrapy1
scrapy2
scrapy3
speedofsound
studyrank

Getting File Attributes

This will first get a list of files in directory and their attributes and then call convert.date()  to convert each file’s last modified time into a human readable form .convert.date() makes use of .strftime() to convert the time in seconds into a string.

from datetime import datetime
from os import scandir

def convert_date(timestamp):
    d = datetime.utcfromtimestamp(timestamp)
    formated_date = d.strftime('%d %b %Y')
    return formated_date

def get_files():
    dir_entries = scandir("C:\\New folder\\Python project(APT)\\")
    for entry in dir_entries:
        if entry.is_file():
            info = entry.stat()
            print(f'{entry.name}\t Last Modified: {convert_date(info.st_mtime)}')
print(get_files())            

Output:

FilePath.py        Last Modified: 19 Apr 2021
hello.py             Last Modified: 17 Apr 2021
RssScrapy.py     Last Modified: 17 Apr 2021
twosum.py        Last Modified: 17 Apr 2021

So by above method we are able to get  the time the files in directry were last modified.

Conclusion:

So we have seen how to get details of any directory by using three methods i.e. os.listdir() , os.scandir() and pathlib.path().We have also seen how to get only files on that particular folder seperately and also attribute of that folder.

How to Make a Discord Bot Python

In a world where video games are so important to so many people, communication and community around games are vital. Discord offers both of those and more in one well-designed package. In this tutorial, you’ll learn how to make a Discord bot in Python so that you can make the most of this fantastic platform.

What Is Discord?

Discord is a voice and text communication platform for gamers.

Players, streamers, and developers use Discord to discuss games, answer questions, chat while they play, and much more. It even has a game store, complete with critical reviews and a subscription service. It is nearly a one-stop shop for gaming communities.

While there are many things you can build using Discord’s APIs this tutorial will focus on a particular learning outcome: how to make a Discord bot in Python.

What Is a Bot?

Discord is growing in popularity. As such, automated processes, such as banning inappropriate users and reacting to user requests are vital for a community to thrive and grow.

Automated programs that look and act like users and automatically respond to events and commands on Discord are called bot users. Discord bot users (or just bots) have nearly unlimited application.

How to Make a Discord Bot in the Developer Portal:

Before you can dive into any Python code to handle events and create exciting automations, you need to first create a few Discord components:

  1. An account
  2. An application
  3. A bot
  4. A guild

You’ll learn more about each piece in the following sections.

Once you’ve created all of these components, you’ll tie them together by registering your bot with your guild.

Creating a Discord Account

The first thing you’ll see is a landing page where you’ll need to either login, if you have an existing account, or create a new account:

Creating-a-Discord-Account

If you need to create a new account, then click on the Register button below Login and enter your account information.

Once you’re finished, you’ll be redirected to the Developer Portal home page, where you’ll create your application.

Creating-a-Discord-Account-login

Creating an Application:

An application allows you to interact with Discord’s APIs by providing authentication tokens, designating permissions, and so on.

To create a new application, select New Application:

Creating-a-Discord-Account-application

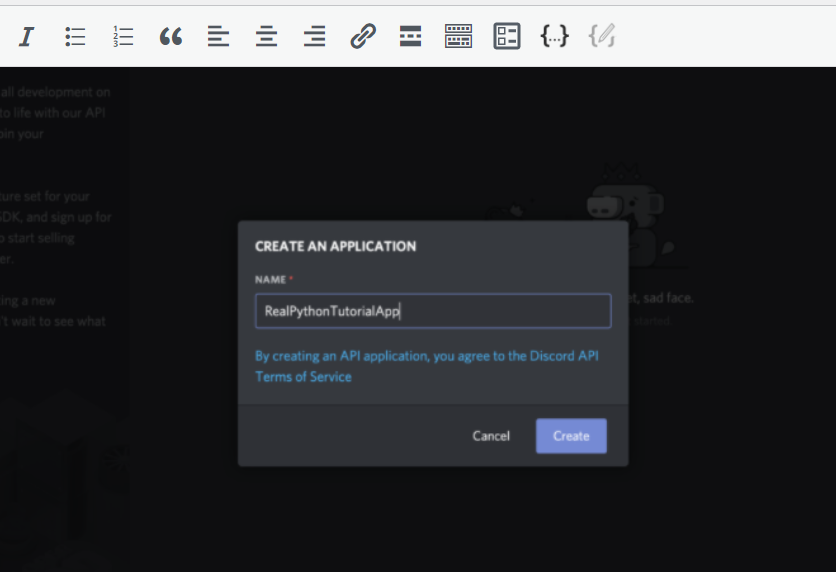
Next, you’ll be prompted to name your application. Select a name and click Create:

Creating-a-Discord-Account-login-creating

Congratulations! You made a Discord application. On the resulting screen, you can see information about your application:

Creating-a-Discord-Account-login-done.png

Keep in mind that any program that interacts with Discord APIs requires a Discord application, not just bots. Bot-related APIs are only a subset of Discord’s total interface.

However, since this tutorial is about how to make a Discord bot, navigate to the Bot tab on the left-hand navigation list.

Creating a Bot

As you learned in the previous sections, a bot user is one that listens to and automatically reacts to certain events and commands on Discord.

For your code to actually be manifested on Discord, you’ll need to create a bot user. To do so, select Add Bot:

Creating-a-Discord-boat

Once you confirm that you want to add the bot to your application, you’ll see the new bot user in the portal:

Creating-a-Discord-account-new-boat-user

Now, the bot’s all set and ready to go, but to where?

A bot user is not useful if it’s not interacting with other users. Next, you’ll create a guild so that your bot can interact with other users.

Creating a Guild

A guild (or a server, as it is often called in Discord’s user interface) is a specific group of channels where users congregate to chat.

You’d start by creating a guild. Then, in your guild, you could have multiple channels, such as:

  • General Discussion: A channel for users to talk about whatever they want
  • Spoilers, Beware: A channel for users who have finished your game to talk about all the end game reveals
  • Announcements: A channel for you to announce game updates and for users to discuss them

Once you’ve created your guild, you’d invite other users to populate it.

So, to create a guild, head to your Discord home page:

Creating-a-Discord-home-page

From this home page, you can view and add friends, direct messages, and guilds. From here, select the + icon on the left-hand side of the web page to Add a Server:

This will present two options, Create a server and Join a Server. In this case, select Create a server and enter a name for your guild.

Creating-a-Discord-creating-a-server

Once you’ve finished creating your guild, you’ll be able to see the users on the right-hand side and the channels on the left.

The final step on Discord is to register your bot with your new guild.

Adding a Bot to a Guild

A bot can’t accept invites like a normal user can. Instead, you’ll add your bot using the OAuth2 protocol.

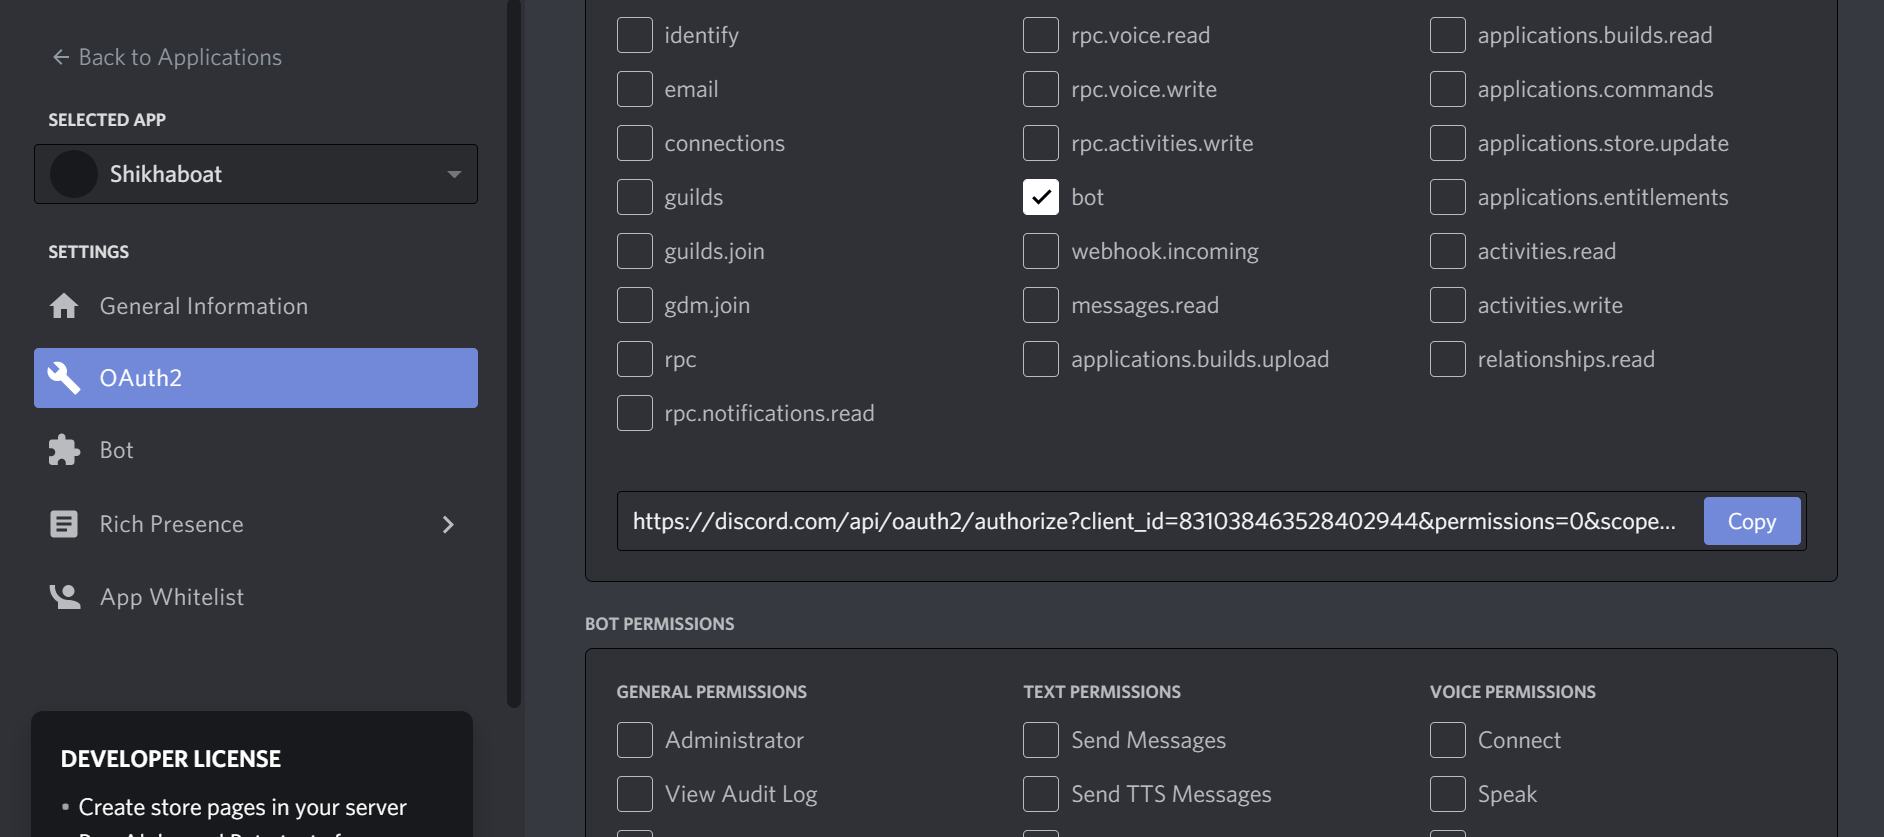
To do so, head back to the Developer Portal and select the OAuth2 page from the left-hand navigation:

Add your bot using the OAuth2 protocol.

From this window, you’ll see the OAuth2 URL Generator.

This tool generates an authorization URL that hits Discord’s OAuth2 API and authorizes API access using your application’s credentials.

In this case, you’ll want to grant your application’s bot user access to Discord APIs using your application’s OAuth2 credentials.

To do this, scroll down and select bot from the SCOPES options and Administrator from BOT PERMISSIONS:

BOT PERMISSIONS

Now, Discord has generated your application’s authorization URL with the selected scope and permissions.

Select Copy beside the URL that was generated for you, paste it into your browser, and select your guild from the dropdown options:

Creating-a-Discord-select-your-grid

Click Authorize, and you’re done!


Authorized
If you go back to your guild, then you’ll see that the bot has been added:

Bot added

In summary, you’ve created:

  • An application that your bot will use to authenticate with Discord’s APIs
  • A bot user that you’ll use to interact with other users and events in your guild
  • A guild in which your user account and your bot user will be active
  • ADiscordaccount with which you created everything else and that you’ll use to interact with your bot

Now, you know how to make a Discord bot using the Developer Portal. Next comes the fun stuff: implementing your bot in Python!

How to Make a Discord Bot in Python

Since you’re learning how to make a Discord bot with Python, you’ll be using discord.py.

discord.py is a Python library that exhaustively implements Discord’s APIs in an efficient and Pythonic way. This includes utilizing Python’s implementation of Async IO

Begin by installing discord.py with pip:

$ pip install -U discord.py

Now that you’ve installed discord.py, you’ll use it to create your first connection to Discord!

Creating a Discord Connection

The first step in implementing your bot user is to create a connection to Discord. With discord.py, you do this by creating an instance of Client:

# bot.py
import os

import discord
from dotenv import load_dotenv

load_dotenv()
TOKEN = os.getenv('DISCORD_TOKEN')

client = discord.Client()

@client.event
async def on_ready():
    print(f'{client.user} has connected to Discord!')

client.run(TOKEN)

A Client is an object that represents a connection to Discord. A Client handles events, tracks state, and generally interacts with Discord APIs.

Here, you’ve created a Client and implemented its on_ready() event handler, which handles the event when the Client has established a connection to Discord and it has finished preparing the data that Discord has sent, such as login state, guild and channel data, and more.

In other words, on_ready() will be called (and your message will be printed) once client is ready for further action. You’ll learn more about event handlers later in this article.

When you’re working with secrets such as your Discord token, it’s good practice to read it into your program from an environment variable. Using environment variables helps you:

  • Avoid putting the secrets into source control
  • Use different variables for development and production environments without changing your code

While you could export DISCORD_TOKEN={your-bot-token}, an easier solution is to save a .env file on all machines that will be running this code. This is not only easier, since you won’t have to export your token every time you clear your shell, but it also protects you from storing your secrets in your shell’s history.

Create a file named .env in the same directory as bot.py:

You’ll need to replace {your-bot-token} with your bot’s token, which you can get by going back to the Bot page on the Developer portal and clicking Copy under the TOKEN section:

 Creating-a-Discord-adding-bot-token

Looking back at the bot.py code, you’ll notice a library called dotnev. This library is handy for working with .env files. load_dotenv()loads environment variables from a .env file into your shell’s environment variables so that you can use them in your code.

Install dotenv with pip:

pip install -U python-dotenv

Finally, client.run() runs your Client using your bot’s token.

Now that you’ve set up both bot.py and .env, you can run your code:

python bot.py
Shikhaboat#5531 has connected to Discord!

Great! Your Client has connected to Discord using your bot’s token. In the next section, you’ll build on this Client by interacting with more Discord APIs.

Interacting With Discord APIs

Using a Client, you have access to a wide range of Discord APIs.

For example, let’s say you wanted to write the name and identifier of the guild that you registered your bot user with to the console.

First, you’ll need to add a new environment variable:

# .env
DISCORD_TOKEN={your-bot-token}
DISCORD_GUILD={your-guild-name}

Don’t forget that you’ll need to replace the two placeholders with actual values:

  1. {your-bot-token}
  2. {your-guild-name}

Remember that Discord calls on_ready(), which you used before, once the Client has made the connection and prepared the data. So, you can rely on the guild data being available inside on_ready():

# bot.py
import os

import discord
from dotenv import load_dotenv

load_dotenv()
TOKEN = os.getenv('DISCORD_TOKEN')
GUILD = os.getenv('DISCORD_GUILD')

client = discord.Client()

@client.event
async def on_ready():
    for guild in client.guilds:
        if guild.name == GUILD:
            break

    print(
        f'{client.user} is connected to the following guild:\n'
        f'{guild.name}(id: {guild.id})'
    )

client.run(TOKEN)

Here, you looped through the guild data that Discord has sent client, namely client.guilds. Then, you found the guild with the matching name and printed a formatted string to stdout.

Run the program to see the results:

 python bot.py
Shikhaboat#5531 is connected to the following guild:
Shikhaboat#5531(id: 571759877328732195)

Great! You can see the name of your bot, the name of your server, and the server’s identification number.

Another interesting bit of data you can pull from a guild is the list of users who are members of the guild:

# bot.py
import os

import discord
from dotenv import load_dotenv

load_dotenv()
TOKEN = os.getenv('DISCORD_TOKEN')
GUILD = os.getenv('DISCORD_GUILD')

client = discord.Client()

@client.event
async def on_ready():
    for guild in client.guilds:
        if guild.name == GUILD:
            break

    print(
        f'{client.user} is connected to the following guild:\n'
        f'{guild.name}(id: {guild.id})\n'
    )

    members = '\n - '.join([member.name for member in guild.members])
    print(f'Guild Members:\n - {members}')

client.run(TOKEN)

By looping through guild.members, you pulled the names of all of the members of the guild and printed them with a formatted string.

When you run the program, you should see at least the name of the account you created the guild with and the name of the bot user itself:

$ python bot.py
Shikhaboat#5531 is connected to the following guild:
Shikhaboat#5531(id: 571759877328732195)
Guild Members:
 - aronq2
 - RealPythonTutorialBot

These examples barely scratch the surface of the APIs available on Discord, be sure to check out their documentation to see all that they have to offer.

Next, you’ll learn about some utility functions and how they can simplify these examples.

Using Utility Functions

Let’s take another look at the example from the last section where you printed the name and identifier of the bot’s guild:

# bot.py
import os

import discord
from dotenv import load_dotenv

load_dotenv()
TOKEN = os.getenv('DISCORD_TOKEN')
GUILD = os.getenv('DISCORD_GUILD')

client = discord.Client()

@client.event
async def on_ready():
    for guild in client.guilds:
        if guild.name == GUILD:
            break

    print(
        f'{client.user} is connected to the following guild:\n'
        f'{guild.name}(id: {guild.id})'
    )

client.run(TOKEN)

You could clean up this code by using some of the utility functions available in discord.py.

discord.utils.find is one utility that can improve the simplicity and readability of this code by replacing the for loop with an intuitive, abstracted function:

# bot.py
import os

import discord
from dotenv import load_dotenv

load_dotenv()
TOKEN = os.getenv('DISCORD_TOKEN')
GUILD = os.getenv('DISCORD_GUILD')

client = discord.Client()

@client.event
async def on_ready():
    guild = discord.utils.find(lambda g: g.name == GUILD, client.guilds)
    print(
        f'{client.user} is connected to the following guild:\n'
        f'{guild.name}(id: {guild.id})'
    )

client.run(TOKEN)

<find() takes a function, called a predicate, which identifies some characteristic of the element in the iterable that you’re looking for. Here, you used a particular type of anonymous function, called a lambda, as the predicate.

In this case, you’re trying to find the guild with the same name as the one you stored in the DISCORD_GUILD environment variable. Once find() locates an element in the iterable that satisfies the predicate, it will return the element. This is essentially equivalent to the break statement in the previous example, but cleaner.

discord.py has even abstracted this concept one step further with the get.utility():

# bot.py
import os

import discord
from dotenv import load_dotenv

load_dotenv()
TOKEN = os.getenv('DISCORD_TOKEN')
GUILD = os.getenv('DISCORD_GUILD')

client = discord.Client()

@client.event
async def on_ready():
    guild = discord.utils.get(client.guilds, name=GUILD)
    print(
        f'{client.user} is connected to the following guild:\n'
        f'{guild.name}(id: {guild.id})'
    )

client.run(TOKEN)

get() takes the iterable and some keyword arguments. The keyword arguments represent attributes of the elements in the iterable that must all be satisfied for get() to return the element.

In this example, you’ve identified name=GUILD as the attribute that must be satisfied.

Now that you’ve learned the basics of interacting with APIs, you’ll dive a little deeper into the function that you’ve been using to access them: on_ready().

Responding to Events

You already learned that on_ready() is an event. In fact, you might have noticed that it is identified as such in the code by the client.event decorator.

But what is an event?

An event is something that happens on Discord that you can use to trigger a reaction in your code. Your code will listen for and then respond to events.

Using the example you’ve seen already, the on_ready() event handler handles the event that the Client has made a connection to Discord and prepared its response data.

So, when Discord fires an event, discord.py will route the event data to the corresponding event handler on your connected Client.

There are two ways in discord.py to implement an event handler:

  1. Using the client.event decorator
  2. Creating a subclass of Client and overriding its handler methods

You already saw the implementation using the decorator. Next, take a look at how to subclass Client:

# bot.py
import os

import discord
from dotenv import load_dotenv

load_dotenv()
TOKEN = os.getenv('DISCORD_TOKEN')

class CustomClient(discord.Client):
    async def on_ready(self):
        print(f'{self.user} has connected to Discord!')

client = CustomClient()
client.run(TOKEN)

Here, just like before, you’ve created a client variable and called <.run() with your Discord token. The actual Client is different, however. Instead of using the normal base class, client is an instance of CustomClient, which has an overridden on_ready() function.

There is no difference between the two implementation styles of events, but this tutorial will primarily use the decorator version because it looks similar to how you implement Bot commands, which is a topic you’ll cover in a bit.

Welcoming New Members

Previously, you saw the example of responding to the event where a member joins a guild. In that example, your bot user could send them a message, welcoming them to your Discord community.

Now, you’ll implement that behavior in your Client, using event handlers, and verify its behavior in Discord:

# bot.py
import os

import discord
from dotenv import load_dotenv

load_dotenv()
TOKEN = os.getenv('DISCORD_TOKEN')

client = discord.Client()

@client.event
async def on_ready():
    print(f'{client.user.name} has connected to Discord!')

@client.event
async def on_member_join(member):
    await member.create_dm()
    await member.dm_channel.send(
        f'Hi {member.name}, welcome to my Discord server!'
    )

client.run(TOKEN)

Like before, you handled the on_ready() event by printing the bot user’s name in a formatted string. New, however, is the implementation of the on_member_join() event handler.

on_member_join(), as its name suggests, handles the event of a new member joining a guild.

In this example, you used member.create_dm()to create a direct message channel. Then, you used that channel to send() a direct message to that new member.

Now, let’s test out your bot’s new behavior.

First, run your new version of bot.py and wait for the on_ready() event to fire, logging your message to stdout:

$ python bot.py
ShikhaBot has connected to Discord!

Now, head over to Discord, log in, and navigate to your guild by selecting it from the left-hand side of the screen:

Creating-a-Discord-navigate-to-server

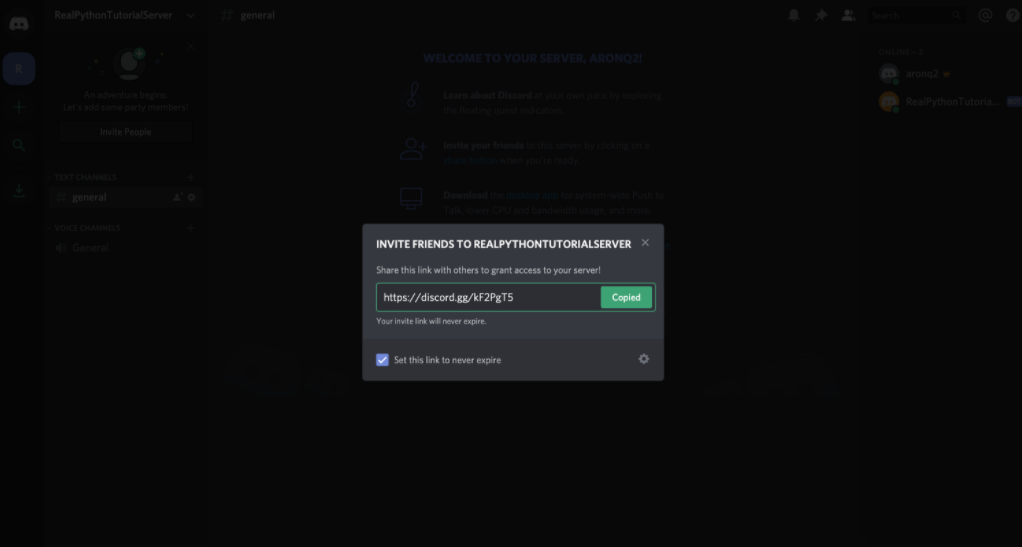
Select Invite People just beside the guild list where you selected your guild. Check the box that says Set this link to never expire and copy the link:

InvitePepole

Now, with the invite link copied, create a new account and join the guild using your invite link.

First, you’ll see that Discord introduced you to the guild by default with an automated message. More importantly though, notice the badge on the left-hand side of the screen that notifies you of a new message:

 Creating-a-Discord-account-new-message.
When you select it, you’ll see a private message from your bot user:

 Boat-is-created

Perfect! Your bot user is now interacting with other users with minimal code.

Conclusion

Congratulations! Now, you’ve learned how to make a Discord bot in Python. You’re able to build bots for interacting with users in guilds that you create or even bots that other users can invite to interact with their communities.


Understanding the Two Sum Problem

The two sum problem is a  very common interview question, asked in companies.For the two sum problem we will write two algorithm that runs in O(n2) & O(n) time.

Two Sum Problem

Given an array of integer return indices of the two numbers such that they add up to the specific target.

You may assume that each input would have exactly one solution and you are not going to use same element twice.

Example:

Given numbers=[ 3 , 4 , 6 ,7 ] , target = 7,

Because num[0]+num[1] = 3 + 4 = 7,

return[0,1]

Example has given above we have to execute two sum problem for any two number in list and give us targeted value.

There are mainly two way to execute two sum problem.

  1. Using Naive Method
  2. Using hash table

Implementing Naive Method:

In this method  we would be loop through each number and then loop again through the list looking for a pair that sums and give us final value. The running time for the below solution would be O(n2).

So for this we will write an algorithm which mentioned below-

def twoSum(nums, target):
    for i in range(len(nums)):
        for j in range(i+1,len(nums)):
            if target - nums[i] == nums[j]:
                return[i,j]

    return None            

test = [2,7,11,15]
target = 9
print(twoSum(test,target))

Output:

C:\New folder\Python project(APT)>py twosum.py
[0, 1]

C:\New folder\Python project(APT)>

So you can see that it has return us those indices which has given target value.If we change the target then value and indices both will change.This is what we want to do but it increases the complexity because we run two loop.

So for increasing complexity we will use second method which is hash table.

Implementing hash table:

Below we will show use of hash table. We can write an another faster algorithm that will find pairs that sum to numbers in same time. As we pass through each element in the array, we check to see if M minus the current element exists in the hash table.

Example:

If the array is: [6, 7, 1, 8] and the sum is 8.
class Solution:
    def twoSum(nums,target):
        prevMap = {}

        for i,n in enumerate(nums):
            diff = target - n
            if diff in prevMap:
               return[prevMap[diff],i]
            prevMap[n] = i
        return    
    nums=[6, 7, 1, 8]
    target= 8
    print(twoSum(nums,target))

Output:

C:\New folder\Python project(APT)>py twosum.py [1, 2] 
C:\New folder\Python project(APT)>

So you can see that above program gives us index value of the two number which gives us our target value.

Conclusion:

Great!So in this article we have seen two methods for two sum problem in python.Naive method has complexity O(n2)and Hash metod has complexity O(n),So best approach is Hash method and worst is Naive method.