Python

Kwargs Functions that accept Variable length Key Value pair as Arguments

Python : **Kwargs | Functions that accept Variable length Key Value pair as Arguments

In this post, we’ll look at how to write Python functions that accept variable-length arguments in key-value pair format.

Functions that accept Variable length Key Value pair as Arguments

1)Kwargs

In Python function definitions, the special syntax **kwargs is used to transfer a keyworded, variable-length argument set. We call ourselves kwargs with a double star. The explanation for this is that the double star helps one to push keyword arguments through (and any number of them).

  • A keyword statement is to give the variable a name before entering it.
  • You can think of the kwargs as a dictionary mapping every keyword to the value we pass. This is why there appears to be no order in which we are iterating through the kwargs.

2)Variable Length Functions

Assume we want to define a function that prints the given student information. Details will be presented in key value pairs, with key representing the property name and value representing the property’s value.
It should print all of the given properties, regardless of their count.

printDetails(name = "Vishal")

Above one should only print one property, namely the name.

printDetails(name = "Vishal", pincode = "983992")

Above one should print two properties , namely the name and pincode

printDetails(name = "Vishal", phone = "333444",address = "NewYork")

Above one should print three properties, namely the name , pincode and address.

It is important that the function accepts variable length arguments in key value pair format.

3)Writing Function which accepts variable length arguments in key value pair using **kwargs

In Python, we must add ** before the parameter name if we want to allow multiple key value pair arguments in a single parameter.
**kwargs can accept multiple key value pair arguments and store them in a dictionary, indicating that kwargs are of the dictionary type.
Let’s make the function with **kwargs now.

Below is the implementation:

def printDetails(**kwargs):
    # Variable-length arguments in key-value pair format are accepted.
    print("Printing all the arguments", kwargs)
    print("Traverse the arguments")
    for key, value in kwargs.items():
        print("person's ", key, " = ", value)
    print()


# passing key's and values to printDetails function
# passing one argument
printDetails(name="Vishal")
# passing two arguments
printDetails(name="Akash", pincode=533333)
# passing three arguments
printDetails(name="Vikram", pincode=213442, adress="NewYork")

Output:

Printing all the arguments {'name': 'Vishal'}
Traverse the arguments
person's  name  =  Vishal

Printing all the arguments {'name': 'Akash', 'pincode': 533333}
Traverse the arguments
person's  name  =  Akash
person's  pincode  =  533333

Printing all the arguments {'name': 'Vikram', 'pincode': 213442, 'adress': 'NewYork'}
Traverse the arguments
person's  name  =  Vikram
person's  pincode  =  213442
person's  adress  =  NewYork

Related Programs:

Python : **Kwargs | Functions that accept Variable length Key Value pair as Arguments Read More »

For Loop Explained with Examples

Python: For Loop – Explained with Examples

For Loop:

A for loop is used to iterate through a series (that is either a list, a tuple, a dictionary, a set, or a string).
This functions more like an iterator method in other object-oriented programming languages than the for keyword in other programming languages.

The for loop allows one to execute a series of statements once for each item in a list, tuple, set, and so on.

For Loop in Python

1)For loop

A for loop in Python allows one to iterate over a set of statements several times. However, the number of times these statements are executed by a for loop is determined by a sequence.

To put it another way, a for loop in Python is useful for iterating over a sequence of elements.

Syntax:

for element in sequence:
    statement one
    statement two
    .......
    .......
    .....
    .......
    ......
    statement n

The keyword “for” is followed by a variable, then the keyword “in,” then a sequence, and finally a colon. The suite of for loop is also known as the block of for loop after the for statement begins the suite of for loop, which is a group of statements with one indent stage.

The for loop will loop through all of the elements in a given sequence. It will allocate each element of the sequence to variable element and then execute the statements in-suite, i.e., statements in the block. These statements may now make use of the element variable, which includes a sequence element for that event.

2)Iterating the string using for loop

# given_string
given_string = "BTechGeeks"
# Traverse the string in for loop
for character in given_string:
    print("Character = ", character)

Output:

Character =  B
Character =  T
Character =  e
Character =  c
Character =  h
Character =  G
Character =  e
Character =  e
Character =  k
Character =  s

As a sequence, we used a string. Then, using a for loop, we looped through all of the characters in the string series.

3)Using For loop and range() to print elements from 1 to 20

The range() function returns a sequence of numbers from start to -1 . We can then iterate over each element of this sequence using the for loop.

Below is the implementation:

# using for loop and range to print elements from 1 to 20
for i in range(1, 21):
    print(i)

Output:

1
2
3
4
5
6
7
8
9
10
11
12
13
14
15
16
17
18
19
20

The following actions were performed by the for loop for each element of the sequence,

  • It assigned the variable i to the element.
  • It execute the lines in the block, i.e. the suite of for loops.

4)Printing numbers in descending order using for loop and range() function

The range() function returns a sequence of numbers with the specified range size from start to end -1.

range(20,0,-1)

# using for loop and range to print elements from 1 to 20 in descending order
for i in range(20, 0, -1):
    print(i)

Output:

20
19
18
17
16
15
14
13
12
11
10
9
8
7
6
5
4
3
2
1

The following actions were performed by the for loop for each element of the sequence,

  • It assigned the variable i to the element.
  • It execute the lines in the block, i.e. the suite of for loops.

We can traverse the list using for loop as shown below.

Below is the implementation:

# given_list
givenlist = ["hello", "this", "is", "BTechGeeks"]
# using for loop to traverse the list
for element in givenlist:
    # print the element
    print(element)

Output:

hello
this
is
BTechGeeks

6)For Loop with else statement

We may have an optional else block in addition to a for loop.

When the for loop has finished executing the statements in the for block, it then executes the statements in the else block. It is important to note that statements in the else block can only be executed in the last position and only once.

Below is the implementation:

# given_list
givenlist = ["hello", "this", "is", "BTechGeeks"]
# using for loop to traverse the list
for element in givenlist:
    # print the element
    print(element)
# else block
else:
    print("For loop is ended")

Output:

hello
this
is
BTechGeeks
For loop is ended

Related Programs:

Python: For Loop – Explained with Examples Read More »

min() Function Tutorial with Examples

Python : min() Function Tutorial with Examples

We’ll go through the details of Python’s min() function with examples in this article.

The min() function in Python is used to find the smallest element in a collection of elements.

Python min() function

1)min() function

The min() function returns the lowest-valued object, or the lowest-valued item in an iterable.

If the values are strings, they are compared alphabetically.

Syntax:

min(iterable, *[, key, default])
min(arg1, arg2, *args[, key])

Parameters:

Iterable : An Iterable object is one that can be traversed, such as a list or a tuple.
arg1,arg2 ...... :  Multiple elements are essential.
key  :  A function that is applied to and object in the Iterable and returns a value based on the argument passed in.

Return:

It returns the Iterable or assigned elements element with the lowest value. If the main function is not available,
 the minimum value is determined by comparing the given objects. If a key function is given, instead of explicitly
 comparing objects, it will first call the key function on each one before comparing it to others.

Exceptions:

When two forms are compared, TypeError is returned.

2)Finding min value in list

Consider the following scenario: we have a list of numbers.

Since list is an Iterable, we may directly transfer it to the min() function to find the list’s minimum value.

Below is the implementation:

# given list
givenlist = [98, 234, 21, 45, 55, 12, 988]
# finding min value in list using min function
minvalue = min(givenlist)
# print the min value
print(minvalue)

Output:

12

3)Finding min ascii character in string using min() function

Assume we have a string.
Since String is an Iterable, we can use the min() function to find the character with the lowest ASCII value in the string.

Below is the implementation:

# given string
string = "onlinebtechgeeks"
# finding min ascii value character in given string
minchar = min(string)
# print the min ascii character
print(minchar)

Output:

b

The min() function compared the ASCII values of the characters in the string and returned the character with the smallest ASCII value.

4)Finding min string from list of strings using min() function

Assume we have a list of strings.
Since list is an Iterable, we may directly transfer it to the min() function to find the minimum string based on alphabetical order in the list.

Below is the implementation:

# given list of strings
strings_list = ["hello", "this", "is", "BTechGeeks"]
# finding min string  in given list of strings
minstring = min(strings_list)
# print the min string
print(minstring)

Output:

BTechGeeks

5)Finding min value and key in dictionary

We can get min value in dictionary by using lambda function as given below.

Below is the implementation:

# given dictionary
dictionary = {'Hello': 238, 'This': 135,
              'is': 343, 'BTechGeeks': 50, 'Platform': 688}
# fet the min value and key in dictionary using lambda and min () function
min_Value = min(dictionary.items(), key=lambda x: x[1])
print('Min value in dictionary : ', min_Value)

Output:

Min value in dictionary :  ('BTechGeeks', 50)

6)min() function with multiple arguments

We may also transfer individual elements to the min function rather than any Iterable.

Below is the implementation:

# min() function with multiple arguments
minvalue = min(100, 24, 454, 22, 989, 12, 5, 467)
# print the min value
print(minvalue)

Output:

5

Related Programs:

Python : min() Function Tutorial with Examples Read More »

What is Hashing and Hash Table

What is Hashing and Hash Table?

Hashing and Hash Table

1)Hashing

Hashing is the process of mapping object data to a representative integer value using a function or algorithm.

This hash code (or simply hash) can then be used to narrow our quest when searching for the item on the map.

These hash codes are usually used to create an index at which the value is stored.

2)Hash Table

A hash table is a data structure that stores data associatively. Data is stored in an array format in a hash table, with each data value having its own unique index value. When we know the index of the desired data, we can access it very quickly.

As a result, it becomes a data structure in which insertion and search operations are extremely quick, regardless of the size of the data. Hash Tables use an array as a storage medium and use the hash technique to produce an index from which an element is to be inserted or located.

3)Features of HashTable

  • It works in the same way as HashMap, but it is synchronised.
  • In a hash table, a key/value pair is stored.
  • In Hashtable, we define an object that will be used as a key, as well as the value that will be associated with that key. The key is then hashed, and the resulting hash code serves as the index for storing the value in the table.
  • The default capacity of the Hashtable class is 11, and the loadFactor is 0.75.
  • HashMap does not support Enumeration, while Hashtable does not support fail-fast Enumeration.

4)Adding element in HashTable

When an entity is inserted into a Hash Table, its hash code is measured first, and the bucket in which it will be stored is determined based on that hash code.

Let us illustrate this with an example.

For instance, suppose we want to store some numbers in a Hash Table, i.e.

32 , 45 , 64 , 92 , 57 , 88 , 73

Internally, this Hash Table can use 10 buckets, i.e.

The Hash Code will be returned by our Hash Function.

HashCode=Element_value%10

This Hash code for,

32 will be 2

45 will be 5

64 will be 4

92 will be 2

57 will be 7

88 will be 8

73 will be 3

Now, each element’s hash code will be used to determine where that element will be stored, for example, 45 will be stored in bucket 5 since its hash code is 5. In the same way, all elements will be stored in the bucket that corresponds to their hash code.

5)Hashing Collisions

As we can see, the hash code for both 32 and 92 is the same, which is 2. In Hashing, this is referred to as Collision. Both components would be deposited in the same bucket if they collide.

6)Searching element in Hash Table

If we want to check for an element in a hash table, we must first calculate the hash code for that element. Then, using the hash code, we’ll go straight to the bucket where this element will be saved. Now, there may be several elements in that bucket; in that case, we’ll look for our element only in those elements.

Assume we want to find 45 in the hash table in the previous case.

Then we’ll measure the hash code, which will be 45 %10 = 5.

Then we’ll go straight to bucket no. 5 and search for the factor there.

7)Best Case Time Complexity in Hashing

From the viewpoint of searching, each bucket containing only one element in the Hash table is the best case scenario. In such a case, searching time would require the following effort:

The complexity of calculating hash codes is O(1)

If the bucket only contains one element, choosing that element from the bucket is a complex task O(1)

Consequently In the best case scenario, finding an element would be difficult O(1)

While the complexity of a collision, i.e. several elements in a bucket, will be O(no. of elements in bucket), it will be much less than the complexity of searching an element from a List, which will be O(n).

8)Worst Case Time Complexity in Hashing

The worst case scenario in hashing is when the Hash Function is not correctly implemented, resulting in the same hash code for several elements.

Assume the following is our hash function:

Hash code = given_element / 100

Then, in the preceding case, the hash code for all elements ( 32 , 45 , 64 , 92 , 57 , 88 , 73 ) will be 0. As a result, all elements will be saved in bucket 0.

Since all components are in the same bucket, complexity is at its highest in this case. As a result, the complexity will be O(n) since it must check for the appropriate element among all elements.

Related Programs:

What is Hashing and Hash Table? Read More »

Iterator, Iterable and Iteration Explained with Examples

Python : Iterator, Iterable and Iteration Explained with Examples

Iterator , Iterable and Iteration with Examples

1)Iterable

Iterable is a type of object that is made up of other components. Iterables include things like list and tuple. It’s identical to any Java collection class or C++ container class. When the iter() function on an Iterable object is called in Python, an Iterator is returned, which can be used to iterate over the elements inside Iterable.

If a class has overloaded the magic method __iter__() in Python, it is called Iterable. The Iterator object must be returned by this feature.

2)Iterator

In Python, an iterator is an entity that iterates over iterable objects such as lists, tuples, dicts, and sets. The iter() method is used to create the iterator item. It iterates using the next() form.

The iterator’s initialization is handled by the __iter(iterable)__ process. Next ( __next__ in Python 3) returns an iterator item. The iterable’s next value is returned by the next process. When we use a for loop to traverse some iterable object, it uses the iter() method to obtain an iterator object, which we then iterate over using the next() method. To signal the end of the iteration, this method raises a StopIteration.

3)Iteration

Iteration is the method of looping through all of the elements of an Iterable with the help of an Iterator object. We can iterate in Python using for loops or while loops.

4)Traverse/Iterate over list (Iterable) using Iterator

Since the __iter__() feature, which returns an Iterator, has been overloaded in Python, List is an Iterable item. The iter() function is used to get the Iterator object from an Iterable object. From the list, let’s get the Iterator object.

Since the __next__() function is overloaded, it returns a list iterator object, which is essentially an Iterator. You may also look at the Iterator form that was returned.
Let’s use this iterator object to loop through the contents of the list.

Below is the implementation:

# given list
givenlist = ["hello", "this", "is", "BTechGeeks"]
# getting the iterator of the list
itrlist = iter(givenlist)
# Traverse the list using iterator
while True:
    try:
        # getting next element in the list using next()
        element = next(itrlist)
        print(element)
    except StopIteration:
        break

Output:

hello
this
is
BTechGeeks

Explanation:

Call the next() function on the Iterable’s iterator object to get the next value. It will return the Iterable’s next value. To get all elements of iterable one by one, keep calling this next() function. When the iterator reaches the end of the iterable’s components, the StopIteration error is thrown.

As previously said, the next() function is similar to Python’s hasnext() function. It is used to get the Iterable’s next value.

5)Iterate over an Iterable (list) using for loop

Python has a fantastic for loop that iterates over the Iterable object using Iterator. For example, we can use the for loop to iterate over the elements in a list (Iterable).
Internally, the for loop does the same thing, retrieving the Iterator from Iterable and using it to iterate over the elements in Iterable. However, it offers a short hand form; we don’t need to write a large while loop or catch StopIteration errors ourselves because it handles everything internally.
We may iterate over other Iterables as well, such as list, tuple, and custom Iterators.

Below is the implementation:

# given list
givenlist = ["hello", "this", "is", "BTechGeeks"]
# traverse the list using for loop
for element in givenlist:
    print(element)

Output:

hello
this
is
BTechGeeks

6)Python Iter() function

When the iter() function is called, the passed object is passed to the __iter__() function, which returns the value received by it. Iterable refers to a class that has an overloaded __iter__() function and is supposed to return an Iterator object.

7)Python next() function

When the next() function is called, the passed object is passed to the __next__() function, which returns the value returned by it. Iterator objects, in essence, overload the __next__() function, returning the next value from the corresponding Iterable item.
Related Programs:

Python : Iterator, Iterable and Iteration Explained with Examples Read More »

If..Elif…Else Statement

Python – If..Elif…Else Statement

You must monitor the flow of your program when writing code in any language. This is usually the case when there is decision-making involved: you’ll want to run one set of code if a condition is met, and a different set of code if it isn’t. The if, elif, and else statements in Python are useful for this.

We’ll learn how to use the if…elif…else declaration to change the flow of code in several directions based on a conditional expression in this article.

If..Elif…Else Statement in Python

1)Need of If..Elif..Else statement

For example, suppose we have a variable p and want our program to behave as follows:

If p is greater than 50 but less than 100, only statements 1 and 2 should be run.
If p is greater than 100 but less than 200, only statements 3 and 4 should be executed.
If p is greater than 200 but less than 300, only statements 5 and 6 should be executed.
If none of the above conditions apply to x, then only statements 7 and 8 should be executed.
According to the rationale above, only two statements should be executed for any value of p.

Now we want to monitor the execution flow in our software so that, depending on the value of x, code flow can be changed to one of four different directions.The if…elif…else declaration makes this easy.

2)Syntax of if..elif..else

if condition1:
    Statement_1
    Statement_2
elif condition2:
    Statement_3
    Statement_4
elif condition3:
    Statement_5
    Statement_6
else:
    Statement_7
    Statement_8

We can have any number of elif blocks after the if-block. However, we can only have one more block in the end. Just one of these code blocks will be executed. When the interpreter comes across an if…elif…else block, it,

  • If the condition in the if-statement evaluates to True, the code in the if block is executed, and the remaining elif and else blocks are skipped.
  • If the condition in the if-statement evaluates to False, the code in the if-block is skipped, and the condition in the first elif statement is evaluated, and if that evaluates to True, the code in the elif block is executed, and the remaining elif and else blocks are skipped.
  • If the elif condition evaluates to False, the programme skips the elif block and moves on to the next. If the next block is also an elif, the process repeats until it either finds an else block or an elif block where the condition evaluates to True.
  • If none of the if-requirements statement’s were met, and all elif statements returned False. Since there is no condition associated with the else block, the interpreter hops to the else-block and executes all of the statements in the else-block.

So, if any of the conditions in the if-statement and all of the elif-statements evaluate to False, the code in the else-block is executed.

3)Examples of if..elif..else

Example -1:

p = 56
if p < 100:
    print('If block executed')
    print('p is smaller than 100')
elif 100 <= p < 200:
    print('first elif block is executed')
    print('p is between 100 and 200')
elif 200 <= p < 300:
    print('second elif block is executed')
    print('p is between 200 and 300')
else:
    print('Else block is executed')
    print('p is greater than 300')

Output:

If block executed
p is smaller than 100

Explanation:

Since the value of p is 56, the if-statement condition evaluates to True. As a result, it only ran the code in the if-block, skipping all of the elif and else blocks.

Example-2:

p = 156
if p < 100:
    print('If block executed')
    print('p is smaller than 100')
elif 100 <= p < 200:
    print('first elif block is executed')
    print('p is between 100 and 200')
elif 200 <= p < 300:
    print('second elif block is executed')
    print('p is between 200 and 300')
else:
    print('Else block is executed')
    print('p is greater than 300')

Output:

first elif block is executed
p is between 100 and 200

Explanation:

Since x is 156, the if-statement condition evaluates to False, but the first elif-statement condition evaluates to True. As a result, the if-block was skipped and only the code in the first elif block was executed. The rest of the elif and else blocks are skipped.

Example-3:

p = 256
if p < 100:
    print('If block executed')
    print('p is smaller than 100')
elif 100 <= p < 200:
    print('first elif block is executed')
    print('p is between 100 and 200')
elif 200 <= p < 300:
    print('second elif block is executed')
    print('p is between 200 and 300')
else:
    print('Else block is executed')
    print('p is greater than 300')

Output:

second elif block is executed
p is between 200 and 300

Explanation:

Since x is 256, the if-block and first elif-block were skipped. In comparison, the code was only executed in the second elif-block. The rest of the elif and else blocks are skipped.

Example-4:

p = 469
if p < 100:
    print('If block executed')
    print('p is smaller than 100')
elif 100 <= p < 200:
    print('first elif block is executed')
    print('p is between 100 and 200')
elif 200 <= p < 300:
    print('second elif block is executed')
    print('p is between 200 and 300')
else:
    print('Else block is executed')
    print('p is greater than 300')

Output:

Else block is executed
p is greater than 300

Related Programs:

Python – If..Elif…Else Statement Read More »

If…Else Statement

Python – If…Else Statement

In real life, there are times when we must make choices and decide what to do next based on those decisions. Similar scenarios occur in programming where we must make decisions and then execute the next block of code based on those decisions.

In programming languages, decision making statements determine the flow of program execution.

If..Else Statement in Python

1)If statement

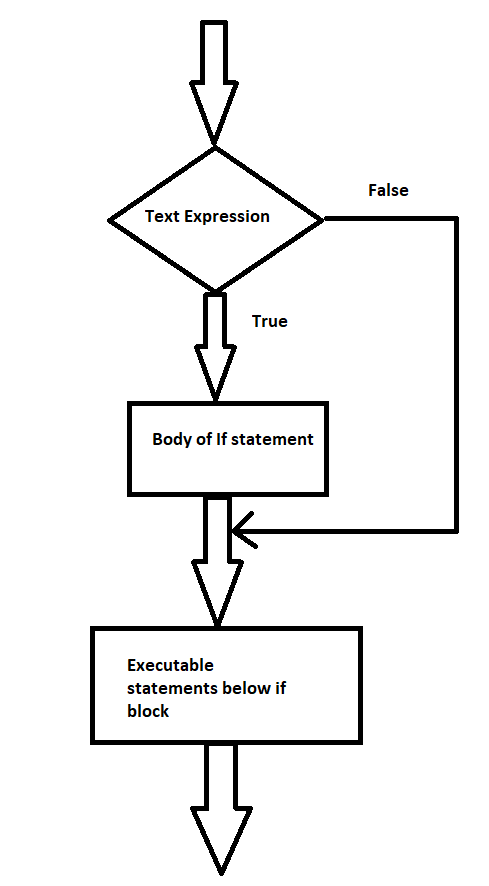
The if statement is the simplest decision-making statement. It is used to determine whether or not a specific statement or block of statements will be executed, i.e. if a certain condition is valid, then a block of statements is executed, otherwise not.

Syntax:

if condition:
    # statements which should be executed

In this case, the condition will be either true or false after evaluation. The if statement accepts boolean values – if the value is valid, the block of statements below it will be executed; otherwise, it will not. We may also use condition with bracket ‘(‘ ‘)’.

Python, as we know, uses indentation to define a block. As a result, the block inside an if statement will be found, as seen in the example below.

if condition:
   statement1
statement2

#If the condition is valid, the if block will only consider
# statement1 to be within its block.

Example:

age = 18
if (age > 15):
    print("age is greater than 15")
print("Statement after if block")

Output:

age is greater than 15
Statement after if block

2)If-else statement

When the interpreter encounters an if argument, it evaluates the condition in the if-statement, and if that condition evaluates to True, it executes the suite in the if-block, i.e., the statements in the if-block and skips the statements in the else portion.

If the condition in the if-statement evaluates to False, the suite in the else block is executed directly, i.e., the statements in the else block are executed instead of the statements in the if block.

Syntax:

if condition:
    statement_1
    statement_2
    statement_3
else:
    statement_4
    statement_5
    statement_6

3)Examples of If else statement

age = 13
if (age > 15):
    print("age is greater than 15")
else:
    print("age is less than 15")

Output:

age is less than 15

Explanation:

Here age is less than 15 so if condition is false and else statement is executed

4)If statement with multiple conditions

In all of the preceding instances, we provide a single condition with the if-statement, but we can also provide multiple conditions.

age = 13
# checking if the age is between 10 to 20
if (age > 10 and age < 20):
    print("ageis between 10 to 20")
else:
    print("age is less than 15")

Output:

age is between 10 to 20

Explanation:

The if-statement in this case checks several conditions, and if all of them satisfy and evaluate to True, the interpreter executes the code in the if-block.
Related Programs:

Python – If…Else Statement Read More »

If-Statement

Python: If-Statement

In real life, there are times when we must make choices and decide what to do next based on those decisions. Similar scenarios occur in programming where we must make decisions and then execute the next block of code based on those decisions.

If Statement in Python

1)If statement

The if statement is the simplest decision-making statement. It is used to determine whether or not a specific statement or block of statements will be executed, i.e. if a certain condition is valid, then a block of statements is executed, otherwise not.

Syntax:

if condition:
    statement 1
    statement 2
    statement 3

We don’t have the definition of brackets in Python to indicate the beginning and end of a block. Instead, it represents a block of indentation. After the “if statement,” for example, there are two other sentences with one degree of indent. It denotes the “if” statement’s block field. In Python, this set of statements in a block is known as a suite.

The keyword “if” is often followed by a conditional expression that should evaluate to a bool value, i.e., True or False. If the condition is True, the interpreter executes the statements in the “if” suite, which are the code statements in the if-block.

Python, as we know, uses indentation to define a block. As a result, the block inside an if statement will be found, as seen in the example below.

if condition:
   statement1
statement2

#If the condition is valid, the if block will only consider
# statement1 to be within its block.

2)Examples of if statement

Example -1:

IF statement is true

Below is the implementation:

height = 70
# checking if the height is greater than 100 or not
if (height < 100):
    print("height is less than 100")
else:
    print("height is greater than 100")

Output:

height is less than 100

Example -2:

IF statement is false

Below is the implementation:

height = 120
# checking if the height is greater than 100 or not
if (height < 100):
    print("height is less than 100")
else:
    print("height is greater than 100")

Output:

height is greater than 100

3)If statement with multiple conditions

In all of the preceding instances, we provide a single condition with the if-statement, but we can also provide multiple conditions.

Example -1:

If statement is true

Below is the implementation:

height = 50
# checking if the height is between 10 to 100
if (height > 10 and height < 100):
    print("height is between 10 to 100")
else:
    print("height is greater than 100 or less than 10")

Output:

height is between 10 to 100

Explanation:

The if-statement in this case checks several conditions, and if all of them satisfy and evaluate to True, the interpreter executes the code in the if-block.

Example -2:

IF statement is false

Below is the implementation:

height = 120
# checking if the height is between 10 to 100
if (height > 10 and height < 100):
    print("height is between 10 to 100")
else:
    print("height is greater than 100 or less than 10")

Output:

height is greater than 100 or less than 10

Related Programs:

Python: If-Statement Read More »

Python: Count Number of True Elements in Numpy Array in Python

Method to find count number of true element in numpy array in python

In this article, we will study what are true elements in python and different methods to calculate the count of true elements in both 1-D and 2-D Numpy array. First, let see what are true elements in python.

True Elements

True elements in numpy array are equivalent to 1 and False element is equivalent to 0. So we can say that it is basically a boolean numpy array.

Now let us see different methods to count a number of True elements in a 1-D numpy array.

  • Method 1-Using count_nonzero() method

This is one of the methods to count a number of true elements in a numpy array. count_nonzero() method require 1 argument i.e. the name of numpy array and then it return the count of true element in numpy array. It also accepts axis as one of the arguments but we do not need it in this case.

Syntax: count_nonzero(arr, axis=None)

Let see this with the help of an example.

import numpy as np

arr1 = np.array([False, True, True, False,True])
arr2 = np.array([0,1,1,0,1])
count1 = np.count_nonzero(arr1)
count2 = np.count_nonzero(arr2)
print('Print count of True elements in array1: ', count1)
print('Print count of True elements in array2: ', count2)

Output

Print count of True elements in array1:  3
Print count of True elements in array2:  3

There are two things to notice in this example first is that in arr1 count of True is 3 hence we get output as 3 and the second thing to notice is that if we write 1 and 0 instead of True and False respectively then we will get the same output. Hence it is also verified that True is equivalent to 1 and False is equivalent to 0 in a numpy array.

  • Method 2-Using sum() function

sum() is another method to count a number of true elements in a numpy array. Here sum() method works in the same way that we see in basic python. It returns the sum of all the elements in a Numpy array. As True is equivalent to 1 and False is equivalent to 0 so the sum we get is equal to count of True elements.

syntax: sum(arr)

Let see this with the help of an example.

import numpy as np

arr1 = np.array([False, True, True, False,True])
count1 = sum(arr1)
print('Print count of True elements in array1: ', count1)

Output

Print count of True elements in array1:  3
  • Method 3 Using bincount() method

bincount() return list of occurrence of each value in numpy array. Let see this with an example.

import numpy as np

arr1 = np.array([False, True, True, False,True])
l = np.bincount(arr1)
print(l)

Output

[2 3]

Here we see that at index 0 it return the count of the number of false values and at index 1 it return a count of true values. So now using list indexing we can return the count of elements at the 1st index which is the count of True values in the Numpy array.

So these are the methods to count a number of True values in a 1-D Numpy array.

Now we see that how to calculate the count of numpy array in the 2-D array. The best part is that the above methods that we study are used to calculate the count of True elements in a 2-D numpy array but the difference is that we can give an extra parameter as the axis to calculate the count of True elements row-wise or column-wise.

  • Method 1-Using count_nonzero() method

The working of the method is the same that we study in the case of a 1-D numpy array. But here we have a choice that we can give the axis as a parameter or not. If we do not give axis as a parameter then this method will return the total count of True elements in a numpy array but if we give an axis it returns a list of the count of True element row-wise or column-wise. There are two axis

axis=1 means return count row-wise

axis=0 means return count column-wise

Let see this with the help of an example.

import numpy as np

arr_2d = np.array([ [False, True, True,False],
                    [True, False, True,False],
                    [False, True, True,False]])
count1 = np.count_nonzero(arr_2d)
count2 = np.count_nonzero(arr_2d,axis=1)
count3 = np.count_nonzero(arr_2d,axis=0)
print("Total count of True values",count1)
print("Count of True values row-wise",count2)
print("Count of True values column-wise",count3)

Output


Total count of True values 6
Count of True values row-wise [2 2 2]
Count of True values column-wise [1 2 3 0]
  • Method 2-Using sum() method

The working of the method is the same that we study in the case of a 1-D numpy array. But here we have a choice that we can give the axis as a parameter or not. If we do not give axis as a parameter then this method will return the total count of True elements in a numpy array but if we give an axis it returns a list of the count of True element row-wise or column-wise. There are two axis

axis=1 means return count row-wise

axis=0 means return count column-wise

Here we have to take care of one this that we can’t simply write sum() here we have to write np.sum() because we use axis as one of argument.

Let see this with the help of an example.

import numpy as np

arr_2d = np.array([ [False, True, True,False],
                    [True, False, True,False],
                    [False, True, True,False]])
count1 = np.sum(arr_2d)
count2 = np.sum(arr_2d,axis=1)
count3 = np.sum(arr_2d,axis=0)
print("Total count of True values",count1)
print("Count of True values row-wise",count2)
print("Count of True values column-wise",count3)

Output

Total count of True values 6
Count of True values row-wise [2 2 2]
Count of True values column-wise [1 2 3 0]

So these are the methods to count the number of True values in both 1-D and 2-D numpy array.

Python: Count Number of True Elements in Numpy Array in Python Read More »

Pandas- Select first or last N rows in a Dataframe using head() & tail()

Pandas: Select first or last N rows in a Dataframe using head() & tail()

In this tutorial, we are going to discuss how to select the first or last N rows in a Dataframe using head() & tail() functions. This guide describes the following contents.

Select first N Rows from a Dataframe using head() function

pandas.DataFrame.head()

In Python’s Pandas module, the Dataframe class gives the head() function to fetch top rows from it.

Syntax:

DataFrame.head(self, n=5)

If we give some value to n it will return n number of rows otherwise default is 5.

Let’s create a dataframe first,

import pandas as pd
# List of Tuples
empoyees = [('Ram', 34, 'Sunderpur', 5) ,
           ('Riti', 31, 'Delhi' , 7) ,
           ('Aman', 16, 'Thane', 9) ,
           ('Shishir', 41,'Delhi' , 12) ,
           ('Veeru', 33, 'Delhi' , 4) ,
           ('Shan',35,'Mumbai', 5 ),
           ('Shikha', 35, 'kolkata', 11)
            ]
# Create a DataFrame object
empDfObj = pd.DataFrame(empoyees, columns=['Name', 'Age', 'City', 'Experience'], index=['a', 'b', 'c', 'd', 'e', 'f', 'g'])
print("Contents of the Dataframe : ")
print(empDfObj)

Output:

Contents of the Dataframe :
     Name  Age  City           Experience
a   Ram     34   Sunderpur 5
b   Riti       31  Delhi          7
c   Aman   16  Thane         9
d  Shishir   41 Delhi          12
e  Veeru     33 Delhi          4
f   Shan      35 Mumbai     5
g  Shikha   35 kolkata      11

So if we want to select the top 4 rows from the dataframe,

import pandas as pd
# List of Tuples
empoyees = [('Ram', 34, 'Sunderpur', 5) ,
           ('Riti', 31, 'Delhi' , 7) ,
           ('Aman', 16, 'Thane', 9) ,
           ('Shishir', 41,'Delhi' , 12) ,
           ('Veeru', 33, 'Delhi' , 4) ,
           ('Shan',35,'Mumbai', 5 ),
           ('Shikha', 35, 'kolkata', 11)
            ]
# Create a DataFrame object
empDfObj = pd.DataFrame(empoyees, columns=['Name', 'Age', 'City', 'Experience'], index=['a', 'b', 'c', 'd', 'e', 'f', 'g'])

dfObj1 = empDfObj.head(4)
print("First 4 rows of the Dataframe : ")
print(dfObj1)

Output:

First 4 rows of the Dataframe :
  Name    Age   City         Experience
a Ram      34     Sunderpur 5
b Riti        31    Delhi          7
c Aman    16    Thane        9
d Shishir   41   Delhi         12

So in the above example, you can see that we have given n value 4 so it returned the top 4 rows from the dataframe.

Do Check:

Select first N rows from the dataframe with specific columns

In this, while selecting the first 3 rows, we can select specific columns too,

import pandas as pd
# List of Tuples
empoyees = [('Ram', 34, 'Sunderpur', 5) ,
           ('Riti', 31, 'Delhi' , 7) ,
           ('Aman', 16, 'Thane', 9) ,
           ('Shishir', 41,'Delhi' , 12) ,
           ('Veeru', 33, 'Delhi' , 4) ,
           ('Shan',35,'Mumbai', 5 ),
           ('Shikha', 35, 'kolkata', 11)
            ]
# Create a DataFrame object
empDfObj = pd.DataFrame(empoyees, columns=['Name', 'Age', 'City', 'Experience'], index=['a', 'b', 'c', 'd', 'e', 'f', 'g'])

# Select the top 3 rows of the Dataframe for 2 columns only
dfObj1 = empDfObj[['Name', 'City']].head(3)
print("First 3 rows of the Dataframe for 2 columns : ")
print(dfObj1)

Output:

First 3 rows of the Dataframe for 2 columns :
   Name  City
a Ram    Sunderpur
b Riti      Delhi
c Aman  Thane

Select last N Rows from a Dataframe using tail() function

In the Pandas module, the Dataframe class provides a tail() function to select bottom rows from a Dataframe.

Syntax:

DataFrame.tail(self, n=5)

It will return the last n rows from a dataframe. If n is not provided then the default value is 5. So for this, we are going to use the above dataframe as an example,

import pandas as pd
# List of Tuples
empoyees = [('Ram', 34, 'Sunderpur', 5) ,
           ('Riti', 31, 'Delhi' , 7) ,
           ('Aman', 16, 'Thane', 9) ,
           ('Shishir', 41,'Delhi' , 12) ,
           ('Veeru', 33, 'Delhi' , 4) ,
           ('Shan',35,'Mumbai', 5 ),
           ('Shikha', 35, 'kolkata', 11)
            ]
# Create a DataFrame object
empDfObj = pd.DataFrame(empoyees, columns=['Name', 'Age', 'City', 'Experience'], index=['a', 'b', 'c', 'd', 'e', 'f', 'g'])

# Select the last 4 rows of the Dataframe
dfObj1 = empDfObj.tail(4)
print("Last 4 rows of the Dataframe : ")
print(dfObj1)

Output:

Last 5 rows of the Dataframe :
  Name     Age City    Experience
d Shishir   41   Delhi      12
e Veeru    33   Delhi       4
f Shan      35   Mumbai  5
g Shikha  35   kolkata    11

So in above example, you can see that we are given n value 4 so tail() function return last 4 data value.

Select bottom N rows from the dataframe with specific columns

In this, while selecting the last 4 rows, we can select specific columns too,

import pandas as pd
# List of Tuples
empoyees = [('Ram', 34, 'Sunderpur', 5) ,
           ('Riti', 31, 'Delhi' , 7) ,
           ('Aman', 16, 'Thane', 9) ,
           ('Shishir', 41,'Delhi' , 12) ,
           ('Veeru', 33, 'Delhi' , 4) ,
           ('Shan',35,'Mumbai', 5 ),
           ('Shikha', 35, 'kolkata', 11)
            ]
# Create a DataFrame object
empDfObj = pd.DataFrame(empoyees, columns=['Name', 'Age', 'City', 'Experience'], index=['a', 'b', 'c', 'd', 'e', 'f', 'g'])

# Select the bottom 4 rows of the Dataframe for 2 columns only
dfObj1 = empDfObj[['Name', 'City']].tail(4)
print("Last 4 rows of the Dataframe for 2 columns : ")
print(dfObj1)

Output:

Last 4 rows of the Dataframe for 2 columns :
     Name   City
d  Shishir  Delhi
e  Veeru    Delhi
f   Shan     Mumbai
g  Shikha   kolkata

Conclusion:

In this article, you have seen how to select first or last N  rows in a Dataframe using head() & tail() functions. Thank you!

Want to expert in the python programming language? Exploring Python Data Analysis using Pandas tutorial changes your knowledge from basic to advance level in python concepts.

Read more Articles on Python Data Analysis Using Padas – Select items from a Dataframe

Pandas: Select first or last N rows in a Dataframe using head() & tail() Read More »