Python

Program to Compute the Area and Perimeter of Pentagon

Python Program to Compute the Area and Perimeter of Pentagon

In the previous article, we have discussed Python Program to Compute the Area and Perimeter of Octagon
Pentagon:

A pentagon (from the Greek v Pente and gonia, which mean five and angle) is any five-sided polygon or 5-gon. A simple pentagon’s internal angles add up to 540°.

A pentagon can be simple or complex, and it can be self-intersecting. A pentagram is a self-intersecting regular pentagon (or a star pentagon).

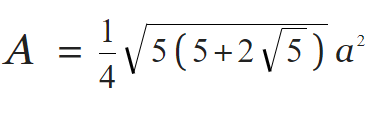
Formula to calculate the area of a pentagon:

 In which, a= The Pentagon’s side length

Formula to calculate the perimeter of a pentagon:

perimeter = 5a
Given the Pentagon’s side length and the task is to calculate the area and perimeter of the given Pentagon.
Examples:

Example1:

Input:

Given The Pentagon's side length = 10

Output:

The Pentagon's area with given side length { 10 } = 172.0477400588967
The Pentagon's Perimeter with given side length { 10 } = 50

Example2:

Input:

Given The Pentagon's side length = 5.5

Output:

The Pentagon's area with given side length { 5.5 } = 52.04444136781625
The Pentagon's Perimeter with given side length { 5.5 } = 27.5

Program to Compute the Area and Perimeter of Pentagon in Python

Below are the ways to Calculate the area and perimeter of a pentagon with the given Pentagon’s side length:

Method #1: Using Mathematical Formula (Static Input)

Approach:

  • Import the math module using the import keyword.
  • Give the Pentagon’s side length as static input and store it in a variable.
  • Calculate the area of the given pentagon using the above given mathematical formula and math.sqrt() function.
  • Store it in another variable.
  • Calculate the perimeter of the given pentagon using the above given mathematical formula.
  • Store it in another variable.
  • Print the Pentagon’s area with the given side length.
  • Print the Pentagon’s perimeter with the given side length.
  • The Exit of the program.

Below is the implementation:

# Import the math module using the import keyword.
import math
# Give the Pentagon's side length as static input and store it in a variable.
side_len = 10
# Calculate the area of the given pentagon using the above given mathematical formula and
# math.sqrt() function.
# Store it in another variable.
pentgn_area = (math.sqrt(5*(5+2*math.sqrt(5)))*pow(side_len, 2))/4.0
# Calculate the perimeter of the given pentagon using the above given mathematical formula.
# Store it in another variable.
pentgn_perimtr = (5*side_len)
# Print the Pentagon's area with the given side length.
print(
    "The Pentagon's area with given side length {", side_len, "} =", pentgn_area)
# Print the Pentagon's perimeter with the given side length.
print(
    "The Pentagon's Perimeter with given side length {", side_len, "} =", pentgn_perimtr)

Output:

The Pentagon's area with given side length { 10 } = 172.0477400588967
The Pentagon's Perimeter with given side length { 10 } = 50

Method #2: Using Mathematical Formula (User Input)

Approach:

  • Import the math module using the import keyword.
  • Give the Pentagon’s side length as user input using float(input()) function and store it in a variable.
  • Calculate the area of the given pentagon using the above given mathematical formula and math.sqrt() function.
  • Store it in another variable.
  • Calculate the perimeter of the given pentagon using the above given mathematical formula.
  • Store it in another variable.
  • Print the Pentagon’s area with the given side length.
  • Print the Pentagon’s perimeter with the given side length.
  • The Exit of the program.

Below is the implementation:

# Import the math module using the import keyword.
import math
# Give the Pentagon's side length as user input using float(input()) function and
# store it in a variable.
side_len = float(input('Enter some random number = '))
# Calculate the area of the given pentagon using the above given mathematical formula and
# math.sqrt() function.
# Store it in another variable.
pentgn_area = (math.sqrt(5*(5+2*math.sqrt(5)))*pow(side_len, 2))/4.0
# Calculate the perimeter of the given pentagon using the above given mathematical formula.
# Store it in another variable.
pentgn_perimtr = (5*side_len)
# Print the Pentagon's area with the given side length.
print(
    "The Pentagon's area with given side length {", side_len, "} =", pentgn_area)
# Print the Pentagon's perimeter with the given side length.
print(
    "The Pentagon's Perimeter with given side length {", side_len, "} =", pentgn_perimtr)

Output:

Enter some random number = 5.5
The Pentagon's area with given side length { 5.5 } = 52.04444136781625
The Pentagon's Perimeter with given side length { 5.5 } = 27.5

Explore more instances related to python concepts from Python Programming Examples Guide and get promoted from beginner to professional programmer level in Python Programming Language.

Python Program to Compute the Area and Perimeter of Pentagon Read More »

Program to Compute the Area and Perimeter of Heptagon

Python Program to Compute the Area and Perimeter of Heptagon

In the previous article, we have discussed Python Program to Check if All Characters have Even Frequency
Math Module :

Python’s math module is a built-in module. By importing this module, we can perform mathematical computations.

Numerous mathematical operations like ceil( ),floor( ),factorial( ),mod( ),value of pi ,…..etc .can be computed with the help of math module.

Heptagon:

A heptagon is a seven-sided polygon or 7-gon in geometry. The heptagon is also known as the septagon, which is formed by combining “sept-” (an elision of septua-, a Latin-derived numerical prefix, rather than hepta-, a Greek-derived numerical prefix; both are cognate) and the Greek suffix “-agon” meaning angle.

Formula to calculate the area of a Heptagon:


In which  a is the Heptagon’s side length

Formula to calculate the perimeter of a Heptagon:

Perimeter = 7a

Given the Heptagon’s side length and the task is to calculate the area and perimeter of the given Heptagon.

Examples:

Example1:

Input:

Given The Heptagon's side length = 8

Output:

The Heptagon's Area with given side length { 8 } = 232.576
The Heptagon's Perimeter with the given side length { 8 } = 56

Example2:

Input:

Given The Heptagon's side length = 15

Output:

The Heptagon's Area with given side length { 15 } = 817.65
The Heptagon's Perimeter with the given side length { 15 } = 105

Program to Compute the Area and Perimeter of Heptagon

Below are the ways to Calculate the area and perimeter of a heptagon with the given heptagon’s side length:

Method #1: Using Mathematical Formula (Static Input)

Approach:

  • Import the math module using the import keyword.
  • Give the heptagon’s side length as static input and store it in a variable.
  • Calculate the area of the given heptagon using the above given mathematical formula and pow() function.
  • Store it in another variable.
  • Calculate the perimeter of the given heptagon using the above given mathematical formula.
  • Store it in another variable.
  • Print the heptagon’s area with the given side length.
  • Print the heptagon’s perimeter with the given side length.
  • The Exit of the program.

Below is the implementation:

# Import the math module using the import keyword.
import math
# Give the heptagon's side length as static input and store it in a variable.
side_len = 8
# Calculate the area of the given heptagon using the above given mathematical formula
# and pow() function.
# Store it in another variable.
heptagn_area = 3.634*pow(side_len, 2)
# Calculate the perimeter of the given heptagon using the above given mathematical formula.
# Store it in another variable.
heptagn_perimetr = (7*side_len)
# Print the heptagon's area with the given side length.
print(
    "The Heptagon's Area with given side length {", side_len, "} =", heptagn_area)
# Print the heptagon's perimeter with the given side length.
print(
    "The Heptagon's Perimeter with the given side length {", side_len, "} =", heptagn_perimetr)

Output:

The Heptagon's Area with given side length { 8 } = 232.576
The Heptagon's Perimeter with the given side length { 8 } = 56

Method #2: Using Mathematical Formula (User Input)

Approach:

  • Import the math module using the import keyword.
  • Give the Heptagon’s side length as user input using float(input()) function and store it in a variable.
  • Calculate the area of the given heptagon using the above given mathematical formula and pow() function.
  • Store it in another variable.
  • Calculate the perimeter of the given heptagon using the above given mathematical formula.
  • Store it in another variable.
  • Print the heptagon’s area with the given side length.
  • Print the heptagon’s perimeter with the given side length.
  • The Exit of the program.

Below is the implementation:

# Import the math module using the import keyword.
import math
# Give the Heptagon's side length as user input using float(input()) function and
# store it in a variable.
side_len = float(input("Enter some random variable = "))
# Calculate the area of the given heptagon using the above given mathematical formula
# and pow() function.
# Store it in another variable.
heptagn_area = 3.634*pow(side_len, 2)
# Calculate the perimeter of the given heptagon using the above given mathematical formula.
# Store it in another variable.
heptagn_perimetr = (7*side_len)
# Print the heptagon's area with the given side length.
print(
    "The Heptagon's Area with given side length {", side_len, "} =", heptagn_area)
# Print the heptagon's perimeter with the given side length.
print(
    "The Heptagon's Perimeter with the given side length {", side_len, "} =", heptagn_perimetr)

Output:

Enter some random variable = 15
The Heptagon's Area with given side length { 15.0 } = 817.65
The Heptagon's Perimeter with the given side length { 15.0 } = 105.0

Explore more instances related to python concepts from Python Programming Examples Guide and get promoted from beginner to professional programmer level in Python Programming Language.

Python Program to Compute the Area and Perimeter of Heptagon Read More »

Program to Compute the Area and Perimeter of Octagon

Python Program to Compute the Area and Perimeter of Octagon

In the previous article, we have discussed Python Program to Compute the Area and Perimeter of Heptagon
Math Module :

Python’s math module is a built-in module. By importing this module, we can perform mathematical computations.

Numerous mathematical operations like ceil( ),floor( ),factorial( ),mod( ),value of pi ,…..etc .can be computed with the help of math module.

Octagon:

An octagon is a polygon with eight sides. It has eight different angles.

Octagon = octa + gon, where octa is the number eight and gon is the number of sides.

In an octagon, there are 20 diagonals.

Formula to calculate the area of an Octagon:

A = 2(1+⎷2)a²
In which  a is the Octagon’s side length
Formula to calculate the perimeter of a Octagon:
perimeter = 8a
Given the Octagon’s side length and the task is to calculate the area and perimeter of the given Octagon.
Examples:

Example1:

Input:

Given The Octagon's side length = 6

Output:

The Octagon's Area with given side length { 6 } = 173.82337649086284
The Octagon's Perimeter with the given side length { 6 } = 48

Example2:

Input:

Given The Octagon's side length = 12.5

Output:

The Octagon's Area with given side length { 12.5 } = 754.4417382415921
The Octagon's Perimeter with the given side length { 12.5 } = 100.0

Program to Compute the Area and Perimeter of Octagon

Below are the ways to Calculate the area and perimeter of a heptagon with the given Octagon’s side length:

Method #1: Using Mathematical Formula (Static Input)

Approach:

  • Import the math module using the import keyword.
  • Give the Octagon’s side length as static input and store it in a variable.
  • Calculate the area of the given Octagon using the above given mathematical formula and sqrt(), math.pow() functions.
  • Store it in another variable.
  • Calculate the perimeter of the given Octagon using the above given mathematical formula.
  • Store it in another variable.
  • Print the Octagon’s area with the given side length.
  • Print the Octagon’s perimeter with the given side length.
  • The Exit of the program.

Below is the implementation:

# Import the math module using the import keyword.
import math
# Give the Octagon's side length as static input and store it in a variable.
side_len = 6
# Calculate the area of the given Octagon using the above given mathematical formula
# and sqrt(), math.pow() functions.
# Store it in another variable.
octgn_area = (2*(1+math.sqrt(2))*math.pow(side_len, 2))
# Calculate the perimeter of the given Octagon using the above given mathematical formula.
# Store it in another variable.
octgn_perimetr = (8*side_len)
# Print the Octagon's area with the given side length.
print(
    "The Octagon's Area with given side length {", side_len, "} =", octgn_area)
# Print the Octagon's perimeter with the given side length.
print(
    "The Octagon's Perimeter with the given side length {", side_len, "} =", octgn_perimetr)

Output:

The Octagon's Area with given side length { 6 } = 173.82337649086284
The Octagon's Perimeter with the given side length { 6 } = 48

Method #2: Using Mathematical Formula (User Input)

Approach:

  • Import the math module using the import keyword.
  • Give the Octagon’s side length as user input using float(input()) function and store it in a variable.
  • Calculate the area of the given Octagon using the above given mathematical formula and sqrt(), math.pow() functions.
  • Store it in another variable.
  • Calculate the perimeter of the given Octagon using the above given mathematical formula.
  • Store it in another variable.
  • Print the Octagon’s area with the given side length.
  • Print the Octagon’s perimeter with the given side length.
  • The Exit of the program.

Below is the implementation:

# Import the math module using the import keyword.
import math
# Give the Octagon's side length as user input using float(input()) function and
# store it in a variable.
side_len = float(input("Enter some random number = "))
# Calculate the area of the given Octagon using the above given mathematical formula
# and sqrt(), math.pow() functions.
# Store it in another variable.
octgn_area = (2*(1+math.sqrt(2))*math.pow(side_len, 2))
# Calculate the perimeter of the given Octagon using the above given mathematical formula.
# Store it in another variable.
octgn_perimetr = (8*side_len)
# Print the Octagon's area with the given side length.
print(
    "The Octagon's Area with given side length {", side_len, "} =", octgn_area)
# Print the Octagon's perimeter with the given side length.
print(
    "The Octagon's Perimeter with the given side length {", side_len, "} =", octgn_perimetr)

Output:

Enter some random number = 12.5
The Octagon's Area with given side length { 12.5 } = 754.4417382415921
The Octagon's Perimeter with the given side length { 12.5 } = 100.0

Explore more instances related to python concepts from Python Programming Examples Guide and get promoted from beginner to professional programmer level in Python Programming Language.

Python Program to Compute the Area and Perimeter of Octagon Read More »

Append Add Row to Dataframe in Pandas

Append/Add Row to Dataframe in Pandas – dataframe.append() | How to Insert Rows to Pandas Dataframe?

Worried about how to append or add rows to a dataframe in Pandas? Then, this tutorial will guide you completely on how to append rows to a dataframe in Pandas Python using the function dataframe.append() We have listed the various methods for appending rows to a dataframe. In this tutorial, we will discuss how to append or add rows to the dataframe in Pandas. Before going to the main concept let us discuss some basic concepts about pandas and Dataframes.

Pandas – Definition

Pandas is a package in python that is used to analyze data in a very easy way. The reason why pandas are so famous is that it is very easy to use. But we can not directly use the pandas’ package in our program. To use this package first we have to import it.

Dataframe – Definition

Dataframe is a 2D data structure that store or represent the data in the 2D form or simply say in tabular form. The tabular form consists of rows, columns, and actual data. By using pandas we can manipulate the data as we want i.e we can see as many columns as we want or as many rows as we want. We can group the data or filter the data.

Let us understand both dataframe and pandas with an easy example

import pandas as pd
d={"Name":["Mayank","Raj","Rahul","Samar"],
   "Marks":[90,88,97,78]
  }
df=pd.DataFrame(d)
print(df)

Output

    Name  Marks
0  Mayank     90
1     Raj     88
2   Rahul     97
3   Samar     78

Here we see that first, we import our pandas package then we create a dictionary, and out of this dictionary, we create our dataframe. When we see our dataframe we see that it consists of rows and columns and data. There are many ways to create a dataframe like importing excel or CSV files or through a dictionary but this is not the main concern of this article.

Before understanding the concept of appending rows to a dataframe first we have to know a little bit about the append() method.

append() method

append() method is used to append rows of other dataframe at the end of the original or given dataframe. It returns a new dataframe object. If some columns are not presented in the original dataframe but presented in a new dataframe then-new column will also be added in the dataframe and data of that column will become NAN.
Syntax: DataFrame.append(other, ignore_index=False, verify_integrity=False, sort=None)

Ways on Pandas append row to Dataframe

Method 1- How to Add dictionary as a row to dataframe

In this method, we see how we can append dictionaries as rows in pandas dataframe. It is a pretty simple way. We have to pass a dictionary in the append() method and our work is done. That dictionary is passed as an argument to other the parameter in the append method. Let us see this with an example.

Add dictionary as a row to dataframe in Pandas

d={"Name":["Mayank","Raj","Rahul","Samar"],
   "Marks":[90,88,97,78]
  }
df=pd.DataFrame(d)
print(df)
print("---------------")
new_d={"Name":"Gaurav",
      "Marks":76}
new_df=df.append(new_d,ignore_index=True)
print(new_df)

Output:

     Name  Marks
0  Mayank     90
1     Raj     88
2   Rahul     97
3   Samar     78
---------------
     Name  Marks
0  Mayank     90
1     Raj     88
2   Rahul     97
3   Samar     78
4  Gaurav     76
Explanation:
In this example, we see how we can append a dictionary in our original dataframe. By this method, our original dataframe will not affect that why we store the new Dataframe in a new variable so that we can analyze the changes.
Instead of assigning it to a new variable, we can assign it to the original dataframe in this case our original dataframe gets modify. It means that the append() method is not inplace.
Note: Passing ignore_index=True is necessary while passing dictionary or series otherwise a TypeError error will come.

Method 2 – Add Series as a row in the dataframe

This is another method to append rows in the dataframe. Let us see why this method is needed.

Add Series as a row in the dataframe in Pandas

d={"Name":["Mayank","Raj","Rahul","Samar"],
   "Marks":[90,88,97,78]
  }
df=pd.DataFrame(d)
print(df)
print("---------------")
new_d={"Name":["Gaurav","Vijay"],
      "Marks":[76,88]}
new_df=df.append(new_d,ignore_index=True)
print(new_df)

Output:

    Name  Marks
0  Mayank     90
1     Raj     88
2   Rahul     97
3   Samar     78
---------------
              Name     Marks
0           Mayank        90
1              Raj        88
2            Rahul        97
3            Samar        78
4  [Gaurav, Vijay]  [76, 88]

If we want to add multiple rows at one time and we try it using a dictionary then we get output like this then we get the output as shown above.

To solve this issue we use series. Let us understand what series means.

Series

Series is a 1-D array that stores a single column or row of data in a dataframe.

syntax: pandas.Series( data, index, dtype, copy)

series=pd.Series(['Ajay','Vijay'])
print(series)
print(type(series))

Output

0     Ajay
1    Vijay
dtype: object
<class 'pandas.core.series.Series'>

That is how we can create a series in pandas. Now we see how we can append series in pandas dataframe. It is similar like as we pass our dictionary. We can simply pass series as an argument in the append() function. Let see this with an example.

d={"Name":["Mayank","Raj","Rahul","Samar"],
   "Marks":[90,88,97,78]
  }
df=pd.DataFrame(d)
print(df)
print("---------------")
series=[pd.Series(['Gaurav',88], index=df.columns ) ,
        pd.Series(['Vijay', 99], index=df.columns )]
new_df=df.append(series,ignore_index=True)
print(new_df)

Output:

     Name  Marks
0  Mayank     90
1     Raj     88
2   Rahul     97
3   Samar     78
---------------
     Name  Marks
0  Mayank     90
1     Raj     88
2   Rahul     97
3   Samar     78
4  Gaurav     88
5   Vijay     99

We see that by this method we solve the problem to add multiple rows at a time that we face in the dictionary.

Method 3 – How to Add row from one dataframe to another dataframe

To understand this method first we have to understand about concepts of loc.

loc[ ]

It is used to access groups of rows and columns by values. Let us understand this concept with help of an example.

students = [ ('Mayank',98) ,
             ('Raj', 75) ,
             ('Rahul', 87) ,
             ('Samar', 78)]
df = pd.DataFrame(  students, 
                    columns = ['Name' , 'Marks'],
                    index=['a', 'b', 'c' , 'd']) 
print(df)
print("------------------")
# If we want only row 'c' and all columns
print(df.loc[['c'],:])
print("------------------")
# If we want only row 'c' and only column 'Name'
print(df.loc['c']['Name'])
print("------------------")
# If we want only row 'c' and 'd' and all columns
print(df.loc[['c','d'],:])
print("------------------")
# If we want only row 'c' and 'd' and only column 'Name'
print(df.loc[['c','d'],['Name']])
print("------------------")

Output:

     Name  Marks
a  Mayank     98
b     Raj     75
c   Rahul     87
d   Samar     78
------------------
    Name  Marks
c  Rahul     87
------------------
Rahul
------------------
    Name  Marks
c  Rahul     87
d  Samar     78
------------------
    Name
c  Rahul
d  Samar
------------------

This example is very helpful to understand how loc works in pandas.

Now it can be very easy to understand how we can add rows of one dataframe to another dataframe. Let us see this with an example.

students1 = [ ('Mayank',98) ,
             ('Raj', 75) ,
             ('Rahul', 87) ,
             ('Samar', 78)]
df1 = pd.DataFrame(  students, 
                    columns = ['Name' , 'Marks'],
                    index=['a', 'b', 'c' , 'd']) 
print(df1)
print("------------------")
students2 = [ ('Vijay',94) ,
             ('Sunil', 76),
             ('Sanjay', 80)
            ]
df2= pd.DataFrame(  students2, 
                    columns = ['Name' , 'Marks'],
                    index=['a', 'b','c']) 
print(df2)

print("------------------")
new_df=df1.append(df2.loc[['a','c'],:],ignore_index=True)
print(new_df)

Output:

     Name  Marks
a  Mayank     98
b     Raj     75
c   Rahul     87
d   Samar     78
------------------
     Name  Marks
a   Vijay     94
b   Sunil     76
c  Sanjay     80
------------------
     Name  Marks
0  Mayank     98
1     Raj     75
2   Rahul     87
3   Samar     78
4   Vijay     94
5  Sanjay     80

In this example, we see how we easily append rows ‘a’ and ‘c’ of df2 in df1.

Method 4 – How to Add a row in the dataframe at index position using iloc[]

iloc[]

iloc[] in pandas allows us to retrieve a particular value belonging to a row and column using the index values assigned to it. IT will raise Index errors if a requested indexer is out-of-bounds.

students1 = [ ('Mayank',98) ,
             ('Raj', 75) ,
             ('Rahul', 87) ,
             ('Samar', 78)]
df1 = pd.DataFrame(  students, 
                    columns = ['Name' , 'Marks'],
                    index=['a', 'b', 'c' , 'd']) 
print(df1.iloc[0])

Output

Name     Mayank
Marks        98
Name: a, dtype: object

This example shows how we can access any row using an index.

Note: We use the index in iloc and not the column name.

Now let us see how we can append row in dataframe using iloc

students1 = [ ('Mayank',98) ,
('Raj', 75) ,
('Rahul', 87) ,
('Samar', 78)]
df1 = pd.DataFrame( students, 
columns = ['Name' , 'Marks'],
index=['a', 'b', 'c' , 'd']) 
print("Original dataframe")
print(df1)
print("------------------")
df1.iloc[2] = ['Vijay', 80]
print("New dataframe")
print(df1)

Output:

Original dataframe
     Name  Marks
a  Mayank     98
b     Raj     75
c   Rahul     87
d   Samar     78
------------------
New dataframe
     Name  Marks
a  Mayank     98
b     Raj     75
c   Vijay     80
d   Samar     78

This example shows how we add a column in the dataframe at a specific index using iloc.

So these are the methods to add or append rows in the dataframe.

Want to expert in the python programming language? Exploring Python Data Analysis using Pandas tutorial changes your knowledge from basic to advance level in python concepts.

Read more Articles on Python Data Analysis Using Padas – Add Contents to a Dataframe

Append/Add Row to Dataframe in Pandas – dataframe.append() | How to Insert Rows to Pandas Dataframe? Read More »

Python Programs for Beginners

Python Programs for Beginners | Basic to Advanced Python Practice Programs for Beginners

Basic Python Programs for Beginners Pdf: This tutorial of python programs for beginners aid you to learn all basics to advanced concepts of python programming. An effective way to gain knowledge and learn the python programming language is by practicing all basic to advanced python concepts example programs. It will extremely helpful for all beginners of python learning.

To make you feel relaxed in searching all simple python practice programs for beginners, we have curated a list of all example programs on concepts of python. Make use of this ultimate tutorial on Python programming for beginners to learn completely & practice efficiently to become proficient in the python programming language.

Python Programs for Practice | List of Popular Python Programs for Freshers and Experienced

Python Basic Programs

Python Conversion Programs

Python Mathematical Programs

Python Decision Making and Loop Programs

Python Class and Object Programs

Python String Programs

Python Algorithms Programs

Python Files Programs

Python Dictionary Programs

Python Pattern Printing Programs

Python Searching Programs

Python List Programs

Python Nested Lists / 2-d List Programs

Python Date and Time Programs

Python Simple Programs on Special Numbers

Python Programming Examples on Fibonacci and Complex Numbers

Python Recursion Programs

Python Hashing/Frequency Programs

Python Number Theory Programs

Python Sorting Programs

Python Range Programs

Python Bit Manipulation Programs

Python Sentence Programs

Python Tuple Programs

Python Number Series Programs

Python Miscellaneous Programs

FAQs on Free Beginners Python Programs Tutorial

1. Is Python programming easy for learning to beginners?

Of course, yes. Beginners and experienced programmers in another programming language can easily learn the python programming language. So, save your valuable time & please jump into the world of python.

2. What are the best tips to code python programs for beginners?

Just have a look at the following tips and implement them while beginners start coding in python for the first time:

  • Choose basic to advance python programs for beginners from the above list
  • Code Everyday & Practice well
  • Go Interactive
  • Write it Out
  • Always learn with other passionate python learners
  • Teach others
  • Raise & Clear Good queries while coding
  • Go Forth and Learn!

3. Which Python Version is best for beginners?

In beneficial to compatibility with third-party modules, the safest version of python to pick is the current one ie., the Python 3.8.1 version.

4. How do I start Python programming for beginners?

Simply select the best Python Programming Online Tutorial from the reliable and trustworthy website and go with the site to search for python programs for beginners. After going through the concepts of the python programming language @btechgeeks.com start practicing basic python programs for beginners from the list available above.

Python Programs for Beginners | Basic to Advanced Python Practice Programs for Beginners Read More »

np.delete(): Remove items/rows/columns from Numpy Array | How to Delete Rows/Columns in a Numpy Array?

In this tutorial, we will discuss about how we can remove items/rows/columns from the Numpy array. We can remove elements from a NumPy array by index position using numpy.delete( ). Get to know the syntax of numpy.delete() function and learn about all its parameters with a clear explanation. Refer to the further modules to be aware of procedures on how to remove or delete an element or multiple elements in rows/columns of 1D and 2D Arrays by its Index Position.

How to remove items/rows/columns from Numpy array using np.delete() in Python?

Python provides a method to delete elements from the numpy array depending on the index position and its syntax is provided below.

numpy.delete( )

Python’s NumPy library has a method to delete elements. It is done by using the np.delete( ) function.

Syntax:

numpy.delete(arr, obj, axis=None)

Where,

  • arr: Array from which elements are to be deleted
  • obj: Index position or positions from which elements are to be deleted
  • axis: The axis along which we want to delete (1 means delete along columns, 0 means delete along the rows, if None then the array is flattened out and then the elements are to be deleted)

It returns a copy of the array with the required elements deleted.

Delete an Element in 1D Numpy Array by its Index position

Let’s see the implementation of it.

Python Program to Delete an element in 1D Numpy Array by its Index position

#Program :

import numpy as np
#Numpy array
arr = np.array([10,20,30,40,50,60,70,80,90])
#deleting a=item at index 2
arr = np.delete(arr, 2)
print('Modified Numpy Array after deleting element at index 2')
print(arr)
Output :
Modified Numpy Array after deleting element at index 2
[10 20 40 50 60 70 80 90]

Delete multiple elements in 1D Numpy Array by its Index position

Let’s see the implementation of it.

Python Program to Delete Multiple Elements in 1D Numpy Array by its Index position

#Program : 

import numpy as np 
#Numpy array 
arr = np.array([10,20,30,40,50,60,70,80,90]) 
#deleting a=item at index 2,5,7 
arr = np.delete(arr, 2) 
print('Modified Numpy Array after deleting element at index 2,5,7') 
print(arr)
Output :
Modified Numpy Array after deleting element at index  2,5,7
[10 20 40 50 70 90]

Deleting rows & columns from a 2D Numpy Array

Delete a column in 2D Numpy Array by its column number

if we want to delete a column from a 2D numpy array using np.delete() then we have to pass the axis=1 along with numpy array and index of column.

Let’s see the implementation of it.

#program

import numpy as np

arr2d = np.array([[10,20,30],
[40,50,60],
[70,80,90]])
#deleting elements at column 1
arr = np.delete(arr2d, 1, axis=1)
print('Modified Numpy Array by deleting element at index position 2,5,7')
print(arr)
Output :
Modified Numpy Array by deleting element at index position 2,5,7
[[10 30]
[40 60]
[70 90]]

Delete multiple columns in 2D Numpy Array by its column number

To delete multiple columns pass axis=1 and list of column numbers to be deleted along with numpy array to the function.

Let’s see the implementation of it.

#Program :

import numpy as np

arr2D = np.array([[11 ,12, 13, 11],
                [21, 22, 23, 24],
                [31, 32, 33, 34]])
arr2D = np.delete(arr2D, [2,3], axis=1)
print('Modified 2D Numpy Array by removing columns at index 2 and 3')
print(arr2D)
Output :
Modified 2D Numpy Array by removing columns at index 2 and 3
[[11 12]
[21 22]
[31 32]]

Delete a row in 2D Numpy Array by its row number

To delete a row from a 2D numpy array using np.delete() we need to pass the axis=0 along with numpy array and the row index.

Let’s see the implementation of it.

Python Program to Delete a row in 2D Numpy Array by its row number

#Program : 

import numpy as np 
arr2D = np.array([[11 ,12, 13, 11], [21, 22, 23, 24], [31, 32, 33, 34]]) 
arr2D = np.delete(arr2D, 0, axis=0) 
print('Modified 2D Numpy Array by removing rowss at index 0') 
print(arr2D)
Output :
Modified 2D Numpy Array by removing rowss at index 0
[[21 22 23 24]
[31 32 33 34]]

Delete multiple rows in 2D Numpy Array by its row number

To delete multiple rows pass axis=0 and list of row numbers to be deleted along with numpy array to np.delete()

#Program :

import numpy as np

arr2D = np.array([[11 ,12, 13, 11],
                [21, 22, 23, 24],
                [31, 32, 33, 34]])
arr2D = np.delete(arr2D, [1, 2], axis=0)
print('Modified 2D Numpy Array by removing rows at index 1 and 2')
print(arr2D)
Output :
Modified 2D Numpy Array by removing rows at index 1 and 2
[[11 12 13 11]]

Delete specific elements in 2D Numpy Array by its index position

When we don’t mention axis value, the default value is none which means the array gets flattened. After that, we use np.delete() to delete elements from rows and columns. The function will return a flattened array without the deleted rows and column elements.

#program :

import numpy as np

arr2D = np.array([[11 ,12, 13, 11],
                [21, 22, 23, 24],
                [31, 32, 33, 34]])
arr2D = np.delete(arr2D, 2)
print('Modified 2D Numpy Array by removing element at row 0 column 2')
print(arr2D)
Output :
Modified 2D Numpy Array by removing element at row 0 column 2
[11 12 11 21 22 23 24 31 32 33 34]

np.delete(): Remove items/rows/columns from Numpy Array | How to Delete Rows/Columns in a Numpy Array? Read More »

Python Pandas- How to display full Dataframe i.e. print all rows & columns without truncation

Python Pandas: How to display full Dataframe i.e. print all rows & columns without truncation

In this tutorial, we will discuss the different methods to display full Dataframe i.e. print all rows & columns without truncation. So, get into this page and learn completely about Pandas dataframe in python i.e. how to print all rows & columns without truncation. Also, you can get a clear idea of how to display full dataframe from here. Pandas will be displayed column in the full dataframe.

Display Full Contents of a Dataframe

Pandas implement an operating system to customize the behavior & display similar stuff. By applying this benefits module we can configure the display to show the complete dataframe rather than a truncated one. A function set_option()is provided in pandas to set this kind of option,

pandas.set_option(pat, value)

It sets the value of the defined option. Let’s use this to display the full contents of a dataframe.

Setting to display All rows of Dataframe

In pandas when we print a dataframe, it displays at max_rows number of rows. If we have more rows, then it truncates the rows.

pandas.options.display.max_rows

This option outlines the maximum number of rows that pandas will present while printing a dataframe. The default value of max_rows is 10.

In case, it is set to ‘None‘ then it implies unlimited i.e. pandas will display all the rows in the dataframe. Let’s set it to None while printing the contents of above-created dataframe empDfObj,

# Default value of display.max_rows is 10 i.e. at max 10 rows will be printed.
# Set it None to display all rows in the dataframe
pd.set_option('display.max_rows', None)

Let’s examine the contents of the dataframe again,

print(empDfObj)

Output: 

    A B ... Z AA
0 jack 34 ... 122 111
1 Riti 31 ... 222 211
2 Aadi 16 ... 322 311
3 Sunil 41 ... 422 411
4 Veena 33 ... 522 511
5 Shaunak 35 ... 622 611
6 Shaun 35 ... 722 711
7 jack 34 ... 122 111
8 Riti 31 ... 222 211
9 Aadi 16 ... 322 311
10 Sunil 41 ... 422 411
11 Veena 33 ... 522 511
12 Shaunak 35 ... 622 611
13 Shaun 35 ... 722 711
14 jack 34 ... 122 111
15 Riti 31 ... 222 211
16 Aadi 16 ... 322 311
17 Sunil 41 ... 422 411
18 Veena 33 ... 522 511
19 Shaunak 35 ... 622 611
20 Shaun 35 ... 722 711
21 jack 34 ... 122 111
22 Riti 31 ... 222 211
23 Aadi 16 ... 322 311
24 Sunil 41 ... 422 411
25 Veena 33 ... 522 511
26 Shaunak 35 ... 622 611
27 Shaun 35 ... 722 711
28 jack 34 ... 122 111
29 Riti 31 ... 222 211
30 Aadi 16 ... 322 311
31 Sunil 41 ... 422 411
32 Veena 33 ... 522 511
33 Shaunak 35 ... 622 611
34 Shaun 35 ... 722 711
35 jack 34 ... 122 111
36 Riti 31 ... 222 211
37 Aadi 16 ... 322 311
38 Sunil 41 ... 422 411
39 Veena 33 ... 522 511
40 Shaunak 35 ... 622 611
41 Shaun 35 ... 722 711
42 jack 34 ... 122 111
43 Riti 31 ... 222 211
44 Aadi 16 ... 322 311
45 Sunil 41 ... 422 411
46 Veena 33 ... 522 511
47 Shaunak 35 ... 622 611
48 Shaun 35 ... 722 711
49 jack 34 ... 122 111
50 Riti 31 ... 222 211
51 Aadi 16 ... 322 311
52 Sunil 41 ... 422 411
53 Veena 33 ... 522 511
54 Shaunak 35 ... 622 611
55 Shaun 35 ... 722 711
56 jack 34 ... 122 111
57 Riti 31 ... 222 211
58 Aadi 16 ... 322 311
59 Sunil 41 ... 422 411
60 Veena 33 ... 522 511
61 Shaunak 35 ... 622 611
62 Shaun 35 ... 722 711

[63 rows x 27 columns]

Also Check:

How to print an entire Pandas DataFrame in Python?

When we use a print large number of a dataset then it truncates. In this article, we are going to see how to print the entire pandas Dataframe or Series without Truncation.

The complete data frame is not printed when the length exceeds.

import numpy as np
from sklearn.datasets import load_iris
import pandas as pd
  
# Loading irirs dataset
data = load_iris()
df = pd.DataFrame(data.data,columns = data.feature_names)
print(df)

Output:

How-to-print-an-entire-Pandas-DataFrame-in-Python.png

By default our complete contents of out dataframe are not printed, output got truncated. It printed only 10 rows all the remaining data is truncated. Now, what if we want to print the full dataframe without any truncation.

Four Methods to Print the entire pandas Dataframe

  1. Use to_string() Method
  2. Use pd.option_context() Method
  3. Use pd.set_options() Method
  4. Use pd.to_markdown() Method

1. Using to_string()

This is a very simple method. That is why it is not used for large files because it converts the entire data frame into a string object. But this works very well for data frames for size in the order of thousands.

import numpy as np
from sklearn.datasets import load_iris
import pandas as pd
  
data = load_iris()
df = pd.DataFrame(data.data,
                  columns = data.feature_names)
  
# Convert the whole dataframe as a string and display
print(df.to_string())

Output:

How-to-display-full-Dataframe-i.e.-print-all-rows-columns-without-truncation_output.pn

So in the above example, you have seen it printed all columns without any truncation.

2. Using pd.option_context()

option_context() and set_option() both methods are identical but there is only one difference that is one changes the settings and the other do it only within the context manager scope.

import numpy as np
from sklearn.datasets import load_iris
import pandas as pd
  
data = load_iris()
df = pd.DataFrame(data.data, 
                  columns = data.feature_names)
  
with pd.option_context('display.max_rows', None,'display.max_columns', None,
    'display.precision', 3,
                       ):
print(df)

Output:

How-to-display-full-Dataframe-i.e.-print-all-rows-columns-without-truncation_output.pn

In the above example, we are used ‘display.max_rows‘ but by default its value is 10 & if the dataframe has more rows it will truncate. So it will not be truncated we used None so all the rows are displayed.

3. Using pd.set_option()

This method is similar to pd.option_context() method and takes the same parameters. pd.reset_option(‘all’) used to reset all the changes.

import numpy as np
from sklearn.datasets import load_iris
import pandas as pd
  
data = load_iris()
df = pd.DataFrame(data.data,
                  columns = data.feature_names)
  
# Permanently changes the pandas settings
pd.set_option('display.max_rows', None)
pd.set_option('display.max_columns', None)
pd.set_option('display.width', None)
pd.set_option('display.max_colwidth', -1)
  
# All dataframes hereafter reflect these changes.
print(df)
  
print('**RESET_OPTIONS**')
  
# Resets the options
pd.reset_option('all')
print(df)

Output:

How-to-display-full-Dataframe-i.e.-print-all-rows-columns-without-truncation_output.pn

**RESET_OPTIONS**

: boolean
use_inf_as_null had been deprecated and will be removed in a future
version. Use `use_inf_as_na` instead.

How-to-print-an-entire-Pandas-DataFrame-in-Python.png

4. Using to_markdown()

This method is similar to the to_string() method as it also converts the data frame to a string object and also adds styling & formatting to it.

import numpy as np
from sklearn.datasets import load_iris
import pandas as pd
  
data = load_iris()
df = pd.DataFrame(data.data,
                  columns=data.feature_names)
  
# Converts the dataframe into str object with fromatting
print(df.to_markdown())

Output:
How-to-display-full-Dataframe-i.e.-print-all-rows-columns-without-truncation_output.pn

Want to expert in the python programming language? Exploring Python Data Analysis using Pandas tutorial changes your knowledge from basic to advance level in python concepts.

Read more Articles on Python Data Analysis Using Padas

Python Pandas: How to display full Dataframe i.e. print all rows & columns without truncation Read More »

Pandas-Delete last column of dataframe in python

Pandas: Delete last column of dataframe in python | How to Remove last column from Dataframe in Python?

In this article, we will discuss different ways to delete the last column of a pandas dataframe in python or how to drop the last columns in Pandas Dataframe. Along with that, you may also study what is Dataframe and How to Remove a Column From a Python Dataframe? Also, you can find all these methods of a pandas dataframe to remove last column of a dataframe in the form of images for quick reference & easy sharing with friends and others learners.

What is Dataframe?

A Data structure provided by the Python Pandas module is known as a DataFrame. It stores values in the form of rows and columns. So, we can have the data in the form of a matrix outlining the entities as rows and columns. A DataFrame relates an Excel or CSV file to the real world.

Different Methods to Drop last columns in Pandas Dataframe

Here are few methods that are used to remove the last columns of DataFrame in Python.

  1. Use iloc()
  2. Use drop()
  3. Use del()
  4. Use pop()

Use iloc to drop last column of pandas dataframe

In this method, we are going to use iloc to drop the last column of the pandas dataframe. In python, pandas have an attribute iloc to select the specific column using indexing.

Syntax:

df.iloc[row_start:row_end , col_start, col_end]

So we will be using the above syntax which will give rows from row_star to row_end and columns from col_start to col_end1.

Use iloc to drop last column of pandas dataframe

import pandas as pd
employees = [('Abhishek', 34, 'Sydney') ,
             ('Sumit', 31, 'Delhi') ,
             ('Sampad', 16, 'New York') ,
             ('Shikha', 32,'Delhi') , ]
#load data into a DataFrame object:
df = pd.DataFrame(employees, columns=['Name', 'Age', 'City'], index=['a', 'b', 'c', 'd'])
print("Contents of the Dataframe : ")
print(df)
# Drop last column of a dataframe
df = df.iloc[: , :-1]
print("Modified Dataframe : ")
print(df)

Output:

Contents of the Dataframe :
        Name       Age   City
a     Abhishek   34     Sydney
b     Sumit        31     Delhi
c     Sampad     16     New York
d    Shikha        32     Delhi

Modified Dataframe :
        Name     Age
a     Abhishek 34
b     Sumit      31
c     Sampad  16
d     Shikha    32

So in the above example, we have to remove last column from dataframe which is ‘city’, so we just selected the column from position 0 till one before the last one…means from column 0 to -2 we selected 0 to -1, this deleted last column.

Must Check:

Python drop() function to remove a column

In this, we are going to use drop() to remove the last column of the pandas dataframe.

This function accepts a sequence of column names that need to delete from the dataframe. Here we ‘axis=1’ for delete column only and ‘inplace=True’ we use to pass arguments.

Python drop() function to remove a column

import pandas as pd
employees = [('Abhishek', 34, 'Sydney') ,
             ('Sumit', 31, 'Delhi') ,
             ('Sampad', 16, 'New York') ,
             ('Shikha', 32,'Delhi') , ]
#load data into a DataFrame object:
df = pd.DataFrame(employees, columns=['Name', 'Age', 'City'], index=['a', 'b', 'c', 'd'])
print("Contents of the Dataframe : ")
print(df)
# Drop last column
df.drop(columns=df.columns[-1], axis=1, inplace=True)
print("Modified Dataframe : ")
print(df)

Output:

Contents of the Dataframe :

       Name        Age   City
a     Abhishek   34     Sydney
b     Sumit        31     Delhi
c     Sampad     16     New York
d    Shikha        32     Delhi

Modified Dataframe :

       Name      Age
a     Abhishek   34
b     Sumit        31
c     Sampad    16
d     Shikha      32

Python del keyword to remove the column

Here we are going to use a del() keyword to drop last column of pandas dataframe.

So in this method, we are going to use del df[df.columns[-1]]for deleting the last column. We will use -1 because we are selecting from last.

Python del keyword to delete the column of a dataframe

import pandas as pd
employees = [('Abhishek', 34, 'Sydney') ,
             ('Sumit', 31, 'Delhi') ,
             ('Sampad', 16, 'New York') ,
             ('Shikha', 32,'Delhi') , ]
#load data into a DataFrame object:
df = pd.DataFrame(employees, columns=['Name', 'Age', 'City'], index=['a', 'b', 'c', 'd'])
print("Contents of the Dataframe : ")
print(df)
# Delete last column
del df[df.columns[-1]]
print("Modified Dataframe : ")
print(df)

Output:

Contents of the Dataframe :
       Name     Age   City
a     Abhishek 34    Sydney
b      Sumit     31    Delhi
c     Sampad   16    New York
d     Shikha     32    Delhi
Modified Dataframe :
     Name      Age
a Abhishek    34
b Sumit          31
c Sampad      16
d Shikha        32

Drop last columns of Pandas Dataframe Using Python dataframe.pop() method

In this, we are going to use the pop(column_name) method to drop last column of pandas dataframe. It expects a column name as an argument and deletes that column from the calling dataframe object.

Drop last columns of Pandas Dataframe Using Python dataframe.pop() method

import pandas as pd
employees = [('Abhishek', 34, 'Sydney') ,
             ('Sumit', 31, 'Delhi') ,
             ('Sampad', 16, 'New York') ,
             ('Shikha', 32,'Delhi') , ]
#load data into a DataFrame object:
df = pd.DataFrame(employees, columns=['Name', 'Age', 'City'], index=['a', 'b', 'c', 'd'])
print("Contents of the Dataframe : ")
print(df)
df.pop(df.columns[-1])
print("Modified Dataframe : ")
print(df)

Output:

Contents of the Dataframe :

        Name    Age    City
a    Abhishek  34   Sydney
b    Sumit       31   Delhi
c    Sampad   16    New York
d   Shikha      32    Delhi

Modified Dataframe :

     Name      Age
a   Abhishek 34
b   Sumit      31
c   Sampad  16
d  Shikha     32

Conclusion to delete the last column of the dataframe

In the above tutorial, we have discussed different ways to delete last column of the dataframe in python. Also, you can learn how to drop last n rows in pandas dataframe by performing import pandas as pd. Thank you & Happy Learnings!

Pandas: Delete last column of dataframe in python | How to Remove last column from Dataframe in Python? Read More »

Python: How to Create an Empty List and Append Items to it?

An ordered list of values is a collection. There may be different types of values. A list is a container that is mutable. This means that the existing ones can be added, deleted, or modified.

The list of Pythons represents a finite sequence mathematical concept. List values are called list items or list elements. A list may multiple times contain the same value. Each event is considered to be a separate element.

In this article, we will look at how to create an empty list and add elements to the list in Python.

How to Create An Empty List and How to Append a list of Items in Python?

There are several ways to create and append values to list some of them are:

Creating a list:

Adding elements to list:

Creating a list

Method #1: Using [] symbol create an empty list in python

An empty list can be generated in Python by simply writing square brackets, i.e. []. If there are no arguments in the square brackets [, it returns an empty list.

Using [] symbol

Implementation:

# creating new list
newlist = []
# printing it
print("Newlist = ", newlist)

Output:

Newlist =  []

Method #2: Using list() Constructor create an empty list in python

The list class in Python has a constructor

list( [iterable] ).

It takes an optional statement, which is an iterable sequence, and constructs a list from these elements. It returns an empty list if Sequence is not given. Let’s use this to make a blank list.

Using list() Constructor

Implementation:

# creating new list
newlist = list()
# printing it
print("Newlist = ", newlist)

Output:

Newlist =  []

Adding items/elements to the list

Method #1: Using append() function add items to an empty list in python

The built-in append() function can be used to add elements to the List. The append() method can only add one element to the list at a time; loops are used to add several elements to the list with the append() method. Since tuples are immutable, they can also be added to the list using the append method. Lists, unlike Sets, can be appended to an existing list using the append() form.

Using append() function

Below is the implementation:

# creating new empty list
newlist = list()
# adding items 1 2 3 to it
newlist.append(1)
newlist.append(2)
newlist.append(3)
# printing it
print("Newlist = ", newlist)

Output:

Newlist =  [1, 2, 3]

Method #2:Using insert() function add elements to an empty list in python

insert():

It inserts the item in the list at the given index.

list.insert(index,element)

The append() method only adds elements to the end of the List; the insert() method is used to add elements to the desired location. Unlike append(), which only needs one statement, insert() requires two (index,element).

creating new empty list Using insert() function

Below is the implementation:

# Taking a list with values
newlist = ['this', 'is', 'BTechGeeks']
# inserting element hello to 2 nd index using insert()
newlist.insert(2, 'hello')
# printing the list
print("list = ", newlist)

Output:

list =  ['this', 'is', 'hello', 'BTechGeeks']

Method #3:Using extend() function add items to an empty list in python

There is one more method to add elements other than the append() and insert() methods, extend(), used at the end of the list to add multiple elements simultaneously.

Note: the methods append() and extend() can only add elements at the end.

Below is the implementation:

# Taking a list with values
newlist = ['this', 'is', 'BTechGeeks']
# extend this newlist with multiple items
newlist.extend(['hello', 'python', 234])
# printing the list
print("list = ", newlist)

Output:

list =  ['this', 'is', 'BTechGeeks', 'hello', 'python', 234]

Related Programs:

Python: How to Create an Empty List and Append Items to it? Read More »

Program to Check Whether the given Two Numbers are Amicable Numbers or Not

Python Program to Check Whether the given Two Numbers are Amicable Numbers or Not

Wondering how to find if two numbers given are Amicable or Not? Then, you have come the right way as we will explain what are Amicable Numbers and Python Program to Check if Two Numbers are Amicable Numbers or not. Refer to the Various Methods for Checking if given Numbers are Amicable or Not and use the method you are comfortable with.

Amicable Numbers in Python

First and foremost, what exactly is this Amicable? We say two numbers are Amicable if the sum of their proper divisors is equal to the opposite numbers, that is, the sum of x’s divisors is equal to y and the sum of y’s divisors is equal to x. We can grasp it better by using an example.

Take 234 and 339 as two numbers; now find the divisors of 123 and 456; their sums will be sum1 and sum2, respectively. Then sum2 must equal 123 and sum1 must equal 456.

We should determine all the suitable divisors of x ,y and add them separately before matching them to the opposite numbers; if they match, we claim the two numbers are amicable; otherwise, we say they are not.

sumX=y,

sumY=x

Where sumX is the sum of all proper divisors of the number x.

Where sumY is the sum of all proper divisors of the number y.

Examples:

Example 1:

Input:

given number1 =220 ;       given number2=284

Output:

The given numbers 220 and 284 are amicable numbers

Example 2:

Input:

given number1= 339    ; given number2=134

Output:

The given numbers 339 and 134 are not amicable numbers

Python Program to Check Whether the given Two Numbers are Amicable Numbers or Not

There are several ways to check whether the given number is given Two Number are Amicable Numbers or Not, some of them are:

Drive into Python Programming Examples and explore more instances related to python concepts so that you can become proficient in generating programs in Python Programming Language.

All of the methods follow a similar technique but differ in terms of time complexity. Methods for obtaining divisors are classified below based on their time complexity:

Method #1: Iterating from 2 to N-1

Approach:

  • Take both integers and store them in different variables.
  • Calculate the sum of the proper divisors of both numbers ( loop from 2 to given_number-1, keep track of the sum of the number’s proper divisors)
  • Repeat the above step for number2
  • Examine whether the total of the proper divisors equals the opposite numbers.
  • They are amicable numbers if they are equal.
  • The final result should be printed.

Below is the implementation:

Python Program to Check Whether the Given Numbers are Amicable Numbers or Not

# python program to cheeck whether the given number is Amicable numbers or not

# function which returns true if the given number is
# Amicable numbers else it will return False


def checkAmicableNumb(given_numb1, given_numb2):
    # Taking a variable totalSum1 and initializing it with 1
    totalSum1 = 1
    # Iterating from 2 to n-1
    for i in range(2, given_numb1):
        # if the iterator value is divides the number then add the given
        # number to totalSum1
        if given_numb1 % i == 0:
            totalSum1 += i
    # repeating the same step for number 2
    # Taking a variable totalSum2 and initializing it with 1
    totalSum2 = 1
    # Iterating from 2 to n-1
    for i in range(2, given_numb2):
        # if the iterator value is divides the number then add the given
        # number to totalSum2
        if given_numb2 % i == 0:
            totalSum2 += i

    # if the totalSum1 is equal to the given number2 and
    # totalSum2 is equal to the given number1 then both the numbers are amicable numbers
    # else they are not amicable numbers

    if(totalSum1 == given_numb2 and totalSum2 == given_numb1):
        # if it is true then they are amicable numbers so return true
        return True
    # if nothing is returned then they are not a amicable numbers so return False
    return False


# Given two numbers
# given number1(numb1)
given_numb1 = 220
# given number2(numb2)
given_numb2 = 284
# passing the given two numbers to checkAmicableNumb to check whether it is
# Amicable numbers or not
if(checkAmicableNumb(given_numb1, given_numb2)):
    print("The given numbers", given_numb1, "and",
          given_numb2, "are amicable numbers")
else:
    print("The given numbers", given_numb1, "and",
          given_numb2, "are not amicable numbers")

Output:

The given numbers 220 and 284 are amicable numbers

It requires O(n) Time Complexity.

Method #2:Iterating from 2 to N/2

Approach:

  • Take both integers and store them in different variables.
  • Calculate the sum of the proper divisors of both numbers ( loop from 2 to given_number//2, keep track of the sum of the number’s proper divisors)
  • Repeat the above step for number2
  • Examine whether the total of the proper divisors equals the opposite numbers.
  • They are amicable numbers if they are equal.
  • The final result should be printed.

Below is the implementation:

# python program to cheeck whether the given number is Amicable numbers or not

# function which returns true if the given number is
# Amicable numbers else it will return False


def checkAmicableNumb(given_numb1, given_numb2):
    # Taking a variable totalSum1 and initializing it with 1
    totalSum1 = 1
    # Iterating from 2 to n-1
    for i in range(2, given_numb1//2 + 1):
        # if the iterator value is divides the number then add the given
        # number to totalSum1
        if given_numb1 % i == 0:
            totalSum1 += i
    # repeating the same step for number 2
    # Taking a variable totalSum2 and initializing it with 1
    totalSum2 = 1
    # Iterating from 2 to n-1
    for i in range(2, given_numb2//2 + 1):
        # if the iterator value is divides the number then add the given
        # number to totalSum2
        if given_numb2 % i == 0:
            totalSum2 += i

    # if the totalSum1 is equal to the given number2 and
    # totalSum2 is equal to the given number1 then both the numbers are amicable numbers
    # else they are not amicable numbers

    if(totalSum1 == given_numb2 and totalSum2 == given_numb1):
        # if it is true then they are amicable numbers so return true
        return True
    # if nothing is returned then they are not a amicable numbers so return False
    return False


# Given two numbers
# given number1(numb1)
given_numb1 = 220
# given number2(numb2)
given_numb2 = 284
# passing the given two numbers to checkAmicableNumb to check whether it is
# Amicable numbers or not
if(checkAmicableNumb(given_numb1, given_numb2)):
    print("The given numbers", given_numb1, "and",
          given_numb2, "are amicable numbers")
else:
    print("The given numbers", given_numb1, "and",
          given_numb2, "are not amicable numbers")

Output:

The given numbers 220 and 284 are amicable numbers

It requires O(n) Time Complexity.

It reduces half the number of iterations.

Method #3: Efficient Approach (Iterating till Square root of N)

Approach:

  • Take both integers and store them in different variables.
  • Calculate the sum of the proper divisors of both numbers (go through the numbers till you get to the square root of n. If a number i divides n, then sum both i and n/i)
  • Repeat the above step for number2
  • Examine whether the total of the proper divisors equals the opposite numbers.
  • They are amicable numbers if they are equal.
  • The final result should be printed.

Below is the implementation:

# python program to cheeck whether the given number is Amicable numbers or not

# function which returns true if the given number is
# Amicable numbers else it will return False


def checkAmicableNumb(given_numb1, given_numb2):
    # Taking a variable totalSum1 and initializing it with 1
    totalSum1 = 1
    k = 2
    while k * k <= given_numb1:
        # if the iterator value is divides the number then add the given number to totalSum
        if given_numb1 % k == 0:
            totalSum1 = totalSum1 + k + given_numb1/k
        k += 1
    # repeating the same step for number 2
    # Taking a variable totalSum2 and initializing it with 1
    totalSum2 = 1
    k = 2
    while k * k <= given_numb2:
        # if the iterator value is divides the number then add the given number to totalSum
        if given_numb2 % k == 0:
            totalSum2 = totalSum2 + k + given_numb2/k
        k += 1

    # if the totalSum1 is equal to the given number2 and
    # totalSum2 is equal to the given number1 then both the numbers are amicable numbers
    # else they are not amicable numbers

    if(totalSum1 == given_numb2 and totalSum2 == given_numb1):
        # if it is true then they are amicable numbers so return true
        return True
    # if nothing is returned then they are not a amicable numbers so return False
    return False


# Given two numbers
# given number1(numb1)
given_numb1 = 220
# given number2(numb2)
given_numb2 = 284
# passing the given two numbers to checkAmicableNumb to check whether it is
# Amicable numbers or not
if(checkAmicableNumb(given_numb1, given_numb2)):
    print("The given numbers", given_numb1, "and",
          given_numb2, "are amicable numbers")
else:
    print("The given numbers", given_numb1, "and",
          given_numb2, "are not amicable numbers")

Output:

The given numbers 220 and 284 are amicable numbers

Here the given numbers 220 and 284 are amicable numbers.

This is the efficient approach to do the same problem quickly compared to the first two methods.

It requires O(Sqrt(n)) Time Complexity.

Related Programs:

Python Program to Check Whether the given Two Numbers are Amicable Numbers or Not Read More »